Prime the wood wick, secure it in the clip, center it in the jar, set the exposed height, wait until the candle is ready, and use the first burn to confirm stable startup.
A wood wick is a flat wooden wick system used in container candles, and the job here is to set that wick up for a clean first light. Priming means lightly preparing or coating the wick for startup behavior; it does not mean picking wick size or fixing every burn defect. The install path stays narrow: attach the wick to the clip, center it in the container, set the exposed height, wait until the candle is ready, and check the first burn. If the wick still burns poorly after those setup checks, the problem usually moves out of installation and into wick sizing or deeper burn diagnosis.
Use this setup path on this page.
- Check whether the wood wick is pre-primed or unprimed.
- Prime only when the wick state or supplier guidance calls for it.
- Seat the wick fully in the clip or tab.
- Center the wick and keep it upright while the candle sets.
- Set the exposed height before lighting.
- Wait until the candle is ready, then use the first burn as a startup check.
On this page, ready for the first burn means the wick is installed, centered, and set to the planned exposed height, and the candle has waited long enough for a fair startup test.
How to Prime a Wood Wick and When Priming Is Actually Needed
Wood-wick priming is light prep on the flat wooden wick before first light, and it helps most when the wick is unprimed or hard to ignite.
A wood wick is a flat wooden wick system used in container candles. Here, priming means lightly coating or preparing that wick so first light is easier and the startup burn is steadier; it does not mean choosing wick size or fixing every burn problem. Not every wood wick needs this step, because some arrive pre-primed from the supplier and already have that surface prep.
How to Prime an Unprimed Wood Wick Before Pouring
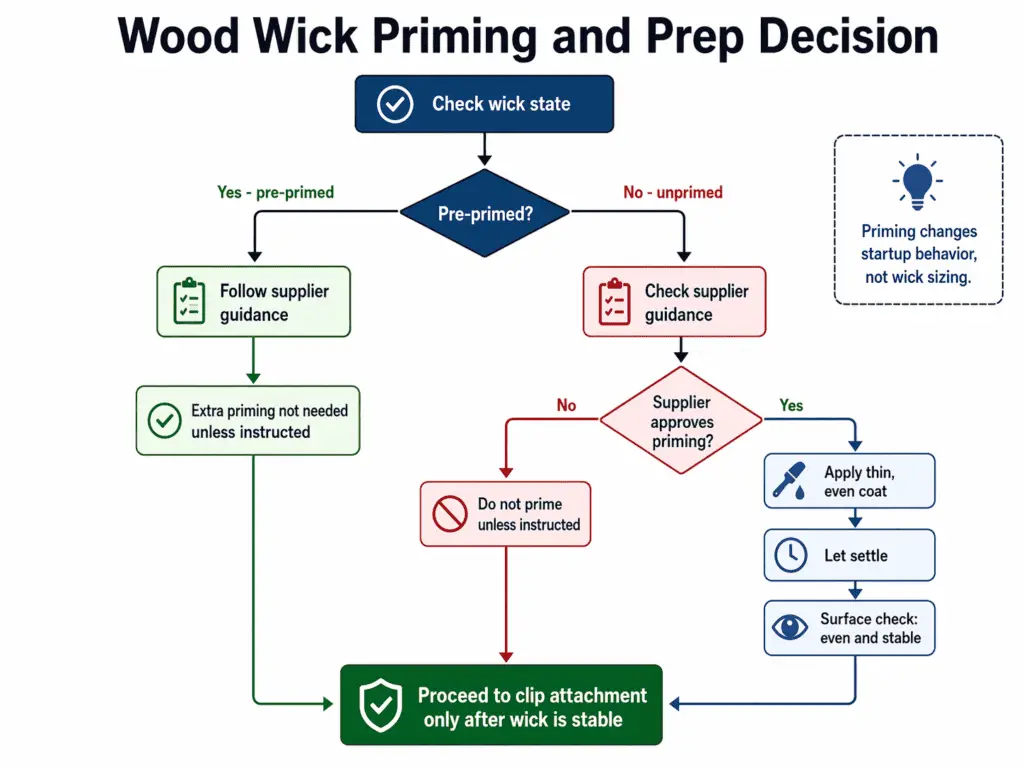
Prime an unprimed wood wick before pouring by using only the light prep the wick supplier calls for, keeping the coat even, and moving to install only after the wick is stable.
On this page, the priming path stays narrow: confirm the wick is unprimed, apply only the supplier-led light prep, keep the surface even, let the wick settle, and then move into clip attachment and centering. Do not turn this step into a sizing decision or a full burn fix.
- Check the supplier state first. If the wick arrives pre-primed, do not repeat prep by default.
- Apply only the light priming step the wick supplier calls for. Keep the coat thin and even rather than heavy or patchy.
- Let the wick settle and check the surface. The finish should look even enough for startup instead of overloaded, rubbed off, or irregular.
- Move to installation only when the wick can seat cleanly in the clip and stay stable for the rest of the setup path.
- Do all wood wicks need priming? No. Unprimed wood wicks often benefit from it, while pre-primed ones may not need more.
- Can a pre-primed wood wick need more prep? Sometimes, but only lightly and only when the supplier state or startup behavior shows it.
- Is failed ignition always a priming problem? No. A bad jar match, weak install, or later burn issue can look similar at first.
Priming changes startup behavior, not the whole candle system. It can help the wick catch more evenly, hold flame sooner, and start with less hesitation on the first light. It cannot correct a wick that is too small, too large, badly installed, or already headed toward a different burn problem.
If the wick is primed and installed correctly but still underperforms after startup checks, check the wood wick size for the jar, fix a wood wick that keeps going out, or troubleshoot common wood wick problems instead of repeating prep.
Pre-Primed vs Unprimed Wood Wicks: When to Skip, Repeat, or Adjust Priming
Pre-primed means the supplier already treated the wood wick for startup use, while unprimed means the wick still needs that prep from you.
| Product state | What it means for setup | What not to assume |
| Pre-primed | Start by checking condition, exposed height, and install before adding more prep | It does not prove the wick size matches the jar or formula |
| Unprimed | Priming is usually part of the setup path before first light | It does not solve a poor fit, weak clip attachment, or later burn faults |
A pre-primed wick may let you skip duplicate prep, but it is still worth checking the surface and startup behavior before lighting. A light adjustment can make sense when the wick arrived dry-looking, rubbed off in handling, or shows uneven startup on the first controlled light. If setup checks pass but startup still fails, check the wood wick size for the jar or troubleshoot wood wick burn problems instead of adding more priming.
Move next to the base connection, because good priming cannot make up for a loose wick at the bottom.
How to Attach a Wood Wick to the Clip or Tab Securely
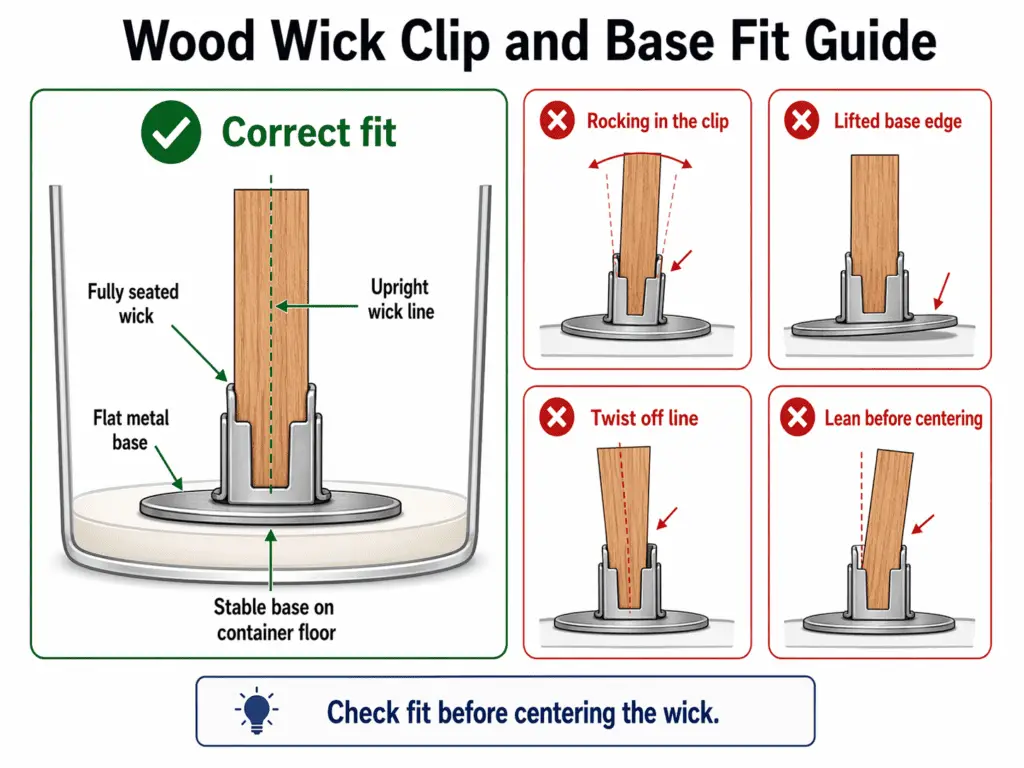
Secure attachment means the chosen wood wick sits fully seated in the metal clip or tab, flat at the base, twist-free, and upright before centering.
This step is about physically anchoring the chosen wood wick to its clip or tab before centering and first light. The clip or tab is the metal base holder that keeps the wood wick at the container floor during setup and the early burn. A poor fit here can look like a bad wick or bad wax choice when the real problem is a loose, tilted, or badly seated base.
- Inspect the wick and the clip or tab before joining them. Look for bends, burrs, damage, or a slot that does not match the wick cleanly.
- Seat the wick into the clip or tab fully. The wick should slide in straight and stop in a firm, even position rather than leaning or rocking.
- Set the base on the container floor and check that it sits flat. The bottom should not wobble, lift on one side, or force the wick to lean.
- Check for looseness, twist, and offset before you move on. A secure fit feels stable, looks upright, and keeps the wick in one clear line from base to top.
Quick check: judge the fit by what you can see and feel before lighting. The wick should sit upright, the metal base should rest flat, and the wick should not rotate or drift sideways with a light touch. If any of those checks fail, the problem is still in attachment.
Wrong-fit signs:
- The wick rocks inside the clip or tab
- The base lifts at one edge instead of sitting flat
- The wick twists off line when you touch it
- The wick leans before centering even starts
If you need to choose the right wood wick clip size and centering tools, do that before forcing a poor hardware fit. If the attachment looks right but the candle later burns badly, diagnose common wood wick problems after you finish the install checks.
How to Orient a Booster or Multi-Ply Wood Wick During Installation
A booster or multi-ply wood wick is a layered wood-wick setup, and orientation matters only for that already chosen wick during install.
Keep the layered parts facing the way the maker intended, and seat the whole wick straight before you check centering. If the layered wick is turned the wrong way, startup can look weak or uneven even when the clip fit is fine. That does not mean you need to compare booster and single-ply wood wicks in the middle of installation. If the layered wick is facing the right way and still struggles later, troubleshoot wood wick performance issues after the full setup checks are done.
Once the wick is anchored and upright, the next job is keeping that line on the true center of the container.
How to Center a Wood Wick and Keep It Straight While the Candle Sets
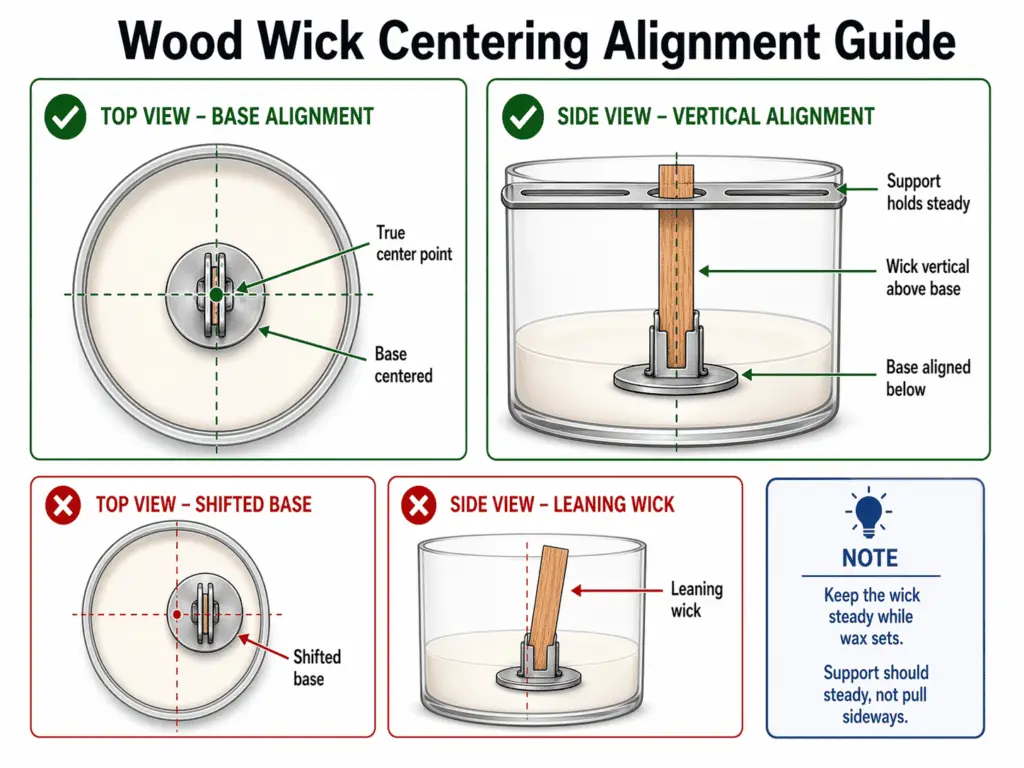
Center the wood wick on the true container centerline and keep both base and top aligned while the candle sets.
This step is about keeping the installed wood wick on the true centerline of the container, not just making it look centered from one angle. True centerline means the wick base sits on the actual middle point of the container floor and the top of the wick stays directly above that same line. A top-down glance is not enough if the base has drifted, tilted, or pulled to one side. Good centering gives the first flame a cleaner starting path and makes the early melt area easier to read.
- Check the base first. The metal holder should still sit flat on the container floor and should not have shifted since installation.
- Match the top to the base. Look straight down and line the top edge of the wick up with the center point under it, rather than centering only the visible top.
- Hold the wick in place while the candle sets. If support hardware is part of your setup, use it only to keep the wick steady and upright, not to force a crooked wick into place.
- Check from more than one angle. Look from above and from at least one side so you can catch a lean that a top view can hide.
- Stop adjusting once the wick is upright, centered, and stable. Repeated nudging after that point can create the shift you are trying to avoid.
A simple alignment check helps here:
- The base is flat and centered at the container floor
- The top sits directly above the base instead of drifting left or right
- The wick looks vertical from the side, not slightly leaned
- The support is holding position, not pulling the wick off line
Signs the wick shifted:
- The top looks centered, but the base is off to one side
- The wick leans after you remove your hand or support
- The holder sits flat, but the wick no longer runs straight upward
- The wick keeps moving when the candle is already set enough to leave alone
If the real problem is tool choice rather than technique, choose centering tools that keep the wood wick aligned. If the wick was centered during setup but the burn later drifts or looks unstable, troubleshoot off-center or unstable wood wick burns instead of reopening the alignment step.
Once the wick holds that centerline, set the exposed height before lighting.
How to Set Wood-Wick Height Before the First Light
Set exposed height before first light so the wood wick starts more predictably and the early flame is easier to control.
Exposed height means the part of the installed wood wick that sits above the wax surface immediately before the first light. Here, trim means setting that pre-light height for a wood wick, not following a full long-term maintenance routine for later burns. This step matters because too much or too little exposed wick can change how easily the wick catches and how steady the startup flame looks. The goal is a clean, even starting height right before the candle is ready to be lit.
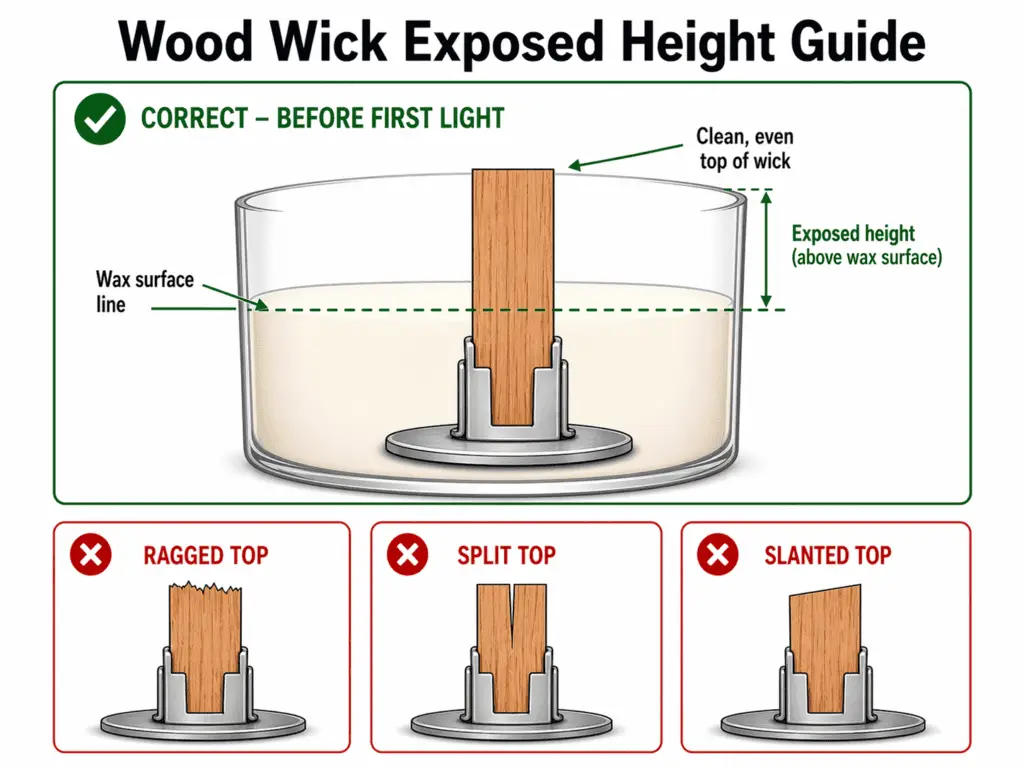
If the wick maker gives no starting-height guidance, keep the top clean, even, and conservative rather than chasing a universal number, then judge the first burn before making more changes.
Set the height after the wick is installed, centered, and otherwise ready for the first burn. Keep the top even rather than ragged, split, or slanted, because an uneven edge can make startup harder to judge. Use the wick maker’s stated starting height when that guidance is available, since this page covers first-light setup rather than one universal number for every wood wick. That is one reason broader care topics belong elsewhere when you need to prep and trim candle wicks correctly across more than one wick type.
One common mistake is importing cotton-wick habits into wood-wick setup. A wood wick does not use the same care logic as a round cotton wick, so treat pre-light height as its own setup step instead of assuming the same trimming habit applies. If the exposed height looks correct but the candle still struggles after lighting, troubleshoot wood wick burn problems or check whether the wick size matches the jar instead of trimming again and again.
With height set, the first burn becomes a clean check of startup behavior instead of a guess.
How to Do the First Burn After Install and What to Check First
Use the first burn as a controlled startup check before you change wick size or start full troubleshooting.
On this page, first burn means the first controlled post-install test used to check ignition, flame position, and early stability. It is a setup check, not a full repair path for every later burn defect.
- Light the wood wick under calm, controlled conditions after the wick has been installed, centered, and set to the planned exposed height.
- Watch the first moments of ignition. A useful first check is whether the wick catches without repeated struggle and starts burning from the intended position.
- Check the flame path. The early flame should look centered on the wick and steady enough to judge the setup, rather than leaning hard to one side or fading at once.
- Note what happens before you change anything. The goal here is to tell whether the setup is working, not to jump straight to a new wick choice.
Pass signals:
- The wick lights without repeated failed starts
- The flame appears centered enough to read the setup clearly
- The flame does not shrink out right away
- Early behavior looks steady enough to keep watching
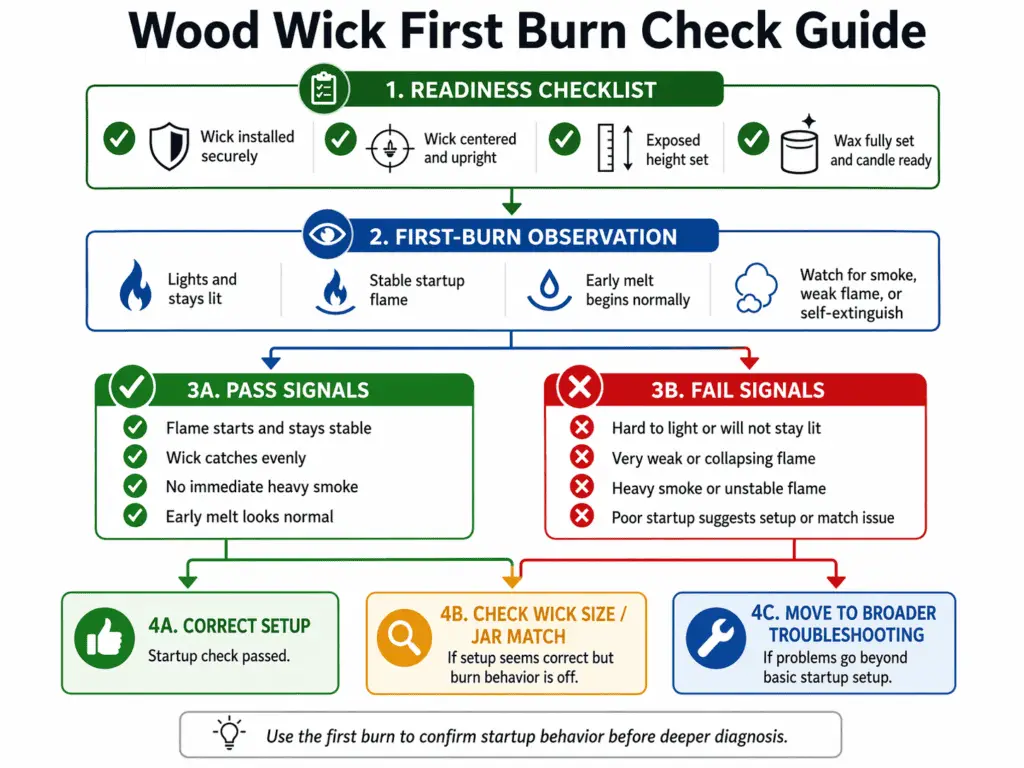
Fail signals:
- The wick struggles to catch even after correct setup
- The flame starts badly off center
- The flame drops out almost immediately
- The candle already looks like it needs a different fix path rather than another install tweak
When the early check shows the setup is complete but the wick still underperforms, move out of setup instead of repeating the same startup steps. Fix a wood wick that keeps going out, solve common wood wick burn problems, or recheck wick width and thickness for the jar based on the next problem you need to solve.
When the Candle Is Ready for the First Burn
Ready means ready for the first controlled burn after install and wait checks, not full wax-science tuning for every formula.
A candle is ready on this page when the install is complete, the wick is stable, the exposed height is set, and the planned wait period has been respected well enough to run a fair startup test. Lighting too early can fake a wick problem and send you toward the wrong fix.
Readiness check:
- Install is complete
- Wick is centered and stable
- Pre-light height is set
- The waiting period has been respected
- You are checking startup behavior, not trying to judge every future burn issue
If those checks are not done, it is too early to diagnose sizing or broader burn faults. If those checks are done and the problem still continues, troubleshoot wood wick problems after the first burn, recheck wick width and thickness for the jar, or use candle wick types and sizing when the problem looks more like sizing than setup.
Install Issue vs Sizing Issue: What to Check Before You Change the Wick
This is a boundary check, not a full troubleshooting article: an install issue here means a setup problem that can still be corrected before or at first light.
On this page, an install issue means the problem still sits in priming, clip fit, centering, exposed height, step order, or readiness. A sizing issue means the wick itself is mismatched to the jar or formula. A broader troubleshooting issue means startup defects continue even after setup checks are complete.
| What you see or check | Still setup-related | More likely a sizing issue | Route elsewhere |
| Priming, clip fit, centering, or height was skipped or done poorly | Yes | No | Stay on this page and correct setup |
| Candle was tested before it was ready | Yes | No | Finish readiness checks first |
| Setup checks are complete, but the wick still underperforms on startup | Maybe not | Possible | Use the next decision step below |
| The problem looks tied to jar match or wick dimensions | No | Yes | check whether the wood wick width and thickness match the jar |
| The setup is complete, but startup problems keep repeating | No | Not always | troubleshoot common wood wick burn problems or fix a wood wick that keeps going out |
Pre-light check before changing the wick:
- Primed correctly
- Clipped securely
- Centered accurately
- Exposed height set
- Readiness check complete
Do not change wick size before those setup checks are complete. Stay on the install path only while those checks are unfinished; once they are finished and the problem remains, the issue likely no longer belongs to installation alone.