
Choose heat-tolerant containers, right-sized wicks, and confirm safety with a logged burn test so flames stay centered, soot stays low, and containers remain intact through repeated burns.
A safer container candle starts with materials that resist heat stress and a wick that doesn’t overdrive the melt pool. Small details—wall uniformity, rim chips, coatings, lids, airflow—decide whether a jar stays calm or fails under real use. The fastest path is a simple screening routine, then controlled burn tests that reveal heat, soot, and stability issues early. When you document results by jar size, wax, wick series, and fragrance load, safety becomes repeatable instead of guesswork.
What makes a candle container “safe”?
A candle container is “safe” when it stays intact under sustained heat, keeps the flame centered away from the rim, and doesn’t crack, shed coatings, tip easily, or overheat during normal burn cycles.
A safe container is heat-tolerant (material + build), stable on a flat surface, and compatible with a wick size that prevents rim licking, heavy soot, and thermal shock cracking.
No, not every glass jar is candle-safe. Reject thin drinkware, decorative glass, plastic, chipped vessels, and containers with unknown interior coatings before you pour.
If you want the broader framework first, start with candle safety standards and labeling, then use the checks below to choose a safe container-and-wick starting point.
| Check | Safer sign | Reject or re-test |
|---|---|---|
| Container material | Heat-tolerant glass, ceramic, or metal made for candle use | Decor-only vessels or unknown materials marketed only for storage |
| Rim and sidewalls | Even walls, no chips, no visible stress points | Rim chips, thin waves, bubbles, or distortion |
| Base stability | Sits flat and feels proportionate for its height | Rocks on a flat surface or feels top-heavy |
| Interior finish | Stable, plain wax-contact surface | Flaking paint, unstable metallic films, or unknown interior coatings |
| Wick fit | Wick can stay centered with room from the sidewalls | Wide opening forces oversized or badly placed wicks |
| Burn-test result | Flame stays centered and soot stays low | Rim licking, heavy soot, cracks, warps, or coating changes |
Reused jars need extra caution because prior heat exposure, hidden stress, and unknown coatings can change how they behave. If you plan to reuse a jar, treat it as a separate screening job and check Using Recycled Jars for Candles: What You Need to Know before you pour.
Quick inspection card (before you pour)
Use this short inspection pass before every pour, even when the container came from a supplier you already trust.
- Rim: reject any jar with chips, sharp nicks, or uneven thickness at the lip.
- Sidewalls: look for thin “waves,” bubbles, or distortion that can concentrate heat stress.
- Base: confirm it sits flat (no rocking) and feels sturdy for its height.
- Interior finish: avoid flaking paint, unstable metallic films, or unknown coatings in the wax-contact zone.
- Fit check: confirm the wick can be centered and kept centered (especially with wide openings).
A practical way to decide is to treat the container and wick as a paired system: the jar spreads heat, and the wick sets how hard the system is driven. Standards help define what “safe enough” means in controlled checks, but your day-to-day safety comes from conservative jar selection plus repeatable burn testing. If the container ever shows cracking, new hairlines after cooldown, visible coating changes, or persistent heavy soot at normal burn lengths, retire it from candle use.
Why container material matters for heat & shock
Container material changes how heat spreads and how the vessel reacts to temperature swings, which is why the same wick can behave calmly in one jar but cause cracking, soot, or rim overheating in another.
Material controls heat conduction and thermal shock resistance; safer choices reduce stress at thin spots, corners, and rims, especially when candles are moved, drafted, or cooled between burns.
Thermal shock is the “sudden change” problem: a hot container meets a cold counter, draft, or quick cooldown and stress spikes at weak points. Glass and ceramics tend to fail by cracking; metals tend to fail by deforming or heating up quickly to the touch. That’s why you screen for defects (chips, bubbles, thin zones) and then validate performance with a controlled burn, not a single “looks fine” pour.
A useful mental model is: material + manufacturing quality + wall uniformity decides how tolerant the jar is, and wick choice decides how aggressively it’s tested. If you need a broader starting point on vessel options, review Choosing the Right Candle Containers before you lock a jar for production.
How to check heat-resistance specs (vendor vs real-world)
Trust vendor claims only after you confirm what they mean, then verify with real burn testing that checks jar integrity, soot, flame height, and melt-pool behavior under consistent conditions.
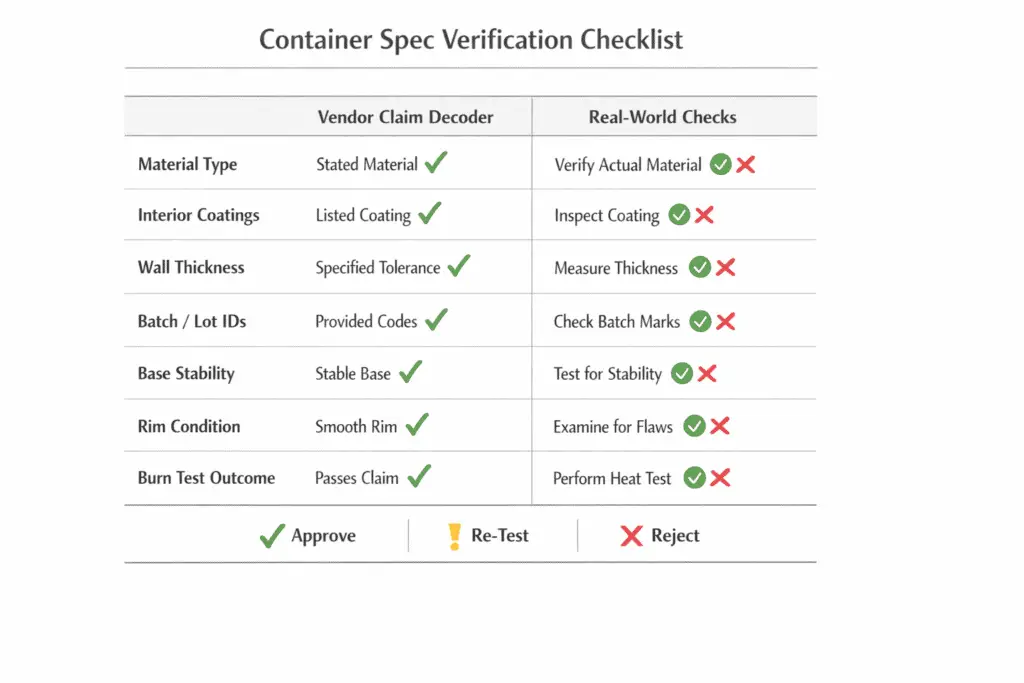
Ask for spec language (material, coatings, intended use), then run a repeatable burn test; reject containers that crack, shed coatings, rock, or push flames to the rim with a properly sized wick.
Vendor claim decoder (fast questions that reveal real specs)
These questions usually tell you whether a supplier is describing a real candle vessel or repeating a vague product title.
- What is the container material (type of glass/ceramic/metal) and is it meant for open-flame heat exposure?
- Is there any interior coating or decorative layer in the wax-contact zone?
- Are there thickness tolerances or a minimum wall thickness target?
- Are there batch/lot identifiers you can record for traceability?
Real-world checks you can actually do
Use the same simple checks every time so a “good-looking” jar does not get a free pass.
- Uniformity check: measure wall thickness at multiple points so thin zones stand out early.
- Stability check: confirm the jar doesn’t rock on a flat surface.
- Rim check: reject micro-chips and uneven lips.
- Burn test check: a “safe” jar stays intact, keeps the flame centered, and doesn’t accumulate heavy soot at normal burn lengths.
If you need a conservative rule of thumb for candle vessels, treat thin decorative containers as higher-risk unless testing proves otherwise. The goal is simple: the container must tolerate repeated burns without cracking, deforming, or shedding anything into the wax-contact zone.
Glass vs ceramic for container candles (X-vs-Y)
Glass is easier to visually inspect for defects and stress lines, while ceramic can hide micro-cracks under glaze; both can be safe when designed for heat and validated by burn testing.
Choose glass when you want easy defect detection and consistent walls; choose ceramic when the vessel is purpose-rated for heat and the glaze or coating is stable at candle temperatures.
X-vs-Y comparison that actually matters
| Criteria | Glass | Ceramic |
|---|---|---|
| Defect visibility | Usually easier to spot bubbles, thin spots, and stress lines | Glaze can hide micro-cracks or surface issues |
| Failure pattern | Can crack suddenly when a weak point is stressed | Can craze gradually before larger failure |
| Finish risk | Interior decorative coatings need extra caution | Unknown glazes or interior finishes need extra caution |
| Best use case | When you want easy inspection and consistent wall checks | When the vessel is clearly heat-rated and the finish is known to be stable |
Decision rule (beginner-friendly)
Use this quick rule when aesthetics are competing with safety.
- If you can’t verify the glaze or coating stability, avoid ceramic interiors with unknown finishes in the wax-contact area.
- If you can’t verify glass quality (thin waves, rim chips, stressed zones), reject it before pouring.
- In both cases, let burn testing decide, not aesthetics.
If your real choice is metal versus glass, compare that separately with Tin vs Glass Candle Containers: Safety Comparison rather than forcing every vessel decision into one rule.
Tin vs aluminum vessels (X-vs-Y)
Both metals heat quickly, so use only sturdy candle-ready vessels and let burn testing decide; this page does not treat tin-versus-aluminum as a full comparison.
Steps: run a home burn test (wick + jar) safely
A safe home burn test uses consistent burn intervals, stable room conditions, and a simple log so you can spot overheating, soot, tunneling, and container damage before you gift or sell a candle.
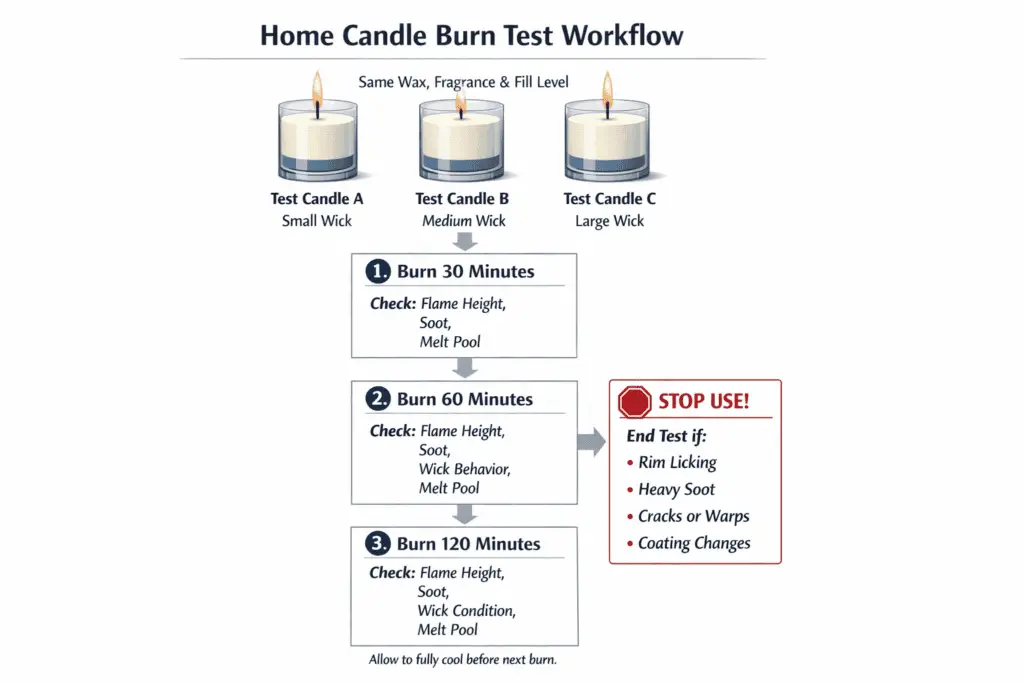
Burn identical test candles in consistent timed sessions, measure melt pool behavior, watch for soot and rim licking, and retire any container that cracks, deforms, or sheds coatings.
Method note: The timings below are a repeatable home-testing example for comparing one setup against another. They do not replace a formal lab or market-specific compliance test.
Steps (repeatable, low-drama, high-signal)
Keep every variable steady except the wick size you are testing.
- Make 3 test candles with the same wax batch, fragrance %, dye, and fill height. Change only wick size.
- Cure consistently (same time, same room conditions).
- Burn on a heat-safe surface away from drafts and combustibles.
- Run timed sessions (for example, equal sessions from burn to burn), then cool fully before the next burn.
- Log at fixed checkpoints (for example, 30/60/120 minutes): flame height stability, soot, melt pool width, and wick tip behavior.
- Stop early if the flame repeatedly touches the rim, soot is heavy, or the container shows distress.
Stop-use signs during testing
These are the signals that tell you to stop testing that setup instead of “seeing if it improves.”
- Repeated rim licking or a flame that rides the sidewall.
- Heavy soot that keeps returning under the same room conditions.
- New cracks, warps, ticks, or coating changes after cooldown.
- Persistent instability even after you trim and remove drafts.
Burn testing is about repeatability: same setup, same burn length, same checkpoints, same notes. If you can reproduce a problem twice under controlled conditions, you can fix it with confidence. For the longer workflow, use How to Run a Full Candle Test Series for a New Jar and Wick instead of expanding every lab note on this page.
How to choose the right wick size for your container
Choose wick size by container inner diameter, then bracket-test nearby wicks and pick the smallest one that burns cleanly, stays centered, and develops a stable melt pool without soot or overheating.
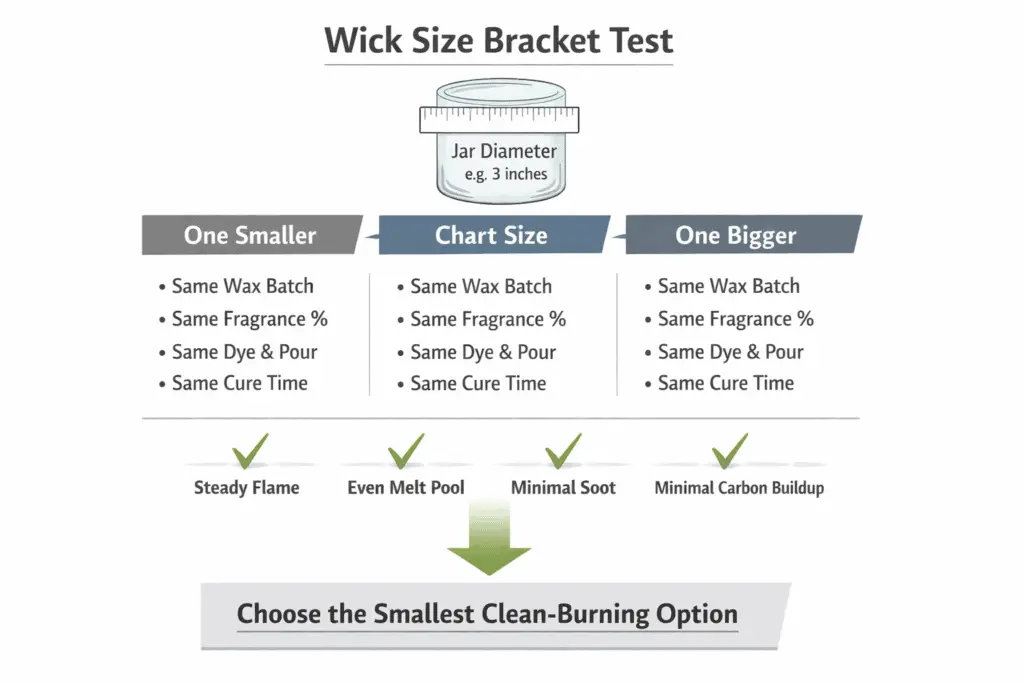
Measure inner diameter at the fill line, test three wick sizes in the same series, and select the smallest wick that reaches an even melt pool and clean flame during controlled burn sessions.
Use this page as the safety filter, then go deeper with Candle Wick Types and Sizing Guide and the Wick Size Chart by Jar Diameter & Wax Type when you need series-by-series starting points.
Bracket test (“one smaller / chart / one bigger”)
This is the simplest way to avoid committing to an oversized wick too early.
- Pick the supplier’s chart wick for your inner diameter and wax.
- Add one size smaller and one size larger in the same wick series.
- Keep everything else identical (wax batch, fragrance %, dye, pour method, cure time).
What “properly wicked” looks like (practical signals)
Use these signs to choose the smallest clean-burning option, not the most aggressive flame.
- Flame is steady, not tall and flickery.
- Melt pool approaches the container edge and doesn’t remain tunneled.
- Wick tip shows minimal carbon buildup; soot is minimal to none.
If a wick gives faster full melt but adds smoke, soot, or aggressive heat, it’s not “better throw”—it’s a riskier system. If a test candle later burns too hot or unevenly, move to Fixing Overheating or Uneven Candle Burn Issues rather than expanding that troubleshooting workflow here.
Wood wicks vs cotton wicks (flame profile & soot) (X-vs-Y)
Wick material affects flame profile and soot, but wood-versus-cotton tuning belongs on a separate page; use Wood Wicks vs Cotton Wicks: Burn, Sound, and Safety Compared for that comparison.
How fragrance load & essential oils change jar temperature
Higher fragrance load and certain additives can change burn chemistry and fuel delivery, which can increase flame size, soot risk, and container heat—especially when wicking is already near the high end.
Treat fragrance and additive changes as “wicking changes”; if you raise fragrance load or switch oils, re-test wick size because heat and soot behavior can shift noticeably.
Fragrance can alter how easily fuel vaporizes and how much carbon forms at the wick tip. A safer workflow is to lock your container and wax first, then validate fragrance ranges with the same bracket test approach you already trust.
Compliance: ASTM/EN standards that affect containers & wicks
In the US, ASTM standards guide candle fire safety; in the EU/UK, EN standards cover sooting, fire safety testing, and safety labeling—so your testing and labels should match the market you sell into.
For US alignment, start with ASTM candle safety standards (F2417, F2058, F2179). For European alignment, start with EN 15426, EN 15493, and EN 15494. This page only uses them as orientation points; the full standards discussion belongs on those dedicated pages.
Practical compliance translation
Use the standards as a structure for testing and labeling, not as a substitute for a careful jar-and-wick validation process.
- Standards don’t replace good burn testing; they structure what “safe enough” means in controlled checks.
- Label requirements matter because correct warnings reduce misuse (like burning too long or placing near combustibles).
- If you sell across borders, keep your burn-test logs and label versions organized by market.
How to verify tempered/borosilicate claims (thermal shock)
Treat tempered and borosilicate as claims to verify inside the vendor-check process above, not as proof by product title alone.
Lids, venting, and pressure build-up: safe practices
Lids change airflow and can trap heat and soot, so safe practice is simple: never cap a hot candle and use lids for dust protection only after the candle is fully cool.
Use lids after cooldown, keep headspace above the melt pool, and avoid sealing a warm candle, which can trap heat and concentrate residue inside the container.
Safer habits that prevent “mystery soot”
These habits solve more lid-related problems than changing the vessel itself.
- Extinguish, then let the candle cool completely before lidding.
- Don’t carry a hot candle to a colder room or counter.
- Keep fill height consistent so the melt pool sits well below the rim.
How multi-wick layouts affect container stress
Multi-wick candles can reduce tunneling in wide jars, but they raise container stress when hot zones overlap, wicks are too close to sidewalls, or spacing is uneven.
Multi-wick layouts are safer when wicks are evenly spaced, centered away from sidewalls, and tested to avoid overlapping hot spots that increase rim heat and soot.
A helpful practical rule is that wide jars often behave better with multiple smaller flames than one oversized flame, as long as spacing prevents overlapping hot zones. The only way to know you’ve achieved that balance is multi-burn testing with consistent checkpoints.
Spacing sanity checks
Use these checks before you assume a wide jar “needs” more heat.
- Keep each wick far enough from the sidewall that the flame doesn’t “ride” the glass.
- Avoid placing wicks so close that the pools merge into one overheated zone early in the burn.
- Test multiple burns; wide jars often change behavior mid-life as wax depth decreases.
FAQ
Can I use any glass jar for a candle?
No. A glass jar still needs even walls, a stable base, a clean rim, and a burn test that confirms the wick does not overdrive the container.
Are recycled jars safe for candle making?
Sometimes, but not by default. Recycled jars need defect screening, extra caution around hidden stress, and their own validation path before reuse.
How do I know if a wick is too large for the container?
A wick is likely too large when the flame runs tall or unstable, soot builds quickly, the melt pool becomes aggressive early, or the flame repeatedly reaches toward the rim.
Do I need a full burn test for every new jar and wick combination?
Yes, because the vessel, wax, fragrance load, and wick interact as one system. Even small changes can shift soot, heat, and stability enough to change the safety outcome.