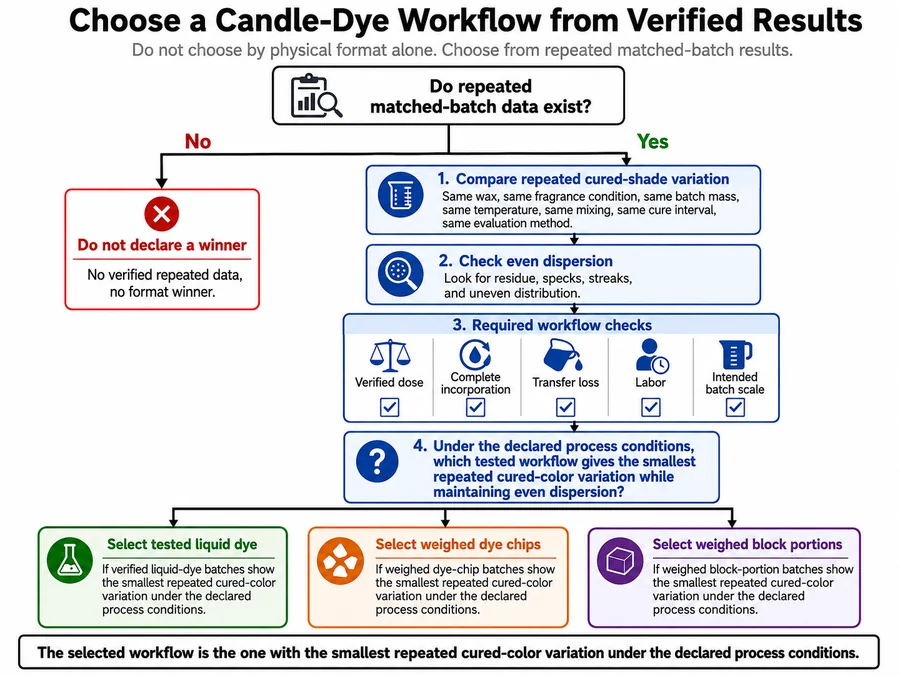

No dye format is universally most consistent. The best workflow delivers a verified dose, incorporates the dye completely, and reproduces the closest cured shade under controlled wax, temperature, mixing, batch, fragrance, and cure conditions.
Liquid dye, dye chips, and dye blocks are candle-colorant delivery formats—not mica, pigments, crayons, or other unrelated colorants. Here, consistency means reproducing a similar cured shade and even dispersion when wax, dose, batch weight, fragrance load, temperature, mixing, and cure conditions stay controlled. Liquid dye can suit tiny verified increments, while weighed chips or block shavings can suit repeatable solid dosing; none wins without matched measurement and process controls. The comparison begins by defining the criteria that separate repeatable color from darkness, mixing speed, convenience, cleanup, and package price.
What Does Consistent Candle Color Mean?
Consistent candle color means reproducing a similar cured shade and even dispersion across matched batches made under the same declared process conditions.
A cured shade is the candle’s color after a fixed cure interval, not its appearance while the wax is molten. Consistency measures repeatability; it does not mean the darkest shade, fastest mixing, easiest cleanup, lowest package price, or simplest handling.
Liquid dye generally favors fine measured adjustments; weighed chips favor clean repeatable solid dosing; and weighed block shavings favor flexible solid portions when preparation and transfer remain controlled.
No option is universally most consistent because unverified drops, counted chips, and visually divided blocks can all deliver unequal dye amounts.
| Comparison criterion | Liquid dye | Dye chips | Dye blocks |
|---|---|---|---|
| Fine adjustments | Strong candidate when delivered mass or volume is verified | Whole chips may be too coarse unless portions are weighed | Weighed shavings can support small adjustments, but fragments may be lost |
| Repeatable dosing | Measured mass or calibrated volume can be repeatable; drop counts are not fixed units | Weighed portions can be repeatable; counted chips may vary in mass | Weighed portions can be repeatable; visual cuts may vary |
| Incorporation | Starts in liquid form but still requires complete mixing | Must dissolve and disperse fully under the tested process | Must dissolve and disperse fully under the tested process |
| Cleanup | Can leave dispenser residue or liquid spills | Usually reduces liquid-spill risk but may leave fragments | Usually reduces liquid-spill risk but cutting can leave shavings |
| Storage | Requires a sealed, clean dispenser and controlled bottle condition | Solid pieces are simple to contain and portion | Solid stock is simple to contain but requires portion preparation |
| Custom color blending | Generally supports small measured additions and fast blending | Possible, but whole-piece size may limit adjustment | Possible through weighed shavings, with additional preparation |
| Small batches | Suitable when the measuring device resolves the target dose | Suitable when a whole or weighed portion fits the target | Suitable when weighed shavings can be transferred completely |
| Production use | Suitable when calibrated dosing equipment and residue controls remain repeatable | Suitable when portion measurement and incorporation remain repeatable | Suitable when portion preparation, transfer, incorporation, and labor remain repeatable |
| Comparison criterion | What must remain matched | What signals inconsistency |
|---|---|---|
| Cured shade | Cure interval, lighting, background, and evaluation method | Noticeable shade changes between batches |
| Dye delivery | Product, concentration, delivered dose, and transfer method | Unequal dye amounts entering the wax |
| Dispersion | Mixing temperature, duration, and technique | Specks, streaks, residue, or uneven color |
| Wax | Exact wax product and lot where possible | Wax differences mistaken for dye-format effects |
| Batch conditions | Batch mass, vessel, heating process, and cooling conditions | Process variation mistaken for format variation |
| Fragrance condition | Same fragrance product and load, or no fragrance in every batch | Fragrance-related color changes |
| Evaluation | Same reference sample and scoring method | Judgments made under different viewing conditions |
Liquid dye, dye chips, and dye blocks should therefore be compared as complete dosing and incorporation workflows. A verified liquid dose may outperform counted chips, while weighed chips or block shavings may outperform unverified drops.
A format is consistent only when repeated matched batches reproduce the same cured result. Keep the wax, delivered dose, batch mass, fragrance condition, temperature, mixing, cure interval, and evaluation method unchanged across the comparison.
Which Candle-Dye Format Reproduces the Closest Shade?
No format is always closest; verified liquid dosing favors fine adjustments, while accurately weighed chips or block shavings can match repeatability under controlled conditions.
The closest shade is the cured result with the smallest predeclared difference from a reference sample. The acceptance threshold is the largest allowed difference, chosen before testing rather than adjusted after seeing the results.
Repeated-batch shade test
Use repeated matched batches with the same wax, delivered dose, fragrance condition, batch mass, temperature, mixing, cure interval, reference sample, scoring method, and acceptance threshold. Record every result because one sample or an average that hides wide variation cannot establish repeatability.
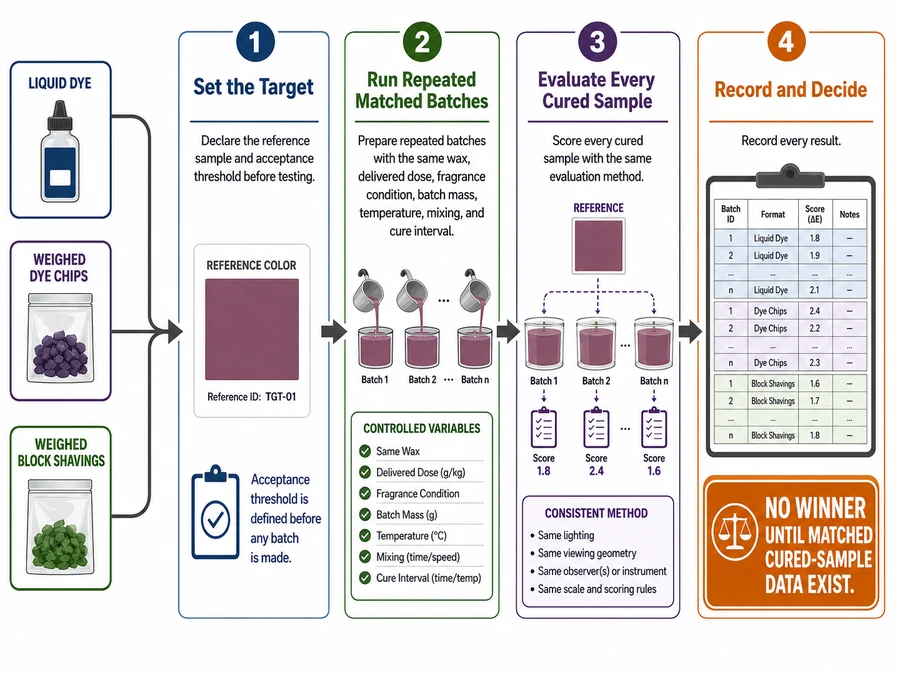
Standardized photographs may document the cured samples, but they cannot replace the declared scoring method.
Until matched cured-sample data exist, the defensible result is no winner—not a guess based on format alone.
Which Candle-Dye Format Is Easiest to Measure Repeatably?
The easiest candle-dye workflow to measure repeatably is the one with the lowest delivery variation at a target dose the measuring device can resolve. Here, easiest does not mean least cleanup, simplest storage, or fewest handling steps. Verified mass or volume is more dependable than assumed equal drops, chip counts, or visually estimated block portions.
A dye format becomes easier to measure when the delivered increment is larger than the measuring device’s resolution and little material remains in the dispenser, container, or transfer tool. The comparison must separate the amount intended, the amount measured, and the amount that actually enters the wax.
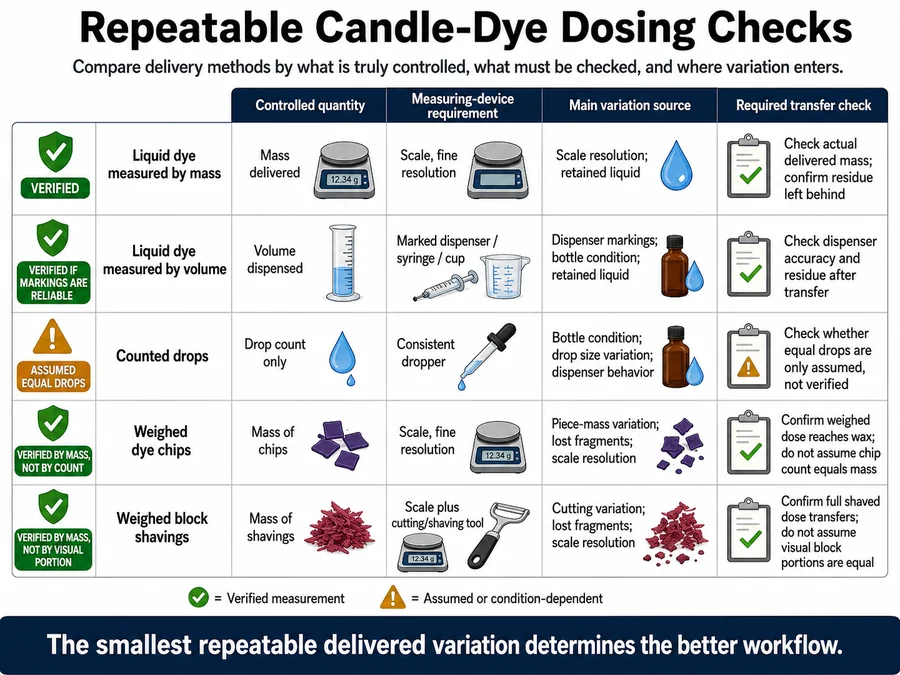
| Dosing method | Quantity controlled | Main source of variation | Required check |
|---|---|---|---|
| Liquid dye measured by mass | Dye mass | Scale resolution, residue, and unstable readings | Repeat the delivery and record the mass entering the vessel |
| Liquid dye measured by volume | Dye volume | Dispenser markings, reading technique, and retained liquid | Confirm the dispenser can resolve the target amount |
| Liquid dye counted as drops | Nominal drop count | Drop size, angle, pressure, bottle condition, and technique | Verify repeated drop deliveries by mass or volume |
| Dye chips counted as pieces | Piece count | Differences in chip mass and transferred fragments | Weigh repeated counted portions |
| Dye chips measured by mass | Chip mass | Scale resolution and transfer loss | Record measured and delivered mass |
| Dye blocks divided visually | Estimated portion size | Uneven cutting and visual judgment | Weigh each prepared portion |
| Dye-block shavings measured by mass | Shaving mass | Scale resolution, fragments, and retained material | Record the mass transferred into the wax |
Measurement method
Set a target dose in declared mass or volume units. Record the device resolution, trial count, measured dose, delivered dose, transfer loss, and any difference from the target. Calculate dose error as delivered dose minus target dose, then compare the spread of repeated deliveries rather than relying on a single attempt.
No format should be called easiest to measure until the same trial design has been applied to each candidate workflow. A verified liquid dose may outperform counted chips, while weighed chips or block shavings may outperform unverified drops.
Why Can Equal Drops of Liquid Candle Dye Produce Different Colors?
Equal drop counts can deliver different dye amounts because output changes with the dispenser, bottle condition, angle, pressure, agitation, and operator technique.
A drop is a delivery event, not a fixed unit of mass or volume. Two sets of ten drops may therefore place different quantities of liquid dye into otherwise matched wax batches. The resulting shade difference can look like a colorant-performance problem even when the underlying cause is unequal delivery.
Bottle orientation can change how liquid reaches the tip. Squeezing pressure and release speed can alter drop formation. Dye retained around the opening, settling within the product, or a partially blocked dispenser can change output during the same session.
This variation does not prove that all liquid candle dye is inconsistent. This variation shows that repeatable liquid dosing requires a declared dispenser procedure and verification by mass or volume.
Liquid-dispenser benchmark
Verify liquid delivery with at least ten repeated mass or volume measurements before reporting a mean, range, or variance. Keep the product, dispenser, bottle condition, nominal delivery, orientation, pressure procedure, and measuring device unchanged.
Liquid dye earns a repeatability advantage only when repeated verified deliveries vary less than the competing solid-dye workflows under matched batch conditions.
Are Dye Chips or Dye Blocks More Consistent?
Dye chips and dye blocks are repeatable only when each portion is measured rather than assumed equal by count or appearance.
Counted chips can differ in mass, and equal-looking block pieces can contain unequal amounts of dye. Weighed chips or weighed block shavings can reduce portioning error when the scale can resolve the target dose and the whole measured portion reaches the wax.
The comparison must keep the exact product, target dose, scale, portioning method, and transfer procedure unchanged. Product lot should also be recorded when available. A result from one chip or block product cannot establish the behavior of every solid candle dye.
| Solid-dye method | What is assumed | What the benchmark must verify |
|---|---|---|
| Counting chips | Every chip has equal mass | Mass distribution across repeated equal-count portions |
| Choosing chips by appearance | Similar size means similar dose | Actual mass of visually matched portions |
| Cutting equal-looking block pieces | Equal dimensions mean equal dye quantity | Measured mass of each prepared piece |
| Measuring whole chips by mass | Displayed mass equals delivered mass | Scale resolution and transfer loss |
| Measuring block shavings by mass | Small weighed increments support finer control | Repeatability of prepared and delivered portions |
A valid solid-portion benchmark records scale resolution, target mass, measured mass, delivered mass, transfer loss, exact product, portioning method, and trial count. Visual estimates and measured portions must be reported separately.
Neither chips nor blocks win by physical form alone. The more repeatable solid workflow is the one that delivers the smallest batch-to-batch dose spread without exceeding the measuring device’s limits.
Which Dye Format Gives the Finest Candle-Color Adjustments?
Verified liquid dye generally supports the finest adjustments—the smallest repeatable delivered increments—while weighed block shavings can approach that control when the scale resolves the dose.
The finest nominal drop, chip, or shaving does not automatically provide the finest control. The useful increment must be large enough for the measuring device to detect, small enough to avoid passing the target shade, and repeatable after transfer into the wax.
Overshoot occurs when one added increment moves the cured sample beyond the declared acceptable shade range. It must be judged after the fixed cure interval, not from the color of molten wax.
| Dye workflow | Candidate adjustment increment | What must be verified | Main limitation |
|---|---|---|---|
| Liquid dye measured by mass | Smallest delivered mass supported by the scale | Delivered mass, transfer loss, and repeated response | The scale may not resolve very small additions |
| Liquid dye measured by volume | Smallest readable dispenser increment | Delivered volume and retained liquid | Markings or dispenser output may be too coarse |
| Liquid dye counted as drops | One nominal drop | Repeated drop mass or volume | Drop size may change between deliveries |
| Dye chips measured by mass | Smallest weighed chip portion | Measured and delivered mass | Whole chips may exceed the required adjustment |
| Dye blocks measured as shavings | Smallest weighed shaving portion | Portion mass and complete transfer | Fine fragments may be lost during transfer |
| Chips or blocks judged visually | Smallest visible portion | Actual mass and cured response | Similar-looking portions may contain different amounts |
Adjustment-response method
Test one verified increment at a time in matched samples and compare the cured response with the same target range. Record whether each increment remains below, within, or above that range and whether it causes overshoot.
No dye format wins this comparison without measured increment-response data. The winning workflow is the one with the smallest verified increment that repeatedly changes the cured shade without frequent overshoot.
Does Faster-Dissolving Candle Dye Give More Consistent Color?
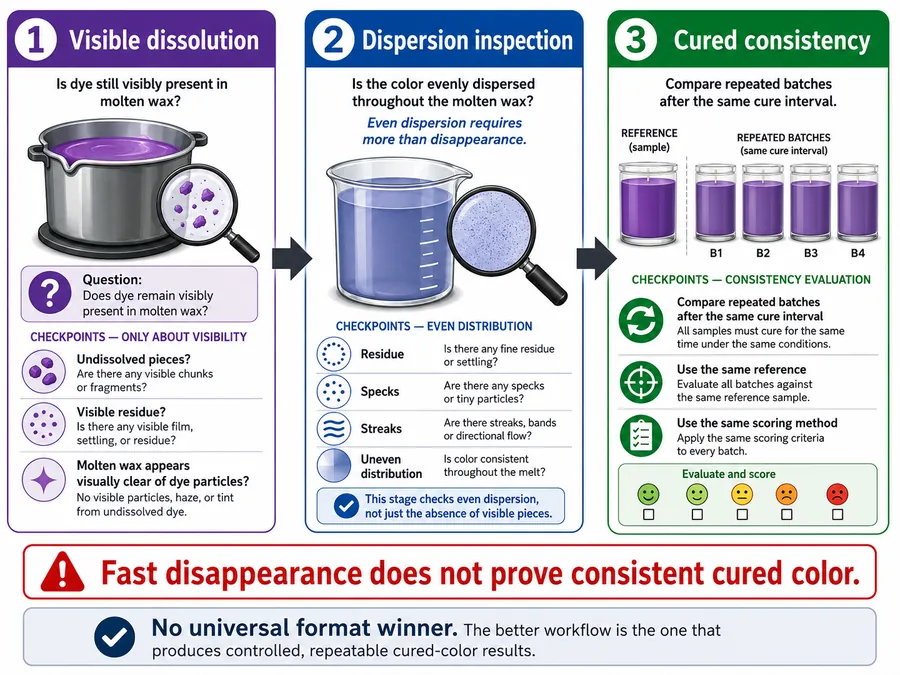
No. Faster visible dissolution does not prove that a candle-dye workflow will produce more consistent cured color.
Visible dissolution describes what can be seen while the wax is molten. Dispersion describes how evenly the colorant is distributed, while consistency describes how closely repeated cured batches reproduce the target shade. These outcomes must be evaluated separately.
A dye can disappear quickly from view yet still leave residue, uneven distribution, or batch-to-batch shade variation. A slower-mixing format can still produce repeatable results when it is fully incorporated under a documented process.
| Benchmark field | What to record |
|---|---|
| Wax | Exact wax product and lot where available |
| Dye | Exact product, format, concentration, and lot where available |
| Delivered dose | Verified quantity that entered the wax |
| Batch size | Actual wax mass |
| Temperature | Actual reading and measurement location |
| Mixing | Duration, technique, and equipment |
| Dissolution criterion | How visible incorporation was judged |
| Cure interval | Fixed time before evaluation |
| Dispersion inspection | Residue, specks, streaks, or uneven areas |
| Shade result | Difference from the reference sample |
| Repetition | Results from every matched batch |
Dispersion failure log
| Observed result | What may have varied | What the result does not prove |
|---|---|---|
| Visible residue remains | Temperature, mixing, product condition, or dose | That the format always fails |
| Specks remain in the wax | Incorporation conditions or solid-particle handling | That every solid dye is inconsistent |
| Streaks appear after curing | Mixing, cooling, wax behavior, or sample preparation | That dissolution speed alone caused the defect |
| Molten wax looks uniform but cured shades differ | Delivered dose, cure conditions, wax, fragrance, or evaluation | That visible dissolution predicted repeatability |
| One batch looks acceptable | Any uncontrolled variable may still be present | That the workflow is repeatable |
The benchmark must hold wax, delivered dose, temperature, mixing, batch mass, fragrance condition, cure interval, and inspection method constant. Without those controls, a process difference can be mistaken for a dye-format difference.
Dissolution speed matters only as one recorded process observation; cured dispersion and repeated shade variation determine whether the workflow is consistent.
How Do Temperature and Mixing Conditions Change Dye-Format Performance?
Temperature and mixing conditions can make the same dye format appear reliable in one trial and inconsistent in another.
Each result applies only to the tested wax, dye product, delivered dose, temperature, mixing procedure, batch mass, fragrance condition, and cure interval. A change in any of those variables can look like a format effect.
| Process change | What it can change | Comparison limit |
|---|---|---|
| Lower or higher addition temperature | Incorporation speed, residue, and visible dissolution | Faster incorporation does not prove lower cured-shade variation |
| Shorter or different mixing | Specks, streaks, residue, and distribution | Incomplete mixing cannot be assigned to the physical format alone |
| Different equipment or batch mass | Heating behavior, wax movement, and transfer | Results from unlike equipment or scales are not equivalent |
A format comparison is valid only inside the recorded process window and cannot be extended to untested products, waxes, temperatures, or mixing methods.
Does Candle-Dye Format Performance Change by Wax Type?
Yes. A candle-dye workflow that is repeatable in one wax product and process window may perform differently in another.
Each conclusion must be limited to the exact wax product, delivered dose, temperature, mixing procedure, fragrance condition, batch mass, cure interval, and evaluation method tested. Results from one wax cannot establish a universal winner for all waxes in the same broad category.
Wax can change the apparent performance of liquid dye, dye chips, and dye blocks by affecting incorporation conditions and the final cured appearance. A format should therefore be judged by repeated cured results in the selected wax, not by how quickly it disappears in molten wax.
Dye product, concentration, and dose can affect candle performance, but wick selection and complete burn testing fall outside this format comparison.
A valid comparison records the exact manufacturer and wax product rather than using labels such as soy, paraffin, coconut, or blend as complete test descriptions. Two products described by the same broad wax type may require different process conditions.
Wax-comparison method
Compare the three formats within one named wax product before repeating the same comparison in another wax. Keep dose, fragrance condition, batch mass, temperature, mixing, cure interval, and evaluation method matched within each wax.
| Decision field | Required comparison | Interpretation limit |
|---|---|---|
| Wax identity | Record manufacturer, exact product, and lot where available | Broad labels such as soy or paraffin do not establish equivalent products |
| Workflow result | Compare repeated cured-shade variation and dispersion within the selected wax | The result applies only to that wax and process window |
| Cross-wax result | Compare each wax separately under its declared conditions | Do not combine unlike wax products into one average |
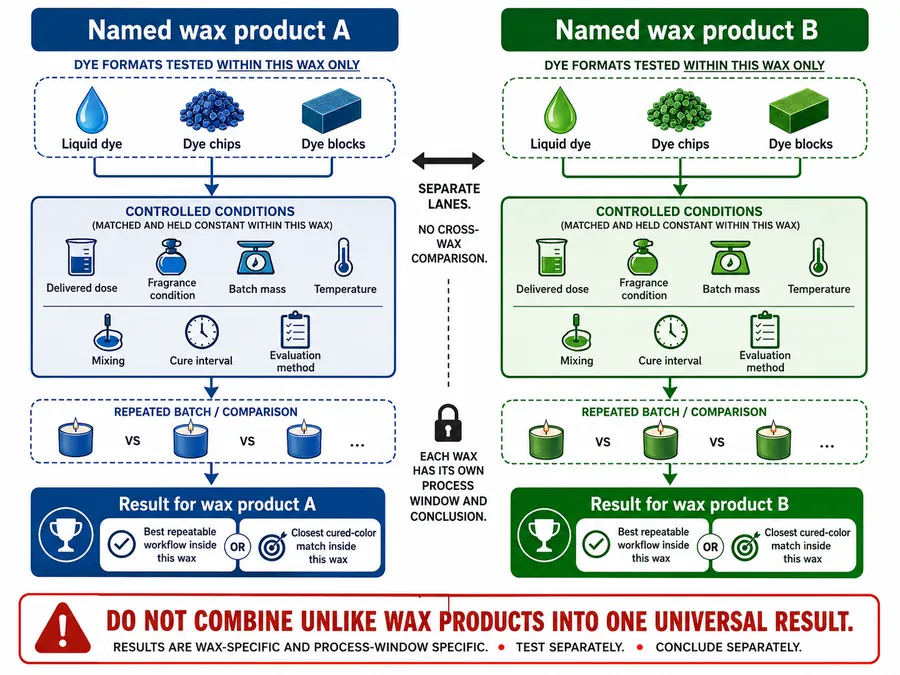
The best candle-dye format for a wax is the verified workflow that reproduces the closest cured result inside that exact tested process window.
Which Candle Dye Works Better for Small Batches Versus Production?
Verified liquid dosing often suits small batches, while calibrated liquid equipment or weighed solid portions may suit production when dosing, handling, and incorporation remain repeatable. Here, better means lower dose variation with manageable measurement, transfer, mixing, and labor at the intended batch scale. It does not mean the largest package, the most familiar method, or the most convenient handling alone.
A method that feels convenient for one small batch may become inconsistent when repeated frequently. A production method may also fail at a small scale when the target dye amount falls below the measuring device’s reliable resolution.
Relative dosing error is the dose error compared with the target dose. The same absolute measurement error represents a larger share of a small target dose than of a large one.
A small-batch method must resolve the target dye amount without excessive relative error. Liquid dye can suit small adjustments when its delivered mass or volume is verified; unverified drops do not establish an advantage.
Dye chips can suit repeated batches when whole or divided weighed portions match the target. Dye-block shavings can cover more batch sizes when each portion is weighed and transferred completely.
Production suitability depends on repeated dosing, incorporation, handling time, correction time, and transfer loss under the intended operating frequency. Package size or quick handling alone does not establish repeatability.
| Workflow scale | Measurement requirement | Liquid dye decision | Dye-chip decision | Dye-block decision |
|---|---|---|---|---|
| Small test batch | The device must resolve the small target dose without excessive relative error | Consider only when mass or volume delivery is verified | Consider when a whole or weighed portion fits the target | Consider when weighed shavings can be transferred without material loss |
| Repeated hobby or studio batch | The method must reproduce the same delivered dose across repeated batches | Compare dispenser variation, residue, and handling time | Compare piece-mass variation, measurement time, and transfer loss | Compare portioning variation, measurement time, fragments, and transfer loss |
| Production batch | The workflow must remain repeatable at the declared batch mass and operating frequency | Validate dosing equipment, mixing, residue, and labor under production conditions | Validate portion measurement, incorporation, handling, and labor under production conditions | Validate portion preparation, incorporation, transfer, and labor under production conditions |
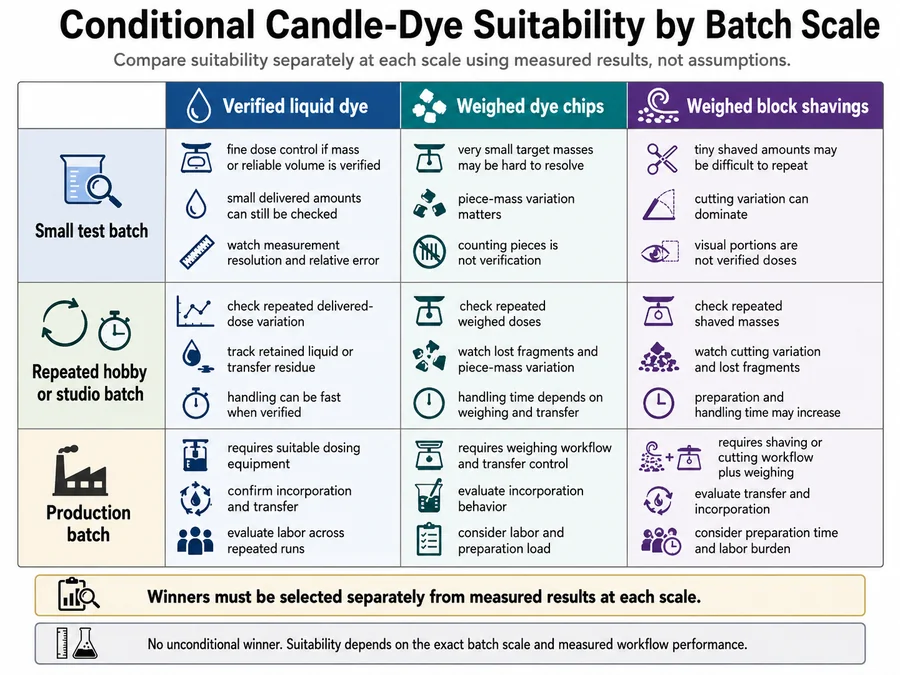
Small-batch and production winners should be selected separately from measured results because convenience at one scale does not establish repeatability at another.
How Should Candle-Dye Cost and Labor Be Compared?
Compare candle-dye formats by cost per accepted repeatable batch, not package price.
The calculation must normalize concentration, delivered dose, transfer loss, labor, corrections, rejected batches, package quantity, currency, and price date. A cheaper package can produce a higher accepted-batch cost when portioning, mixing, residue, or rework consume more material and time.
| Cost input | Required record | Why it matters |
|---|---|---|
| Currency | Currency used for every price and labor input | Prevents unlike prices from being combined |
| Price date | Exact date each price was recorded | Supplier prices and package sizes can change |
| Package price | Amount paid before shipping or other declared additions | Establishes the material-cost input |
| Package quantity | Mass or volume in the package | Converts package price into unit cost |
| Concentration | Declared strength or normalized dye-equivalent quantity | Prevents unlike dye strengths from being treated as equal |
| Delivered dose | Amount that actually enters the wax | Connects material cost to the tested batch |
| Transfer loss | Dye retained in a dispenser, vessel, cutting tool, or work surface | Accounts for material paid for but not delivered |
| Handling and mixing labor | Recorded minutes multiplied by the declared labor rate | Captures workflow effort |
| Corrections and rework | Extra dye, wax, labor, or processing used to correct a batch | Captures costs hidden by package-price comparisons |
| Acceptance rate | Accepted batches divided by attempted batches | Spreads failed-batch cost across usable output |
Transfer loss
Transfer loss is the difference between the measured amount and the amount that enters the wax. Liquid retained in a dispenser, chips left in a measurement container, and block fragments left on cutting tools all increase the material required per accepted batch.
Transfer loss should be measured separately for each workflow. A format with a low unit price may lose its material-cost advantage when repeated residue, fragments, or cross-color cleanup increase consumption.
Calculation method
Calculate material cost from normalized usable quantity and quantity consumed, then add recorded labor, corrections, and rework. Divide the total attempted-batch cost by the acceptance rate to compare the cost of usable repeatable output.
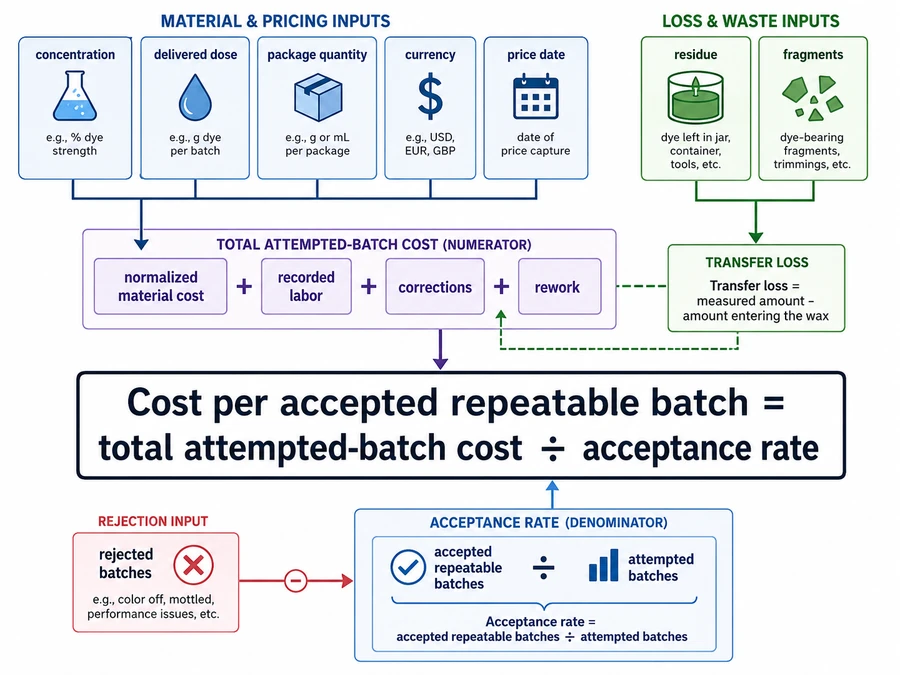
The acceptance rule must match the article’s consistency standard: the batch reproduces the declared cured shade and even dispersion within the preselected tolerance under matched conditions. This comparison does not cover tax, inventory, equipment purchases, or unrelated overhead.
The economical dye format is the verified workflow with the lowest cost per accepted repeatable batch under the maker’s actual wax, dose, batch, and production conditions.
Which Candle-Dye Format Should You Choose?
Choose the dye workflow that delivers a verified dose, incorporates completely, and reproduces the target cured shade under your tested wax and process conditions.
Liquid dye can suit workflows that need small measured adjustments, provided dispenser output and transfer loss remain controlled. Dye chips can suit repeatable solid dosing when portions are weighed rather than assumed equal by count. Dye blocks can suit workflows that weigh shavings or prepared portions consistently and account for cutting, transfer, mixing, and labor.
| Workflow condition | Conditional choice |
|---|---|
| Verified liquid delivery produces the lowest cured-shade variation | Choose the tested liquid-dye workflow |
| Weighed chips produce the lowest variation with acceptable mixing and labor | Choose the tested dye-chip workflow |
| Weighed block portions produce the lowest variation at the intended batch scale | Choose the tested dye-block workflow |
| Results change across waxes, batch sizes, or process windows | Select separately for each tested condition |
| No repeated matched-batch evidence exists | Do not declare a winner |
The most consistent option is not a physical format by itself. It is the format, measurement method, incorporation process, and control set that produce the smallest repeated cured-color variation for the intended workflow.