Choose candle holders by matching candle fit, heat-safe material, stable base, airflow, surface protection, and placement before lighting.
A candle holder is the support, socket, cup, tray, sleeve, lantern, chimney, shield, or base that keeps a candle upright, contains wax, and separates heat from nearby surfaces.
The safest holder fits the candle, resists tipping, handles heat, and keeps wax and flame away from damage-prone surfaces. Here, “safe” means lowering risks from wobble, heat transfer, wax drips, soot, poor airflow, cracked materials, drafts, and nearby combustibles. Use only holders or accessories made or labeled for burning candles; decorative objects are not candle holders unless the label or maker states they are suitable for candle use. When a candle label and a holder label give instructions, follow those labels before any general setup rule. This guide covers candle-holder sizing, materials, ventilation, surface protection, drip control, storage, and display setup, not wax formulas, scent choices, product recalls, or fire-code advice. You will use simple fit checks, placement rules, material comparisons, and holder-type tests to choose and set up each candle holder.
How to size a candle holder to the candle base
Measure the candle base and holder socket, then choose a near-snug fit that stands straight without forcing wax.
A safe candle-holder fit means the candle base sits upright in the socket, cup, or collar without leaning, rattling, or needing pressure. The National Candle Association advises using sturdy holders that will not tip over, placed on stable, heat-resistant surfaces.
| Fit check | What it means | Use it? |
|---|---|---|
| Candle will not enter the socket | Holder is too small or the taper is too wide | No |
| Candle enters only with force | Wax may shave, crack, or sit crooked | No |
| Candle stands straight with light contact | Best fit for most taper and socket-style holders | Yes |
| Candle rattles or leans | Holder is too loose | No, unless corrected safely |
| Candle sits high above the socket | Base is unsupported | No |
5-step measurement checklist
- Measure the candle base at its widest lower point.
- Measure the inside width of the holder socket.
- Set the candle in without twisting or forcing it.
- Check from two sides to see whether the candle leans.
- Gently tap the table; reject the setup if the flame line would wobble.

Methods note: Use the same unit for both measurements, either millimetres or inches. Treat the fit gap as: holder socket width minus candle base width. Because handmade tapers and decorative holders vary, the final test is upright stability, not the number alone.
Do not turn this into a full taper-size chart; the goal here is only to confirm that the chosen holder supports the candle before lighting.
How to match holders to candle types (taper, votive, tealight, pillar, jar)
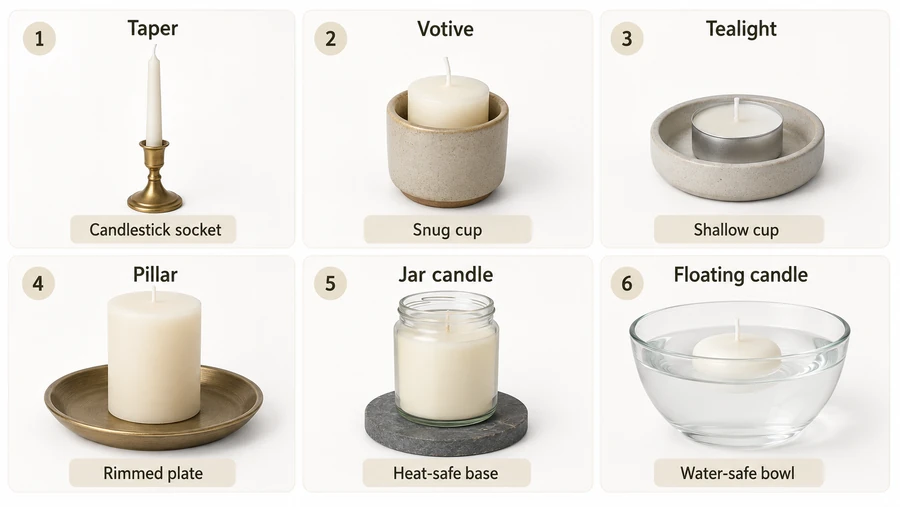
Match tapers to candlesticks, votives to snug cups, tealights to shallow cups, pillars to plates, and jars to heat-tolerant sleeves or surfaces.
The holder must match the candle’s burn shape: tapers need upright support, votives need side containment, tealights need a heat-safe base, pillars need wax-catching width, and jars need ventilation around the container. A one-size-fits-all holder can cause leaning, drowning, heat trapping, or wax overflow. Candle safety guidance also stresses using heat-resistant holders and bases for burning candles.
| Candle type | Best holder match | What the holder must control |
|---|---|---|
| Taper | Candlestick, socket, or taper holder | Upright fit and drip path |
| Votive | Votive cup | Melt pool containment |
| Tealight | Tealight cup or shallow heat-safe holder | Metal or plastic cup heat transfer |
| Pillar | Flat plate, tray, or saucer with rim | Wax spread and base stability |
| Jar candle | Heat-safe plate, trivet, or vented sleeve | Container heat and airflow |
| Floating candle | Water-safe bowl or intended floating setup | Water support and flame spacing |
Quick chooser steps
- Identify the candle type before buying the holder.
- Match the holder to the candle’s melt-pool shape.
- Check that wax has somewhere safe to collect.
- Avoid deep, tight sleeves unless the candle label allows them.
- Test the setup cold before lighting.
Methods note: Any cup-depth or diameter number should come from the candle or holder label when available. Without label data, use the physical fit, upright support, wax containment, and airflow checks above instead of guessing a universal size.
Choose the holder by candle type first, then judge style only after fit, heat, airflow, and wax control are solved.
What holder materials are safest for heat
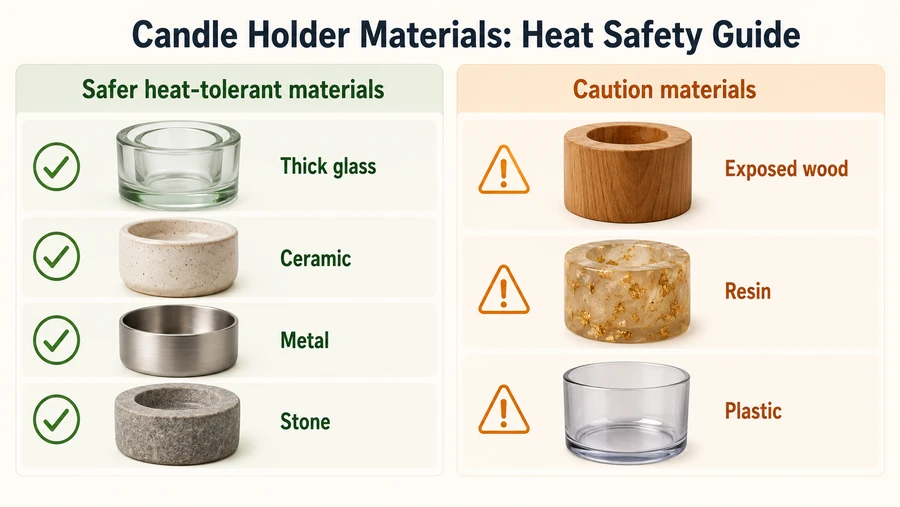
The safest candle-holder materials are non-combustible, heat-tolerant glass, ceramic, metal, and stone with intact finishes.
A holder material is safe only when it can handle flame heat, warm wax, and surface contact without softening, cracking, scorching, or shedding coating. Candle-safety guidance says holders should be sturdy, heat-resistant, and large enough to avoid heat build-up or oxygen starvation.
| Holder material | Best use | Safety check before lighting |
|---|---|---|
| Thick glass | Votives, tealights, hurricanes | No chips, cracks, thin walls, or tight heat traps |
| Ceramic | Pillars, jars, plates, decorative cups | Fully glazed or heat-safe surface, no cracks |
| Metal | Tapers, lanterns, trays, bobeches | No flaking paint, sharp wobble, or heat-sensitive coating |
| Stone or marble | Pillar plates, coasters, trays | Flat base, no slick tilt, no unstable raised feet |
| Wood | Decorative use only unless shielded by a rated insert | Keep flame and wax away from exposed wood |
| Resin or plastic | Decorative display only | Do not use near open flame unless label says candle-safe |
Borosilicate glass is heat-resistant glass made to tolerate temperature changes better than ordinary glass. Thermal shock means cracking caused by sudden temperature change, such as hot glass touching cold water.
Quick material filter
- Choose non-combustible material first.
- Check that the surface coating is intact.
- Reject holders with cracks, flakes, bubbles, or soft inserts.
- Avoid unknown novelty materials near open flame.
- Use the candle label if it gives holder limits.
Methods note: Treat “heat-safe” as a use claim from the product label, not a guess from appearance. If the holder has no material notes, no candle-use claim, and no heat-safe base, use it only for unlit display.
The best material is not always the heaviest one. The safer choice is the holder that combines heat tolerance, intact finish, correct candle fit, and stable support.
Steps to assess holder stability and tip resistance
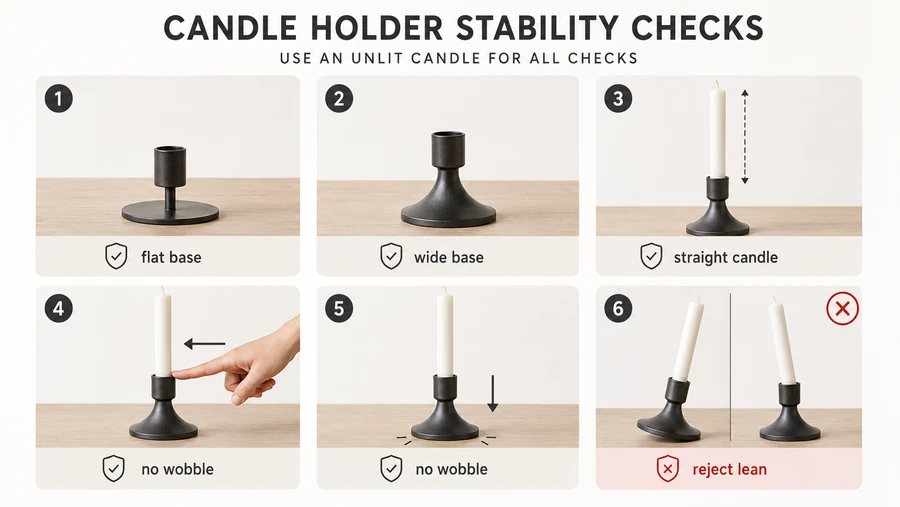
Test candle-holder stability by checking base width, weight, level contact, candle fit, and wobble before lighting.
Tip resistance means the holder resists falling when bumped, tilted slightly, or placed on a normal table surface. The National Candle Association advises using sturdy holders that will not tip over easily and placing candles on stable, heat-resistant surfaces.
7-step stability test
- Put the empty holder on a flat, hard surface.
- Press each side lightly to check for rocking.
- Insert the candle and confirm it stands straight.
- Compare candle height with base spread; tall candles need wider support.
- Tap the table gently and watch for wobble.
- Move the setup away from edges, pets, kids, and traffic paths.
- Reject the holder if it leans, slides, rings, or tips during the cold test.
| Stability problem | What it suggests | Safer correction |
|---|---|---|
| Holder rocks when empty | Uneven base or warped feet | Use a different holder |
| Candle leans in socket | Loose or mismatched fit | Choose a better-size holder |
| Tall taper sways | Base is too narrow for height | Use a heavier, wider candlestick |
| Holder slides easily | Slick base or slick surface | Add a non-flammable mat |
| Candle sits off-centre | Poor cup shape or uneven wax base | Re-seat or change holder |
| Clustered holders bump each other | Display is too tight | Spread the arrangement |
Methods note: A simple comparison helps: candle height divided by holder base width. A higher result means more tip risk, especially for tall tapers. Use the number only as a warning signal; the cold wobble test decides whether the setup is usable.
Do not fix a bad fit with paper, cloth, tape, or melted wax near the flame path. Use a holder that fits without combustible shims.
How much heat clearance and ventilation you need
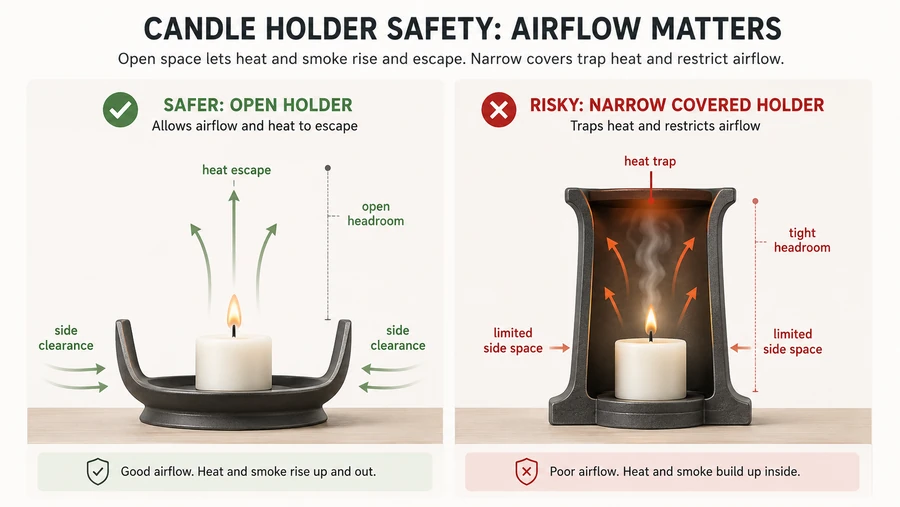
Choose a candle-holder setup with open space above and around the flame so heat can rise and air can feed the burn without trapping heat.
Heat clearance means empty space between the flame, holder walls, shades, shelves, curtains, and nearby décor. Ventilation means the holder allows enough air to reach the flame and enough heat to leave. A cramped holder can darken glass, raise surface temperature, deform wax, or make the candle smoke.
| Setup detail | Safer choice | Riskier choice |
|---|---|---|
| Space above flame | Open top or tall vented shade | Low shelf, closed lid, or narrow cap |
| Side space | Flame not touching holder walls | Flame close to glass, metal, or décor |
| Holder opening | Wide enough for heat to rise | Necked-in top that traps heat |
| Shade or chimney | Vented at top and bottom | Enclosed glass with poor airflow |
| Jar sleeve | Loose, vented sleeve | Tight sleeve hugging the hot jar |
| Nearby décor | Empty air gap | Dried flowers, ribbon, paper, greenery |
4-step clearance check
- Look straight down: the flame should not sit under a lid, shelf, or low shade.
- Look from the side: the flame should not touch glass, metal, or décor.
- Check the top: heat needs a clear upward path.
- Check after 10–15 minutes: stop use if glass darkens fast, wax overheats, or the holder becomes unsafe to touch.
Methods note: Use the candle label first if it gives clearance or holder rules. Without label data, judge the flame path: heat rises upward, so anything directly above or tightly around the flame carries the highest risk.
Good ventilation does not mean placing the candle in a draft. The safer setup gives the flame still air, open headroom, and no heat trap.
How to protect surfaces from heat and wax
Set candle holders on non-flammable, heat-resistant mats, trays, saucers, or coasters that catch wax and block heat transfer.
Surface protection matters because candle heat and melted wax can damage wood, varnish, fabric, plastic, stone sealers, and painted finishes. A holder that looks stable can still conduct heat downward or let wax escape beyond its base.
| Surface | Main risk | Better protection |
|---|---|---|
| Wood table | Heat mark, wax stain, finish damage | Stone, ceramic, or metal coaster |
| Tablecloth | Scorching and wax soaking | Remove cloth or use a wide non-flammable tray |
| Plastic shelf | Softening or warping | Do not burn candles on it |
| Painted furniture | Staining and heat imprint | Wide saucer over a heat-safe mat |
| Marble or stone | Wax staining or sealer damage | Tray with raised rim |
| Bathroom counter | Heat ring, residue, slick base | Flat coaster with grip and rim |
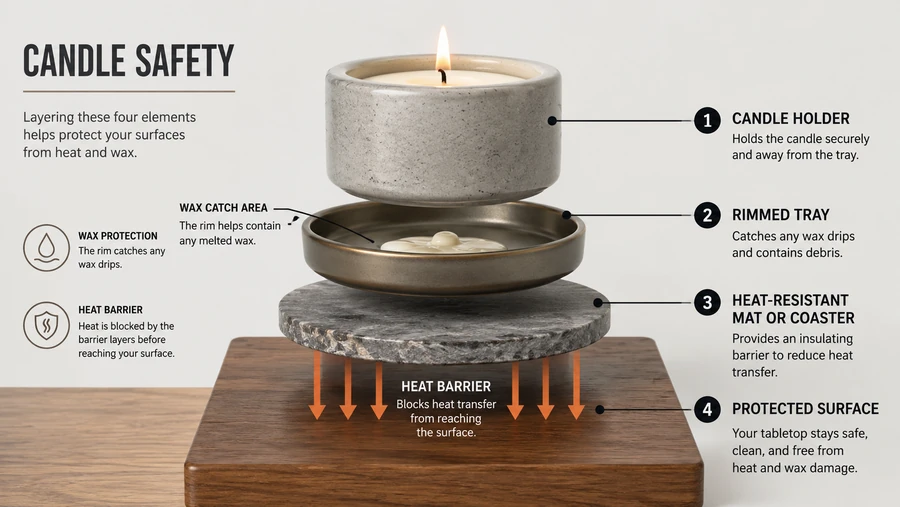
Surface-protection steps
- Choose a base wider than the candle holder.
- Use a non-flammable material such as ceramic, stone, glass, or metal.
- Prefer a rim if the candle can drip or pool wax.
- Keep the setup flat; a raised rim should not tilt the holder.
- Check the surface below during the first burn.
- Remove hardened wax with a dull scraper after the holder cools.
Methods note: A coaster protects only the area it covers. For pillar candles, wide tapers, and grouped displays, size the tray for the likely wax spread, not just the holder footprint.
Do not rely on napkins, paper plates, cardboard, fabric runners, or thin decorative placemats under burning candles. They add fuel near the flame instead of lowering risk.
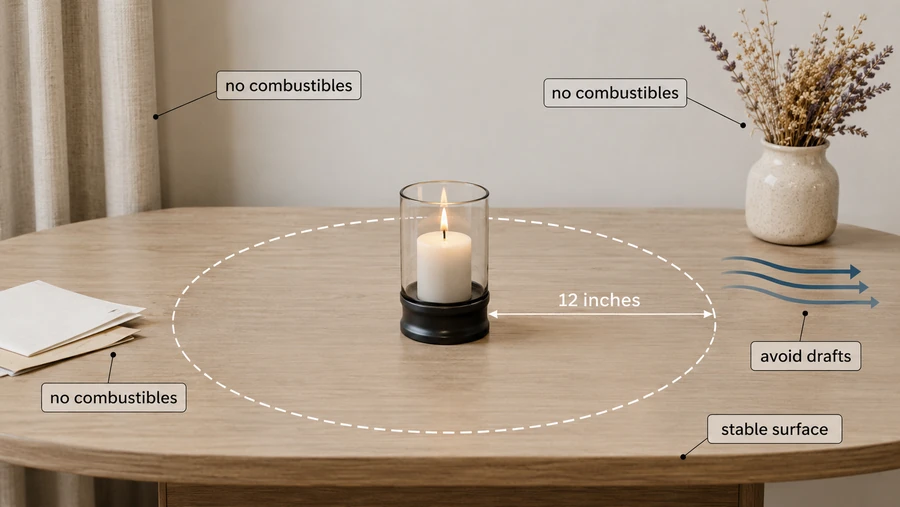
How to place holders away from drafts and combustibles
Place candle holders at least 12 inches from anything that can burn, and keep them out of drafts, vents, windows, and traffic paths.
A holder can be heat-safe and still unsafe if the flame sits near curtains, paper, bedding, dried flowers, shelves, or moving air. The National Candle Association and U.S. Fire Administration both state that candles should stay at least 12 inches from burnable materials, and the U.S. Fire Administration says lit candles should be in stable holders where they cannot be knocked down.
| Placement risk | Why it matters | Safer setup |
|---|---|---|
| Curtains or blinds | Fabric can move into the flame | Keep the holder away from windows |
| Books, cards, paper | Paper ignites easily near flame | Clear the area around the holder |
| Dried flowers or greenery | Décor can catch or shed into wax | Use non-flammable décor nearby |
| HVAC vent or fan | Moving air can flare or bend the flame | Move the holder out of airflow |
| Table edge | Holder can be bumped down | Place it deeper on the surface |
| Pet or child zone | The holder can be knocked over | Use a higher, supervised surface |
Placement steps
- Clear a 12-inch no-burn zone around the flame.
- Move the holder away from curtains, shelves, paper, fabric, and décor.
- Check nearby vents, fans, open windows, and doorways.
- Place the holder on a flat, uncluttered, heat-resistant surface.
- Keep the setup out of reach of children and pets.
- Extinguish the candle before leaving the room.
Methods note: Measure the safety zone from the flame area, not only from the holder base. For tall tapers and raised centerpieces, check the flame height against nearby objects at the same level.
A draft guard can help in mild airflow, but it does not make a bad location safe. Move the candle first; use shielding only after the placement is clear.
When to use hurricanes, lanterns, and glass chimneys
Use hurricanes, lanterns, and glass chimneys when you need flame shielding, but choose vented designs that do not trap heat.
A hurricane is a tall glass shield around a candle. A lantern encloses the candle inside a frame. A glass chimney is a tube that guides airflow around a flame. These holders can reduce contact with mild drafts, but closed or narrow designs can overheat the candle, stain glass, or starve the flame of air.
| Holder type | Best use | Avoid when |
|---|---|---|
| Hurricane | Indoor tables, mild drafts, pillar display | The glass is narrow, cracked, or too close to flame |
| Lantern | Patio tables, protected outdoor use, handled setup before lighting | It has no vents or unstable hanging hardware |
| Glass chimney | Tapers or specialty holders that need guided airflow | The candle label forbids enclosed holders |
| Open holder | Still indoor rooms with no draft | Airflow or décor contact is a concern |

How to choose a shielded holder
- Check that the candle type is allowed inside the holder.
- Look for air entry near the lower area and heat exit at the top.
- Keep flame away from glass walls and metal caps.
- Choose a wide, heavy base for tall glass.
- Stop use if the glass soots quickly, rattles, or becomes heat-stressed.
Methods note: Shielded holders need two things at the same time: flame protection and heat escape. If the design blocks the side draft but traps heat above the flame, it solves one problem and creates another.
Do not carry a lantern while the candle is burning or while wax is liquid. Set it up cold, light it in place, and let it cool before moving.
How to choose holders for outdoor and windy settings
Choose outdoor candle holders with a wide base, wind shielding, heat-safe material, and vents that let heat escape upward.
Outdoor settings add moving air, uneven surfaces, moisture, and more chances for a holder to be bumped. The safer holder shields the flame without sealing it inside a hot chamber, and it stays level on patio tables, stone, deck boards, or serving trays.
| Outdoor condition | Better holder choice | Avoid |
|---|---|---|
| Light breeze | Hurricane or vented lantern | Open taper holder |
| Uneven table | Low, wide holder | Tall narrow candlestick |
| Patio dining | Weighted lantern or pillar tray | Loose holder near plates and sleeves |
| Deck or balcony | Non-flammable tray under holder | Bare wood under flame or wax |
| Damp evening | Metal, glass, ceramic, or stone | Paper, wicker, resin, or soft coatings near flame |
| Buggy area | Covered lantern with vents | Candle placed under fabric canopy |
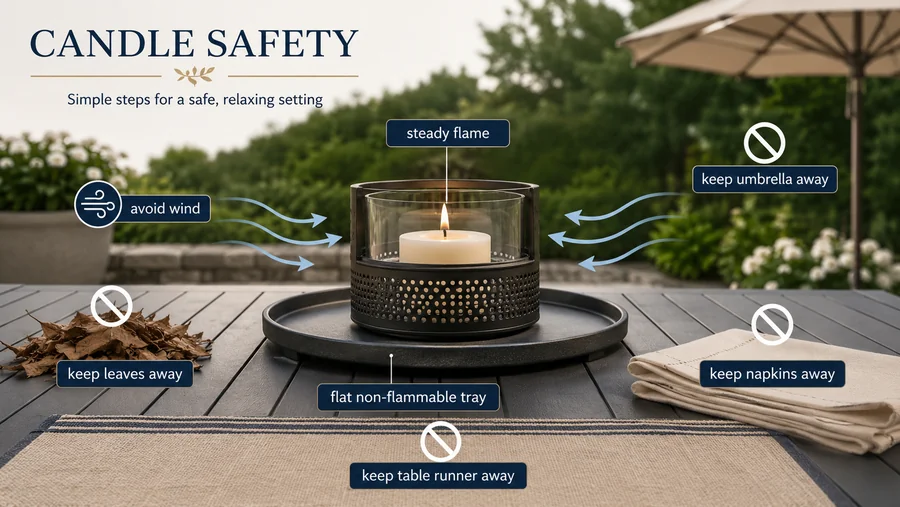
Outdoor setup steps
- Choose a low, wide holder before choosing a tall design.
- Place it on a flat, non-flammable tray or coaster.
- Check that wind cannot push the flame into glass, décor, or the holder wall.
- Keep the holder away from umbrellas, awnings, dry leaves, napkins, and table runners.
- Extinguish the candle if the flame bends, flares, smokes, or touches the holder.
- Let wax cool before moving the holder indoors.
Methods note: Watch the flame during the first few minutes. A steady upright flame suggests the holder location is workable. A flame that leans, pulses, or darkens the glass means the setup needs less wind, more space, or a different holder.
Outdoor candle holders are not storm gear. Use battery candles when wind, crowding, hanging décor, or dry vegetation makes an open flame hard to control.
How to choose drip trays, bobeches, and saucers
Choose drip trays, bobeches, and saucers that extend beyond the candle’s wax path and stay heat-safe under the holder.
A bobeche is a ring or small dish that sits around a taper candle to catch drips. A drip tray or saucer sits under a candle or holder to catch wax, ash, and residue. The right catcher protects the surface without making the candle unstable.
| Wax-control item | Best match | Main safety check |
|---|---|---|
| Bobeche | Taper candles | Must sit level and not crowd the flame |
| Rimmed saucer | Pillars and votives | Rim must catch wax without tilting the candle |
| Flat tray | Jar candles and grouped holders | Tray must be heat-safe and wide enough |
| Charger plate | Centerpieces | Material must be non-flammable |
| Glass drip plate | Decorative tapers | Thick glass, no cracks, stable surface |
| Metal tray | Outdoor or clustered setups | No flaking paint or heat-sensitive lining |
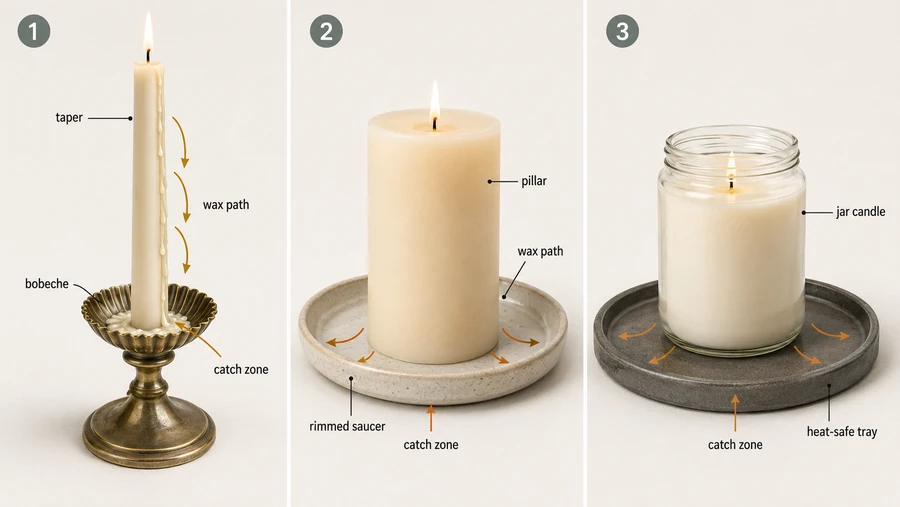
Selection steps
- Identify where wax will fall: down the taper, around the pillar, or under the jar.
- Choose a catcher wider than that wax path.
- Use ceramic, metal, thick glass, or stone.
- Check that the catcher does not make the holder wobble.
- Avoid paper, cardboard, thin fabric, or painted craft trays near flame.
- Clean wax only after the holder and catcher have cooled.
Methods note: Judge wax control by overflow direction, not only by candle width. A taper needs drip interception near the stem, while a pillar needs a base that can hold melted wax if the side wall breaks.
A drip catcher is backup protection, not permission to burn a poor-quality candle in a weak holder. If wax escapes fast, tunnels sideways, or floods the tray, extinguish the candle and change the setup.
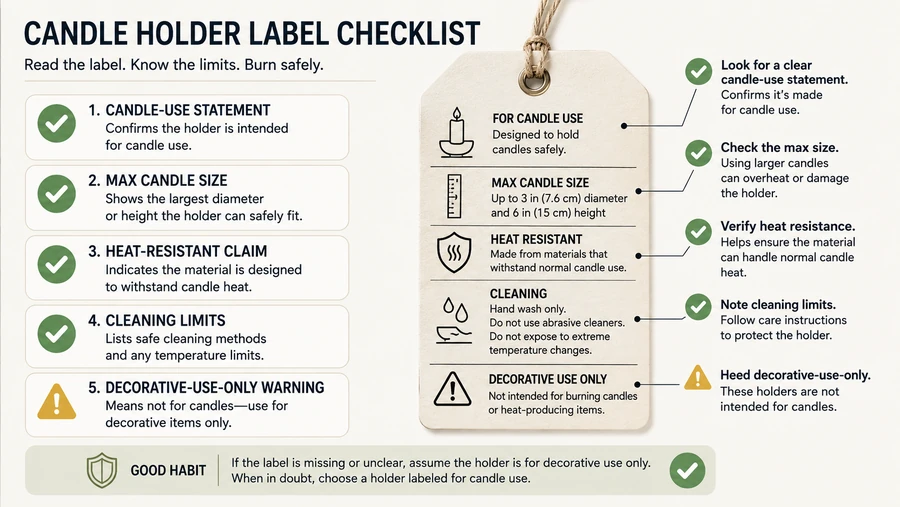
How to verify label warnings and heat ratings
Read the holder label before lighting, then follow its maximum candle size, material limits, cleaning rules, and candle-use warnings.
Holder warnings tell you whether the item is made for burning candles or only for display. U.S. CPSC guidance lists ASTM standards for candle fire-safety labeling, candle fire safety, and candle accessories; the National Candle Association notes that candle accessories include candle holders.
| Label phrase or symbol | What it means for holder choice | What to do |
|---|---|---|
| “For decorative use only” | Not approved for burning | Do not light a candle in it |
| “Max candle size” | Holder has a size limit | Use only candles within that limit |
| “Heat-resistant” | Material is intended to handle heat | Still check fit, airflow, and surface protection |
| “Hand wash only” | Finish or material may be sensitive | Avoid dishwasher heat and harsh cleaning |
| “Dishwasher safe” | Cleaning tolerance, not flame approval | Do not treat it as a burn-safety claim |
| Coated, painted, or plated finish | Finish may react to heat or abrasion | Check for flakes, bubbles, and discoloration |
Label-check steps
- Look for a candle-use statement, not only décor wording.
- Match the candle diameter, height, and type to the stated limit.
- Check whether the holder needs a heat-safe base underneath.
- Read cleaning limits before the first burn.
- Keep a photo of the label if the holder will be stored without packaging.
- Reject any holder with missing warnings when the material, coating, or candle fit is uncertain.
Methods note: Do not infer flame safety from cleaning claims. “Dishwasher safe” means the item can tolerate a washing condition; it does not prove the holder is suitable for an open flame, a deep melt pool, or a hot candle container.
A label is not a substitute for a cold setup test. Use the label to set the limits, then confirm the holder is level, stable, vented, and protected underneath.
How to pair holders with wood-wick and metal-core candles
Pair wood-wick and metal-core candles with holders that leave open headroom, side clearance, stable support, and label-matched heat escape.
Wood-wick candles can produce a broader flame line than a thin cotton wick, so the holder should not crowd the top, sides, sleeve, or shade. For metal-core wicks, the holder decision is label-based: use current, clearly labeled candles from a traceable source. CPSC states that metal-cored candlewicks and candles using them must not contain lead above 0.06% by weight under 16 CFR § 1500.17(a)(13).
| Candle feature | Holder implication | Reject condition |
|---|---|---|
| Wood wick | Needs open headroom and side clearance | Tight sleeve, low cap, or narrow chimney |
| Crackling wood wick | Needs a holder or tray that contains small residue | Dried décor, ribbon, paper, or greenery below the flame |
| Metal-core wick | Needs current label information and traceable sourcing | Unlabeled, older, or uncertain candle source |
| Tall flame | Needs more distance from shade rims and holder walls | Flame touching glass, metal, décor, or a low cover |
Holder-only pairing steps
- Read the candle label for wick type, burn-time limit, and holder warnings.
- Use open or vented holders for wood-wick candles.
- Keep the flame away from glass walls, metal caps, dried décor, and shade rims.
- Stop the burn if the flame grows tall, smokes, bends into the holder, or heats the container unevenly.
Methods note: Judge wick-holder pairing by flame footprint, not wick name alone. A wider or hotter-looking flame needs more open space above it and less enclosure around it.
Do not hide a wood-wick or metal-core candle inside a tight decorative sleeve unless the candle and holder labels allow that combination. The safer pairing gives the flame room, contains residue, and lets heat leave.
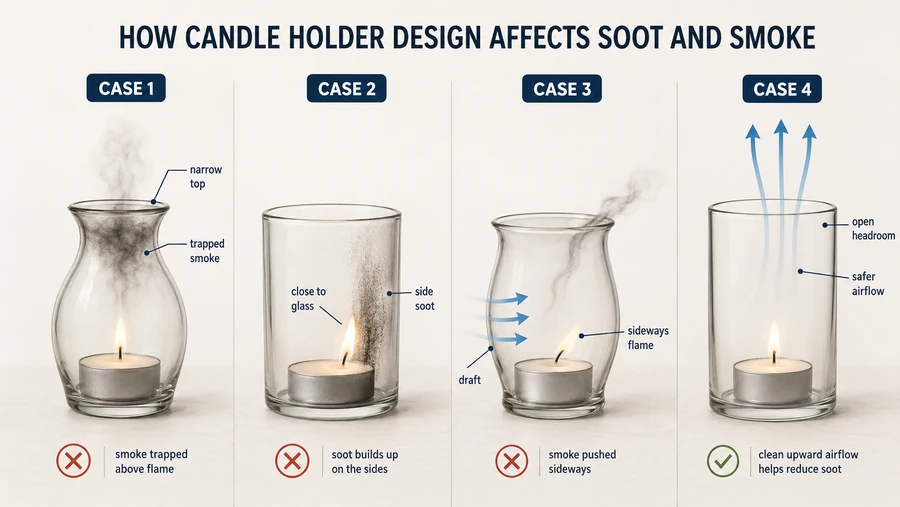
How holder design affects soot and smoke
Holder design affects soot and smoke by changing airflow, flame clearance, heat build-up, and how close the flame sits to glass or metal.
Soot and smoke are holder-selection warnings when marks appear near glass, caps, sleeves, or one side of a shield. Use this section only to reject or adjust the holder setup; wick trimming, wax composition, and burn-time causes belong to separate burn troubleshooting.
| Holder design issue | What it can cause | Better choice |
|---|---|---|
| Narrow top opening | Heat and smoke collect near the flame | Wider or vented top |
| Flame close to glass | Soot staining and hot spots | Larger holder or shorter candle |
| Deep unvented sleeve | Poor airflow and heat build-up | Vented sleeve or open tray |
| Draft-exposed holder | Flicker, uneven burn, smoke | Move holder or use vented hurricane |
| Low metal cap or shade | Heat reflection toward wax | Higher shade or open holder |
| Crowded décor around flame | Dirty burn and ignition risk | Clear space around the holder |
Holder-related smoke checks
- Check that the flame does not touch holder walls, shade edges, or a narrow top.
- Move the holder away from vents, fans, open windows, and moving air.
- Use holders with open headroom above the flame.
- Extinguish the candle if soot, smoke, or dark glass appears quickly, then change the holder or location before relighting.
Methods note: Diagnose holder-related soot by looking at where the marks appear. Soot concentrated on one side often points to draft or off-centre flame contact; soot around a narrow top often points to poor venting.
Do not solve smoke by hiding the candle deeper in a decorative sleeve. The cleaner fix is more airflow, better clearance, correct wick length, and a holder that does not crowd the flame.
How to choose holders for wide or multi-wick candles
Choose holders for wide or multi-wick candles by giving the candle a broad, level, heat-safe base with open airflow.
Wide candles and multi-wick candles create more flame points, more melted wax, and more heat across the holder area than a small single-wick candle. Use a sturdy holder on a stable, heat-resistant surface, which aligns with general candle-safety guidance for holder and surface choice.
| Candle setup | Holder need | Avoid |
|---|---|---|
| Wide pillar | Broad saucer or tray with rim | Small plate that exposes wax edges |
| 2-wick jar | Heat-safe base under the container | Tight decorative sleeve |
| 3-wick candle | Open top and wide surface support | Low cover or narrow chimney |
| Oval or irregular candle | Tray that supports the full footprint | Round holder that leaves corners unsupported |
| Multi-wick centerpiece | Spacing between holders and décor | Crowded flowers, paper, or fabric |
| Large wax pool | Rimmed tray or saucer | Flat décor plate with no spill control |
Selection steps
- Measure the full candle footprint, not just the jar bottom.
- Choose a holder or tray wider than the candle.
- Use ceramic, metal, stone, or thick glass.
- Keep the top open so heat can rise.
- Leave space between the flame area and holder walls.
- Stop the burn if one wick flares, the wax pool shifts, or the holder becomes too hot for its setting.
Methods note: Treat each wick as a separate heat source. The holder must handle the combined flame area, wax pool, and container temperature, not just the candle’s outside diameter.
Do not put a wide or multi-wick candle into a snug decorative bowl unless the label allows that setup. A broad, open tray is usually safer than a tight holder that traps heat around several flames.
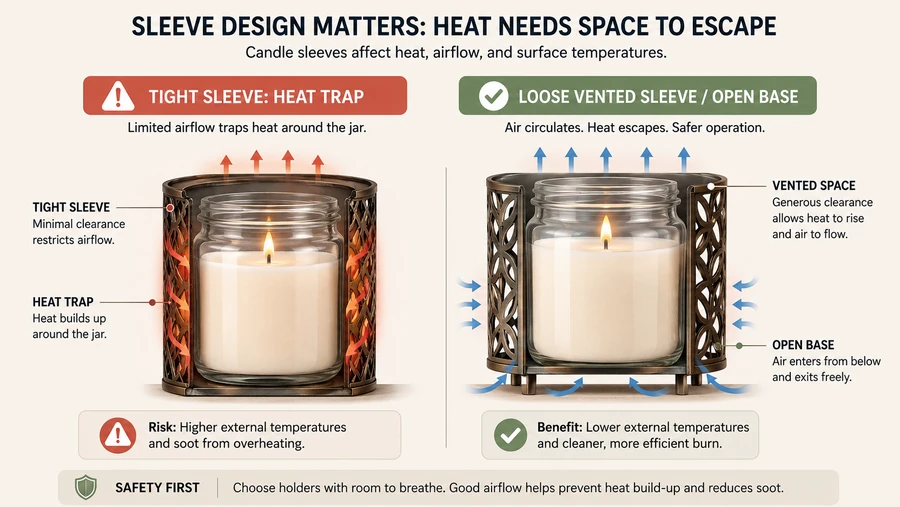
How to prevent tunneling/overheating with snug holders
Reduce holder-related tunneling and overheating risk by avoiding sleeves, bowls, or cups that squeeze the candle, trap heat, or block an even melt pool.
A snug holder can be safe for a taper socket, but risky for jars, pillars, and container candles when it traps heat around the wax or glass. Tunneling means wax burns down the middle while hard wax remains around the sides. This page covers tunneling only when the holder blocks airflow, squeezes the candle, or traps heat.
| Snug-holder problem | What it can cause | Safer correction |
|---|---|---|
| Tight jar sleeve | Heat builds around the container | Use a loose, vented sleeve or open base |
| Narrow pillar cup | Wax wall softens unevenly | Use a wider plate or saucer |
| Deep decorative bowl | Heat and smoke collect | Choose an open tray |
| Holder blocks wax edge | Uneven melt pool | Use a holder that supports without squeezing |
| Candle label forbids enclosed use | Fire and glass-break risk | Follow the label and change holder |
| Holder gets too hot | Surface damage or material stress | Extinguish, cool, and switch setup |
Holder-related checks
- Check whether the holder touches the candle sides tightly.
- Read the candle label for enclosure or sleeve warnings.
- Use open holders for pillars, wide candles, and jar candles unless the label allows enclosure.
- Stop the burn if the holder smokes, darkens, smells hot, or overheats.
Methods note: A close fit is useful only where support is the goal, such as a taper base in a socket. For candles that create a wide melt pool or heat a glass container, the holder should support the candle without acting like insulation.
Do not fix tunneling by moving a hot candle into another holder mid-burn. Extinguish it, let the wax harden, then choose a holder that gives the candle more room and airflow.
How to clean and maintain glass and metal holders safely
Clean candle holders only after they cool, using gentle wax removal, non-abrasive tools, and care methods that match the holder material.
Cleaning matters for holder safety when residue, scratches, cracks, flaking coatings, or warped bases change how the holder handles the next burn. Keep this check focused on whether the holder remains safe to use, not on full stain removal or polishing methods.
| Holder condition | Why it matters | Action before reuse |
|---|---|---|
| Leftover wax | Can feed a messy flame path or hide cracks | Cool fully, loosen gently, and remove residue |
| Soot film on glass | Can hide heat stress and darken faster next burn | Wipe gently with a soft cloth |
| Chip or hairline crack | Heat can spread the break | Retire the holder |
| Flaking metal finish | Coating can shed near wax or flame | Stop using it for burning candles |
| Damp metal or seams | Moisture can support rust or weak joints | Dry fully before storage |
| Warped or rocking base | Holder may tip during the next burn | Use a different holder |
Maintenance checks
- Extinguish the candle and let the holder cool fully.
- Remove loose wax with a dull, non-scratch tool.
- Check for cracks, chips, warped bases, loose seams, and coating flakes.
- Dry metal holders before storage.
- Retire holders that rock, crack, shed finish, or show heat damage.
Methods note: Clean by material, not by candle type. A glass votive cup, metal taper holder, and painted lantern can hold similar wax residue but need different pressure, temperature, and cleaning products.
Do not pour boiling water into a cold glass holder or rinse a hot holder under cold water. Sudden temperature change can crack glass and make the next burn less predictable.
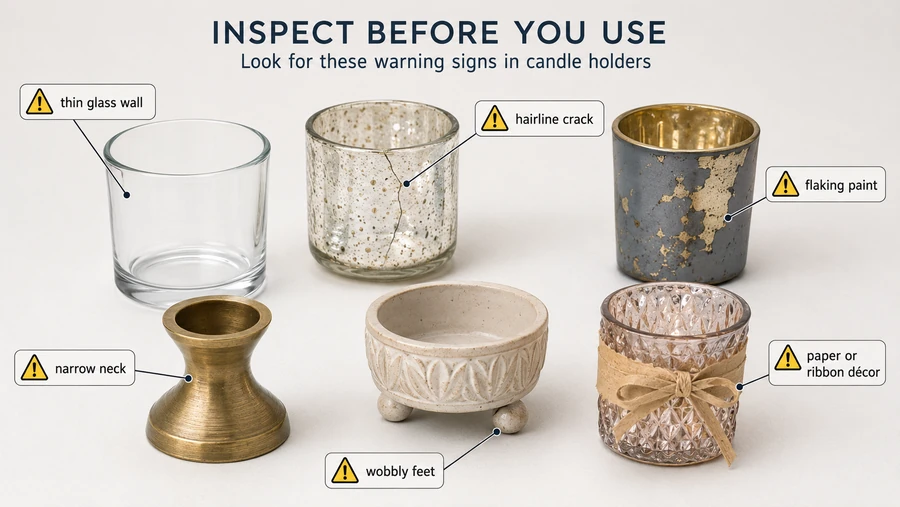
How to spot unsafe designs (thin glass, flaking paint, coatings)
Reject candle holders with thin glass, cracks, unstable bases, flaking paint, soft coatings, or decorative parts near the flame.
Unsafe holder design usually shows up before lighting if you inspect the material, finish, base, and flame path. The biggest warning signs are weak glass, loose seams, peeling finish, uneven feet, narrow openings, and décor that can heat, melt, shed, or burn.
| Unsafe design sign | Why it matters | Safer choice |
|---|---|---|
| Thin glass wall | Can heat unevenly or crack | Thick glass made for candle use |
| Chip or hairline crack | Heat can spread the break | Retire the holder |
| Flaking paint | Coating can contaminate wax or expose weak finish | Uncoated or intact heat-safe finish |
| Narrow neck | Can trap heat and soot | Wider, vented opening |
| Wobbly feet | Holder may tip during burn | Flat, level base |
| Attached ribbon, paper, or dried décor | Can burn or drop into wax | Keep décor away from flame area |
Inspection steps
- Hold the empty holder under bright light.
- Look for cracks, chips, bubbles, seams, and uneven glass thickness.
- Rub painted or coated areas with a dry cloth; reject flakes or powdery residue.
- Set the holder on a flat surface and check for rocking.
- Place the candle inside without lighting and confirm the flame path is clear.
- Retire the holder if heat damage appears after a previous burn.
Methods note: Judge safety by the whole design, not the material name alone. A glass holder can be unsafe if it is thin or cracked, and a metal holder can be unsafe if its coating flakes near the flame.
Do not use vintage, novelty, or handmade holders for burning unless they are clearly intended for candle use and pass the fit, stability, finish, and heat-path checks.
How to choose non-flammable mats and coasters
Choose non-flammable mats and coasters made from ceramic, stone, metal, thick glass, or other heat-safe materials with a stable, level surface.
A mat or coaster protects the surface under the holder only when it resists heat, stays flat, and extends beyond the holder footprint. It should not add paper, fabric, cork dust, soft plastic, loose fibres, or unstable raised edges near a burning candle.
| Mat or coaster material | Better use | Watch for |
|---|---|---|
| Ceramic tile or coaster | Jars, pillars, votives, tealights | Glaze cracks or uneven base |
| Stone slab | Pillars, grouped holders, heavy jars | Wax staining on porous stone |
| Metal tray | Outdoor holders and clusters | Hot edges and flaking paint |
| Thick glass plate | Decorative indoor setups | Chips or thermal shock risk |
| Silicone trivet | Only if label supports candle heat use | Softening, odour, or warping |
| Fabric, paper, thin cork, plastic | Not for burning candles | Adds fuel or can deform |
Choosing steps
- Match the coaster to the holder size, not only the candle size.
- Pick a non-flammable material with a flat base.
- Use a larger tray for pillars, tapers, or grouped holders.
- Check that raised rims do not tilt the holder.
- Keep the mat dry, clean, and free from loose fibres.
- Stop using it if it scorches, warps, smells hot, cracks, or sheds coating.
Methods note: Size the mat for heat and wax spread. A jar candle may need heat protection under the container, while a taper may need a wider tray to catch falling wax.
Do not place burning candles on paper doilies, cloth runners, napkins, cardboard, plastic placemats, or thin decorative craft boards. They may look protective, but they can add burn risk.
How to store holders to avoid cracks and thermal shock
Store candle holders clean, dry, separated, and fully cooled so glass, ceramic, coatings, and metal parts do not crack or weaken before the next burn.
Thermal shock is damage from sudden temperature change, such as hot glass meeting cold water or cold stone. Storage belongs on this page only where it prevents hidden holder damage that could affect the next safe burn.
| Storage issue | What it can cause | Better storage choice |
|---|---|---|
| Stacking glass holders tightly | Chips, pressure cracks, rim damage | Separate with soft dividers |
| Storing while warm | Moisture marks, stress, warped finishes | Cool fully before storage |
| Leaving wax residue | Sticky dust or hidden damage | Clean before storing |
| Damp storage | Rust, tarnish, mouldy residue, weak coatings | Dry holders fully |
| Outdoor storage | Moisture, dirt, coating breakdown | Bring holders indoors when not in use |
Storage checks
- Let the holder cool fully after use.
- Remove wax and soot before long storage.
- Dry metal, glass, and ceramic pieces completely.
- Inspect for cracks, chips, wobble, and coating damage before the next burn.
Methods note: Store by material and fragility, not by decoration style. A thick stone saucer can handle stacking better than a thin glass votive cup, even if both are used for the same candle size.
Do not rinse hot glass, place warm holders on cold stone, or move outdoor holders straight from cold storage into a hot burn setup. Let the holder return to room temperature first.
How to set up centerpieces and clustered displays safely
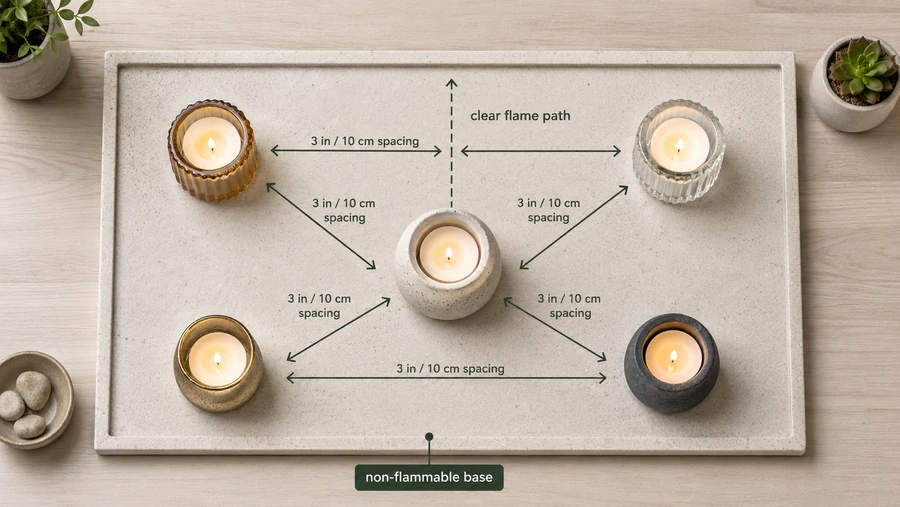
Set up candle centerpieces by spacing each holder, clearing burnable décor, using a wide heat-safe base, and keeping every flame visible and reachable.
Clustered displays create shared heat, shared wax spill risk, and more ways for décor to touch a flame. The safest centerpiece uses fewer candles, stable holders, non-flammable trays, and enough open space for airflow, cleaning, and quick extinguishing.
Use the candle or holder label first for spacing. If no label gives a spacing rule, keep burning candles at least 3 inches apart; use about 10 cm when following metric candle-safety guidance.
| Centerpiece detail | Safer choice | Avoid |
|---|---|---|
| Holder spacing | Gaps between holders and flames | Holders touching or leaning into each other |
| Base | Wide ceramic, stone, metal, or thick glass tray | Fabric runner, paper charger, or plastic tray |
| Décor | Stones, ceramic pieces, glass beads kept below flame line | Dried flowers, ribbon, paper tags, loose greenery |
| Flame height | All flames visible from seated height | Hidden flames inside dense décor |
| Access | Clear path to snuffer or extinguisher method | Candles buried in the arrangement |
| Table setting | Away from sleeves, napkins, menus, and place cards | Flame near guest movement or loose linens |
Centerpiece setup steps
- Build the display on a wide, non-flammable base.
- Place the tallest holders first and check for tipping.
- Keep flames away from décor, napkins, sleeves, cards, and serving pieces.
- Leave airflow between holders instead of packing them tightly.
- Test sight lines so every flame remains visible.
- Keep a snuffer nearby and extinguish candles before moving the display.
Methods note: Plan the cluster around flame paths, not around symmetry. A display can look balanced while one taper sits too close to greenery, a shade rim, or a guest’s sleeve.
For décor, choose color and style after the safety layout is set. Seasonal colors, glass beads, ceramic accents, and metal trays can support the look without adding burnable material near the flame.