
If a candle burns too hot or unevenly, trim the wick, remove drafts, re-center the wick, and retest one change at a time before you change the wax or container.
A tall flame, soot, and an overheated container usually mean the candle is being over-fed by the wick or disturbed by airflow. Uneven burns, like tunneling, one-sided melt pools, or thick wax hang-up, usually come from wick centering, drafts, jar geometry, or a first burn that ended too early. The fastest route to a stable candle is to repeat the same timed test while changing one variable at a time. If the candle behaves unsafely, stop the burn and correct the setup instead of pushing the session longer.
Diagnose a Candle That Burns Too Hot
Stop the burn, cool the candle fully, then check wick length, drafts, centering, and melt-pool behavior to identify why the candle is running hot.
A hot candle is rarely caused by one thing alone. It is usually a pattern: tall flame, soot, fast melt, and a deep melt pool early in the session. Start by eliminating the most common false positives, like a long wick and drafts, then decide whether the wick is simply too large or the candle is over-fueled.
If heat and soot continue after trimming and removing drafts, fragrance load or additives can keep feeding the flame more aggressively. Treat that as a one-variable test branch, not a reason to change wick, jar, and formula at the same time.
Do this first before any longer retest: extinguish any candle with a very tall flame, heavy soot, or overheating glass, let it cool fully, trim the wick, move it out of drafts, and stop using any cracked, chipped, or visibly heat-stressed container.
For the broader placement, burn-habit, and hazard checks around hot glass and open flame, see the full guide to candle safety and compliance.
Fast diagnosis ladder
Do these in order:
- Safety stop check
If the flame is unusually tall, smoking heavily, or pushed into the jar wall, extinguish the candle and let it cool completely. - Trim and debris check
Trim the wick to 3 to 5 mm, about 1/8 to 3/16 inch, and remove wick crumbs so you do not add extra fuel. Many care labels use about 1/4 inch, around 6 mm, as a general trim point before each burn. If your candle runs hot or sooty, the slightly shorter trim here is a troubleshooting adjustment, not a universal rule. - Draft check
Move the candle away from windows, fans, and air vents. Drafts can cause high flames, soot, and one-sided overheating. - Centering check
Look straight down from the top and confirm the wick is centered. Even a small offset can create a hot wall on one side and tunneling on the other. - Fuel check
If soot and overheating continue after trimming and removing drafts, suspect over-wicking, meaning the wick is too large or too hot, or over-fueling, meaning the fragrance load or additives are changing fuel flow.
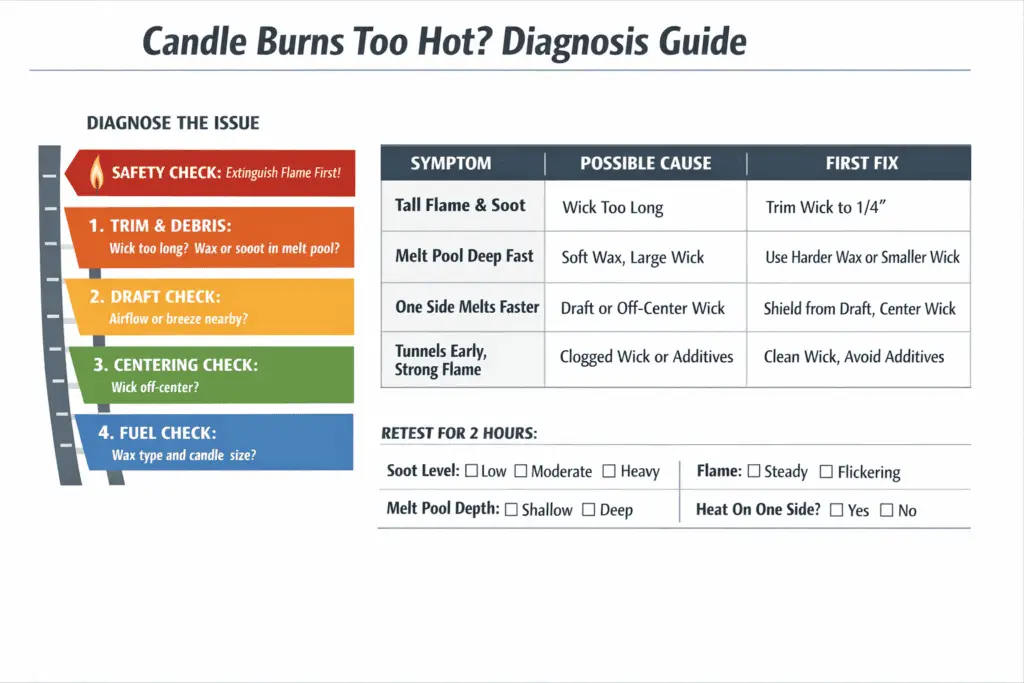
Symptom, likely cause, and first fix
| Symptom | Likely Cause | First Fix |
|---|---|---|
| Tall flame and soot quickly | Wick too large or wick too long | Trim, then test one wick size down |
| Melt pool gets deep fast | Too much heat for the jar | Shorten session, downsize wick, verify no drafts |
| One side melts faster | Off-center wick or draft | Re-center wick and relocate away from airflow |
| Tunnels early but flame looks strong | First burn ended too soon, or jar is too wide for one wick | Use a longer first burn, consider double-wicking in wide jars |
How to tell overwicking from draft or centering error
Overwicking usually shows up as a tall flame, fast soot, and a melt pool that gets deep even in still air. Draft or centering problems are more likely when one side runs hotter, the flame bends, or the hot spot changes when you move the candle or correct the wick position.
If trimming and moving the candle out of drafts changes the behavior quickly, suspect placement or centering first. If the candle still runs hot in still air with a centered wick, suspect wick size or fuel load next.
Repeatable 2-hour test
If you want notes that are actually useful, keep the test identical each time:
- Same room
- Same surface
- Still air
- Supervised session
Method note: The 120-minute window here is a working troubleshooting test for comparing one change at a time under the same conditions. It is not a general consumer burn rule and it should not be used to push a candle past safe behavior.
Burn for 120 minutes, then extinguish and log:
A stable result means the flame stays mostly upright, soot stays none or light, the melt pool remains even without a rapidly deepening center, and one side does not keep running hotter than the other.
- soot level
- flame stability
- melt-pool depth
- whether one side ran hotter
Do not move the candle while the wax is liquid.
For a more formal validation workflow, use this step-by-step guide for candle burn tests.
Once you know whether the candle is over-fed, the next step is choosing a wick change that cools the flame without creating tunneling.
Choose the Right Wick Size to Cool the Flame
Measure the inner diameter, pick a wick from a chart for your wax, then downsize one step if heat or soot is high and confirm with the same timed test.
For the broader placement, burn-habit, and hazard checks around hot glass and open flame, see the full guide to candle safety and compliance.
Wick choice is fuel delivery. Too much delivery creates soot, high flames, and excessive container heat. Too little delivery encourages tunneling and wax hang-up. The goal is not the biggest melt pool possible. The goal is a steady flame and a melt pool that grows evenly without heavy soot.
If you need a starting range before you downsize, use this wick size chart by jar diameter and wax type.
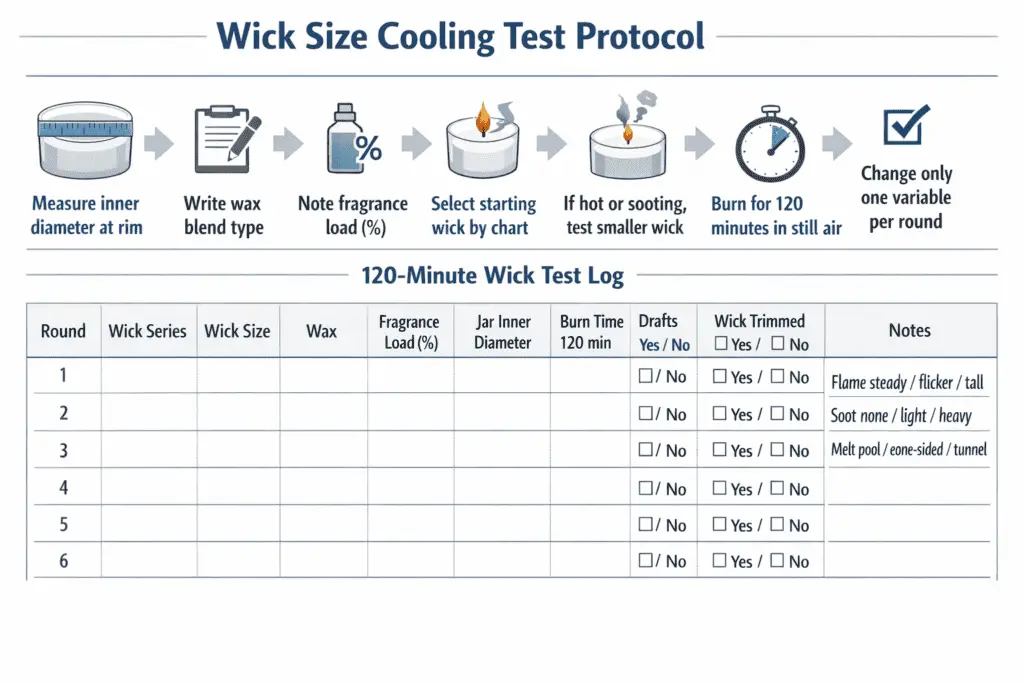
Step-by-step wick sizing
- Measure the inner diameter at the rim, not the outside label.
- Write down the wax blend and fragrance load by percentage of weight.
- Choose a starting wick from a manufacturer chart for that wax family and diameter.
- If the candle is running hot or sooting, test one size smaller in the same series first.
- Burn for 120 minutes under still-air conditions and log the same data each round.
- Change one variable only per test round, either wick size, wick series, or fragrance load.
One-variable test protocol
Copy and reuse this:
- Round: __
- Wick series: __
- Wick size: __
- Wax: __
- Fragrance load: __%
- Jar inner diameter: __ cm (__ in)
- Burn time: 120 min
- Drafts: Yes / No
- Wick trimmed to 3 to 5 mm: Yes / No
- Notes: flame steady / flicker / tall, soot none / light / heavy, melt pool even / one-sided / tunnel
Drafts and wick lean can destroy wick sizing tests, so lock down placement and centering first.
Trim the Wick to 3 to 5 mm Before Lighting
Trim to 3 to 5 mm before each light to lower flame height, reduce soot, prevent mushrooming, and keep container heat from creeping upward.
For the broader placement, burn-habit, and hazard checks around hot glass and open flame, see the full guide to candle safety and compliance.
A long wick behaves like an oversized wick. It produces a larger flame envelope and more carbon buildup. That carbon cap, often called mushrooming, burns like extra fuel and can cause smoke, soot, and sudden flare-ups.
For mushrooming, drowning, or repeat wick instability that trimming does not solve, use this detailed breakdown of common candle wick problems.
Trim routine
- Let the candle cool until the wax surface is firm.
- Cut the wick straight across to 3 to 5 mm, about 1/8 to 3/16 inch.
- Remove the trimmed piece and any black brittle cap so it does not fall into the melt pool.
- Re-check that the wick is upright and centered before relighting.
Many consumer guidelines suggest trimming to about 1/4 inch, around 6 mm. If your candle runs hot or sooty, trimming slightly shorter is often a practical troubleshooting adjustment before you jump to rewicking.
Quick mushrooming checklist
- Black cap appears quickly: trim shorter and shorten burn sessions
- Soot appears after a long session: stop earlier and trim before relighting
- Wick crumbs in wax: remove debris, because crumbs add extra fuel
If the candle still burns unevenly after trimming, treat wick position as the next likely culprit.
Re-Center and Stabilize a Drifting Wick
Center and secure the wick so the flame stays vertical, the melt pool stays balanced, and one side of the jar does not overheat or scorch.
For the broader placement, burn-habit, and hazard checks around hot glass and open flame, see the full guide to candle safety and compliance.
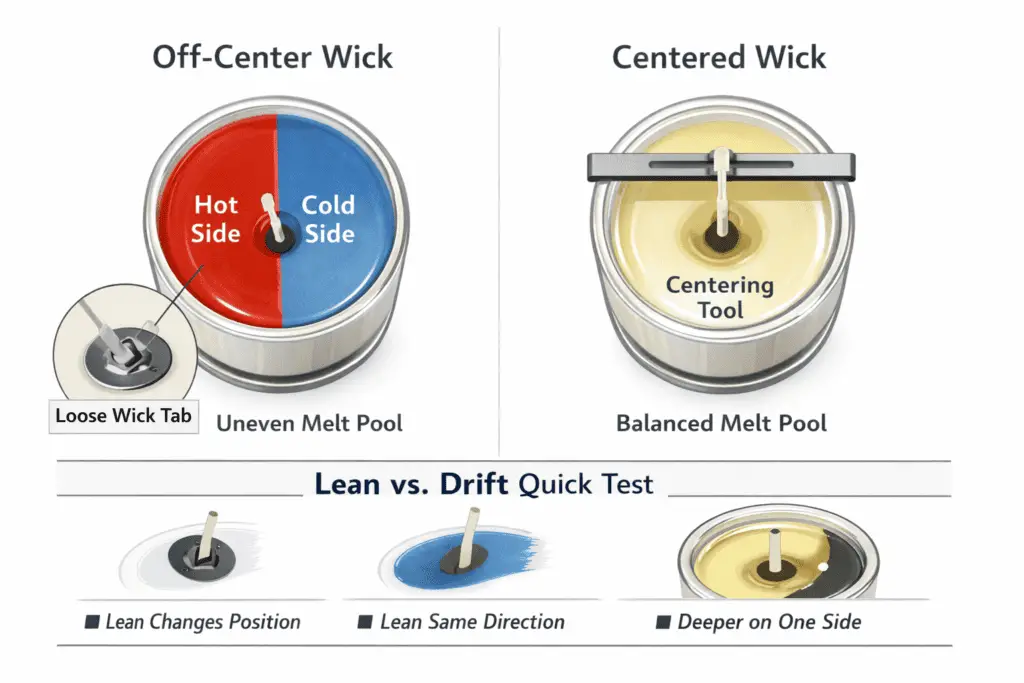
A wick that sits even a few millimeters off-center will pull heat toward one wall. That creates a hot side and a cold side, which shows up as uneven melt, tunneling, or soot on one section of the glass.
If the wick keeps shifting between burns, this detailed breakdown of centering and securing wicks goes deeper on tools and setup.
Fix it, only when the candle is cool
- Check the wick from above. It should be centered in the opening.
- Confirm the wick tab is firmly attached to the base. A loose tab lets the wick migrate as the wax softens.
- Use a centering bar or jig to hold the wick upright and centered.
- If the wick repeatedly drifts, plan a rebuild, meaning rewick or repour, instead of repeatedly nudging it mid-life.
Lean vs drift quick test
- Lean that changes session to session: drafts or handling while wax is liquid
- Lean that always points the same direction: wick tab placement or cure-time centering issue
- Melt pool always deeper on one side: centering error first, drafts second
If the wick is centered but the flame still bends and the melt pool leans, airflow is usually the missing piece.
Control Airflow and Drafts to Prevent Uneven Burn
Remove drafts and level the surface so the flame stays upright and heat does not get pushed into one side of the container.
For the broader placement, burn-habit, and hazard checks around hot glass and open flame, see the full guide to candle safety and compliance.
Drafts are one of the most common reasons a candle burns unevenly even with the right wick. Moving air pushes the flame sideways, concentrates heat on one wall, and leaves the opposite edge behind.
Draft-proof placement checklist
- Stable, heat-resistant, level surface
- Away from HVAC vents, fans, open windows, and curtains
- Not in a doorway path or next to a frequently opened door
- Clear space above and around the candle, with no shelf directly overhead
Quick draft test
- Light the candle where you normally burn it.
- Watch the flame for 60 seconds.
- If the flame bends noticeably or flickers in cycles, such as when HVAC turns on and off, relocate and retest before changing wick size.
Room temperature swings can change how quickly wax reaches the edges. Keep conditions consistent while diagnosing so you do not misread cold-room behavior as a wick failure.
If drafts and centering are controlled and you still get hang-up on wide jars, jar geometry may require a different wick configuration.
Match Vessel Diameter to Wick Series
Use a single wick for smaller round jars, but consider two smaller wicks in wide or square vessels instead of oversizing one wick to reach the edges.
For the broader placement, burn-habit, and hazard checks around hot glass and open flame, see the full guide to candle safety and compliance.
Wide jars and corners are hard for one flame to heat evenly. The most common mistake is oversizing one wick until the center runs too hot, creating soot and container overheating, while the edges still lag.
If wide or square vessels still leave cool edges after trim, centering, and draft fixes, treat vessel fit as the next routing step instead of forcing a hotter single wick. Use this step-by-step guide for double wicking for setup details, or read the full guide to fire-safe containers and wicks before you keep testing the same jar.
Use a Foil Collar Only for Uneven Melt, Not to Cool an Overheating Candle
A foil collar can help a tunneling or rim-hang-up candle reach the outer wax, but it should not be used to push an overheating candle through a longer burn.
For the broader placement, burn-habit, and hazard checks around hot glass and open flame, see the full guide to candle safety and compliance.
Foil traps and redirects heat. That can help a cool outer rim catch up when the main problem is uneven melt. It is the wrong fix for a candle that already has a tall flame, heavy soot, overheating glass, or wall-hugging flame.
When a short foil session is reasonable
- Confirm the candle is no longer overheating. The flame should be controlled, the glass should not be showing stress, and the main issue should be a cool outer rim or shallow tunnel.
- Extinguish the candle and let it cool completely.
- Trim the wick to 3 to 5 mm and remove debris from the wax surface.
- Form a loose foil collar around the rim to reflect heat toward the cooler outer wax. Do not let the foil touch the flame.
- Relight and monitor closely for a short session. Stop if the flame grows, the glass overheats, or soot returns quickly.
- Remove the collar once the melt evens out. If the candle only behaves with repeated foil sessions, the lasting fix is usually wick or vessel correction.
If tunneling is the main problem, use this step-by-step guide for preventing candle tunneling for the full rescue flow.
Stop rules
Do not try to rescue beyond these points:
- Flame repeatedly hits the container wall
- Heavy soot returns quickly after trimming
- Container shows heat stress, cracking, or damage
- Any behavior that feels unsafe to supervise
If controlled fixes do not stabilize the candle, rebuilding is the reliable solution.
Rewick and Repour to Salvage a Problem Candle
Rewick and repour when a candle remains unstable. Rebuilding removes drifted tabs, char contamination, and wrong wick choices that trimming cannot fix.
For the broader placement, burn-habit, and hazard checks around hot glass and open flame, see the full guide to candle safety and compliance.
Only salvage the candle if the container is intact and the wax is not heavily contaminated with soot odor. If the jar is cracked, chipped, or heat-stressed, discard it instead of reusing it.
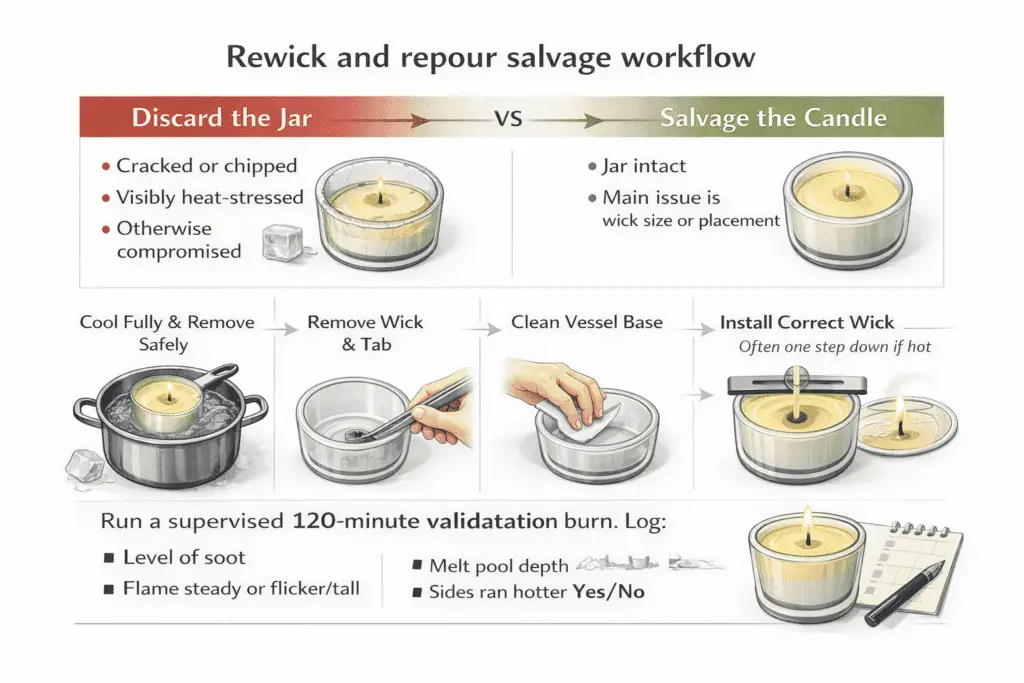
Salvage workflow
- Cool fully and remove wax safely, using gentle warming if needed.
- Remove the wick and tab, then clean the vessel base so the new tab bonds flat.
- Install a correctly sized wick, often one step down if the candle ran hot, and center it with a jig.
- Repour and cure as you normally would.
- Run a supervised 120-minute validation burn and log the same metrics as before.
Discard vs salvage
- Discard the jar if it is cracked, chipped, visibly heat-stressed, or otherwise compromised.
- Salvage the candle if the jar is intact and the main issue is wick size or placement, not structural damage.
After rebuilding, or once the candle is stable, the first burn is what prevents many uneven-burn problems from coming back.
Run a Burn-In Test and Set the Memory Ring
A long enough first burn sets the candle’s memory ring so later burns do not tunnel. Aim for an even melt footprint while staying within safe burn habits.
For the broader placement, burn-habit, and hazard checks around hot glass and open flame, see the full guide to candle safety and compliance.
If first-burn prevention is the main problem instead of current overheating or uneven burn, use this detailed breakdown of candle burn memory for the full timing and setup explanation.