A candle burn test for fire risk is a controlled burn series used in candle making to judge whether a candle’s flame behavior, melt pool, smoke or soot, stability, and shutdown behavior support a pass, fail, or re-test decision.
On this page, fire risk means observable burn-test signals under comparable conditions—not full standards interpretation, wick optimization, or separate troubleshooting ownership.
This guide focuses on a controlled setup, repeatable measurements, and the safety signals that matter most. It keeps the page on the test itself instead of expanding into separate troubleshooting guides. Use it to make a conservative decision from comparable cycles, notes, and photos.
A burn test is the most reliable way to spot unsafe candle behavior before it reaches real homes. Stable room conditions and repeatable checkpoints make your observations comparable across wick sizes and batches. You’ll track what the flame does, how the melt pool forms, and whether smoke or soot appears as the candle warms. Clear notes and photos turn “seems fine” into a pass/fail decision you can repeat.
Candle burn test setup: room conditions, surfaces, and clearances
A safe burn test setup keeps airflow, surface level, and surrounding clearance consistent so your results reflect the candle—not the room.
Test in a calm, draft-free area on a level, non-combustible surface with generous clearance from anything that can scorch, melt, or ignite. Record room temperature and humidity near the candle at the start of each burn cycle, and keep the candle in the same position for every test.
A surprising amount of “bad candle behavior” is actually room behavior, which is why candle safety starts with the test environment. Your goal is to reduce those variables so the only changes you see come from the candle’s wick, wax, container, and fragrance. Keep that routine inside your broader candle safety and compliance process so your burn data, handling rules, and safety decisions stay aligned.
Set up the station (repeatable every time)
- Choose the location: Pick a spot away from windows, doors, fans, and vents. Avoid hallways and high-traffic areas.
- Use a heat-safe base: Place a ceramic tile, stone slab, or metal tray on a sturdy table to protect the surface under the candle.
- Level the surface: Check level front-to-back and side-to-side. If it’s off, shim the tile until it’s truly flat. A slight tilt can make a melt pool look uneven and can exaggerate “tunneling.”
- Add a draft control: Use a simple three-sided shield that blocks side airflow while leaving the top open. You want less wind, not trapped heat.
- Set clearances: Keep a “no clutter” perimeter around the candle. Remove paper, fabric, plastics, and anything that could warm up or catch soot.
- Stage tools and log: Place your timer, ruler, thermometer, and log sheet within reach so you don’t move the candle mid-cycle.

What to write down at the start of each cycle
- Start time and planned end time
- Room temperature near the candle
- Humidity near the candle
- Wick trim length before lighting
- Any abnormal condition (someone opened a window, heater turned on, etc.)
If you can’t control drafts consistently, treat the results as “not comparable,” mark the run re-test rather than fail, and repeat the cycle later under stable conditions.
Stability and tip-over checks for freestanding candles
Freestanding candles need a separate stability check because a candle that tips or slides can fail for fire risk even when the flame looks calm.
Place the candle on the same heat-safe base, introduce a controlled incline, and watch whether it stays upright without sliding, tipping, or deforming into instability. Record the angle used and the point where movement begins so the result is repeatable.
A practical reference check is a 10° incline for freestanding formats. If the candle tips, slides, or cannot stay upright at that stage, treat it as a fail instead of a tuning note.
How to run a quick stability check
- Start with a fully cooled candle on a clean, level, heat-safe base.
- Raise one side of the base in a controlled way until you reach the target incline.
- Watch for sliding, tipping, rocking, or shape changes that make the candle unstable.
- Log the result as pass or fail and keep a photo with the test angle if possible.
This check belongs with fire-risk screening, not appearance testing. Container candles still need a level-surface setup, but freestanding formats add a tip-over question that a normal melt pool check will not answer.
Tools & materials: wicks, rulers, timers, thermometers
Use the same core tools every burn test so measurements are consistent, comparable, and easy to verify later.
Gather a timer, a millimeter ruler (or measurement card), a wick trimmer, a snuffer, a simple log sheet, a camera, and temperature tools (room thermometer/hygrometer; optional IR thermometer for container surface checks). Prepare multiple wick sizes in the same series so you can compare outcomes.
The point of a burn test is repeatability. If you measure melt pool diameter with a different ruler each time, or you change how you time a “cycle,” you can accidentally create differences that look like wick problems. A simple standardized kit prevents that.
Core kit (recommended)
- Timer: phone timer is fine if you use the same checkpoints every time
- Ruler / measuring card (mm): for flame height and melt pool diameter
- Depth tool: a marked stick or probe for melt pool depth
- Wick trimmer: to keep trims consistent before relights
- Snuffer or lid: to end burns safely without blowing soot
- Notebook or burn test log template: fixed fields beat free-form notes
- Camera: photos from the same angles at each checkpoint
- Thermometer/hygrometer: to record room conditions near the candle
- IR thermometer (optional): helpful when you’re tracking container surface hot spots
Wick samples (what to prepare)
- Pick the wick series you’re using and prepare a smaller, expected, and larger size from that same series so you can compare outcomes without switching variables.
- Label each test candle clearly so you never confuse wick codes during comparisons.
Tool consistency rule
If you change tools mid-test (new thermometer, new ruler, new timing method), treat the next run as a new baseline and repeat once more before making conclusions.
Measuring melt pool (diameter & depth) and recording time stamps
Measure melt pool diameter and depth at fixed time stamps so you can compare candles fairly and spot risk trends early.
At consistent checkpoints during a working burn schedule—often hourly during a multi-hour cycle—record melt pool diameter (edge-to-edge at the surface) and melt pool depth (vertical measurement at the center). Pair each reading with a time stamp and a matching photo ID.
Melt pool measurements tell you whether the candle is progressing toward an even burn or drifting into problems like tunneling, overheating, or wick drowning. The key is taking measurements the same way, at the same times, so you can compare wick A vs wick B without guessing.
The checkpoint schedule below is a practical working method for comparison, not a universal legal threshold.
A full burn test is not one quick session; keep the same cycle length across repeat burns until later-life behavior is checked or a clear safety stop ends the series.
Method note
This schedule is a comparison routine, not a legal rule. Keep checkpoint timing, trim length, room setup, and photo angles the same so wick A and wick B are judged on the same conditions.
Keep the same schedule through later-life burns until about ¼ inch / 6 mm of wax remains or a clear safety stop condition ends the series.
Reliable checkpoint schedule (example)
- 30 minutes: early stability notes (don’t over-interpret yet)
- 60 minutes: first measurement set (diameter + depth + photo)
- 120 minutes: trend check (often where heat/soot shifts appear)
- End of cycle: final readings + any stop reason

How to measure melt pool diameter
- Take a top-down photo first (so you don’t disturb the surface).
- Measure across the widest part of the liquid wax at the surface.
- Measure inner edge to inner edge (not across the outer jar).
How to measure melt pool depth
- Use a stick/probe marked in millimeters.
- Insert straight down near the center (don’t angle it).
- Read at eye level to avoid parallax errors.
What your time-stamped measurements reveal
- Diameter grows but depth stays controlled: usually stable progress
- Diameter stays narrow and walls remain tall: tunneling trend
- Diameter reaches the edge quickly and depth keeps increasing: overheating/over-wicking trend
- Depth increases but flame weakens: possible wick drowning or fuel imbalance
Record what happened, not what you hope happened. If a checkpoint is missed, mark it as missed instead of filling it in from memory.
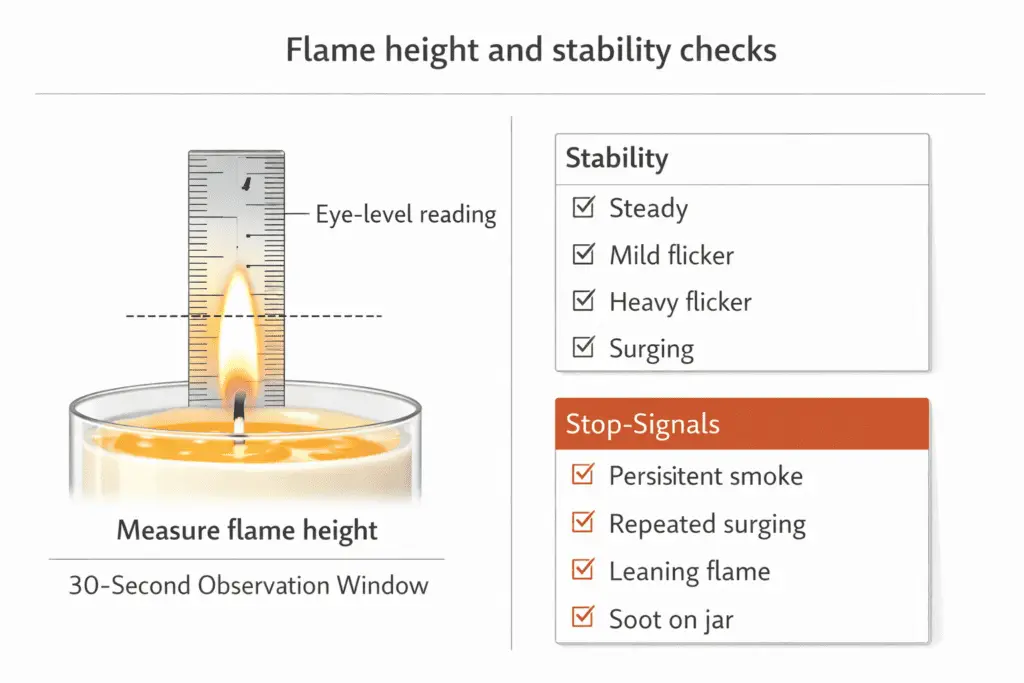
Flame height, flicker, and stability checks
Check flame height and stability on a schedule, and treat repeated surging, leaning, and smoke as reasons to stop and adjust.
Once the candle stabilizes, measure flame height using a millimeter scale at eye level, observe flicker for 30 seconds, and record peak height plus stability notes at the same checkpoints as your melt pool readings. Treat persistent smoke, repeated surging, or a flame that keeps growing later in the cycle as stop signals rather than normal variation.
Threshold note for fire-risk screening
If a container or pillar candle approaches 75 mm flame height, or a tea light approaches 30 mm, treat that as a fail signal rather than normal variation. A flame that keeps climbing, surges repeatedly, or needs intervention to stay controlled should end the run immediately.
Flames change as the candle warms. A flame that looks modest at 10 minutes can become taller and dirtier after the melt pool expands and fuel flow increases. Stability is a safety signal: a steady flame is easier to trust than one that repeatedly surges.
How to measure flame height (repeatably)
- Place a ruler/measuring card behind the flame (not above it).
- Read at eye level and record the peak height you observe during a 30-second window.
- Take a photo with the scale visible, using the same distance each time.
Stability notes that make comparisons easy
- Steady (mostly vertical, minor flicker)
- Mild flicker (normal movement, no spikes)
- Heavy flicker (active movement, noticeable lean)
- Surging (repeated spikes taller than baseline)
Stop signals to take seriously
- Persistent visible smoke after stabilization
- Repeated surging that doesn’t settle in a calm room
- A flame that consistently leans into one side of the container
- Sudden changes that coincide with soot appearing on the jar
If you find yourself “managing” the candle to keep it calm (moving it, shielding it constantly, trimming excessively mid-cycle), the candle is telling you it’s not stable under normal use conditions.
Diagnosing soot, mushrooming, and smoking
Diagnose smoke and soot by when it appears, how long it lasts, and whether residue accumulates over repeated checkpoints.
If smoke persists after the candle stabilizes or soot builds on the container, stop the cycle, document the time stamp and a clear photo, and treat the pattern as a fire-risk result that must be confirmed or routed before any deeper fix work.
Soot and smoke are not just “cosmetic.” They’re evidence that combustion is incomplete or that fuel flow is out of balance. A quick puff at ignition is different from a persistent plume 90 minutes into a burn. Your job is to separate brief events from ongoing behavior.
Simple A/B/C grading you can reuse
- A: No visible smoke during a 30–60 second observation window
- B: Brief wisps, no residue building over time
- C: Persistent plume and/or visible residue forming on glass or nearby surfaces
How to observe smoke without guessing
- Stand in the same spot each time.
- Use a dark, matte background behind the flame if possible.
- Watch for a full 30–60 seconds at each checkpoint.
- Record smoke duration (seconds) and grade (A/B/C).
Common patterns and first interpretation
- Persistent mid-cycle smoking: fire-risk warning that needs a controlled re-test or fail call, depending on severity
- Heavy carbon cap (“mushrooming”): sign that combustion may be out of balance and should be documented before any tuning change
- Soot that gets worse later: late-cycle heat behavior is worsening and should weigh against a pass decision
When that pattern repeats, keep this page at the test-reading stage: document it first, then use a separate guide such as candle soot causes and cleanup, mushrooming causes, or common candle wick problems only after the fire-risk test has identified what needs separate diagnosis.
Tunneling vs full melt pool: interpreting outcomes
Tunneling leaves wax walls and a narrow pool, while a full melt pool reaches the edge evenly without becoming excessively deep.
If the melt pool stays narrow and leaves tall sidewalls, you’re tunneling; if it reaches the rim evenly with controlled depth and stable flame behavior, you’re closer to a full melt pool. Use your time-stamped diameter and depth trend to choose the next test change.
This is where many tests get misread. A candle can look “almost there” at one checkpoint and still be tunneling over the full cycle. Conversely, a candle can reach the edge early but be running too hot, which is not a win.
Decision snapshot (symptom → next move)
| What you see at checkpoints | More likely | Best next test |
| Narrow pool, tall walls, modest stable flame | Under-wicked or cycle too short | Extend cycle slightly or test one wick size up |
| Reaches edge fast, depth keeps increasing, flame surges | Over-wicked | Test one wick size down |
| Reaches edge but smokes/soots later | Hot + poor combustion | Wick down or change wick series, then re-grade soot |
Two-cycle rule (for honest interpretation)
Unless you hit a clear safety stop condition, confirm tunneling or overheating trends over at least two comparable cycles with the same trim length, room setup, and checkpoint schedule.
If the narrow-pool pattern repeats, record it as a tunneling trend and keep it separate from a safety pass call. A full melt pool by itself is not a safety pass unless the depth, flame behavior, and late-cycle burn remain controlled. Use a separate overheating or uneven-burn guide or a wick-sizing guide only after the burn test has established which pattern is repeating.
End-of-life testing, aftersmoke, and container integrity
A fire-risk burn test is incomplete until you repeat later-life burns and check what happens when the candle is extinguished and the jar cools.
Run comparable cycles through more than one stage of the candle’s life, then record aftersmoke, glowing wick time, any re-ignition or secondary flame, and any crack, leak, or distortion in the container. Early clean burns do not cancel a late-cycle safety failure.
Heat behavior can change as the wax level drops and the same wick begins warming a smaller fuel area and a hotter container. Use the same extinguishing method each time; when you need a repeatable routine, follow how to extinguish a candle safely and record what happens after the flame goes out.
What to check in later-life cycles
- Whether aftersmoke stays brief or lingers longer than earlier cycles
- Whether the wick glows unusually long or re-ignites after extinguishing
- Whether any debris, carbon cap, or nearby material creates a secondary flame
- Whether the container shows cracks, chips, leaks, sharp hot spots, or visible distortion
- Whether soot, surging, or leaning gets worse as the candle burns lower
Any secondary ignition, re-ignition after extinguishing, or container damage is a fail, not a tuning note. When a later-life cycle cannot be completed safely, stop the series and log the exact reason.
Pass/fail cues and compliance context (reference to common standards)
A candle passes a fire-risk burn test only when repeat cycles stay stable, extinguish cleanly, and show no late-stage safety failures.
Mark “pass” only when flame behavior, melt pool progress, smoke/soot, extinguishing behavior, and container condition remain predictable across comparable cycles. Mark “fail” when you see persistent smoke, repeated unsafe surging, secondary ignition, re-ignition after extinguishing, container damage, or heat behavior that escalates as the candle burns lower.
A practical burn test doesn’t require you to quote standards language, but it should stay conservative and consistent with ASTM candle safety standards and common candle-safety guidance. The goal is not to name-drop a standard. The goal is to make a safety call you can defend from your own notes, photos, and repeat cycles.
What counts as an immediate fail?
Stop the series and mark fail when the candle tips, shows secondary ignition after extinguishing, exceeds a safe flame-height limit, or shows container cracking, leaking, or comparable structural damage. Mark re-test instead when a draft event, a moved candle, a missed checkpoint, or multiple variable changes make the run non-comparable.
Which thresholds matter most for pass/fail?
The main pass/fail checks on this page are stability, flame height, shutdown behavior, aftersmoke, and container integrity.
Use the same cues every time so the decision stays conservative and repeatable. On this page, these cues are practical burn-test references that stay consistent with common fire-safety checks without replacing a full standards explainer.
| Check | Pass / re-test / fail cue | How to use it in this guide |
| Stability / tip-over | Freestanding candle stays upright through the stability check = pass cue; tips or slides = fail | Use for freestanding formats before or alongside burn observations |
| Flame height | Up to 75 mm for most container/pillar candles; up to 30 mm for tea lights; repeated rise toward or beyond that limit = fail cue | Measure at repeatable checkpoints and stop if the flame keeps climbing |
| Secondary ignition after extinguishing | No secondary flame beyond 10 seconds = pass cue; secondary ignition beyond that = fail | Watch closely right after extinguishing and log exact seconds |
| Aftersmoke / glowing wick | Brief aftersmoke and glow can be acceptable; prolonged smoke or glow beyond 30 seconds is a fail cue | Use the same extinguishing method each time and record the duration |
| Container integrity | No cracks, breaks, leaks, or visible distortion = pass cue; any of those = fail | Check during hot use and again after cooling |
| Comparable cycles | Stable results across comparable cycles = pass support; draft events, missed checkpoints, or moved candles = re-test | Do not score invalidated runs as a pass or fail |
Simple rubric (easy to defend)
- Pass: stable flame + predictable melt pool + no persistent smoke + clean extinguish behavior + no container stress across comparable cycles
- Fail: persistent smoke/soot, repeated unsafe surges, any secondary ignition, re-ignition after extinguishing, or container stress/damage
- Re-test: drafty setup, moved candle, missed checkpoints, or multiple variables changed at once
Quick safety checklist before you mark pass/fail
- The flame stayed stable instead of surging later in the cycle.
- The melt pool reached a predictable pattern without becoming progressively deeper and hotter.
- Smoke and soot did not persist or escalate as the candle burned lower.
- The candle extinguished without re-igniting or showing a secondary flame.
- The container stayed intact, with no cracks, leaks, or visible stress.
Write your reason like this (example formats)
- PASS: “Stable flame and clean burn across repeated cycles; melt pool reached edge without deepening into overheating.”
- FAIL: “Persistent smoke and visible soot residue began at 120 minutes and worsened; later cycle showed re-ignition after extinguishing, so testing stopped for safety.”
- RE-TEST: “Draft event at 60 minutes invalidated flame height comparison; repeat under stable conditions.”
Post-test documentation: photos, logs, batch traceability
Document each cycle with consistent photos and a structured log tied to batch identifiers so results can be repeated and verified.
Photograph each checkpoint from the same angles, record measurements in a fixed template, and attach batch identifiers (wax, wick series/size, jar diameter, fragrance lot) so your pass/fail result can be repeated or audited later.
For a batch-level call, document more than one candle from the same batch instead of relying on a single clean run.
Documentation is what turns a burn test into a usable system. Without it, you’ll end up repeating work because you can’t remember whether “Wick B was the one that smoked late” or whether the room was drafty that day.
A candle burn test worksheet helps keep the same fields in the same order across batches, especially when more than one person is reviewing the same candle line.
Photo discipline (simple and effective)
- Use the same two angles every time: top-down (melt pool) and side (flame/smoke).
- Take photos at the same time stamps as your measurements.
- Keep lighting consistent so smoke and residue are visible.
File naming that prevents mix-ups
Use a format that sorts correctly:
BatchID_Cycle_Time_TOP and BatchID_Cycle_Time_SIDE
Example: CS-2412-A_C2_120_TOP
Minimum burn log fields
| Field | What to record | Why it matters |
| Batch/Candle ID | wax, wick, jar, fragrance identifiers | ties evidence to a formula |
| Cycle + time stamps | exact minutes into the burn | makes comparisons fair |
| Flame notes + height | peak mm + stability label | captures risk behavior |
| Melt pool dia + depth | mm readings | shows tunneling vs overheating |
| Smoke/soot grade | A/B/C + duration (seconds) | documents combustion quality |
| Photo IDs | matching filenames | links proof to readings |
| Stop reason | if ended early | explains pass/fail call |
| Invalidated cycle note | draft event, moved candle, missed checkpoint, or changed variable | shows why the run should be re-tested instead of scored |
If a checkpoint is missed, mark it as missed. A complete, honest log beats a “perfect” log filled in from memory.