
To prevent candle containers from overheating or shattering, control wick heat output, keep proper headspace, choose stable vessels, and confirm with timed test burns that log jar-wall temperature. On this page, “safe” means repeatable, controlled container heat behavior during normal use, and “uncomfortably hot” is a repeatable fail signal in the same test conditions—not a legal label standard or a universal temperature limit; this page covers prevention and first-change diagnosis, not the full burn-test protocol, crack repair, or legal labeling.
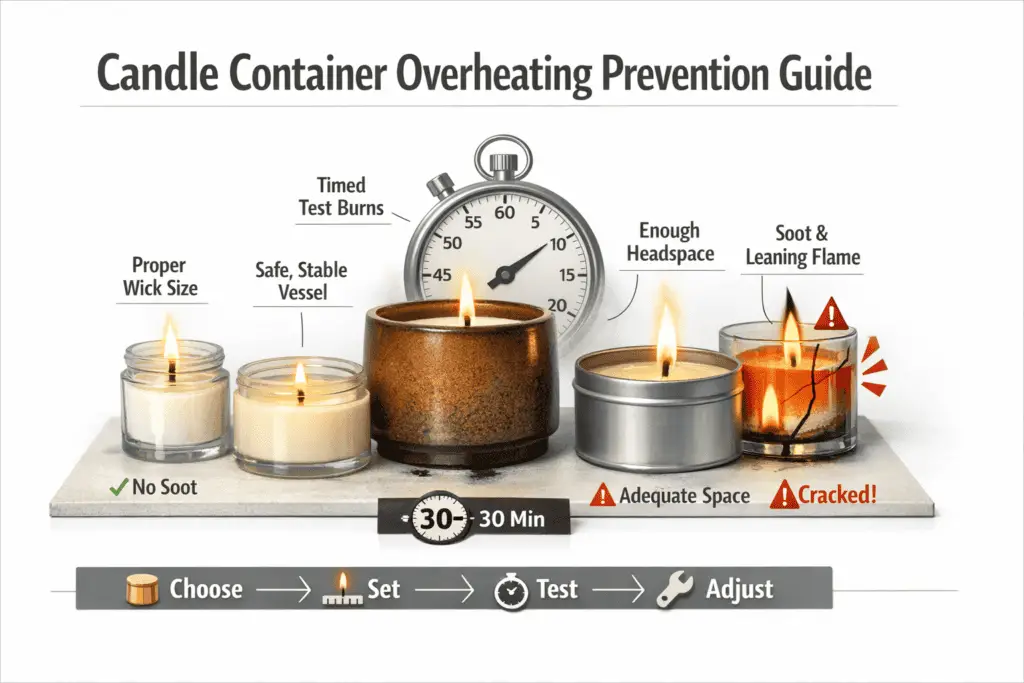
If a jar feels too hot at 45–60 minutes or you hear a sharp “ping,” the problem is usually heat flux, trapped heat, or a fast temperature swing—not bad luck. Most fixes come down to right-sizing the wick, leaving enough headspace, and picking containers that tolerate your wax, fragrance load, and environment. The safest approach is a repeatable test burn that measures jar-wall temperature and flags warning signs like soot, leaning flames, and shoulder hot spots. Once the root cause is clear, small, controlled changes can bring the burn back to a steady, comfortable wall temperature without sacrificing melt pool or scent.
What causes candle containers to overheat or crack?
Most candle containers overheat or crack because the flame is outputting more heat than the vessel can shed safely, or the glass is hit with a sudden temperature change.
If you want to prevent container failure, start by separating “overheating” (steady, accumulating heat) from “thermal shock” (fast hot-to-cold or cold-to-hot swings).
Overheating is usually driven by an oversized wick, a tall/roaring flame, or a hot spot created by drafts and off-center burning.
Cracking is often the result of stress concentrating at the shoulder/rim, hidden defects, or a rapid temperature delta from cold glass, moisture, or a cold surface.
A quick way to narrow the cause is to ask: is the jar progressively getting hotter every 15 minutes, or did it “ping” and crack soon after lighting or after being moved?
If you’re still shopping or switching vessels, start with this full guide to candle containers and jars so you can rule out thin walls, tight shoulders, and poor heat handling before you retest.
Then run a safety burn test that checks for early warning signs: leaning flame, soot, mushrooming, a single sidewall running much hotter, or a rim that becomes uncomfortably hot at the 45–60 minute mark.
| What you notice | Most likely cause | What to change first |
| Jar keeps getting hotter through the session | Overheating from wick size, trapped heat, or a persistent hotspot | Downsize the wick one step, re-check headspace, and remove draft exposure before changing other variables |
| Sharp “ping” or crack soon after lighting or right after moving | Thermal shock from fast temperature change, moisture, or a cold surface | Warm and dry the vessel gradually, avoid cold counters, and do not move hot glass |
| One wall runs much hotter than the rest | Draft, off-center burn, or container geometry creating a localized hotspot | Eliminate airflow, re-check wick centering, and inspect the container for shoulder stress |
| Leaning flame, soot, or mushrooming appears early | The wick is feeding too much fuel or being pushed sideways by airflow | Trim consistently, remove drafts, and downsize the wick before changing the container |
| Rim or shoulder gets hottest first | Minimal headspace or a tight shoulder is trapping heat near the top | Increase headspace and keep wax below the shoulder or thread transition before retesting |
| Crack starts at a chip, seam issue, or visible hairline | Stress is concentrating at a damaged or weak point in the vessel | Reject the vessel and inspect the rest of the batch before reusing that container style |
Use this fast diagnosis order before you change more than one variable:
- If heat rises across the jar through the session, treat wick size, headspace, and trapped heat as the first suspects.
- If one wall spikes hotter than the others, check drafts and wick centering before you change wax or container material.
- If the crack appears soon after lighting or after moving the candle, treat thermal shock, moisture, or a cold surface as the main route.
- If you find a chip, hairline, or shoulder defect, reject the vessel before deeper retesting.
Here’s what most “mystery cracks” come down to in practice:
- Too much heat flux: the wick is feeding a larger flame than the jar size and wax system can handle, so wall temperature climbs quickly.
- Too little buffer space: minimal headspace and overfilling trap hot air near the rim and raise shoulder temperatures.
- Stress concentrators: thick-to-thin transitions, tight shoulders, embedded bubbles, chips, or micro-cracks create a weak point that fails once the jar expands.
- Environment: drafts push the flame sideways (creating a wall hotspot), and cold/damp glass or cold counters increase thermal shock risk.
If a container ever starts to crack mid-burn, extinguish the candle and let it cool fully before handling; moving hot glass to a cooler area is one of the fastest ways to worsen the break.
How to choose a wick size that keeps jar temperature safe
Choose a conservative wick for your jar diameter and wax/fragrance system, then confirm it with repeatable timed test burns that track wall heat and flame behavior.
For wick safety basics, the simplest rule is that wick choice controls fuel rate, and fuel rate controls flame size, heat flux, and how fast the sidewall warms up.
Simple pass/fail stop rule you can repeat: if the jar becomes uncomfortably hot by about 60 minutes, or the flame leans and soots, fail that setup and downsize the wick before changing anything else.
Use this page to decide whether wick heat is the likely cause; for the full sizing method and chart selection, use this step-by-step guide to properly sizing your candle wick and the live candle burn test page for repeatable confirmation.
Steps to set a safe wax fill level and headspace
Leave consistent headspace and don’t fill to the rim, so heat and flame turbulence don’t build up at the shoulder. On this page, safe headspace means a small air buffer that helps keep rim temperatures steadier during a normal burn session.
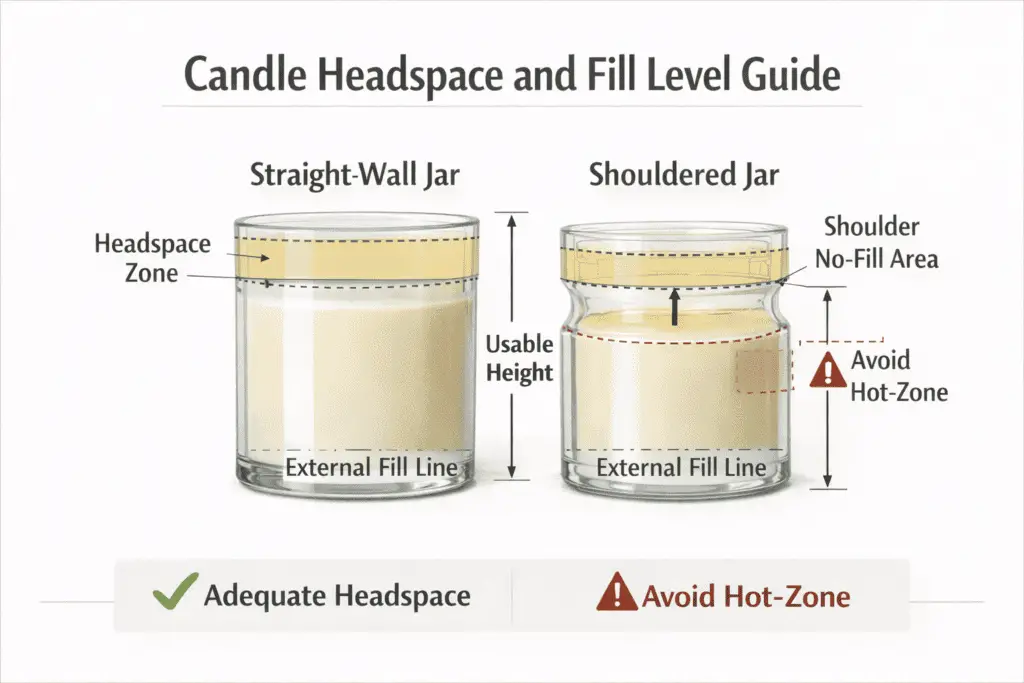
Headspace is simply the distance from the wax surface to the container’s top edge (or to the start of any tight shoulder).
When that buffer is too small, hot air and combustion byproducts hang near the rim longer, which can make the upper sidewall feel hotter and increase sooting.
Use this simple procedure to make fill level repeatable across batches while keeping the “hot zone” away from the rim:
- Measure the usable height: from the container bottom to the point you want wax to stop (below threads, below shoulder transitions, and below any label warning area).
- Choose a headspace target: start conservatively, then keep it the same across tests so your results mean something.
- Mark a fill line: use a ruler and a fine paint pen or a small piece of tape to mark the outside of the jar at your target wax height.
- Pour to the line, not the lip: the lip is not a safety reference point—your mark is.
To keep your measurements consistent, write the key numbers right on your test container (even just a tiny “H=___ mm”) and include container dimensions in your batch notes so you’re not guessing later.
If you accidentally overfill, let the candle fully cool, correct the fill level, and then retest—don’t try to “fix it” by burning harder; if it already runs hot, you’ll want to cool a hot-running candle by reducing heat output, not increasing it.
One extra habit that prevents nasty surprises: avoid capping hot jars, because trapping heat under a lid right after a burn can keep the upper glass hotter for longer than you expect. If you need the setup step behind this, use this step-by-step guide to preparing candle containers before pouring wax.
Glass vs tin vs ceramic: how material, thickness and shape affect heat
Tin, glass, and ceramic manage candle heat differently, and thickness plus shape often matter as much as the material itself.
| Material | Heat behavior in real use | Common stress points | Practical watch-outs |
| Tin | Conducts heat quickly; often feels warm all over | Hot base on thin tins; very hot lid if used | Monitor surface heat and base temperature closely |
| Soda-lime glass (most “regular” jars) | Slower conduction; can hold localized hot spots | Shoulder transitions; seam/defect zones | Watch for thermal shock and one-sided hotspots |
| Borosilicate glass (less common) | Often handles temperature swings better than standard glass | Still vulnerable if thin or tight-shouldered | Thickness and shape still matter |
| Ceramic | Higher mass can buffer heat; glaze and porosity matter | Hairline cracks; uneven thickness | Quality varies more than appearance suggests |
Use this section to rule out obvious heat-handling mismatches; for a full side-by-side decision, use this detailed comparison of glass vs tin candle containers.
How wax type, fragrance load and dye affect container temperature
Wax type, fragrance load, and dye can change burn rate, so the same jar can run cooler or hotter after a formula change.
Start with formulation safety basics: treat wax, fragrance, dye, and wick as one system, because changing any one of them can shift jar-wall heat.
In practice, a formula that was stable can become sootier or run hotter after you increase fragrance, deepen color, or change wax family.
A steadier setup shows a calm flame and walls that stay comfortable over time, while a hotter setup trends toward stronger flame behavior, faster wall heating, and more shoulder stress.
Change one variable at a time, retest wall heat and flame behavior, and only then decide whether the wick or vessel still needs adjustment.
If formulation changes are becoming the main variable, use this guide to fragrance load in candle making to separate fuel-rate changes from container problems before you rebuild the whole setup.
Steps to run a safe test burn and measure jar-wall temperature
Run a 60–90 minute test burn and log jar-wall temperature, melt pool diameter, and flame height every 15 minutes under the same conditions.
Keep a short log with jar size, wick, wax/fragrance, time marks, wall temperature, and soot/lean notes, then use the live candle burn test guide for the full method, repeat counts, and measurement details.
How to avoid thermal shock from moisture or sudden temperature changes
Keep the container dry, let it reach room temperature gradually, and avoid moving hot glass onto cold surfaces to prevent thermal shock.
Thermal shock cracks usually happen from fast temperature swings (cold jar → sudden flame heat, or hot jar → cold counter), not from “normal” overheating over time.
Moisture makes the swing harsher because condensation cools some areas while the flame rapidly heats others, creating uneven expansion.
You’ll lower risk most by treating cold starts and post-burn handling like a controlled warm-up and cool-down.
Cold-start checklist (especially after winter delivery or storage):
- Confirm the jar is fully dry inside and out; wipe off any condensation before lighting.
- Let the candle sit until the glass and wax feel like the room (not “chilly to the touch”).
- Avoid “quick fixes” like warm water or a hair dryer; gentle, gradual warming is safer than spot-heating.
- Consider pre-warming and drying by storing jars in a dry, stable indoor area rather than garages, windowsills, or damp basements.
During and after a burn, the goal is staging temperature changes instead of sudden swaps:
- Don’t carry a hot jar into a colder room, set it on stone/metal, or place it near a cold window.
- Use a stable, insulating surface (a coaster or mat) so the base doesn’t cool abruptly while the walls stay hot.
- If you need to move it, extinguish first, then wait until the container is comfortably cool before relocating.
A useful troubleshooting clue: shock cracks often appear early in the first light (or right after a move), while heat-driven stress tends to show up later after long sessions, drafts, or oversized wicks. If the vessel has already cracked or flashed a visible defect, use this detailed guide to fixing cracked candle containers before you decide whether the style is still usable.
Steps to manage burn time, drafts and surfaces for safer jar temperatures
Use a timer, burn in reasonable sessions, eliminate drafts, and choose a stable heat-resistant surface for safer jar temperatures.
Use burn session safety to think in repeatable controls: time, airflow, and surface.
Longer burns don’t just “use more wax”—they keep the glass in the hot zone longer, which can compound sidewall heat and create shoulder hot spots.
Drafts tilt the flame and shove heat sideways into one wall, so a candle can feel “fine” one day and run much hotter the next.
Surface choice matters because stone, metal, and thin glass tables can pull heat unevenly from the base and encourage stress.
A simple session-length risk map (directional, not a universal rule):
- 1–2 hours: lower stress, good for first tests and small spaces
- 2–3 hours: typical steady session if the candle is behaving well
- 3+ hours: higher risk zone, especially with drafts or already-warm containers
Practical surface & placement tips you can apply every time:
- Set a timer before lighting; consistency prevents “accidental all-day burns.”
- Place the candle on a level, heat-resistant base that extends beyond the jar’s footprint.
- Keep it out of airflow lanes (open windows, HVAC vents, doorway cross-breezes, ceiling fans).
- Re-center habits: if you notice repeated leaning flame patterns, treat drafts as the first suspect before changing the wick.
- Let the jar cool fully between sessions; rapid re-lights can stack heat.
- Stop burning when about 1/2 inch (12 mm) of wax remains in a container candle, because the remaining fuel buffer is no longer doing the same heat-protection job.
Jar too hot mid-burn — do this now (tight decision card):
- Extinguish the flame (don’t move the jar while it’s very hot).
- Leave it in place on a protective base and keep people/pets away.
- Do not add water, do not put it in a sink, and do not cap it while hot.
- Once fully cool, treat the setup as a fail and adjust wick/formula/airflow before relighting.
If the container starts feeling uncomfortably hot mid-session, cool an overheated candle by extinguishing it (don’t cap a hot jar), leaving it undisturbed on a protective base, and waiting until it’s comfortably cool before any handling or re-lighting.
How to inspect jars for micro-cracks, chips and heat ratings
Use bright angled light, rotate the container slowly, check the rim and shoulder for hairlines or chips, and confirm the supplier’s heat rating before you pour or burn.
A reliable routine for container QA basics starts with changing the lighting angle until tiny defects “flash” into view, because many hairlines disappear under straight-on room light.
Don’t confuse mold lines with cracks: mold lines look smooth and uniform, while cracks usually look jagged, branch slightly, or catch light differently as you rotate the jar.
To reveal the hard-to-see problems, backlight the glass, rotate it in small increments, and do a gentle fingernail pass on the rim and shoulder where stress concentrates.
Reject checklist (fast scan):
- Any chip on rim/shoulder, any starburst mark, or any “catch” under a fingernail → reject
- Deep scratch lines near the base or shoulder → reject
- Visible hairline that changes as you rotate under angled light → reject
- Unknown prior heat cycles, thrifted glass, or previously cracked vessels → treat as high risk unless fully verified
When you apply accept/reject criteria, be strict about rim and shoulder defects, because small damage there can turn into a failure once the glass expands under heat.
And if you’re deciding whether to reuse a jar, keep a clear reuse policy: reuse only if it passes inspection perfectly and you know its heat history—otherwise, retire it. If reused vessels are part of your workflow, check this guide to using recycled jars for candles before you put a damaged or unknown jar back into rotation.
How to label burn warnings and safe use correctly
Put clear burn warnings on the container in readable type with high contrast, covering distance-from-flammables, session time limits, wick trimming, and surface guidance.
If you follow warning label basics, you’ll treat the label as part of the safety system: it prevents the exact user behaviors that make jars run hotter (drafty spots, marathon burns, and unstable surfaces).
Keep this section at practical burn-warning support only; for the legal and standard-specific version of this topic, use this detailed guide to legally required candle labels and the broader candle safety compliance page.