
To make candles, you need wax, wicks, containers or molds, heat-safe tools, and optional fragrance or dye, plus a clean workspace for melting, measuring, and pouring safely.
Candle making only needs a small set of core materials, a few practical tools, and a safe setup that fits the type of candle you want to make. Wax, wicks, containers or molds, fragrance, and a heat source form the foundation, while tools like a scale, thermometer, and pouring pitcher make the process easier and more repeatable. The exact list changes depending on whether you are making jar candles, pillars, tapers, or wax melts. Starting with the essentials helps you avoid wasting money and keeps beginner testing simpler.
For a basic first batch, focus on the items you need first and add extras later.
- You need: wax, pre-tabbed wicks, a heat-safe jar or mold, a safe melting and pouring setup, a thermometer, a digital scale, and a stirring tool.
- Optional: fragrance oil, dye, labels, lids, and other finishing items.
Essential candle making supplies and materials
The essential candle making supplies are wax, wicks, a vessel or mold, and optional scent or color, plus a few small items that help everything stay centered, sealed, and finished properly. These materials become part of the candle or directly affect how it looks, smells, and burns.
For most beginners, the smartest move is to buy a small set of compatible supplies instead of mixing random parts from different candle styles. Jar candles usually need wax, pre-tabbed wicks, jars, wick stickers, and labels. Pillars and shaped candles usually need a mold, mold release, and a wick pin or threading tool instead of a container. Picking one candle format first keeps testing simpler and reduces waste.
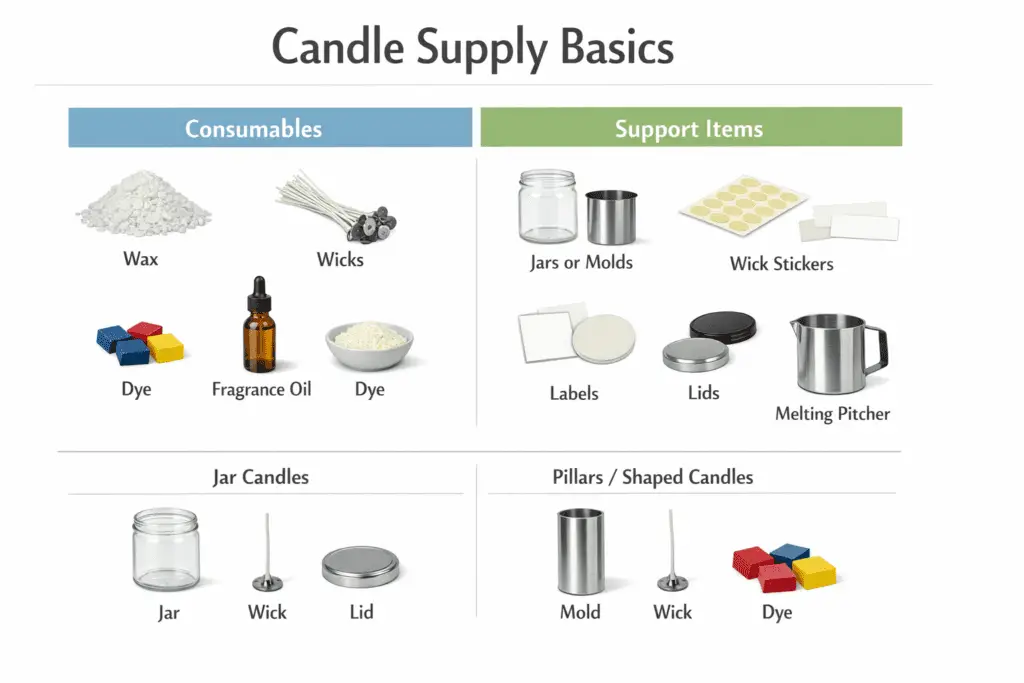
A useful way to organize your list is to split it into consumables and support items. Consumables include wax, wicks, fragrance oil, dye, and additives if you plan to use them. Support items include jars or molds, wick stickers, and a clean liner or tray for your work surface, with labels and lids added later if you want a more finished result. When those basics fit the same candle style, your first batches are much easier to troubleshoot.
Material choice matters because every part affects the final result. The wax controls texture and burn character. The wick controls flame size and melt pool. The container or mold controls form. Fragrance and dye change scent strength and appearance. Before adding extras, choose safe candle materials that can handle heat, work well with your wax, and suit the kind of candle you want to make.
What tools do you need to make candles at home?
The tools you need to make candles at home are a safe melting setup, a pouring pitcher, a thermometer, a digital scale, and simple tools for stirring, centering, and cleanup. These tools help you heat wax evenly, measure ingredients by weight, and pour with more control.
You do not need a full workshop, but you do need dedicated gear that can handle hot wax and repeated use. The core candle making tools are the ones that control heat, weight, and pouring. A double boiler or wax melter heats the wax. A digital scale measures wax and fragrance. A thermometer helps you know when the wax is ready for fragrance and pouring. Add a spatula or spoon for stirring, wick centering bars or clothespins, and paper towels for cleanup, and you have a solid home setup.
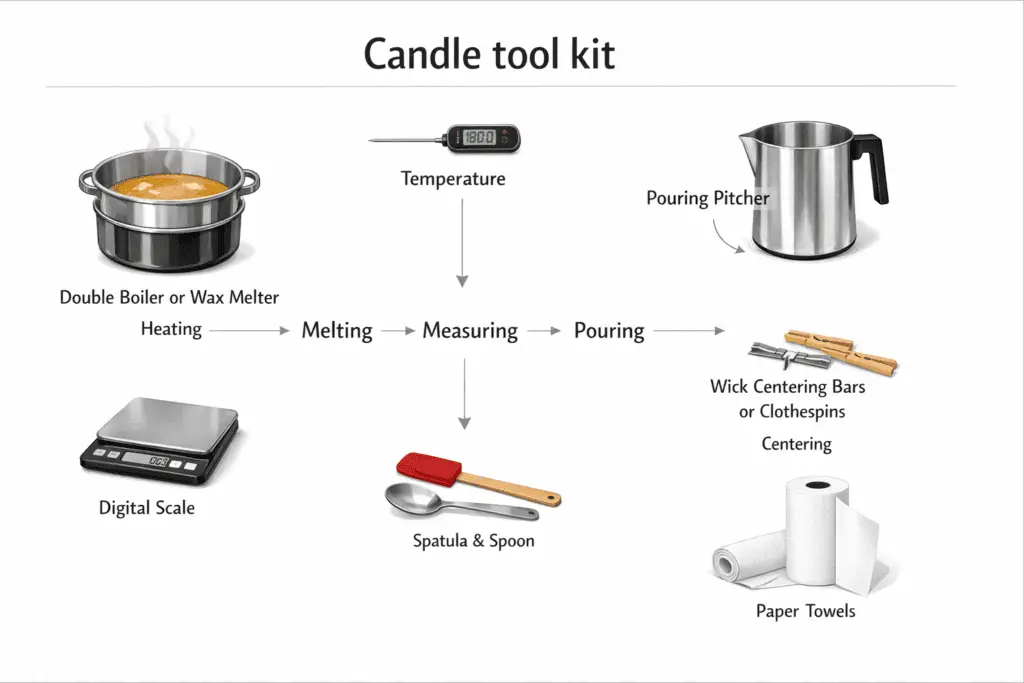
A candle pouring pitcher makes the process cleaner and safer than pouring from a hot pan. The handle gives you better grip, and the spout helps direct wax into jars without flooding the wick tab or coating the rim. Stainless steel is common because it handles heat well and is easy to clean between batches. Keeping one pitcher for candle use only also helps prevent contamination from food oils or soap residue.
Many beginners ask whether they really need a thermometer for candle making if the wax already looks fully melted. The answer is yes, especially when you are learning a new wax, adding fragrance, or trying to fix rough tops, weak scent throw, or poor glass adhesion. The same applies to the scale. Measuring by weight is far more reliable than guessing by sight, and a simple, consistent tool kit will usually give you better candles than a huge pile of tools you barely use.
How to choose the right wax for your candles
The right candle wax depends on your container, scent goals, finish preferences, and how much testing you are willing to do.
For a first batch, pick one beginner-friendly wax that matches your candle format and test it in a small run before comparing blends or specialty options. If you want a deeper breakdown of performance, finish, and candle-style fit, read how to choose the best wax for candle making instead of trying to solve every wax question on this page.
Wick types and sizing for different candle containers
The best wick for a candle container depends on the jar diameter, wax type, fragrance load, and how the candle behaves during burn testing.
For this page, the important point is that wick choice starts with your jar diameter, wax, and fragrance load, then gets confirmed through burn testing. If you want the full breakdown of wick families, charts, and sizing steps, use this candle wick types and sizing guide so this page can stay focused on what you need to get started.
Fragrance, dye, and additives you may need
Fragrance, dye, and additives are optional extras, not basic requirements, but they can change how a candle smells, looks, and performs.
Most beginners start with fragrance before they experiment with anything else because scent has the biggest impact on how a finished candle feels. Fragrance oil is usually easier to work with than trying to build scent from household ingredients, and it gives more predictable results in wax. The best approach is to use a fragrance intended for candle use and test it with your wax and wick combination before making a larger batch.

Color is also optional, and many new makers skip it during early test pours so they can focus on wick performance and scent throw. When you do want color, keep it simple. Dye chips, liquid dye, and dye blocks can all work, but the right choice depends on the wax and the look you want. Clean, even color matters more than trying to force an extremely dark shade in one pour.
Additives are usually not part of a beginner starter list. Many beginner-friendly waxes are designed to work well on their own, especially for container candles, so it is smarter to learn the base wax first and change one variable at a time only if testing shows you need to.
Candle making equipment safety guide
Candle making equipment should help you control heat, avoid spills, and reduce fire risk while you melt, mix, and pour.
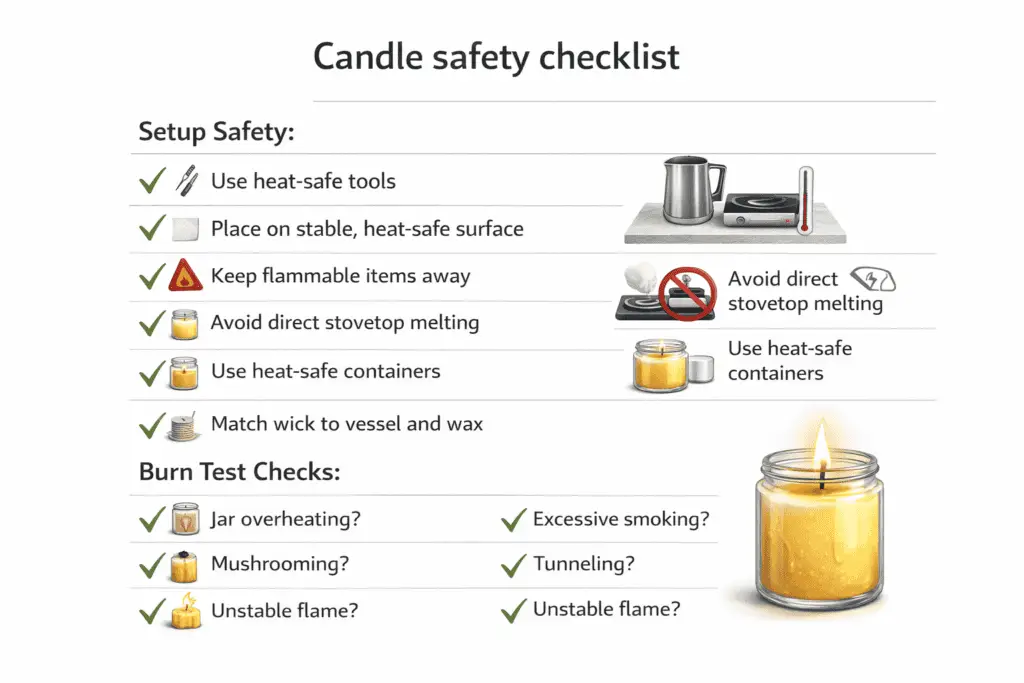
A good home setup starts with simple candle safety habits, not fancy gear. Use heat-safe tools dedicated to candle making, work on a stable heat-safe surface, keep flammable items away from the pouring area, and avoid direct stovetop melting unless the equipment is made for it. Stable surfaces, careful handling, and steady heating matter more than owning a large number of tools. Simple routines prevent more problems than extra equipment ever will.
It is also worth understanding practical candle safety basics, even if you are only making candles for personal use. That means using heat-safe containers, matching the wick to the vessel and wax, keeping flammable items away from the pouring area, and labeling finished candles clearly if other people will use them. Safe candle making is less about one magic tool and more about choosing compatible materials and testing them responsibly.
One of the most useful safety habits is doing a burn test before deciding a candle is finished. A burn test shows whether the wick runs too hot, whether the jar overheats, and whether the melt pool behaves the way you expected. It can also reveal problems like smoking, mushrooming, tunneling, or an unstable flame. Good equipment helps, but testing is what proves that your tools, materials, and candle design actually work together safely.
A simple beginner candle-making starter list
A simple beginner candle-making starter list includes wax, pre-tabbed wicks, heat-safe jars, a pouring pitcher, a thermometer, a digital scale, fragrance oil if wanted, and small tools for stirring and centering.
The easiest first setup is one that lets you make a small batch of container candles without buying a lot of gear you may not need yet. Starting small makes testing easier, keeps costs lower, and helps you focus on the basics before you move into pillars, molds, or more decorative projects.
Many people begin with a candle making starter kit because it bundles the core items into one purchase and removes some of the guesswork around compatibility. That can be useful when you want to learn melting, mixing, and pouring before comparing individual waxes, wick lines, and vessel styles. Even so, it still helps to understand what is inside the box so you can replace materials confidently later.
A basic candle making supplies list usually includes:
- Wax
- Pre-tabbed wicks
- Heat-safe jars
- Wick stickers
- A pouring pitcher
- A thermometer
- A digital scale
- A spatula or stirring tool
- Wick centering tools or clothespins
- Paper towels for cleanup
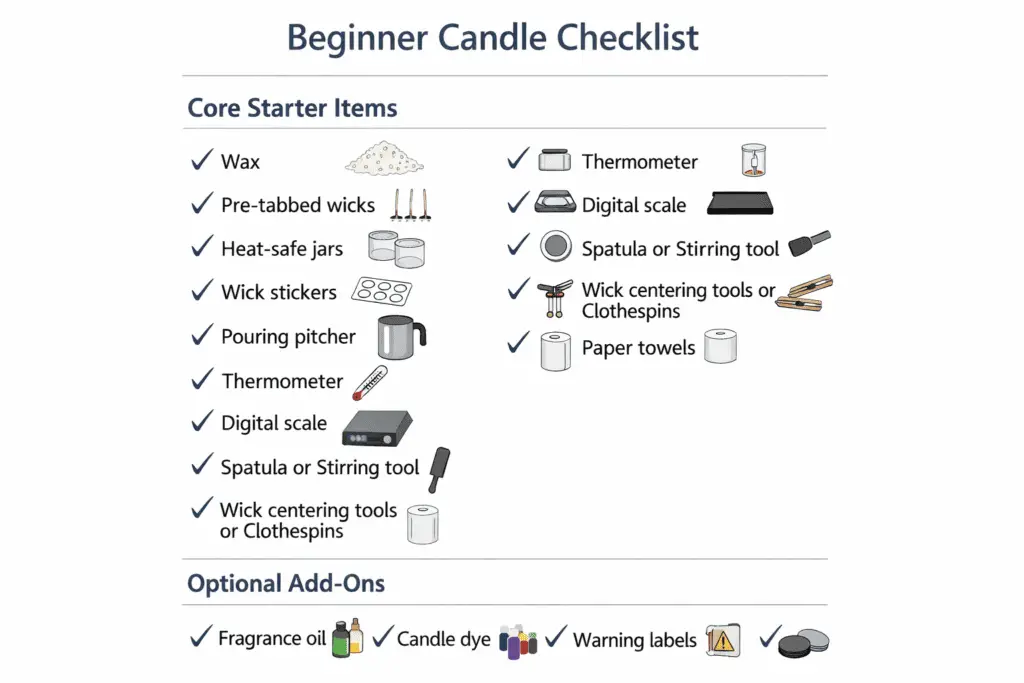
You can add fragrance oil, dye, warning labels, and lids once you are ready to make candles that look more finished or are meant for gifting. Keeping the list short at first helps you spend money on the items that affect performance most.
If your goal is to start candle making at home, choose one wax, one jar style, one wick family, and no more than one fragrance for your first round of testing. That setup gives you fewer variables to track and makes it much easier to figure out what caused weak scent throw, rough tops, or an uneven burn. A modest setup with compatible supplies will teach you far more than a giant shopping haul bought all at once.