
Start with wide glass containers, begin with the waterline about 25 to 50 mm below the rim, space floating candles about 5 to 8 cm apart, and choose fillers that will not cloud the water or tip the candles.
Floating candles look effortless until one sinks, a wick drowns, or a vase turns cloudy. Most failures come from a mismatch between the container opening, candle size, and waterline clearance. A few setup ratios, plus smart filler choices and a relight plan, keep the flames steady and the glass clear. Use the steps below to style floating candles safely and estimate burn time so tables stay lit.
Choose Containers for Floating Candles
Pick a container with a wide base, a smooth inner rim, and an opening that gives each candle enough room to self-center and stay level.
Start with the basics of floating candle types. A container works best when it is heavy enough not to tip, wide enough to resist wobble, and tall enough that splashes will not wet the wick. In practice, shallow bowls and low cylinders are the easiest options because you can see the waterline clearly and re-center candles quickly. If you want height, choose thick glass with a broad footprint and avoid narrow-necked vases that force candles to rub against the sides.
A wider base and a little clearance around the candle make floating candles easier to keep level and easier to relight. If you are still comparing formats, review the broader types of candles first, then match the container opening to the floating-candle diameter you plan to use.
Method: Measure the inside opening where the candle will actually float, at the waterline. Aim for a small clearance on all sides so the disc is not pinched or drifting into the wall.
Before finalizing the container, think ahead to how many candles you plan to float and how close the waterline will sit to the rim.
How Many Candles per Bowl, and the Ideal Water Level
Keep the waterline below the rim, leave breathing room between discs, and avoid crowding so each wick stays dry and easy to relight.
Use the table below as a starting point, not a fixed rule. The two variables that cause most problems are wicks getting splashed or misted, and discs bumping into each other and tilting. In most setups, starting with the waterline about 25 to 50 mm below the rim gives you room for movement and refills, but test the final vessel before the event.
Quick Count Lookup
| Bowl or cylinder opening, inside | Suggested disc count |
|---|---|
| 15 to 20 cm | 1 to 2 |
| 20 to 30 cm | 3 |
| 30 to 40 cm | 4 to 6 |
| 40 cm and up | 6 to 10 |
Wick height and airflow still matter even when the candle is floating. Before guests arrive, trim the wick and confirm that nearby candles and fillers are not crowding the flame.
Method: Start with the waterline about 25 to 50 mm below the rim, then test with one lit candle in the final vessel. If the wick gets damp during even a gentle swirl, lower the waterline or increase spacing.
Once the waterline and candle count feel stable, you can add fillers that support the look without clouding the water.
Fillers That Work, and How to Use Them
Use non-porous, rinseable fillers that will not bleed dye, shed dust, or trap bubbles, and keep them low enough that candles can drift without snagging.
The safest starting point is always floating candle basics. From there, you can build style on top. Clear glass beads and polished stones are usually the easiest fillers because they rinse clean and do not shed. Untreated botanicals are riskier because they can cloud the water, leave tannins, or break apart over time.
If you want greenery, choose hardy stems or sealed faux stems and rinse them first so you are not introducing oils, dirt, or sap into the water.
Treat your centerpiece like a small water-clarity test. If something clouds the water at home, it will usually cloud faster under warm room lighting and repeated refills. After the event, rinse the glass promptly so residue does not have time to set.
A filler trick that looks expensive without becoming impractical is to keep the filler layer thin, leave a clear floating lane in the middle, and add delicate accents only after the waterline is set.
Florals With Floating Candles: Fresh vs. Faux
Fresh florals can bleed and sink. Faux florals stay more consistent. Either way, pre-test buoyancy and dye bleed so petals do not foul the water or drift into wicks.
Start with floating candle basics, then decide based on how long the centerpiece must still look perfect. Fresh petals can absorb water and sink or drift unpredictably. Faux petals often float more consistently, but some shed pigment or coatings.
The smartest move is a short, boring test before the event. Submerge a sample for an hour, swirl the water, and check for tint, film, fuzz, or sinking.
A short soak-and-swish test quickly shows which petals float clean and which ones tint or shed. If you want colored water, test the tint separately so you can tell decorative color from contamination. For taller glass, choose sturdy vessels with a broad base and walls thick enough for repeated event use.
Once florals behave in water, you can decide whether to add color or scent, or leave the water crystal clear.
Color and Scent: Dyes, Food Coloring, and Essential Oils
Tint water lightly and avoid oils. Scent in the water often creates film or clouding, so it is better to put fragrance in the room, not in the vase.
Treat the water as part of the visible design. If you tint it, test the color in the same lighting your event will use, because a shade that looks soft in daylight can turn murky once candle reflections hit the glass.
Avoid adding essential oils directly to centerpiece water. Oils often form a surface film, can leave residue on glass, and may affect how the flame looks.
If fragrance matters for the room, compare scented vs. unscented candles for the broader use case, but keep oils out of centerpiece water.
Method: Make a one-cup test with the same filler and water source you will use later. Add tint one drop at a time and stop as soon as you can see color at arm’s length.
Once the water looks right, choose a theme so the color, filler, and vessel shape work together instead of competing.
Theme Ideas for Weddings, Holidays, and Outdoor Parties
Pick one dominant color family, one filler texture, and one vessel shape, then repeat that formula across tables so the look feels intentional.
Anchor the setup with floating candle basics, then build a repeatable recipe. A reliable approach is to keep the glass consistent and change only the filler or accent so the setup stays fast and the room looks cohesive.
Four Quick Centerpiece Recipes
- Wedding classic: clear cylinders, white floating discs, polished stones, and one small floating bloom
- Holiday glow: low bowls, a warm water tint, metallic beads, and a few pine sprigs kept well away from the wick
- Outdoor party: heavy bowls, stones, hardy greenery, and wider spacing for airflow
- Minimal modern: one disc per vessel, no filler, and mirror tiles under the glass, after testing glare
Keep tones consistent under the warm bulbs your venue actually uses. If you are styling outside, confirm that open flame is allowed and protected from wind before you commit to the look.
Once the theme is set, placement does most of the real visual work.
Placement for Ambience: Spacing, Reflections, Mirrors, and Pools
Space vessels so flames do not merge visually, use reflections intentionally, and test glare from guest eye level so centerpieces feel warm instead of blinding.
Lock in the basics with floating candle basics, then treat placement like lighting design. Tight clusters can feel romantic up close, but from a distance they often look chaotic. Wider spacing feels calmer and makes each flame and reflection count more.
If you add mirrors, test them at seated eye level and under the same overhead lights your venue uses. Small angle changes can turn harsh glare into a softer halo.
Pay attention to visual weight so tall glass does not overpower low tables. Before final styling, make sure the surface is level and not slippery so vessels do not slide when tables get bumped.
Once placement looks right, the next step is keeping everything stable and safe for the full burn window.
Safety and Stability: Preventing Tipping, Heat Risk, and Surface Damage
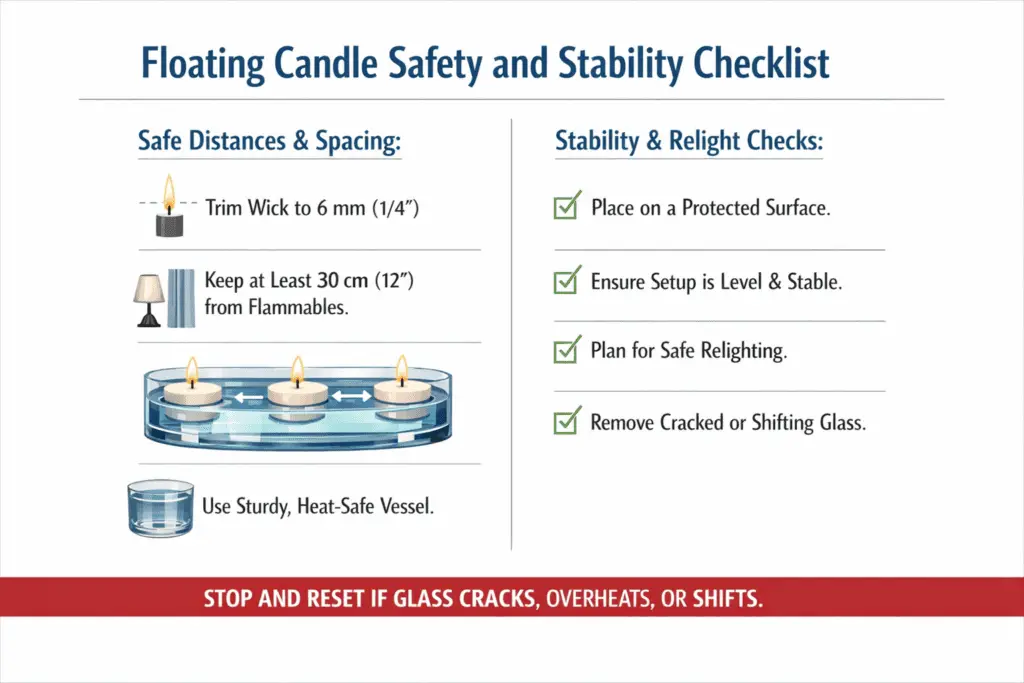
Trim wicks to about 6 mm, keep burning candles at least 30 cm from anything that can catch fire and about 7.5 cm apart from each other, use sturdy heat-safe vessels on protected surfaces, and build a relight plan so you are not leaning over guests with matches.
Run a simple pre-event checklist. Stability comes first: wide bases, level surfaces, and no overcrowding that causes glass-to-glass contact. Heat risk comes next: do not leave candles unattended, avoid placing flames under low décor or near delicate linens, and remove any arrangement that shows stress cracks, hot spots, or wobble.
If the venue has its own rules, confirm them early and decide whether LED alternatives are required.
Use a simple setup checklist so nothing gets missed during installation. If you notice overheating, cracking, or shifting glass, stop using that vessel and reset the arrangement before relighting.
For general guidance, the National Candle Association offers a useful baseline: NCA candle safety tips.
If something still goes wrong, such as tilting candles, drowning wicks, or soot on the glass, troubleshoot one variable at a time instead of rebuilding the entire centerpiece blindly.
Troubleshooting: Candles Sink, Wick Drowns, or Glass Soots
Most problems come from size mismatch, wet wicks, or crowding. Fix the waterline and clearance first, then adjust spacing and wick trim.
If you need the mechanics behind why a disc sits level or tips, see how floating candles float, then diagnose only one variable at a time.
- If a candle tilts or sinks, the disc is often too small for the opening, or it is being pushed by filler or neighboring candles.
- If the wick drowns, the waterline is too high for the amount of movement in the container, or the candle has taken on water from repeated splashes.
- If the glass soots, the problem is often airflow related, usually because the setup is too crowded, too drafty, or the wick is too long.

Fast Fixes, in Order
- Remove fillers and extra candles until one candle burns cleanly.
- Lower the waterline and re-center the disc.
- Add candles back one by one with more spacing.
- Trim the wick and retest.
To prevent size mismatch, compare the container opening with the actual disc diameter and confirm the fit in the final vessel before the event.
Method: Troubleshoot with a single candle in the final container for 10 to 15 minutes. Change only one thing per retest, either waterline, spacing, or wick trim.
Once the setup behaves reliably, planning burn time becomes much easier.
Burn Time and Budgeting: How Long They Last and How Many to Buy
Many floating candles burn for about 4 to 10 hours , depending on disc diameter, wax blend, wick design, and drafts, so plan by the actual candle rather than a generic label promise.
Burn time depends heavily on disc size. Small floaters often land around 4 to 5 hours, while many 3-inch floating candles run closer to 8 to 10 hours. First decide your actual lit window, such as cocktail hour through dessert, then decide whether you will swap candles mid-event or let them burn down naturally.
Simple Planning Formula
To estimate total candles needed, use:
Total candles needed =number of vessels × candles per vessel × number of burn cycles needed
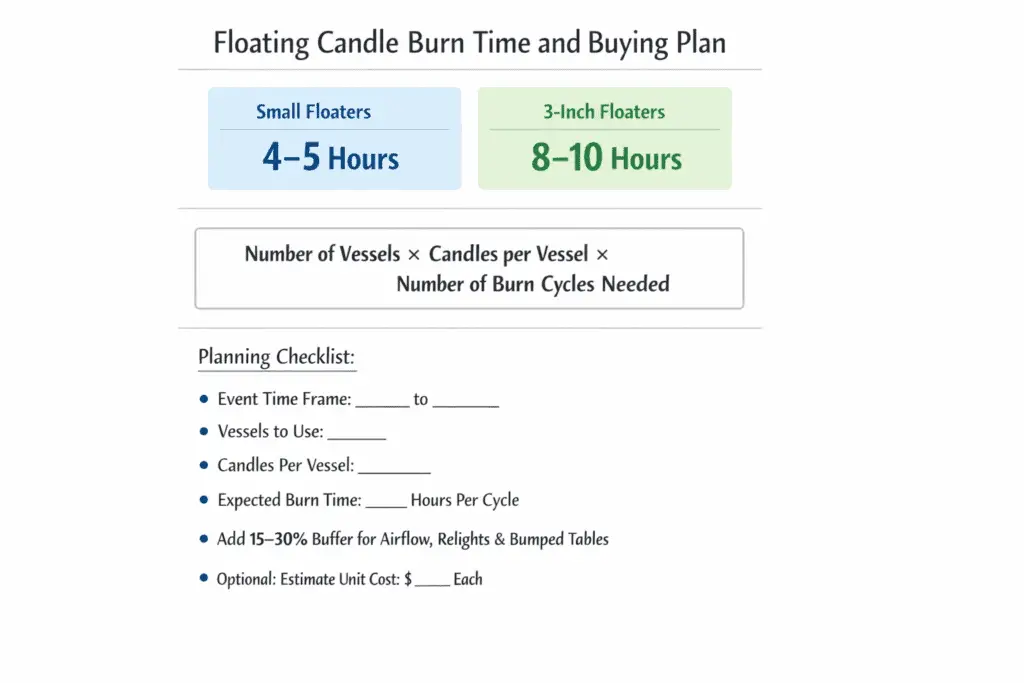
Then add a 15 to 30 percent buffer as a planning cushion for outdoor airflow, relights, and tables that get bumped or moved more often, then confirm the final number with a home test.
What to Record in a Home Test
- event lit window in hours
- number of vessels
- candles per vessel at peak
- expected burn time per candle in hours
- buffer percentage
- optional unit cost
What That Gives You
- total candles needed
- minimum extra candles for relights
- estimated cost, if you know the unit price
For broader runtime context beyond floating candles, see how long candles last, then confirm the exact runtime of your chosen discs with a home test. If you are deciding between similar sizes, compare the stated burn time on the package and test one candle in the final container.
When quantities are planned properly, setup and teardown become much easier.
Setup and Teardown: Fast Prep, Relighting, and Wax Cleanup
Stage glass and fillers first, light in a single pass, and assign one person to relights so the look stays consistent without disrupting guests.
Begin with floating candle basics so your team understands what can go wrong and why. The fastest setups are repetitive: identical vessels, pre-rinsed fillers, and a marked fill line so every container matches.
Light in one direction around the room, then do a second pass to re-center any discs that drifted. For teardown, let wax cool, lift remaining discs with a slotted spoon, and drain water before moving the glass.
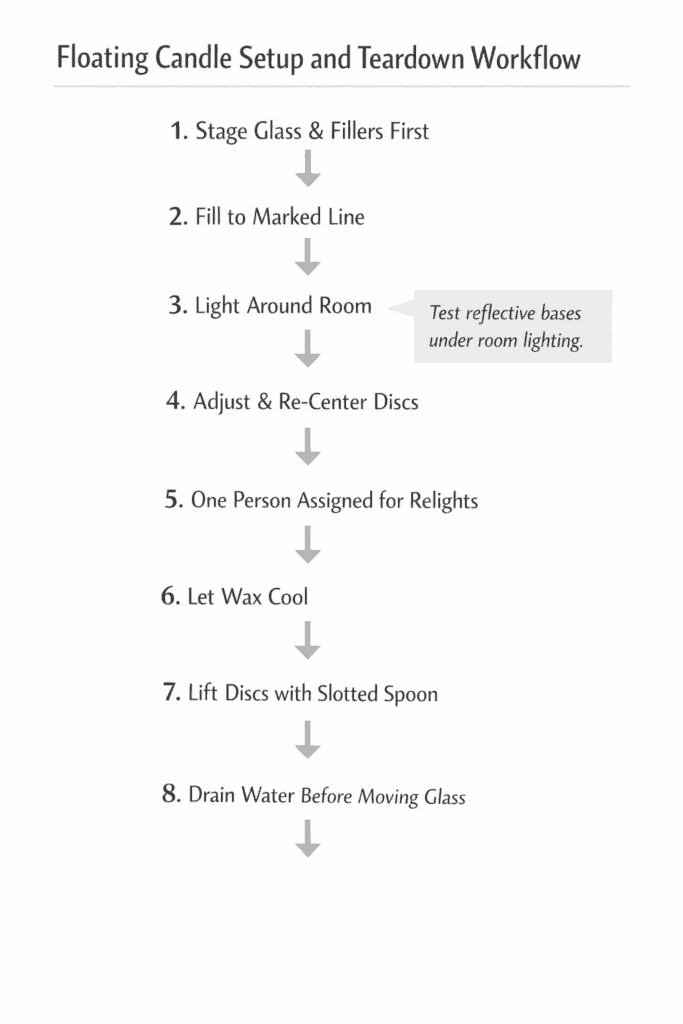
If your room has mixed table sizes, plan spacing on paper first so you do not waste time adjusting layouts on site. If you are using reflective bases, test them early under the real room lighting so glare is solved before guests sit down.
Method: Do one full-table rehearsal at home or in the venue. Fill, place, light, relight, and pack down a single table. Time it, then multiply by the number of tables to estimate staffing realistically.
Once the workflow is dialed in, reusing inventory becomes much easier.
Reuse and Storage: Cleaning Holders, Removing Residue, and Storing Stock
Rinse glass immediately, remove wax residue gently, dry everything completely, and store discs and vessels by size so the next setup is faster and the water stays clear.
Treat reuse as part of the budget. Dump the water promptly, rinse the vessel before residue dries onto the surface, and remove any remaining film gently so the next fill stays clear.
For storage, dry glass fully, then sort vessels and candles by size so the next setup is faster and no one has to guess which pieces belong together.
With clean glass and a labeled stock system, you spend less time troubleshooting and more time getting the glow exactly where you want it.
FAQ
How far below the rim should the waterline be for floating candles?
A practical starting point is about 25 to 50 mm below the rim. Then test for wick wetting during gentle movement in the final vessel.
How many floating candles can you put in one bowl?
It depends on the inside opening. Start by leaving visible water between discs so they do not bump into each other and tilt, then adjust by testing with the final setup.
Can you add essential oils to the water with floating candles?
Usually no. Oils often create a surface film, cloud the water, and leave residue on the glass. It is better to fragrance the room in another way.
Why do floating candles sink or tilt?
Common causes include a disc that is too small for the opening, crowding from fillers or nearby candles, or a waterline and wick setup that keeps the candle damp and unstable.
How long do floating candles burn?
It depends on the candle size and build, but many floating candles land somewhere around 4 to 10 hours. Small floaters are often closer to the low end, while larger 3-inch discs can run much longer.
How do you keep floating candles safe at an event?
Use stable, heat-safe vessels, keep flames away from drafts and edges, follow venue rules, and assign a relight plan so staff are not leaning over guests randomly during service.