
Fix tunneling, soot, weak scent, frosting, cracks, bubbles, warping, and layer issues in decorative candles by matching the wick to the wax, controlling pour and cooling conditions, and using quick re-melt repairs when needed.
A decorative pillar that tunnels, smokes, or loses scent can ruin the look of a display fast. In most cases, the real problem is a small mismatch between heat output, wax behavior, and the shape you poured. Once you know which symptom points to which variable, the fix becomes a short checklist instead of guesswork. Use the sections below to diagnose the problem, apply the fastest safe correction, and prevent it on the next pour.
For the broader cluster view, start with candle types and the general common issues and fixes in candle making guide, then use this page when the problem is specific to decorative or shaped candles.
| Symptom | Likely Cause | Fast Fix Now | Change on the Next Pour |
|---|---|---|---|
| Tunneling | Undersized wick, drafts, short burn | Run a controlled catch-up burn and level tall wax walls if needed | Retest wick size for the pillar diameter and wax blend |
| Mushrooming or soot | Oversized wick, heavy fragrance or dye load, long burns | Trim the wick to clean material and stop a smoky burn | Wick down or reduce the load that is feeding a dirty flame |
| Weak scent throw | Low melt-pool heat, poor wax/fragrance fit, early testing | Standardize the test and compare like with like | Adjust wax choice, wick heat, or fragrance load within supplier guidance |
| Frosting | Cooling shock and crystal bloom, especially in soy | Do a light cosmetic reflow only where needed | Slow the cool-down and stabilize mold and room temperature |
| Cracks or sinkholes | Uneven cooling and shrinkage around the wick | Reflow the top and top off any visible cavity | Warm molds and cool more evenly in a stable spot |
| Air bubbles or pitting | Fast pour, cold mold, trapped air around details or embeds | Top off late voids instead of chasing them with heat | Warm the mold and pour with less turbulence |
| Warping | Soft blend, thin geometry, uneven heat or storage pressure | Gently warm and straighten only if the candle is still sound | Use a firmer blend, better support, and cooler storage |
| Wick drowning or self-extinguishing | Undersized wick, deep melt pool, flooding | Remove a little excess liquid wax and re-center the wick | Retest wick size, fragrance load, or wax firmness |
| Layer separation or color bleed | Pours timed too hot or too cold, seam disturbed | Warm the seam and repair with a thin binder layer if needed | Control timing and temperature difference between layers |
Fix now vs next pour: If the candle is already made, start with the fastest safe repair for the defect you can see. If the same defect returns under controlled conditions, treat it as a formula, wick, mold, or cooling problem to correct on the next pour instead of repeating rescue steps forever.
Steps to Fix Candle Tunneling in Decorative Pillars
Candle tunneling stops when you build an edge-to-edge melt pool early and keep the wick output matched to the pillar’s diameter.
Run a controlled, draft-free burn long enough to reach the edge, then correct the root cause by resizing the wick if the melt pool still stays narrow on the next test burn. If the problem keeps repeating, move to a dedicated candle tunneling fix workflow before you keep forcing longer burns.
Tunneling happens when the melt pool never reaches the edges, so wax walls stay standing and the candle burns a deep center channel. The fastest fix is a longer, draft-free burn plus a wick change when the candle cannot reach full width even with enough time.
Start with safe burning fundamentals. Keep the candle level, away from drafts, and on a heat-safe surface. A common starting point is about 60 minutes per 1 inch (2.5 cm) of diameter, but the melt pool reaching the edge matters more than the clock.
Here are quick answers to the most common save-it questions:
Can I fix tunneling without repouring?
Yes. You can usually erase the memory ring by forcing a full melt pool with a controlled catch-up burn.
Can a heat gun fix tunneling?
Yes. It can level the top and melt the wax walls inward, but it does not replace a correctly sized wick.
Does tunneling ruin a candle?
No. But it reduces burn time and can make the flame behave poorly if the wax walls collapse later.
Take a quick proof photo before you start. Snap one top-down shot of the candle at 30 minutes, then another when the melt pool finally reaches the edge. That before-and-after pair makes it obvious whether the fix worked and whether the wick still looks undersized.
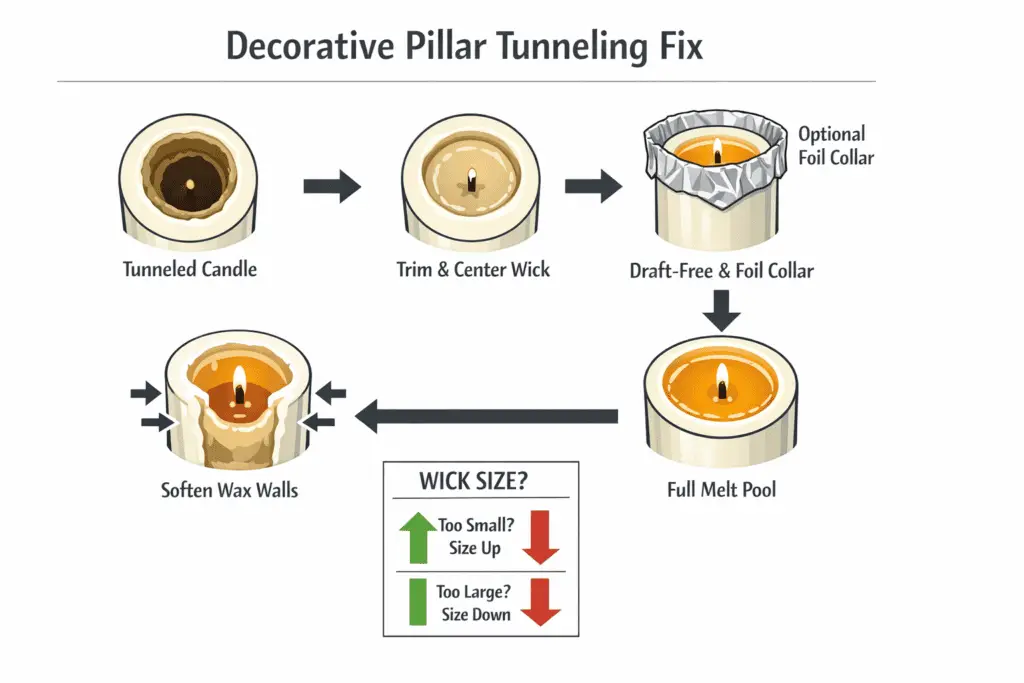
Checklist to fix tunneling safely
- Reset the conditions. Place the pillar on a level, heat-resistant surface in still air, and trim the wick to about 6 mm, or 1/4 inch, before lighting.
- Run a controlled catch-up burn. Burn long enough to reach a full melt pool to the edge, then keep it there for another 15 to 30 minutes so the wax walls soften evenly.
- Use a foil collar only as a temporary helper. Wrap a loose foil chimney around the top edge to reflect heat inward, and remove it once the melt pool reaches full width.
- Level the top if the walls are tall. Warm the wax walls and surface gently until the rim softens and slides inward, then let it cool fully before the next burn.
- Fix the real cause, wick sizing. If the candle still tunnels after an adequate session, you likely need a different wick size for that diameter and wax blend.
- Watch for warning signs. A tall flickering flame, smoke, or heavy carbon buildup means you should stop and troubleshoot soot or wick issues before trying another long session.
A simple rule keeps you from guessing. If, in still air, the melt pool still stays clearly short of the edge near the end of a full first-session burn, test one wick size up. If the flame grows tall, smoky, or overheats the edge, test one wick size down.
Quick repeatable test method: Keep room temperature, trim length, airflow, and burn duration the same. Record melt-pool width at the same checkpoints each session. If smoke or soot appears, stop testing and correct wick size first.
How to Prevent and Fix Wick Mushrooming (Carbon Cap)
Wick mushrooming drops when the wick stays trimmed and the wick size matches the wax and fragrance load so the flame burns cleanly instead of running fuel-rich.
Trim back to a clean tip before each relight, shorten burn sessions while testing, and resize the wick or adjust fragrance load if a carbon cap returns quickly after proper trimming. If trimming alone does not solve it, work through a dedicated candle wick problems guide before you keep relighting the same bad setup.
A carbon cap, the black mushroom-shaped buildup on the wick tip, forms when the wick delivers more fuel than the flame can burn cleanly. This is common with oversized wicks, higher fragrance loads, heavier dye loads, and poor burn conditions.
Start with safe burning basics so the flame stays steady and you can judge the wick honestly. Trim to a short, clean tip before each relight, and end the burn if the flame becomes unusually large or smoky.
Use a close-up proof step. Take a quick macro photo of the wick tip before trimming, then another right after trimming to a clean blunt end. That small before-and-after makes it easier to spot patterns across burns.
Common causes and fixes
- Wick is too large for the diameter. You see a fat flame and rapid cap growth. Fix it by choosing a smaller wick and retesting in still air.
- Fragrance oil is pushing the wick too hard. The cap returns quickly even after trimming. Fix it by reducing fragrance load and retesting after full cure.
- Dye or additives are increasing residue. You see darker caps and more smoke. Fix it by reducing dye load and confirming the wick series suits the wax.
- Burn sessions are too long. The cap grows after the first hour. Fix it by shortening sessions until the wick choice is stable.
Mid-burn correction steps
- Extinguish and cool. Let the candle cool until the wax surface firms up so you do not smear hot carbon into the melt pool.
- Trim to clean material. Remove the carbon ball and trim back to a clean tip at about 5 to 6 mm.
- Relight and observe for 10 to 15 minutes. A stable flame is short and steady. A tall flame or visible smoke means the wick is still too aggressive.
- Change the wick if trimming is not enough. If the cap returns quickly after correct trimming, adjust wick size or wick series. Trimming alone will not solve a mismatch.
The fastest way to reduce soot is to trim consistently and stop trying to power through a bad wick choice. Treat smoke as a separate problem. If you see black smoke or soot marks, pause the test and fix that first.
Quick repeatable test method: Keep trim length, room airflow, and burn duration constant for two burns in a row. If caps return quickly under identical conditions, treat it as a sizing or formula mismatch, not a one-off trim issue.
Steps to Improve Cold and Hot Scent Throw in Decorative Candles
Stronger scent throw comes from a compatible wax, a measured fragrance load within limits, and enough cure time for the blend to stabilize.
Standardize your process, test two fragrance loads within supplier guidance, and adjust wax choice or wick heat based on measured results instead of blindly adding more oil. If the decorative candle still smells weak after a controlled comparison, move to a dedicated weak scent throw in candles workflow before expanding your test plan.
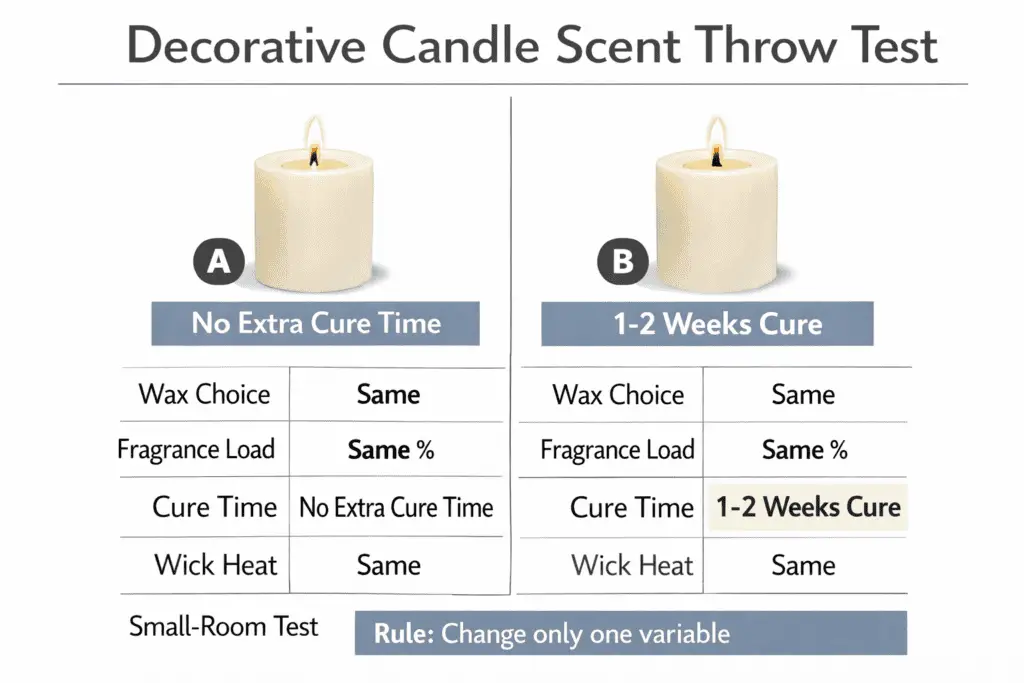
Before changing anything, compare like with like. Weigh wax and fragrance on a scale, mix thoroughly at a consistent temperature, and record cure days and test results under the same room conditions.
Fast fixes that actually work
- Confirm you are not nose-blind. Step outside for a minute, then smell the candle again. For hot throw, test in a small room with the door mostly closed for 30 to 60 minutes.
- Stay inside wax and fragrance limits. Do not jump straight to more oil. If the surface feels greasy, sweats, or weeps, you are likely past what the wax can hold.
- Choose wax for throw, not just looks. Decorative pillar blends often prioritize hardness and detail, sometimes at the cost of diffusion. If scent matters more, use a pillar blend known for stronger throw and then re-dial the wick.
- Standardize cure time. Testing too early can make hot throw seem weak even when the formula is fine.
- Match wick heat to fragrance release. Under-wicking can make hot throw seem weak because the melt pool stays too small and cool. Over-wicking can scorch notes and still smell thin.
A simple A/B test plan
For deeper side-by-side scent testing, use the dedicated weak-scent guide linked above. On this page, keep the rule simple: change one variable at a time, test under the same room conditions, and log only the few measurements you need to tell whether the problem is wax compatibility, cure, or melt-pool heat.
Steps to Fix Soy Candle Frosting (White Bloom)
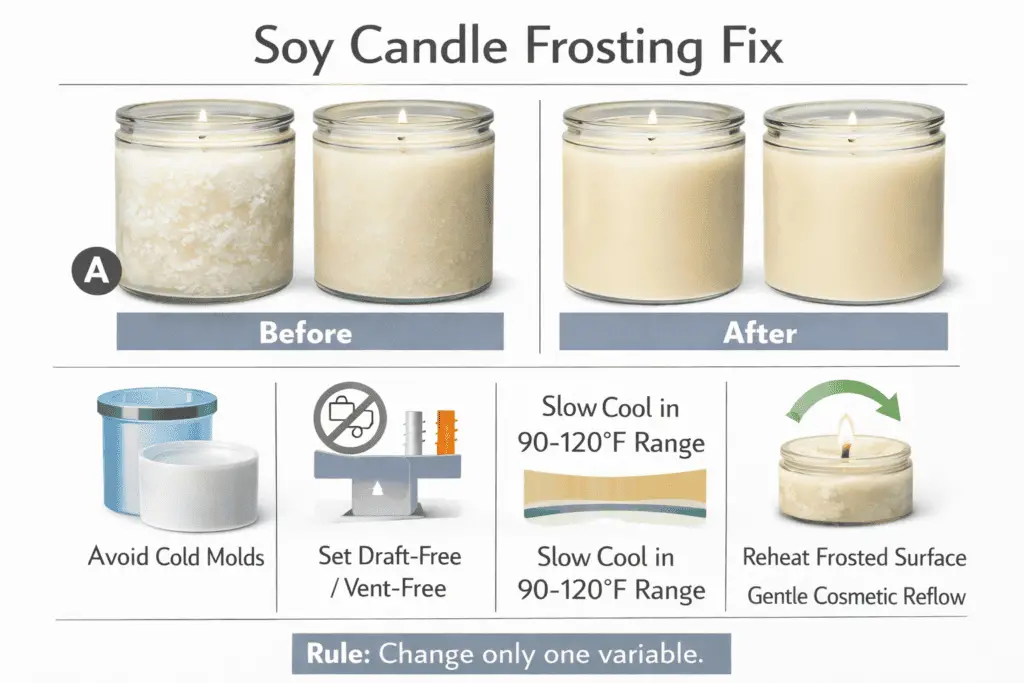
Soy frosting is mostly a cooling and crystal issue. Rapid temperature swings and cold molds push wax crystals to the surface. You reduce it by controlling cooling, tightening your pour routine, and doing gentle surface correction only when needed.
Keep molds and workspace at stable room temperature, cool slowly away from drafts, and lightly reflow the surface only when you need a cosmetic reset.
Frosting can show up overnight, especially on colored soy, and it does not automatically mean the candle is bad. The practical goal is a smoother, more uniform finish that stays presentable under normal storage and display.
Step-by-step prevention
- Warm the mold and workspace. A cold mold exaggerates crystal formation.
- Pour consistently. Pick a pour temperature window that works for your wax and stick to it for the whole batch.
- Slow the cool-down. Let candles cool in a stable room away from vents, windows, and cold countertops.
- Avoid shock changes after demolding. Moving a candle from a warm room to a cold one, or into direct sun, can bring frosting forward even if it looked fine at first.
Fixing frosting already on the candle
- Gently re-melt the surface. Brief, even warming can reflow the top layer and reduce the hazy look.
- Spot-smooth only where needed. If frosting is patchy, treat the patches instead of overheating the whole candle.
- Check your notes. If frosting repeats in the same mold, start by looking at mold temperature, pour consistency, and cooling location.
Quick do and do not list
Do:
- cool in a stable room with minimal airflow
- keep molds at room temperature before pouring
- change one variable at a time
Do not:
- chase zero frosting forever, soy is prone to bloom
- cool on cold stone or metal surfaces
- overheat the surface trying to erase every mark
Quick repeatable test method: Use the same wax batch, dye load, pour temperature, and mold. Change only cooling speed or insulation. Photograph the candle at 24 hours and 72 hours.
Steps to Fix Surface Cracks and Sinkholes on Candle Tops
Most top cracks and sinkholes can be fixed by gently reheating the surface, refilling the cavity, and letting the candle cool evenly so the top sets as one piece.
Reflow the top just enough to relax the crack, then top off the void with matching wax at the right moment so it bonds instead of forming a floating cap.
To fix a sinkhole around the wick, level the candle first, warm only the top until it turns slightly glossy, then add a small top-off pour of the same wax and let it cool in a draft-free spot. If the defect keeps coming back, move to fixing sinkholes and wet spots in candles for a deeper repair workflow.

Read the defect before fixing it
- Hairline crack across the top: the surface set too fast while the center kept shrinking.
- Crack ring around the wick: the wick area cooled differently or got bumped while setting.
- Single deep sinkhole near the wick: the center shrank as it cooled, leaving a hidden void.
Step-by-step repair
- Stabilize and prep the candle. Put it on a level surface. Trim the wick a bit if it is flopping, and brush away loose crumbs.
- Reheat only the top layer. Use low, moving heat just until the surface turns slightly glossy. You want a brief melt skin across the surface, not a softened candle body.
- Fill the void cleanly. If you can see a cavity, add a small amount of matching wax into the low spot.
- Cool slowly and evenly. No fan, no fridge, no cold windowsill.
- Polish the surface if needed. A final light heat pass can even out the sheen.
If you keep getting sinkholes and cracks, treat it as a cooling problem. Cold tools and fast cooling create stress lines. In molded work, starting with a cold mold causes more trouble than most people realize.
Quick repeatable test method: Keep batch size, mold, and pour temperature constant. Compare two cool-down spots, one drafty and one stable, and photograph tops at unmold and after they have fully rested.
How to Eliminate Air Bubbles and Pitting in Molded or Embedded-Decor Candles
To stop bubbles and pitting, warm the mold, pour slowly at the right temperature, and give trapped air a path to escape before the wax forms a skin.
Reduce turbulence, vent high points, and pop surface bubbles early. Then repair late voids with a controlled top-off instead of chasing them with heat. If the same mold keeps trapping air, move to a dedicated candle mold bubbles fix workflow before changing unrelated variables.
If bubbles keep showing up, use the same core idea every time. Reduce turbulence, keep wax viscosity workable, and release air early. Repair hidden voids later with a controlled top-off if needed.
Why bubbles happen
- You pour too fast, from too high, or directly onto details.
- Air gets trapped at tips, edges, or around embeds.
- Tiny bubbles rise late or the surface cools unevenly, causing pitting.
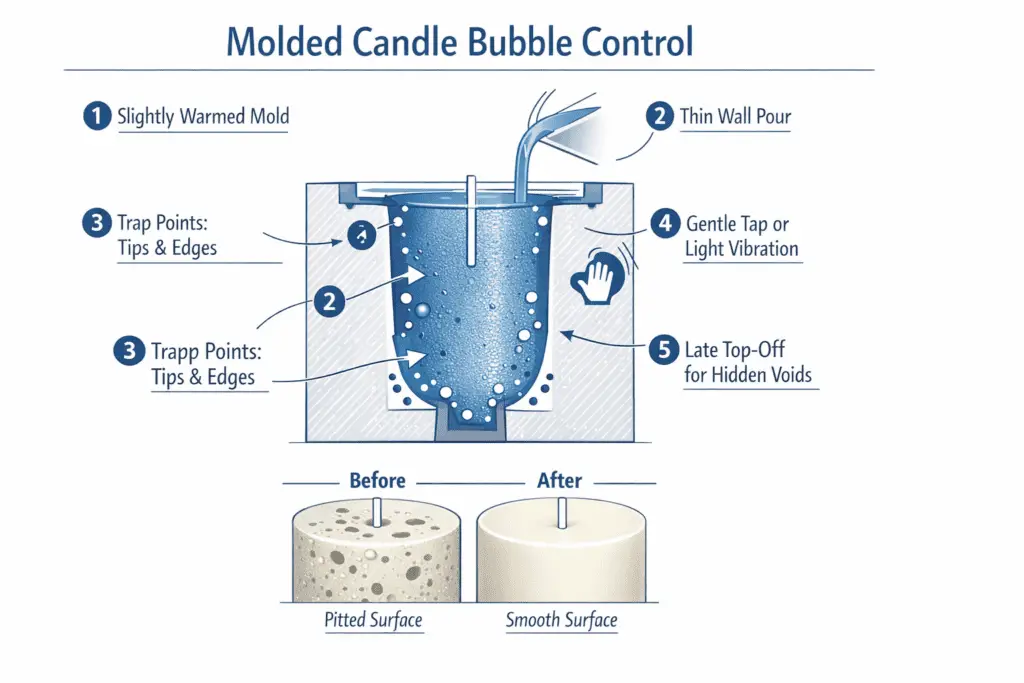
A reliable bubble-control routine
- Warm and prep the mold. A clean, dry, slightly warmed mold releases air more easily than a cold one.
- Control wax condition. Wax that is too cool traps bubbles. Wax that is too hot can cause more shrinkage and later voids.
- Pour with low turbulence. Pour in a thin stream along the side wall so wax climbs the details instead of splashing into them.
- Help air escape from top points. For molds with sharp tips or high points, tiny vent paths can make a big difference.
- Release bubbles early. Tap the mold gently or give it a light vibration right after pouring.
- Repair late-forming voids. If a cavity appears during set, top it off with matching wax once the candle has a firm outer shell.
Extra note for embedded decor
Air often hides where an embed meets the wax. Place embeds so wax can flow under and around them, and pour in stages if needed instead of forcing wax through tight gaps.
Quick repeatable test method: Run one fast pour and one slow wall pour with the same wax and mold. Compare bubble count and pitting after 24 hours. Photograph the worst areas, especially tips and edges.
Steps to Prevent Warping in Decorative-Shaped Candles
Warping happens when a soft wax blend or thin shape gets uneven heat and then cools out of alignment. Prevention is mostly about firmness, support, and stable storage.
Use a firmer blend for tall or thin shapes, support the candle upright during cure, and store it away from heat and pressure so it never softens out of alignment.
If you already see a bend or slump, you can often correct it with gentle, even warming and a simple straightening jig, as long as the candle is not cracking or crumbling. If the shape itself keeps fighting the formula, step back to how to make decorative-shaped candles before you keep testing hotter or longer burns.
The three main control points are:
- wax firmness
- shape strength
- heat exposure during cure, storage, and transport
Practical steps that prevent most warps
- Harden the wax for the chosen shape. Tall, thin, or delicate designs usually need a firmer blend.
- Support the geometry while it sets. Keep tall candles upright for the first several hours after demolding.
- Cool evenly, not quickly. Uneven cooling locks in stress that can show up later as a bend.
- Store like a fragile sculpture. Keep candles upright, spaced apart, and out of warm windows or stacked pressure.
- Plan for transport heat. A parked car acts like an oven. Pack candles with rigid support, keep them shaded, and do not leave them in the vehicle.
How to straighten a warped candle
- Warm the bent area only with gentle, moving heat until it becomes slightly flexible.
- Align the candle against a straight edge, such as two flat boards.
- Let it cool fully in that position before handling it again.
Quick repeatable test method: Record room temperature and any heat exposure for one week of storage. If warps match heat spikes, fix storage and transport before changing the formula.
How to Stop Wick Drowning and Self-Extinguishing
A wick goes out when it cannot draw enough fuel through the melt pool. Usually that means the wick is undersized, the melt pool is too deep, or the wick is being smothered by excess liquid wax.
If flooding is obvious, carefully remove a small amount of excess liquid wax, re-center and re-trim the wick, then resize the wick or adjust fragrance and additives if it keeps happening under controlled conditions.
If the wick keeps going out, start with a fast diagnosis. Look for a deep pool, a tiny weak flame, or a wick tip that has bent over and submerged.
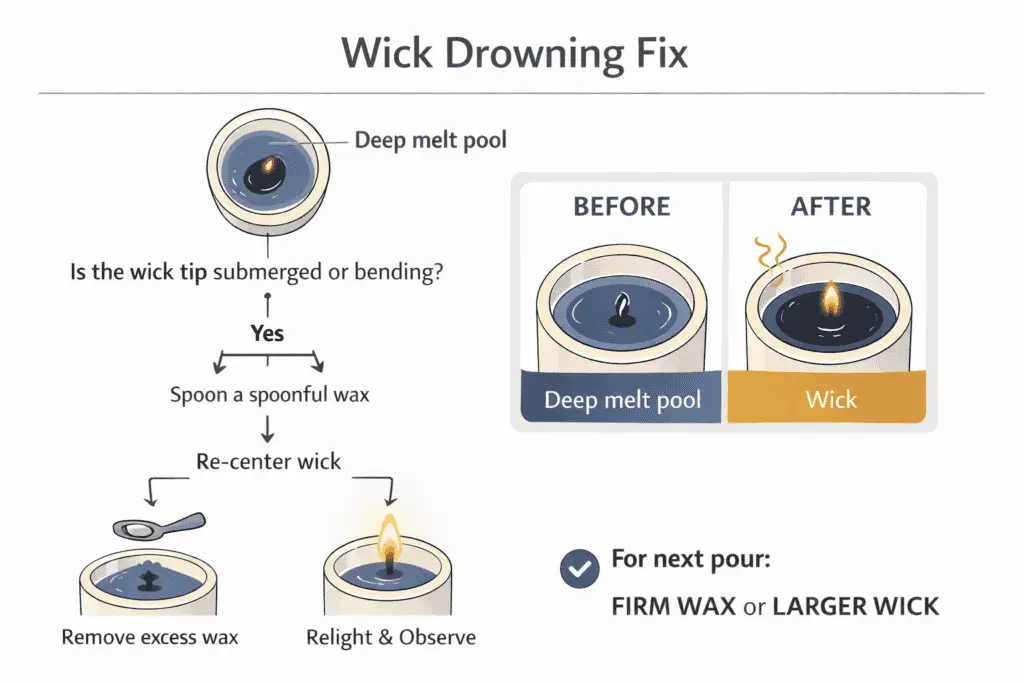
Quick rescue during a burn
- Extinguish safely and let the wax settle.
- Remove a small amount of liquid wax if flooding is obvious.
- Straighten and re-center the wick so the tip is upright and exposed.
- Relight and watch for 10 to 15 minutes.
If the flame remains tiny and weak, you likely need a larger wick on the next pour.
Prevention for future candles
- Use the correct wick size for the diameter and wax hardness. Undersized wicks are the most common root cause.
- Watch fragrance load and compatibility. Too much fragrance, or the wrong oil, can change how the wax feeds the wick.
- Keep the wick upright through cooling and early burns. A leaning wick can melt one side deeper and drown itself.
If it only goes out later in the burn
That usually points to a melt pool that becomes too deep over time or a wick that cannot sustain fuel delivery once saturated. Retest with a slightly larger wick, a lower fragrance load, or a firmer wax blend.
Quick repeatable test method: Log flame height and melt-pool depth at consistent checkpoints during one burn. If depth increases until the wick tip submerges, solve pool depth instead of trimming alone.
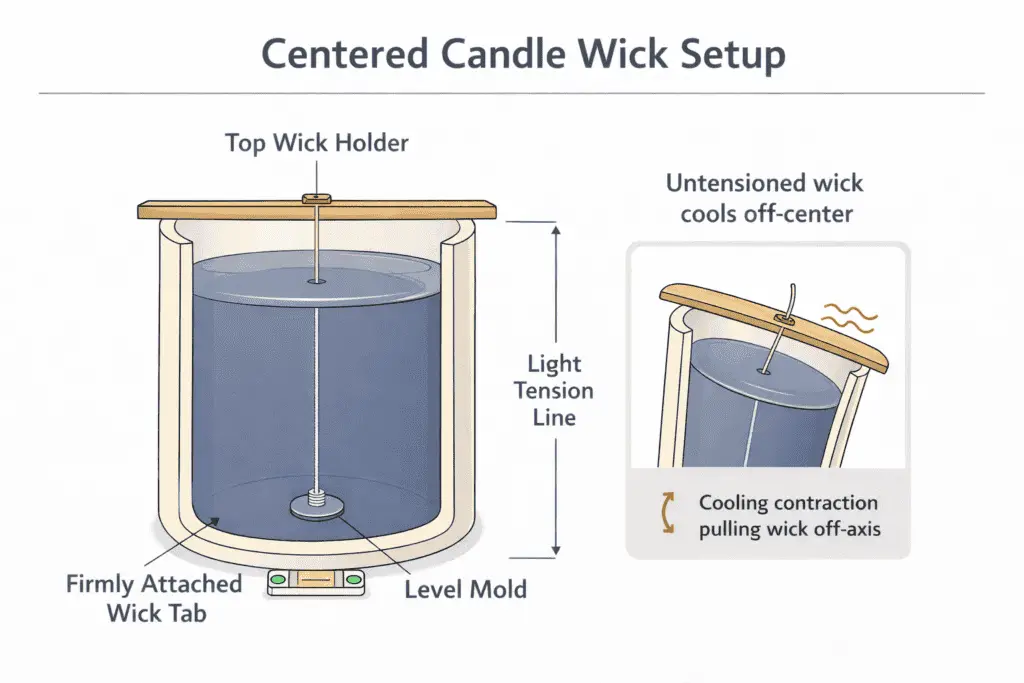
Steps to Keep Wicks Centered (Prevent Drifting and Off-Center Burns)
To keep the wick centered, anchor the wick tab firmly, hold the wick under light tension, and keep it locked in place until the candle is fully set and cooled.
Center at the base and the top, stabilize with a holder, and do not move the mold during the thickening stage when wax shrinkage can pull the wick off-axis.
Most drifting starts before the wax looks finished. A wick can lean when the base is not stuck well, when the top is not held straight, or when wax pulls as it cools.
The sneaky culprit is cooling contraction. As wax shrinks, it can tug the wick off-axis if anything is loose or if the wick is not tensioned.
Steps that prevent drift
Keep this section as a quick diagnosis, not a full setup tutorial: lock the tab firmly, hold the top of the wick straight with light tension, keep the mold level, and correct minor drift only while the wax is still pliable. If the wick keeps freezing off-center after controlled pours, it needs a dedicated wick-centering workflow rather than more small nudges.
Steps to Fix Layer Separation and Color Bleed in Multi-Layer Pillars
To fix layer separation, prep the first layer’s surface for bonding, control temperature differences, and time each pour so layers adhere without melting into each other.
Pour the next layer when the first is firm but still warm, score the surface for grip, and control the next pour temperature so you fuse without remelting the boundary. If seams keep bleeding or separating, move to preventing color bleeding between candle layers for the deeper timing and dye workflow.
Layering fails in two main ways. Either the layers do not bond and split, or they bond too wet and colors smear across the boundary. The biggest lever is the second pour temperature relative to the condition of the first layer.
Too hot, and you soften the edge. Too cold, and you get a weak bond that can pop apart later.
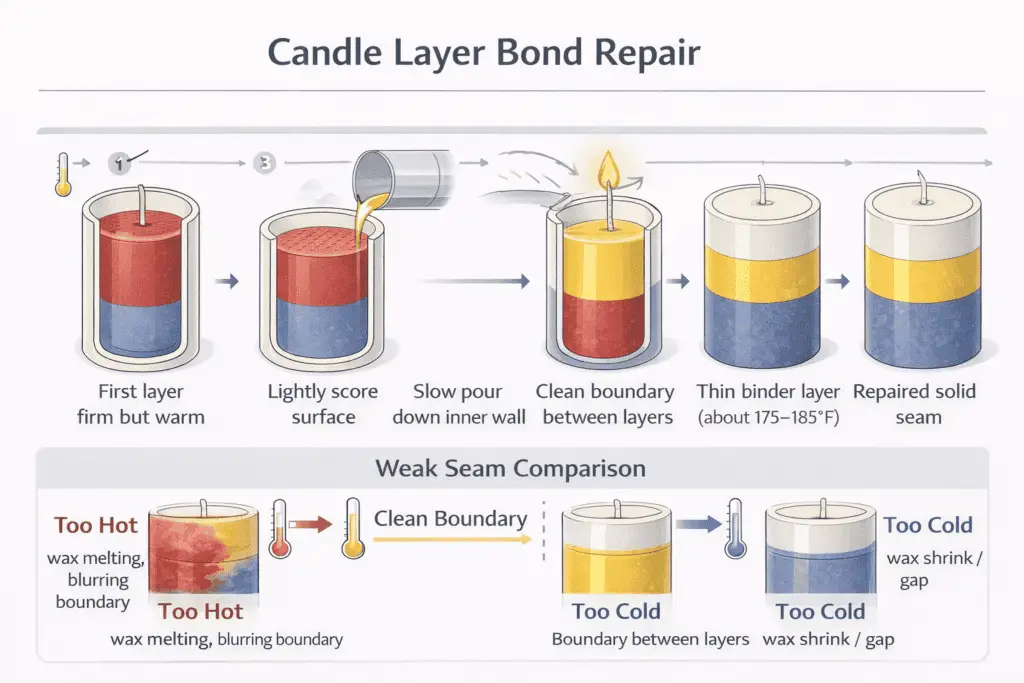
Steps for stronger bonds and cleaner color lines
- Let the first layer set to firm but warm. You want a stable surface that can still accept heat.
- Score the surface lightly. A little texture gives the next layer something to grip.
- Pour slowly along the wall. This reduces turbulence that can drag dye across the seam.
- Match wax hardness across layers. Big formula differences can shrink at different rates and encourage separation.
- Keep temperature swings small. Large jumps encourage either remelt and bleed or poor fusion and separation.
- Repair a separated layer carefully. Warm the seam just enough to soften it, then re-pour a thin binder layer before adding the next full layer.
Dye choice and bleed risk
| Dye Type | Typical Bleed Tendency | Best Use in Layers |
|---|---|---|
| Liquid dyes | Higher, can migrate more easily | Soft blends and subtle gradients |
| Dye chips | Medium, depends on load and wax | Cleaner stripes when used lightly |
| Pigments and powders | Lower migration, but can streak if overused | Bold bands when fully dispersed |
Quick repeatable test method: Run a two-layer test where only one variable changes, either timing or pour temperature difference. Photograph the seam at 24 hours and again after one full burn session.
Steps to Preserve Carved and Sculpted Candle Details
Keep carved details from slumping by running a cooler wick profile, shortening burn sessions, and building enough wax mass that the melt pool never washes over the fine edges.
Reduce flame heat first, trim and wick down if needed, then choose a firmer wax for complex shapes so raised details stay crisp through real burn sessions.
Treat detail loss as a heat-management problem, not a mold problem. If the flame is too hot for the candle’s surface area, the highest relief softens first and the design rounds over.
A good first move is to step down to a smaller wick, or a cooler-burning wick series, then retest in short sessions.
Use a simple photo check. Take a phone photo from the same angle before lighting, then another after a short burn session, focusing on the thinnest edges and highest ridges.
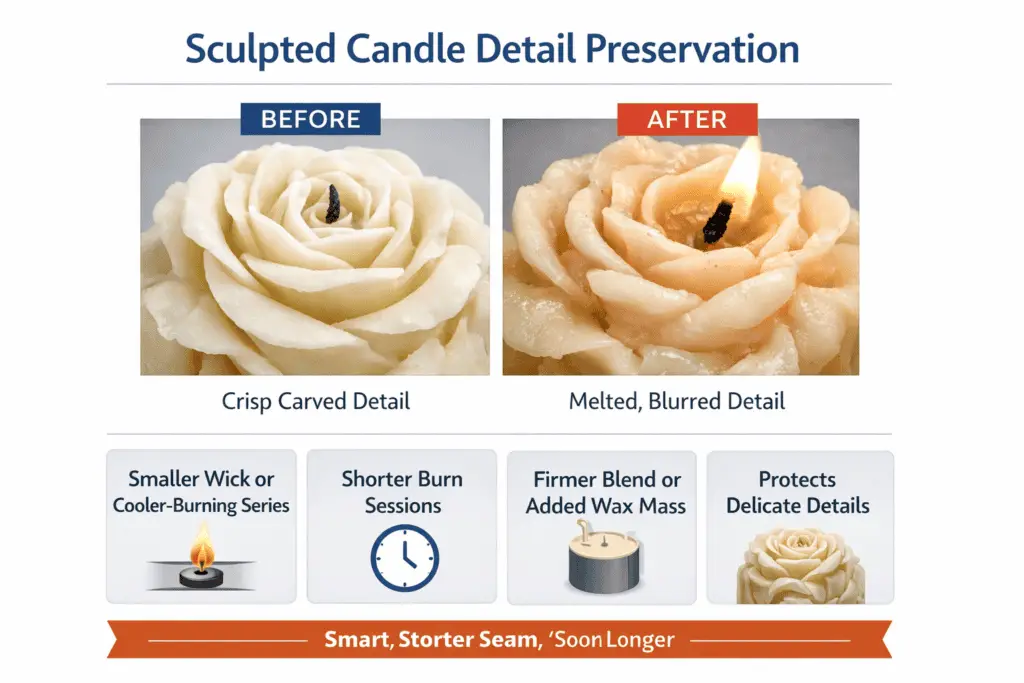
Practical step sequence
- Reduce heat input first. Trim the wick, then test one size down or a cooler series.
- Cap your burn sessions. Detailed pillars do better with shorter burns and full cool-downs between them.
- Add wax mass where the design is thin. If your mold allows it, increase wall thickness or redesign fragile features.
- Match wax hardness to design complexity. Soft blends round details sooner.
- Stiffen the blend if needed. If the wax is consistently too pliable, use a firmer blend or selective additives, then retest.
- Retest with a simple pass-fail rule. If crisp relief survives a short session and full cool-down, you are close. If it still rounds fast, step down the wick again before changing anything else.
Quick repeatable test method: Use the same candle design and compare two wick sizes with identical trim and burn duration. Photograph the same detail area before the burn and after cool-down.
How to Remove Visible Mold Seams and Flash Lines on Decorative Pillars
Remove seam lines by trimming the ridge cleanly, scraping it flush, then lightly heat-polishing the surface. Prevent new seams by aligning and clamping the mold halves before you pour.
Let the candle harden fully, shave the seam ridge in thin passes, then blend micro-scrapes with gentle moving heat so you smooth the finish without rounding details.
First, identify the defect correctly:
- Flash is the thin fin of wax that squeezes into a gap at the mold seam.
- Seam line is the raised ridge left where two mold halves meet.
Prevention starts before pouring. Rigid molds often need tighter alignment and even clamping, while flexible molds may need support to keep the seam from shifting.
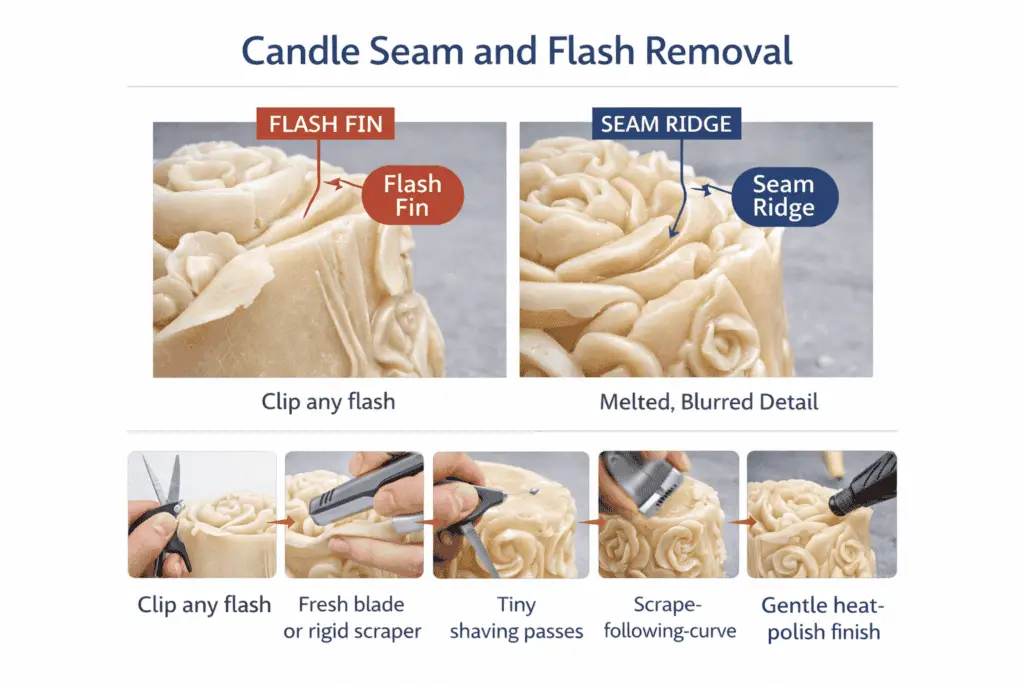
Setup habits that prevent seams and flash
- align the mold halves carefully
- clamp evenly from top to bottom
- pour at a steady, moderate pace
- avoid forcing wax into gaps
Low-risk seam and flash removal sequence
- Let the candle fully harden. Seam work goes better when the wax is firm and not tacky.
- Trim the high ridge. Use a fresh blade or rigid scraper and shave the seam down in tiny passes.
- Scrape flush, do not grind. Follow the curve of the candle so you remove the ridge without flattening nearby detail.
- Polish with gentle heat. A quick light pass of warm air can blend micro-scrapes back into the surface.
- Re-check with a simple score. Rate seam visibility from 1 to 10 in your testing log and keep changes small.
If you are working with 3D-printed molds, seam problems can be structural rather than technique-related. In that case, you may need to seal or improve the mold itself, because the mold is creating the same raised line every time.
Final Troubleshooting Rule
Do not change five variables at once and then pretend you learned something. That is how people waste wax and keep repeating the same mistake.
For every test candle, keep a simple log with:
- wax blend
- wick type and size
- fragrance load
- dye load
- pour temperature
- room conditions
- cure time
- melt-pool width
- flame behavior
- visible defects after cooling and burn
Change one variable, test it properly, and record the result. That is how decorative candle troubleshooting stops being guesswork and starts becoming repeatable.