
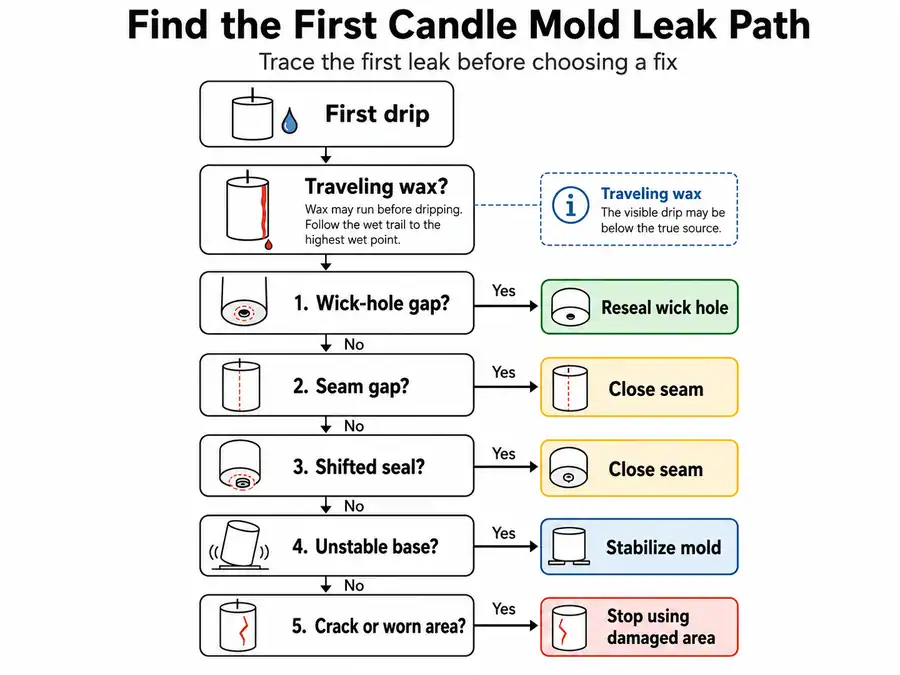
| First sign | Likely leak path | First action | Route outward if |
|---|---|---|---|
| Wax appears at the bottom wick opening | Wick-hole gap | Reseal the bottom opening before pouring | The question shifts to wick size or burn testing |
| Wax runs along a side seam | Joining-edge gap | Realign the mold and apply even seam pressure | The question becomes mold construction comparison |
| Wax appears after the mold is moved | Shifted seal or unstable base | Stabilize the mold before adding more wax | The question becomes full workspace setup |
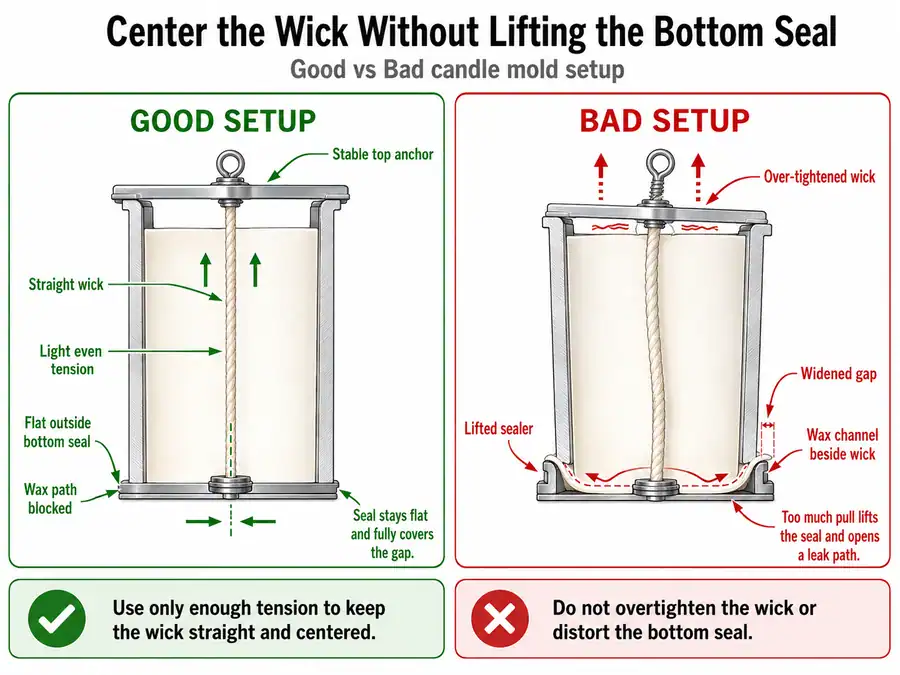
| Wax appears after the wick is tightened | Lifted bottom seal | Center the wick without pulling the seal loose | The question shifts to wick-series selection |
| Wax appears away from wick holes and seams | Crack, puncture, or worn area | Stop using that leak point for hot wax | The question becomes permanent repair or defect assessment |
| The bottom looks wet, but the first wet point is higher | Traveling wax from a seam, upper edge, or crack | Trace upward and fix the true source first | The question becomes broader mold-release or cleanup guidance |
Why Wax Leaks From the Wick Hole
Wax leaks from the wick hole when the bottom opening is not fully sealed around the wick, pin, plug, or sealer. A wick-hole leak is wax escaping through the bottom opening where the wick, wick pin, plug, or temporary seal passes through the candle mold. This leak starts at the mold’s lowest opening, so even a small gap can drain wax before the candle sets. Check supplier SDS and mold instructions before using any sealer that touches heated wax or the mold surface. The most likely cause is not the wick itself; it is the space around the wick. Wax can escape if the wick hole is wider than the wick, if the mold sealer misses one edge of the opening, if the wick is pulled upward and lifts the seal, or if the seal softens during the pour. Use this wick-hole symptom table to match the first sign to the likely sealing problem.| Wick-hole symptom | Likely cause | What it means before you fix it |
|---|---|---|
| Wax beads around the bottom wick opening | Small gap beside the wick, pin, or plug | The bottom opening needs a tighter outside seal before pouring |
| Wax runs straight down the wick | Wick path is not blocked at the bottom | The wick is acting like a leak channel, not just a wick |
| Wax leaks only after the mold is moved | Seal shifted or lifted during handling | The mold needs support before the pour rather than more sealer alone |
| Wax leaks after the wick is tightened | Wick tension lifted the bottom seal | The wick should be centered without pulling the seal loose |
| Wax appears near the wick hole but starts higher | Wax traveled down from a seam or crack | Diagnose the first escape point before sealing the bottom again |
Why Candle Mold Seams Leak
Candle mold seams leak when joining edges on a two-part or multi-part mold do not close evenly enough to hold melted wax. A seam leak is wax escaping through the joining edge where mold pieces meet. It happens when the seam has a gap, residue, uneven pressure, misalignment, or flexible bowing during the pour. For mold construction differences, use one-piece vs two-part candle molds as the side guide after you confirm the leak starts at the joining edge. A seam leak is not the same as a visible seam line on a finished candle. A finished seam line is a surface mark left by the mold. An active seam leak is melted wax escaping while the candle is being poured or cooled. Use this leak-type table to separate bottom leaks, seam leaks, damage leaks, and false wick-hole leaks.| Leak type | Where it starts | Main clue | Best next action |
|---|---|---|---|
| Wick-hole leak | Bottom wick opening | Wax forms around the wick, pin, plug, or bottom seal | Reseal the bottom opening and check wick tension |
| Seam leak | Joining edge of a two-part or multi-part mold | Wax beads or runs along the mold’s side join | Realign the mold and apply even pressure along the seam |
| Crack or damage leak | Split, chip, puncture, or worn area | Wax escapes away from the wick hole and normal seam | Stop using the damaged leak point for hot wax until the mold is replaced or assessed |
| False wick-hole leak | Higher seam or crack, then wax travels down | Bottom looks wet, but the first wet spot is above it | Trace the first escape point before choosing the fix |
Leak-Point Diagnosis Checklist Before You Fix the Mold
Diagnose the leak before choosing a fix by finding the first wax escape point, when it starts, and what changed in the setup. A leak-point diagnosis is a practical setup check, not warranty proof or defect certification. The goal is to match the leak pattern to the wick hole, seam, crack, shifted seal, or unstable mold support before adding more sealer. Use this checklist before you patch the mold:- Watch the first drip, not the largest puddle.
- Check whether wax appears at the wick hole, bottom opening, seam, or a higher mold edge.
- Note when the leak starts: during filling, after moving the mold, after tightening the wick, or after the wax heats the seal.
- Look for lifted mold sealer, loose putty, wrinkled tape, or a plug that does not sit flat.
- Check whether the wick is pulling upward on the bottom seal.
- Press the seam edges together gently and see whether the gap changes.
- Confirm that clamps, bands, or fasteners close the seam evenly instead of twisting the mold.
- Place the empty mold on a level tray and check whether it rocks, tilts, or flexes.
| What you see first | Likely leak source | What to check next | Correct route |
|---|---|---|---|
| Wax beads around the bottom wick opening | Wick-hole gap | Bottom seal, wick tension, plug fit | Seal the wick hole before pouring |
| Wax runs along a side joining edge | Mold seam gap | Alignment, residue, clamp or band pressure | Use seam pressure and seam sealing steps |
| Wax appears after the mold is moved | Shifted seal or unstable base | Tray level, mold support, wick movement | Stabilize the mold before pouring |
| Wax appears after the wick is tightened | Lifted bottom seal | Wick tension and top anchor | Center the wick without breaking the seal |
| Wax appears away from wick holes and seams | Crack, puncture, or worn area | Damage location and hot-wax safety | Stop using that leak point until assessed or replaced |
| Bottom looks wet, but the first wet point is higher | Traveling wax | Seam, upper edge, or crack above the bottom | Fix the true upper leak source first |
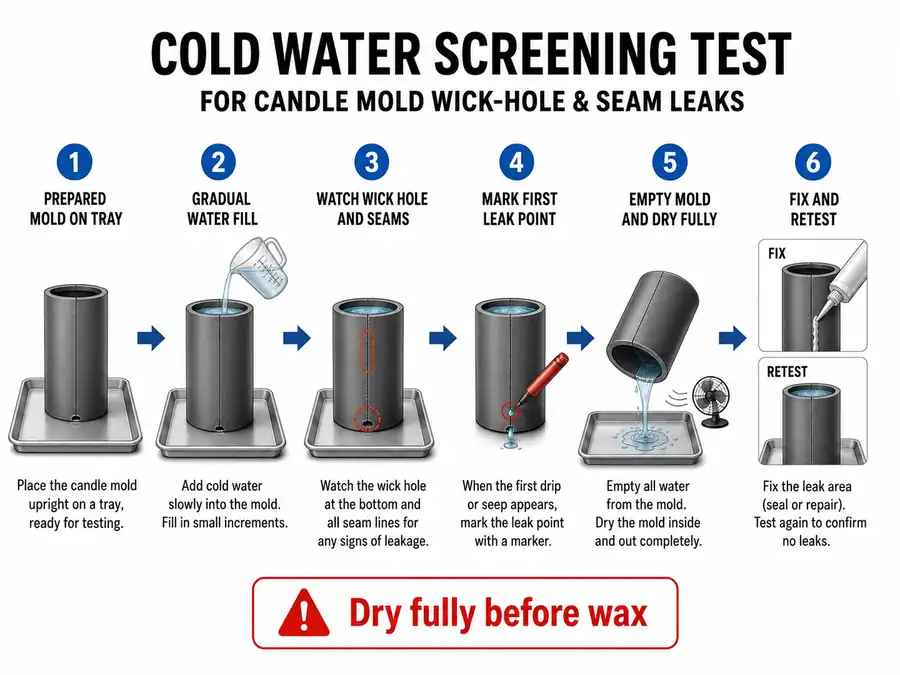
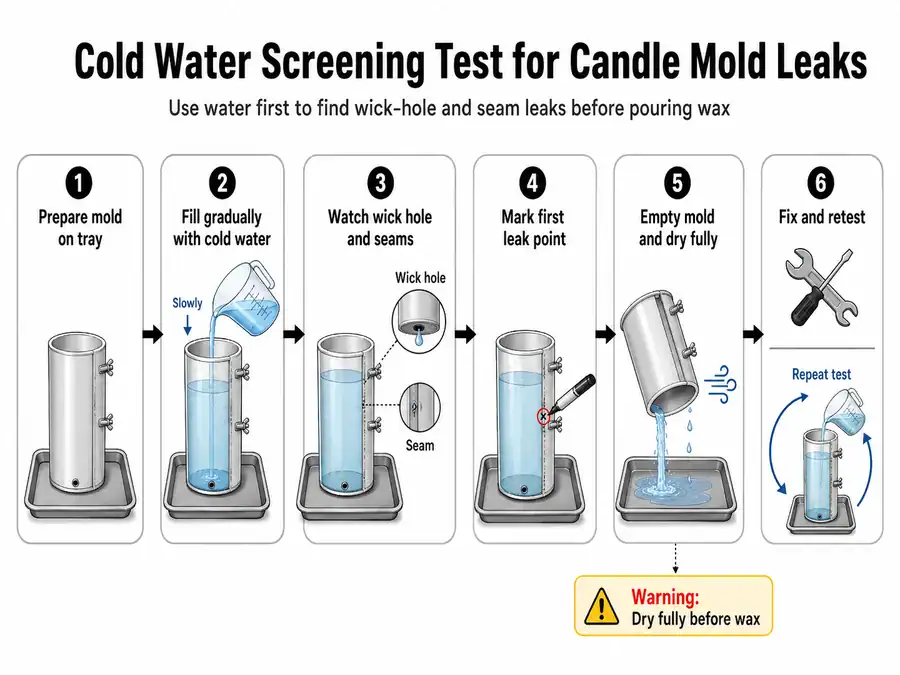
Do a Pre-Pour Water Leak Test
A pre-pour water leak test is a cold screening check that helps find obvious openings in a candle mold before hot wax is added. Test the prepared mold with water over a tray, watch the wick hole and seams, mark any leaks, drain it, dry it fully, and fix failures before pouring wax. Passing this test lowers risk, but it does not prove every seal will survive hot wax, heat-softened sealer, or a damaged mold.- Prepare the mold as if wax will be poured.
- Place it on a tray or absorbent surface.
- Fill the mold gradually with water.
- Watch the wick hole, bottom opening, and seams.
- Mark the first leak point while the mold is still in position.
- Empty the mold.
- Dry the mold completely before adding wax or resealing.
- Fix the leak point, then test again if the first test failed.
| Water-test result | What it means | What to do before wax |
|---|---|---|
| No water appears at the wick hole or seams | No obvious cold leak found | Dry fully, then proceed with normal caution |
| Water beads around the bottom opening | Wick-hole seal is not tight enough | Reseal the bottom opening and retest |
| Water runs from the side seam | Seam is not closing evenly | Clean, align, clamp, band, or reseal the seam |
| Water appears only after moving the mold | Seal or seam shifts under handling | Stabilize the mold before filling again |
| Water appears from a crack or worn area | The mold has a damage-related leak path | Do not rely on temporary sealer for hot wax |
| Water passes, but past wax pours leaked | Heat or wax flow may be the missing test condition | Use a small hot-wax validation test |
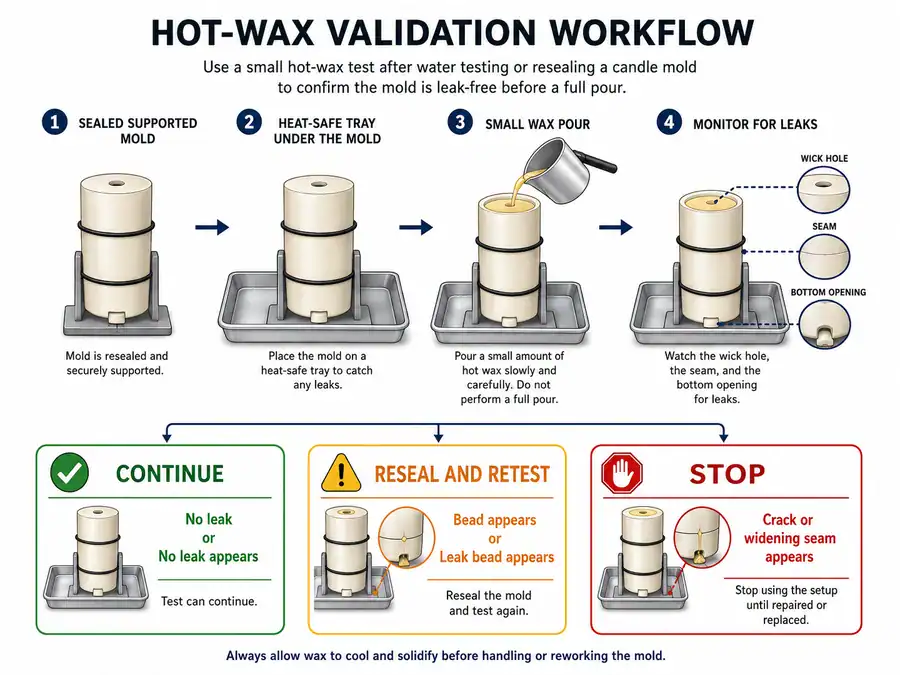
When to Validate With a Small Hot-Wax Test
Use a small hot-wax test when a water test passes but the seal still needs heat and wax-flow validation before a full pour. A small hot-wax test is a limited pour used to see whether the wick-hole seal, seam closure, and mold support hold under heated wax. Use it after resealing a wick hole, adjusting a seam, trying a new temporary seal, or working with a flexible mold that passed water but leaked before. Use the wax supplier’s pour-temperature guidance for the wax you are using. Do not raise the temperature to “force” a test; hotter, thinner wax can stress weak gaps and temporary seals.- Prepare, seal, and support the mold.
- Place it on a heat-safe tray.
- Pour a small amount of wax into the mold.
- Watch the wick hole, seam, and bottom opening.
- Stop if wax escapes from a crack, lifted seal, or widening seam.
- Let the test wax cool before handling or clearing the mold.
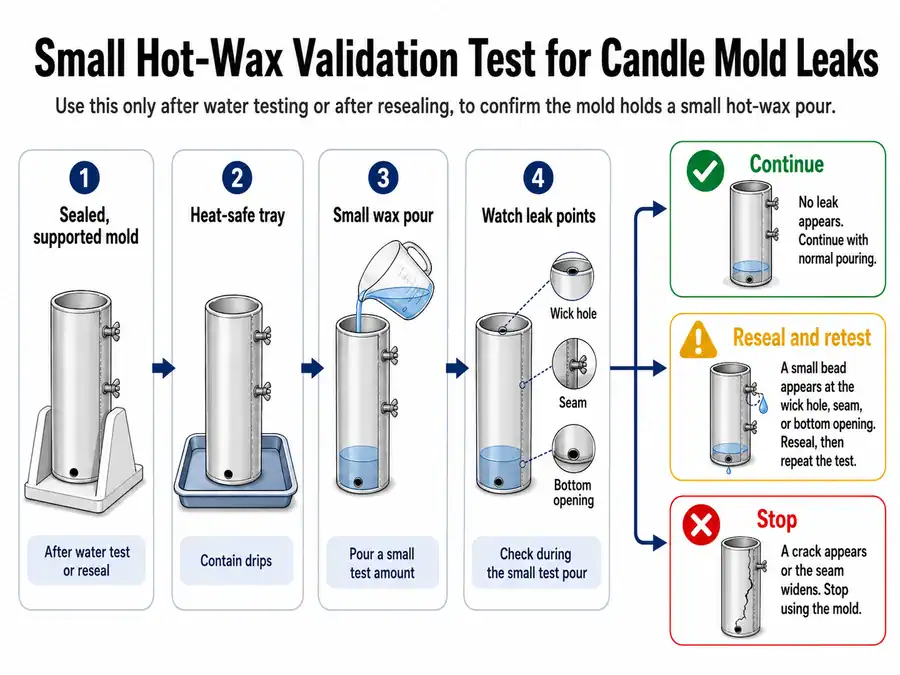
| Hot-wax test result | Decision |
|---|---|
| No wax escapes and the seal stays in place | Continue with the planned pour |
| A small bead appears at the wick hole | Pause, cool, reseal the bottom opening, then retest |
| Wax runs from the seam | Stop, cool, realign, and apply even seam pressure |
| Seal softens, lifts, or slides | Replace the seal method before a full pour |
| Wax escapes from damage | Stop using that leak point for hot wax |
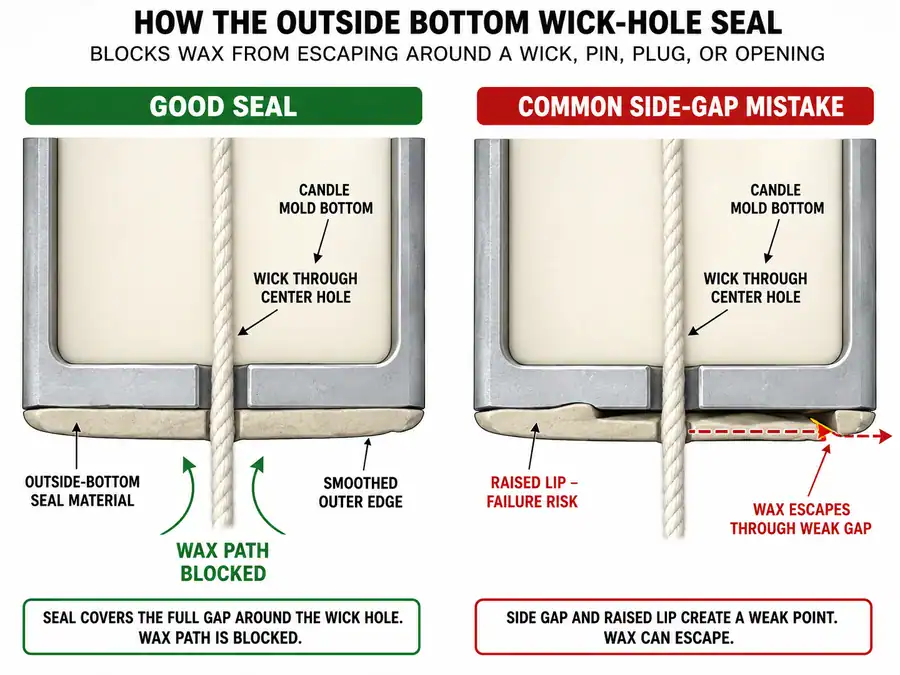
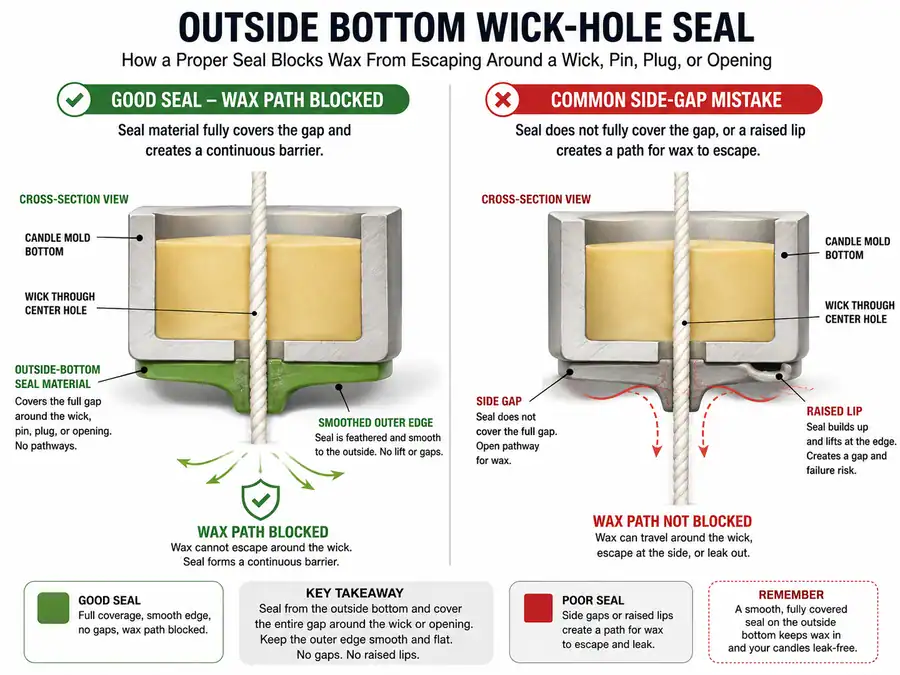
Seal the Wick Hole Before Pouring Wax
Wick-hole sealing materials are temporary barriers placed around the outside bottom opening of a candle mold to stop melted wax from escaping during the pour. Seal the wick hole from the outside bottom with a temporary material that covers the gap around the wick, pin, plug, or opening and stays stable during pouring. The seal belongs outside the mold because the leak path starts where melted wax can escape around the bottom opening. Do not push seal material into a filled mold; this prevention step is an outside-bottom setup action before wax is poured. Follow this order:- Thread the wick, place the wick pin, or fit the plug.
- Turn the mold so you can see the outside bottom opening.
- Press the seal material around the wick hole, not only on one side.
- Smooth the outer edge so wax cannot travel under a raised lip.
- Keep the wick or pin stable while the seal is being pressed in.
- Set the mold upright without dragging the bottom seal.
- Run a water test or small hot-wax check when the setup has leaked before.
| Use this | Avoid this |
|---|---|
| A temporary mold sealer, putty, plug, or tape rated by its supplier for the intended use | Household glue, plumbing putty, resin repair, or unknown adhesive near hot wax |
| A seal that covers the full gap around the bottom opening | A small patch that touches only the wick but leaves side gaps |
| A method that can be removed without damaging the mold | A permanent repair attempt on a worn, cracked, or unsuitable mold |
| Supplier SDS or product instructions when heat, residue, or material compatibility matters | Treating any seal material as universally safe for every wax and mold |
Mold Sealer vs Tape vs Putty vs Plug
There is no universal best candle mold sealer; choose the option by leak point, mold material, hot-wax exposure, removability, and residue risk. “Best” means best fit for the wick-hole or seam condition, not the strongest adhesive. A stronger bond can be the wrong choice if it leaves residue, damages the mold, softens near hot wax, or makes the next pour harder to set up. Use this comparison table to match the temporary sealing option to the leak condition.| Option | Best fit | Use with care when | Failure signal |
|---|---|---|---|
| Mold sealer | Small bottom wick-hole gaps and routine molded-candle setup | The mold surface is oily, dusty, damp, or warm | Sealer lifts, slides, or forms a wax channel |
| Putty | Irregular bottom openings or a wick that needs a shaped barrier | It is too soft, crumbly, or hard to remove | Wax beads under the edge or follows the wick |
| High-temperature tape, where appropriate | Supporting an outer seam or holding a seal edge flat | Product instructions do not support heat or residue use | Tape wrinkles, peels, or traps wax under the edge |
| Plug | Bottom openings designed to accept a plug | Plug fit is loose, angled, or not made for the mold | Wax escapes around the plug rim |
| Combined method | A known weak wick hole that needs a blocked gap and edge support | The layers hide the first leak point or make cleanup difficult | Wax appears between layers instead of at the hole |
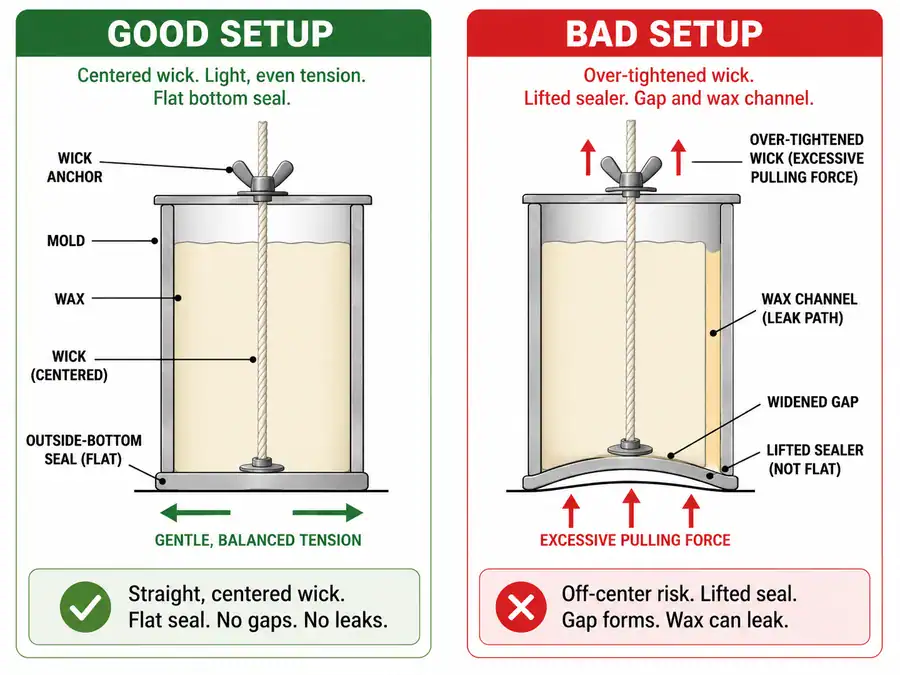
Center the Wick Without Breaking the Bottom Seal
Wick centering and tension prevent leaks when the wick stays straight without pulling the bottom seal loose. Wick tension can make a candle mold leak when the wick is pulled hard enough to lift, cut, or shift the bottom seal around the wick hole. For molded candles, “tight” means straight and stable, not pulled hard enough to widen the opening, deform the mold, or drag sealer away from the bottom. Use this setup order:- Seal the bottom wick hole first.
- Center the wick or wick pin from the top.
- Apply light, even tension.
- Anchor the wick without twisting it.
- Recheck the bottom seal after the top is anchored.
- Stabilize the mold before pouring.
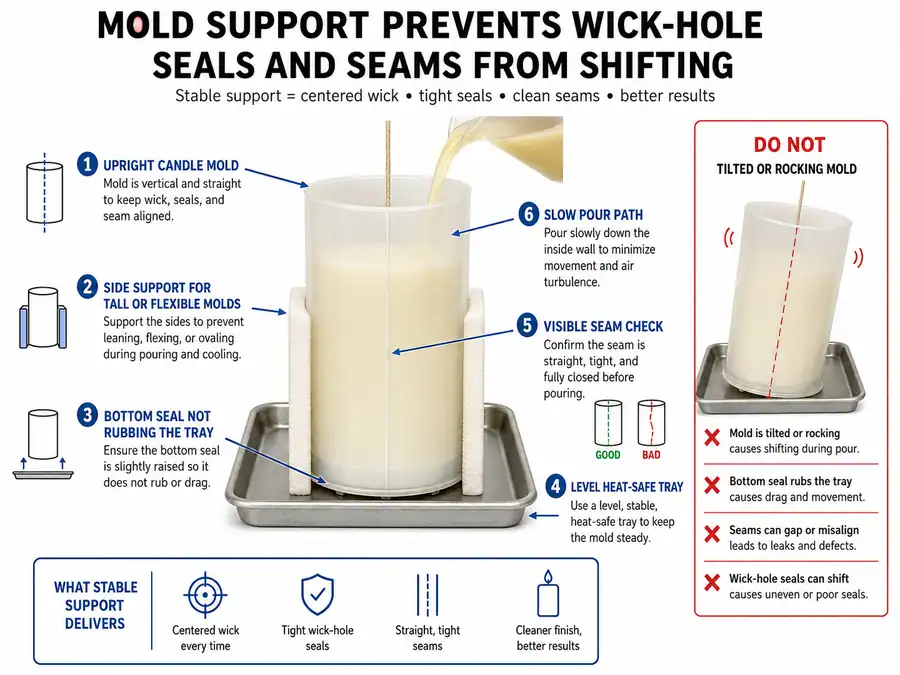
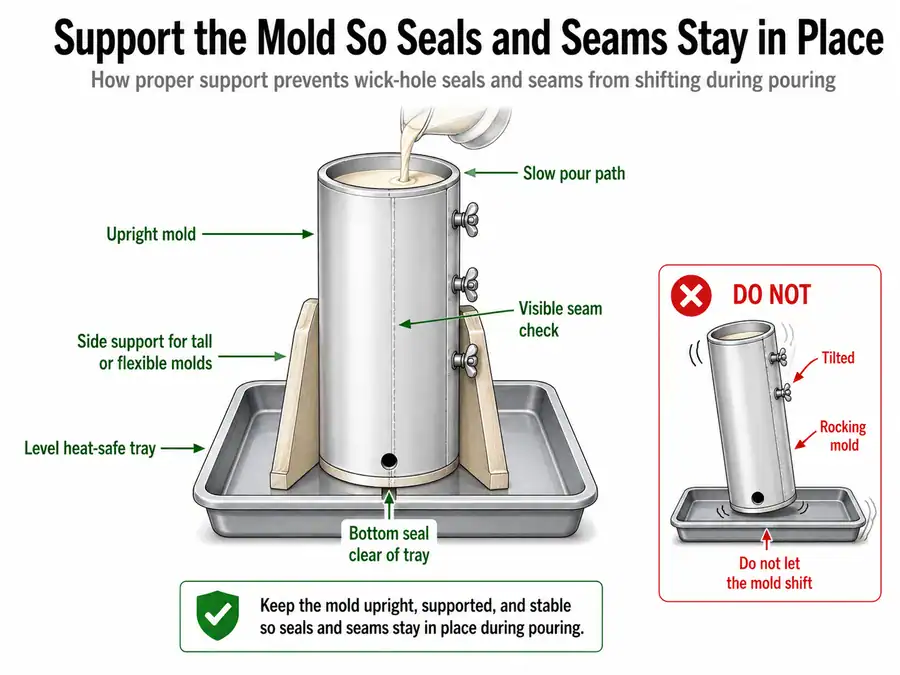
Keep the Mold Upright, Level, and Supported During the Pour
Mold stabilization means keeping the candle mold upright, level, and supported so seals and seams do not move during the pour. A tilted or unsupported candle mold can leak because movement, bowing, or uneven wax weight can reopen weak wick-hole seals and seam gaps during filling. “Stable” means upright, level, and supported enough to keep the leak seal undisturbed; it does not mean commercial fixtures or complex production equipment. Use this setup checklist before pouring:- Place the mold on a level, heat-safe tray.
- Support tall, narrow, or flexible molds before wax is added.
- Check that the bottom wick-hole seal is not rubbing against the tray.
- Check that seams stay closed after the mold is moved.
- Keep sealing supplies close enough for a controlled pause.
- Pour slowly enough to spot a leak before the mold is full.
- Recheck the wick, seal, seam, and base position right before filling.
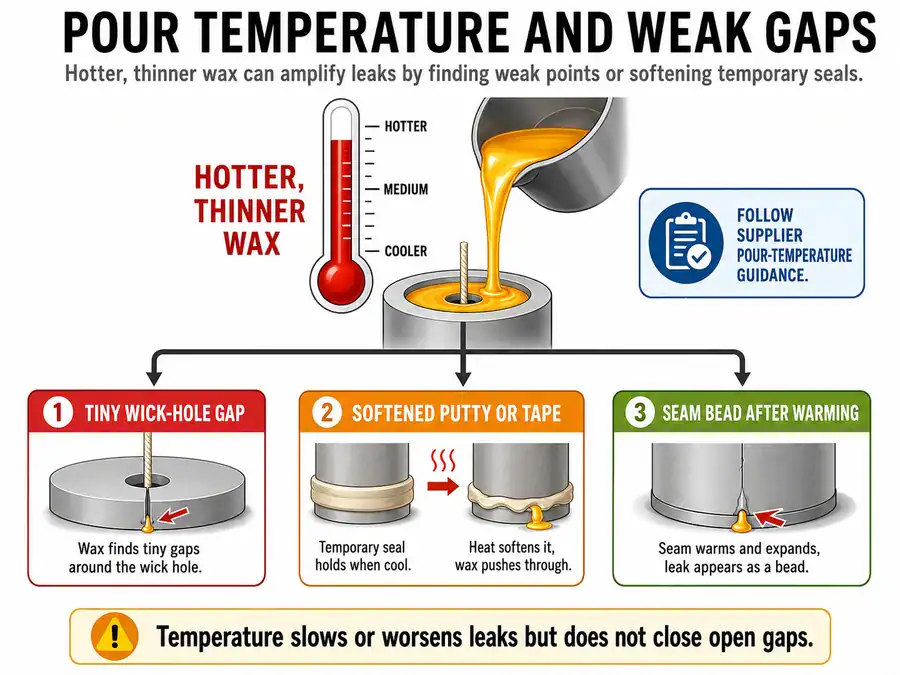
Control Pour Temperature So Wax Does Not Find Weak Gaps
Pour temperature can make candle mold leaks worse when hot, thin wax finds a weak wick-hole seal or seam gap. Pour temperature is the wax temperature at the time it enters the candle mold. In leak prevention, temperature matters because hotter, thinner wax can flow through small gaps faster or soften weak temporary seals. It should support proper sealing, not replace it. Follow the wax supplier’s pour-temperature guidance for the wax you are using, and use a thermometer instead of guessing. Do not rely on one universal pouring temperature for every wax, mold material, sealer, or plug. Use this temperature table before changing the wax temperature.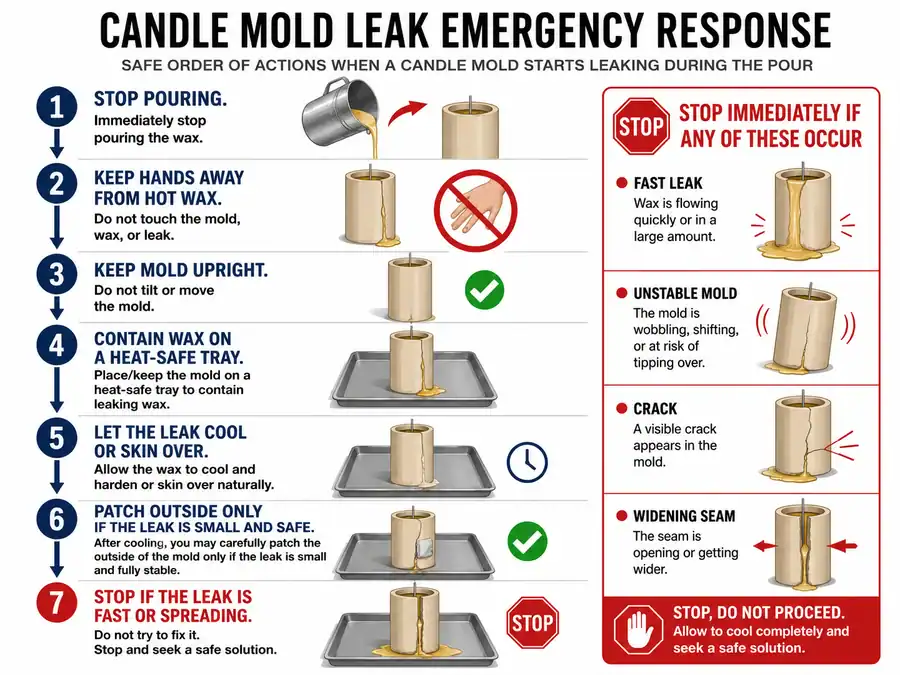
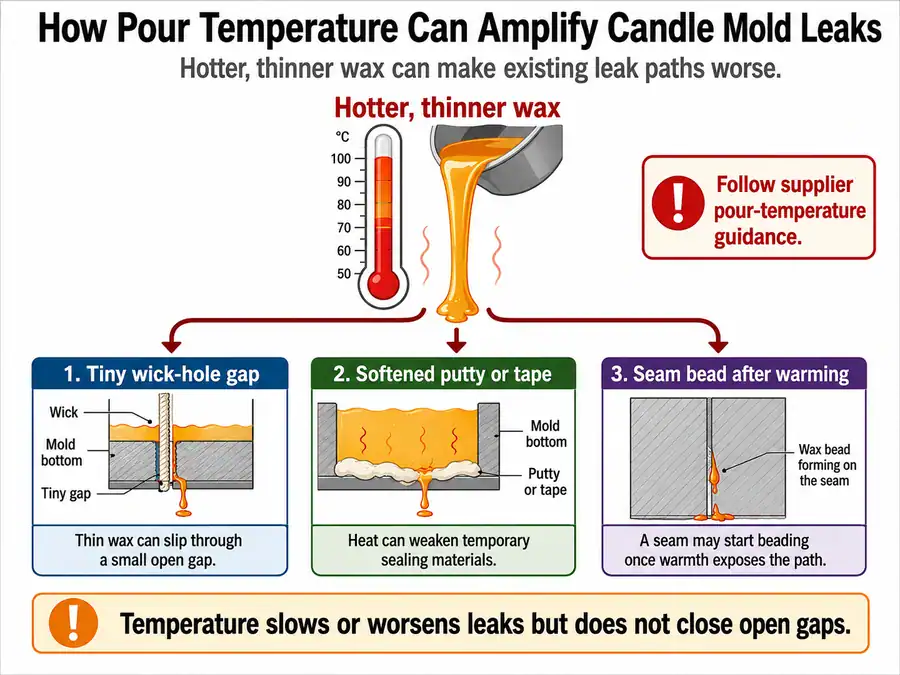
| What you notice | Possible temperature contribution | Setup check before changing wax temperature |
|---|---|---|
| Wax leaks fast through a tiny wick-hole gap | Wax may be thin enough to pass through a small opening quickly | Reseal the bottom opening and smooth the seal edge |
| Putty, tape, or sealer shifts during filling | Heat may be softening or loosening the temporary barrier | Check supplier instructions and switch to a suitable seal method |
| A seam beads only after the mold warms | Heat and wax weight may be stressing a weak seam | Re-align the mold and add even seam pressure |
| The water test passed, but wax leaks | Water did not test heat, wax flow, or seal softening | Run a small hot-wax validation test |
| Lower-temperature pours still leak | Temperature is probably not the only cause | Recheck the wick hole, seam, support, and damage points |
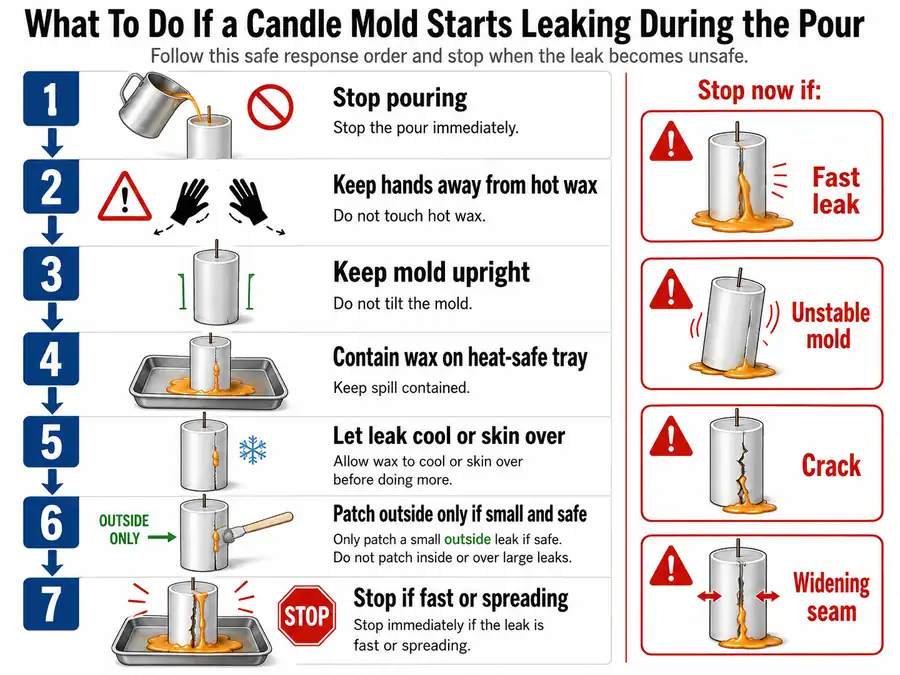
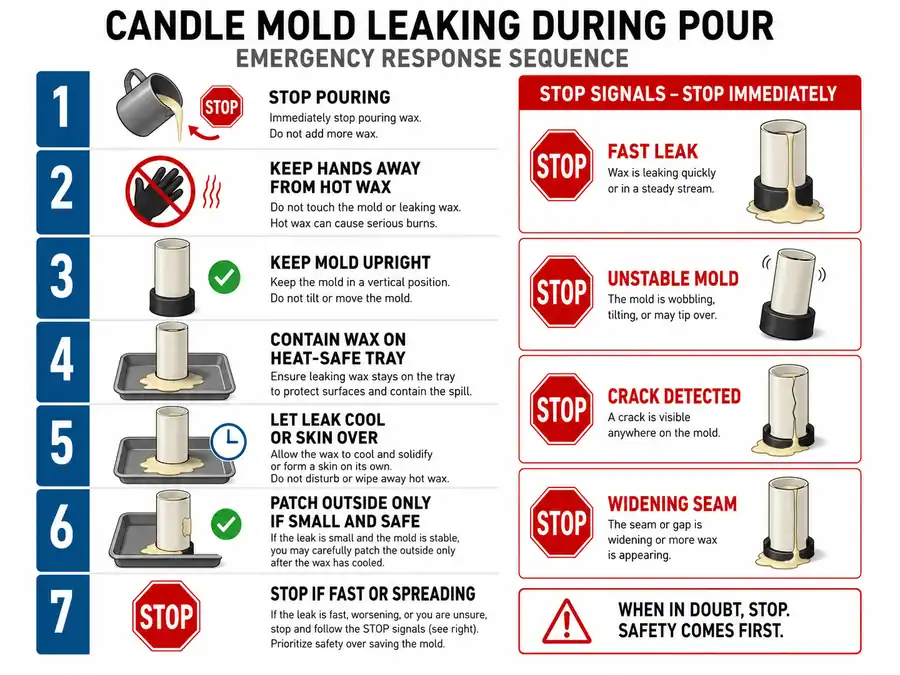
What to Do if the Mold Starts Leaking During the Pour
Emergency leak containment is a short-term response when hot wax starts escaping from a candle mold during the pour. If the mold starts leaking during the pour, stop adding wax, keep the mold stable, contain the escaping wax on a heat-safe tray, and decide whether the leak is small enough to patch safely or serious enough to stop. The goal is to reduce wax loss and safety risk without turning the moment into a full cleanup, first-aid, or recasting task. Follow this order:- Stop pouring wax.
- Keep hands away from hot wax.
- Keep the mold upright and steady.
- Let the escaping wax land on a heat-safe tray or safe work surface.
- Let the leak slow, cool, or skin over before touching the area.
- Patch only from the outside if the leak is small, reachable, and safe.
- Stop the pour if the leak is fast, spreading, unstable, or unsafe.
| Do not | Why |
|---|---|
| Do not grab the leaking seam or wick hole with bare hands | Hot wax and hot mold surfaces can burn skin |
| Do not lift a leaking mold full of wax unless leaving it is more dangerous | Moving the mold can widen the leak and spill more wax |
| Do not push sealer into the inside of a filled mold | It can disturb the candle, contaminate the pour, or expose hands to hot wax |
| Do not keep pouring into a widening leak | More wax weight can make the gap worse |
| Do not treat cleanup or burn care as part of the pour fix | Cleanup and medical questions need separate safety guidance |
Salvage, Pause, Patch, or Stop?
Continue only if the leak is slow, controlled, external, and safe; stop if it is fast, spreading, unstable, or unsafe. A leak decision should be based on severity, access, mold stability, and heat risk. “Salvage” means safe recovery or controlled continuation when the leak allows it; it does not mean the finished candle is guaranteed saleable, clean, or worth recasting. Use this decision table to choose pause, patch, stop, or later salvage.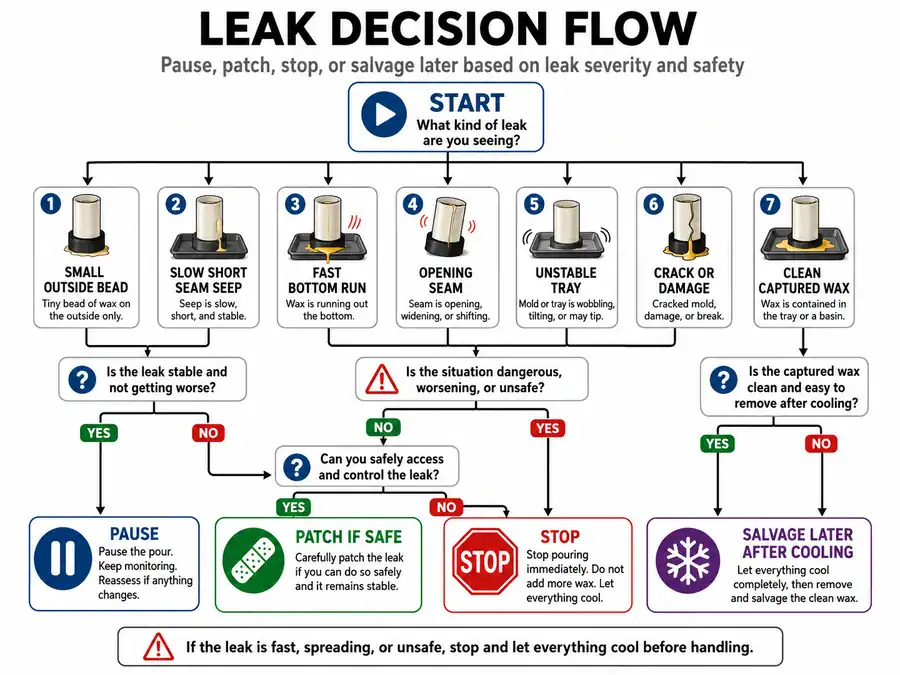
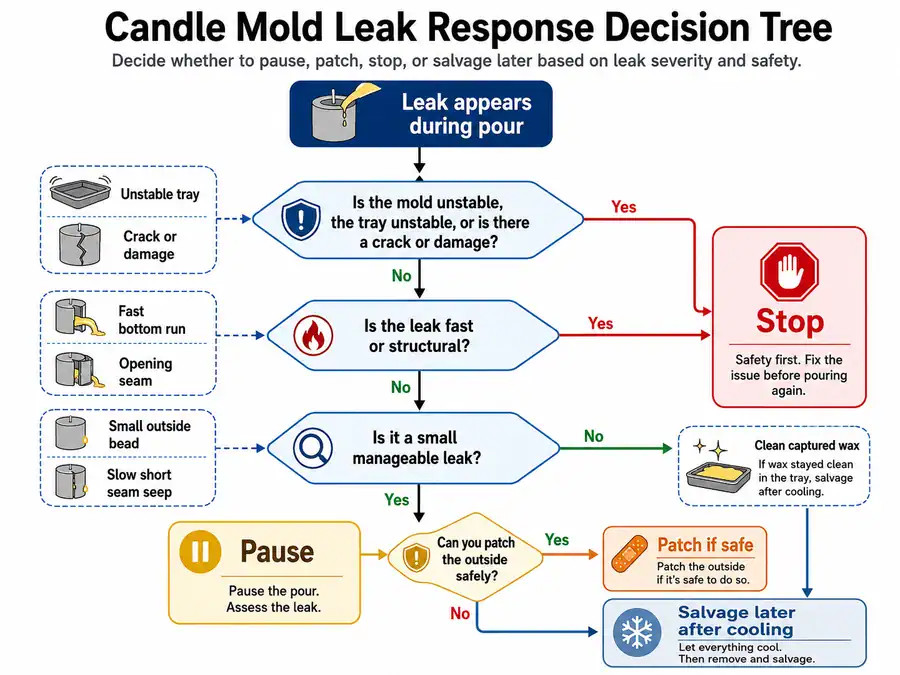
| Situation | Best decision | Why |
|---|---|---|
| One small bead forms at the outside wick-hole seal | Pause and patch from the outside if safe | The leak may be a surface gap that can be slowed without moving the mold |
| Wax seeps slowly along a short seam section | Pause and add even outside pressure if safe | A controlled seam leak may respond to gentle support |
| Wax runs quickly from the bottom opening | Stop the pour | The bottom seal has failed and wax weight will likely make it worse |
| The seam opens wider during filling | Stop the pour | The mold is losing alignment, not just leaking through a small gap |
| The mold rocks, tilts, or shifts on the tray | Stop and stabilize before deciding | Movement can create a larger spill risk |
| Wax leaks from a crack or damaged area | Stop using that leak point for hot wax | Temporary patching should not replace a damage assessment |
| Clean wax is captured on a safe tray | Salvage later only if clean and safe | Reuse belongs after cooling, filtering decisions, and contamination checks |
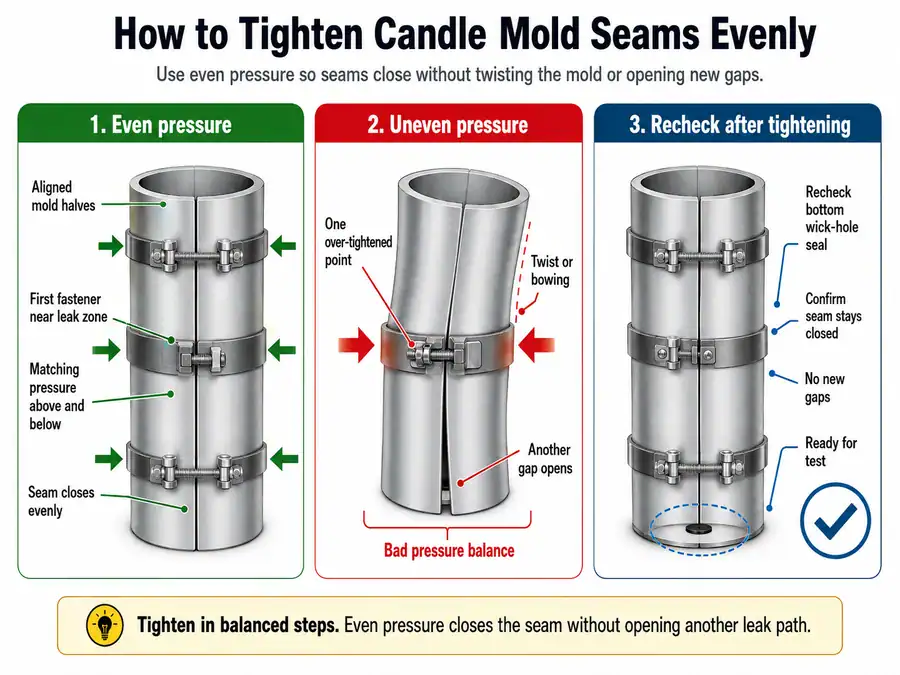
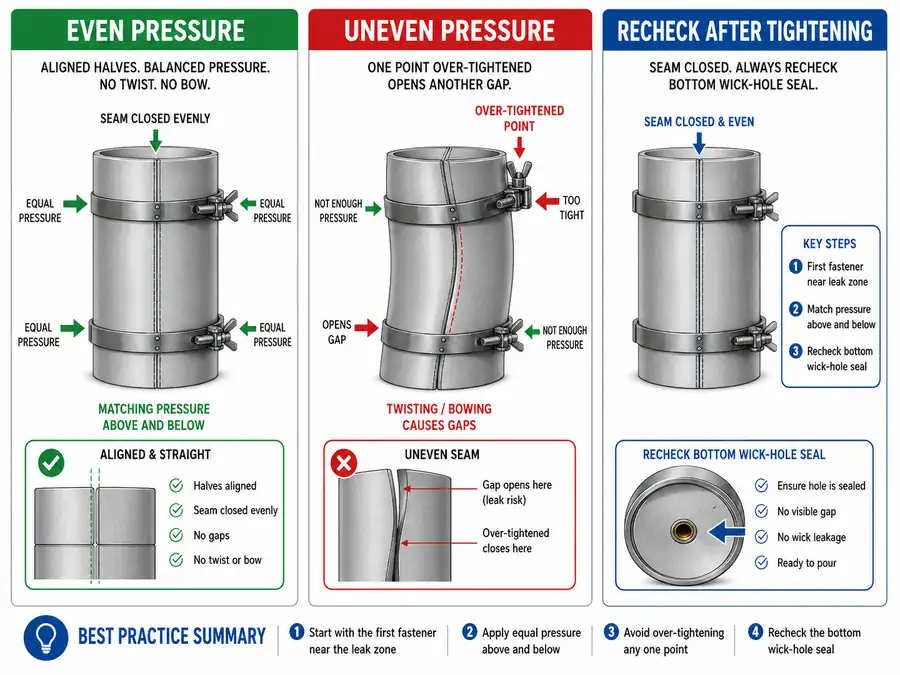
Use Clamps, Bands, or Fasteners to Stop Seam Leaks
Apply even pressure along the seam so mold parts stay aligned without warping, bowing, or opening during pouring. Clamps, bands, or fasteners help seam leaks when the leak source is a joining edge that needs even closure pressure. They do not fix a dirty seam, cracked mold, mismatched mold half, or bottom wick-hole gap by themselves. Use this placement order:- Empty, cool, and clean the mold before setting fasteners.
- Align the mold halves or joining edges.
- Add the first clamp, band, or fastener near the main leak zone.
- Add matching pressure above and below that point when the seam is long.
- Check that the mold is not twisted, bowed, or pinched.
- Recheck the bottom wick-hole seal after tightening.
- Run a water test or small hot-wax test if the seam has leaked before.
| Fastener type | Best use | Watch for |
|---|---|---|
| Rubber bands | Light, even pressure around small or flexible molds | Bands can slide, snap, or pull unevenly |
| Binder clips | Local pressure on flat seam edges | Clips can pinch one point and open another |
| Mold clamps | Repeatable closure on molds designed for clamping | Over-tightening can warp or stress the seam |
| Tape support | Holding an outer seam edge or backing a small external patch | Tape can wrinkle, loosen, or trap wax underneath |
| Built-in screws or fasteners | Molds designed with closure hardware | Loose, missing, or uneven hardware can create gaps |
How Metal, Silicone, and Plastic Molds Change the Fix
Mold material changes leak prevention because metal, silicone, and plastic differ in flex, heat response, residue behavior, seam pressure, and seal compatibility. A leak fix should match the mold material before it matches the tool. A tight band that helps a flexible mold may do little for a rigid metal seam. A tape that holds on one surface may peel, leave residue, or soften on another. Check the mold supplier’s care instructions and the sealer supplier’s SDS before using a material near heated wax. Use this material table to keep the leak fix matched to the mold surface and structure.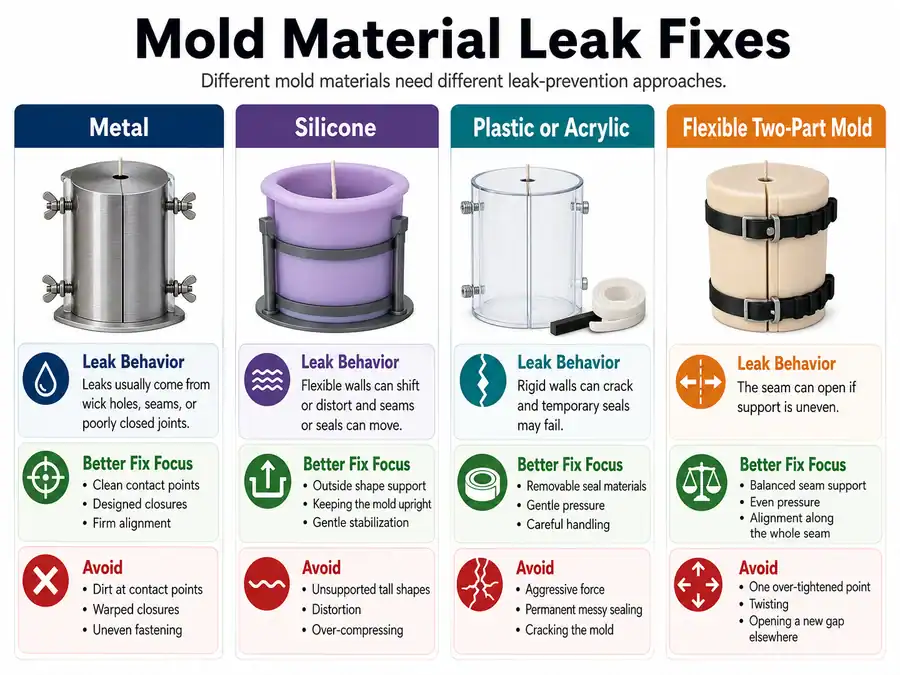
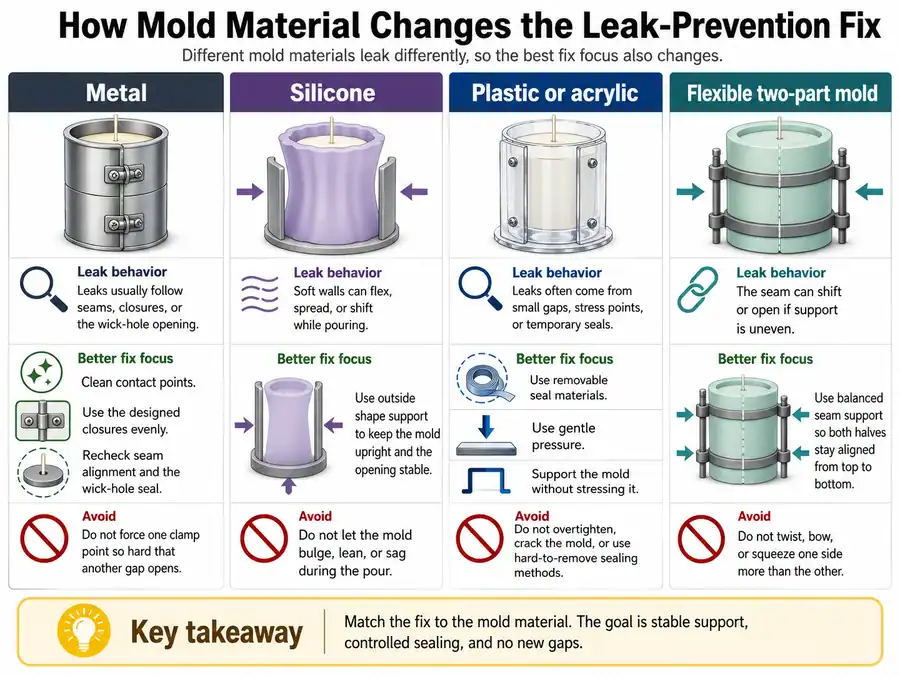
| Mold material | Leak behavior | Better fix focus | Avoid |
|---|---|---|---|
| Metal molds | Usually rigid, but seams, wick holes, and plugs can still leak when misaligned or dirty | Clean contact points, seal the bottom opening, and use designed closures evenly | Over-tightening clamps that distort edges |
| Silicone molds | Flexible walls can bulge, flex, or shift as wax weight increases | Support the outside shape and keep the bottom seal from moving | Unsupported pouring or tight bands that pinch the shape |
| Plastic, acrylic, or polycarbonate molds | Surfaces may need gentle pressure and careful seal choice | Use removable seal materials and mild, even support | Unknown adhesives, excess heat, or pressure that cracks the mold |
| Flexible two-part molds | The seam can open if pressure is uneven | Use balanced bands or supports along the full seam | One tight fastener that opens another section |
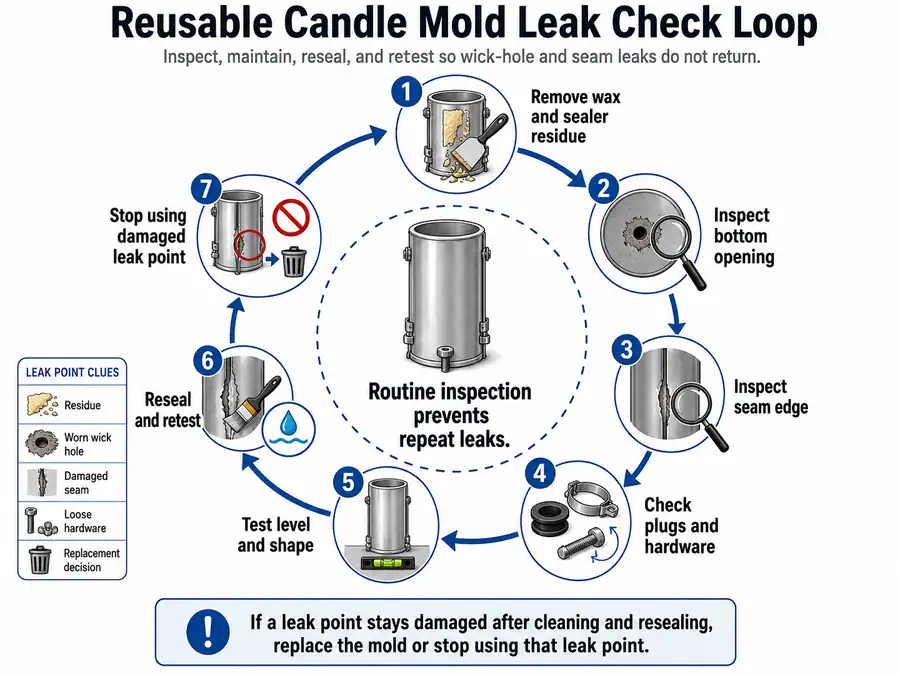
Maintain Reusable Molds So Leaks Do Not Return
Reusable molds keep leaking when residue, worn wick holes, damaged seam edges, weak closure hardware, or distorted sealing surfaces prevent a tight temporary setup. Maintenance means leak-prevention inspection, residue removal, wear checks, and replacement decisions before the next pour. It does not mean full demolding care, stuck-candle repair, polishing, or cosmetic defect removal. Use this inspection checklist after the mold has cooled and before the next pour:- Remove old wax, putty, tape, and sealer residue from wick holes and seam edges.
- Check the bottom opening for widening, chips, cuts, or uneven wear.
- Check the seam edge for dents, hardened wax, bent sections, or gaps.
- Check plugs, screws, clips, bands, and closure hardware for looseness or wear.
- Test whether the empty mold sits level and holds its shape.
- Reseal and retest any mold that leaked during the last pour.
- Stop using a leak point for hot wax if damage keeps returning after normal setup.

| Repeat leak pattern | Likely maintenance issue | What to do next |
|---|---|---|
| Wick hole leaks every pour | Worn opening, residue, or weak plug fit | Clean, inspect, reseal, and replace the plug or mold if the opening no longer seals |
| Seam leaks in the same place | Damaged edge, trapped residue, or uneven closure | Clean the edge, align the mold, and test with balanced pressure |
| Leak starts only after clamping | Fastener pressure is twisting or bowing the mold | Reduce pressure and spread support across the seam |
| Seal works once, then fails later | Residue or surface wear is reducing adhesion | Clean the sealing surface and change the temporary seal method |
| Leak appears away from wick hole or seam | Crack, puncture, or material fatigue | Stop using that area for hot wax until the mold is replaced or assessed |