Choose a starting wick size for a molded candle by using its effective burn diameter, wax type, shape, and wick family, then validate that choice with a burn test.
A molded candle is a free-standing candle made in a mold, including pillar candles, taper candles, and novelty shapes. The effective burn diameter is the wax area the wick must melt safely while still preserving the candle wall. A starting wick size is not a guaranteed final wick; it is the first test size or nearby size range you use before adjusting. The final wick is the one that burns safely in the actual mold, wax blend, wick family, fragrance load, dye, and shape you plan to repeat.
Start With the Molded Candle’s Effective Burn Diameter
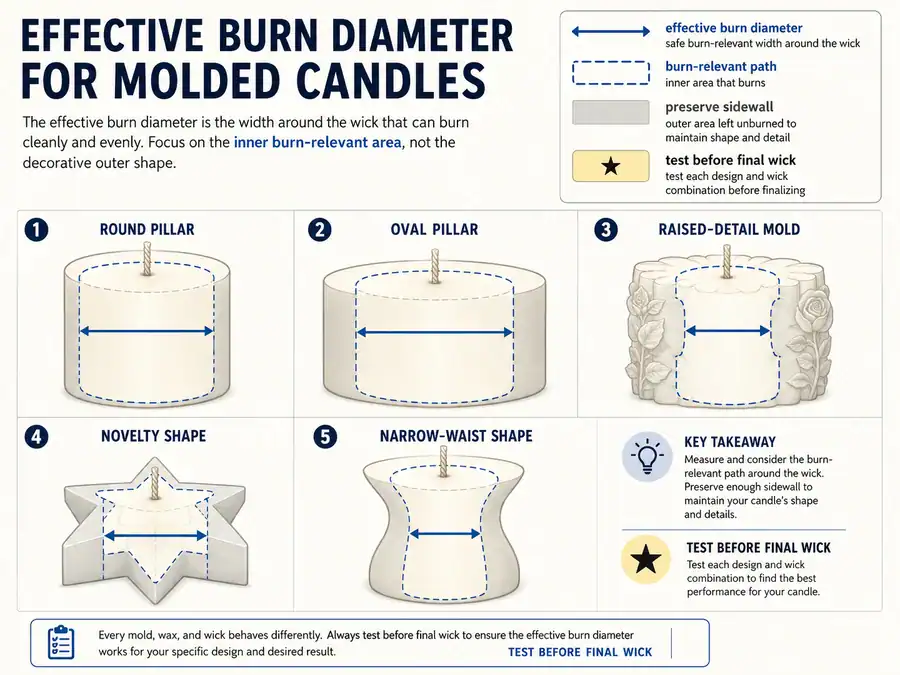
Use the effective burn diameter: the area the wick must melt safely while preserving the free-standing candle wall.
The outside mold width is only the first clue. For molded candles, the better sizing input is the burn-relevant path around the wick, because raised details, oval molds, narrow waists, and sculpted sides can make the real burn area smaller than the decorative outline.
Use a candle burn testing guide after measuring, because the measurement gives a starting wick range, not the final answer. A general candle wick types guide can help you keep wick-family labels separate before comparing test sizes.
Use this checklist before choosing your first wick size:
| Molded candle shape | What to measure | Wick-sizing risk |
|---|---|---|
| Round pillar | Widest usable burn diameter across the center | A wick that is too small can tunnel down the middle. |
| Oval pillar | Shorter burn-relevant width first | A wick chosen from the longest width can overheat the sidewall. |
| Raised-detail mold | Smooth center burn path, not raised decoration | Decorative edges may melt unevenly before the main body burns. |
| Novelty shape | Functional burn zone around the wick | The outside silhouette can overstate the safe wick size. |
| Narrow-waist shape | Narrowest vulnerable section near the flame path | A large wick can cause dripping or wall failure at the weak point. |
Methods note: Effective burn diameter is not always the same as outside diameter. Use the candle’s burn-relevant body width first, then confirm the wick by testing flame behavior, melt path, and sidewall strength in the finished candle.
Choose a Starting Wick for Pillar Candles by Diameter and Sidewall
Start with a wick range matched to pillar diameter and wax hardness, then test flame height, melt path, and sidewall stability.
A pillar candle is a free-standing molded candle, so its wick must melt enough wax to avoid a deep tunnel without destroying the outer wall. This is why pillar wick sizing differs from container candle sizing: an edge-to-edge melt goal can be wrong when the sidewall must hold liquid wax.
Use a pillar candle mold guide for mold shape and release decisions, but keep wick choice tied to burn behavior. A molded candle wax guide can help explain why harder waxes, softer blends, and additives may need different test sizes.
Use this pillar table to choose a safer starting direction:
| Pillar candle condition | Better starting logic | What to watch during the burn test |
|---|---|---|
| Narrow pillar | Start conservatively within the wick family | Tall flame, fast sidewall thinning, or dripping. |
| Medium pillar | Match the diameter range, then test nearby sizes | Stable flame, gradual melt path, and firm outer wall. |
| Wide pillar | Do not keep sizing up without checking wall safety | Blowout risk, oversized flame, or uneven heat spread. |
| Harder wax blend | Expect the wick to work harder | Tunneling or a small melt path can mean the wick is too small. |
| Softer wax blend | Watch for excess heat sooner | Fast melt, sweating, or weak walls can mean the wick is too large. |
Methods note: A pillar starting wick is only the first test size. The final wick is the one that keeps the pillar burning steadily while leaving enough sidewall to contain the melt pool.
Choose a Smaller Wick for Taper Candles and Drip Control
Choose taper wicks from the candle’s narrow burn path, not from pillar-style diameter charts.
A taper candle is a long, narrow molded candle, so the wick has less wax mass around it than a pillar. A wick that works in a wider pillar can burn too hot in a taper, bend the flame, thin the wall, and cause dripping.
Use a taper candle mold guide for mold shape and release details, but keep this wick decision tied to the narrow body of the taper. A braided wick sampler can help test nearby sizes within one wick family without comparing unrelated wick-number systems.
Use this taper checklist to decide your first adjustment direction:
| Taper condition | Starting wick logic | Likely correction |
|---|---|---|
| Slim taper | Start smaller within the wick family | Move up only if the flame struggles or tunnels. |
| Standard dinner taper | Use the narrow body width as the main input | Test one size down if the candle drips early. |
| Highly tapered shape | Size for the thinner burn sections | Avoid a wick chosen from the widest base. |
| Soft wax taper | Start with extra heat caution | Move down if the wall softens or runs. |
| Hard wax taper | Watch for weak melt and poor flame | Move up only after a controlled burn test. |
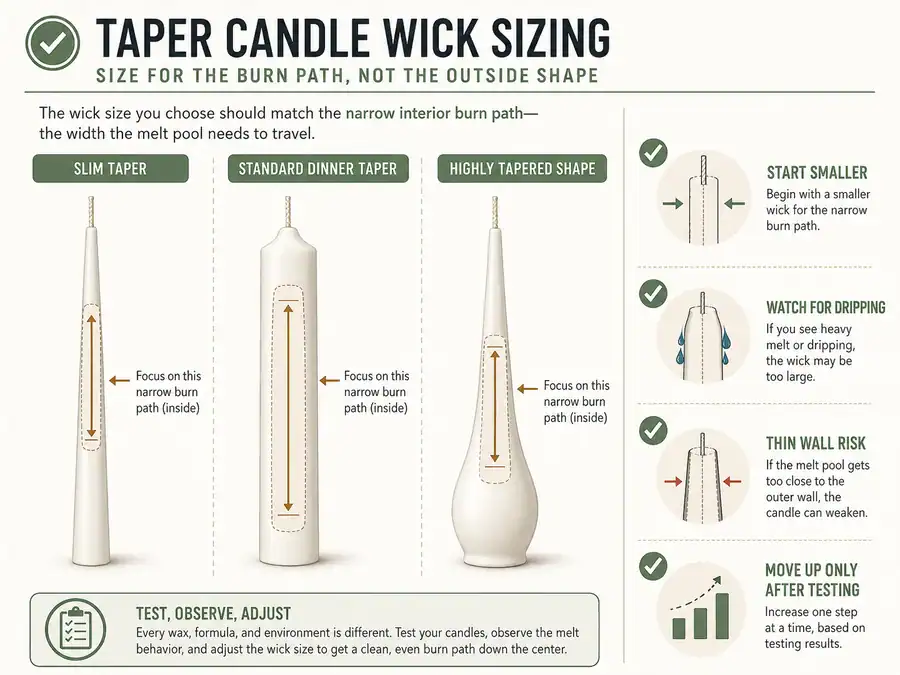
Drip-control rule: If the taper drips before a stable cup of wax forms near the flame, the wick may be too large for the wax and shape. If the flame is tiny, drowns, or leaves an unburned core, the wick may be too small.
Size Wicks for Novelty Shapes by Functional Burn Path, Not the Decorative Outline
Size a novelty candle wick around the functional burn path: the wax body the flame can melt safely as the shape changes.
A novelty molded candle has an irregular free-standing shape, such as a figure, shell, geometric form, flower, or sculpted object. Its outside outline can make the candle look wider than the area the wick can burn without breaking walls, flooding details, or overheating weak sections.
Use a novelty candle mold guide for shape choice and release planning, but choose the wick from the burn-relevant body around the wick. A test-wick pack is useful here because novelty candles often need a conservative starting size and nearby test options.
Use this table before sizing a wick from the widest visible outline:
| Novelty shape feature | Wick-sizing risk | Safer starting decision |
|---|---|---|
| Wide decorative base | Overstates the real burn path | Do not size from the widest decorative footprint alone. |
| Narrow neck or waist | Can fail before the wider body burns | Start smaller and test wall strength near the narrow area. |
| Raised surface details | Can melt unevenly | Judge the central wax body first. |
| Off-center mass | Flame may heat one side faster | Test for leaning flame and uneven wall loss. |
| Thin projecting parts | Details may drip or detach | Treat them as decoration, not wick-sizing diameter. |
Map the Widest and Narrowest Burn-Relevant Cross-Sections
Map the widest and narrowest burn-relevant sections before choosing a wick for sculptural or changing shapes.
A cross-section is a slice through the candle body at a burn-relevant height. In novelty candles, the wick may pass through wide, narrow, and uneven sections during one burn, so one outside measurement can be misleading.
Use this mapping step before testing:
- Measure the width around the wick near the top burn area.
- Measure the narrowest section the flame will reach.
- Measure the widest section that must burn without tunneling.
- Ignore decorative edges that are not part of the main wax body.
- Choose a conservative starting wick if the shape has thin walls, narrow waists, or uneven mass.
- Burn test the finished candle and adjust by symptoms, not by appearance alone.
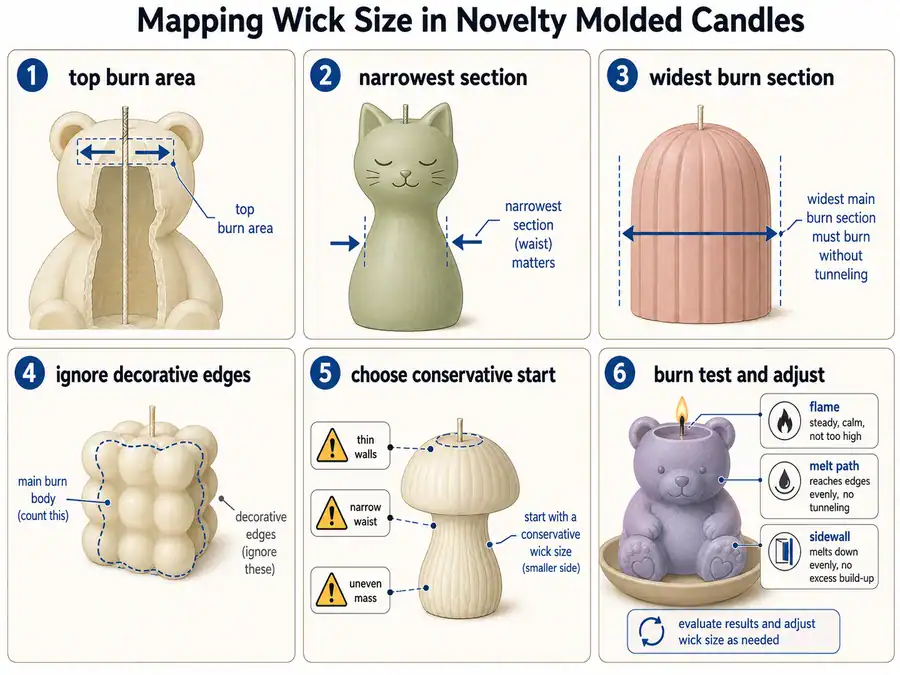
Shape rule: For irregular molded candles, the safest starting point is often the smaller practical wick that can still avoid tunneling. Oversizing the wick to force a full melt can damage the shape before the candle burns cleanly.
Decision box: when one wick is no longer the right problem
Use one wick for most pillars, tapers, and small novelty candles, but stop sizing up when the candle is too wide or irregular for one flame to burn safely.
A larger wick is not always the fix for tunneling. Past a practical single-wick range, upsizing can create an oversized flame, weak sidewalls, soot, dripping, or a blowout before the candle reaches a clean burn path.
| Burn-test result | Do not keep doing this | Better decision |
|---|---|---|
| Deep tunnel in a very wide pillar | Keep increasing one wick size | Change the mold, wax, or candle design. |
| Large flame but unburned outer wax | Use an even hotter wick | Treat the shape as unsuitable for one centered wick. |
| Blowout near one side | Force a wider melt path | Move down or change the mold geometry. |
| Irregular novelty shape burns one side first | Size from the widest outline | Size from the safer burn path or redesign the candle. |
| Multi-wick idea seems needed | Guess wick spacing | Use a separate multi-wick candle guide instead. |
Boundary rule: This page covers how to choose a starting wick size for molded candles. It does not calculate multi-wick layouts, wick spacing, or large-candle heat patterns.
Adjust Wick Size for Wax Type, Hardness, and Burn Resistance
Adjust the starting wick for wax behavior because harder, softer, and additive-heavy waxes do not burn the same way.
Wax type changes how much heat the wick must supply. A harder pillar blend may need more wick to avoid tunneling, while a softer blend may need less wick to protect the sidewall from fast melting, dripping, or blowout.
Use a molded candle wax guide for wax selection, but keep this step tied to wick sizing. A pillar wax blend and wick sampler can help you test nearby wick sizes without changing too many variables at once.
Use this table to decide how wax behavior affects the first test:
| Wax or blend condition | Wick-sizing effect | Test-burn signal |
|---|---|---|
| Hard pillar wax | May resist melting | Small melt path or tunneling can mean the wick is too small. |
| Softer wax blend | May melt faster | Weak sidewall, dripping, or large flame can mean the wick is too large. |
| Beeswax-heavy candle | Often burns with more resistance | Test carefully before moving up more than one nearby size. |
| Soy pillar blend | Behavior depends on the blend | Judge by flame, melt path, and wall strength, not wax name alone. |
| Wax with additives | May change burn rate | Retest the wick after the formula changes. |
Methods note: Change only one main variable during testing when possible. If the wax blend changes, treat the old wick result as a reference point, not a final answer for the new molded candle.
Do Not Compare Wick Numbers Across Wick Families
Compare wick sizes only inside the same wick family because size numbers do not transfer cleanly between wick series.
A wick family is a wick series with its own material, braid, treatment, and burn behavior. A “larger” number in one family may not burn like a larger number in another family, so switching series resets the test.
Use a candle wick types guide before changing families, and use a wick sampler from one series when testing nearby sizes. This keeps the adjustment path clear: one size down, one size up, or same size with a different wax result.
Use this table to avoid false wick-size comparisons:
| Wick-family mistake | Why it fails | Better test method |
|---|---|---|
| Comparing numbers across series | The numbering systems may not match burn strength | Stay inside one family for size adjustments. |
| Switching wick material mid-test | Material changes flame and melt behavior | Treat the switch as a new test, not a minor adjustment. |
| Using a chart from another brand | Chart ranges may assume different wax and wick series | Confirm the chart’s wick family before testing. |
| Fixing wax problems by changing family too soon | Too many variables change at once | Test nearby sizes first, then change family if needed. |
Rule: A wick size is only meaningful with its family, wax, mold diameter, and candle shape. Without those details, a number alone is not enough to choose the final wick.
Retest checklist: fragrance, dye, and additive changes
Retest the wick whenever the formula changes enough to alter burn behavior.
Fragrance oil, dye, and additives can change how the wick draws wax, how the flame behaves, and how quickly the candle wall softens. This page does not cover scent throw or fragrance-load design; it only covers when those changes affect molded-candle wick sizing.
Retest when you change:
- Fragrance oil type or load
- Dye amount or dye type
- Wax additive amount
- Wax supplier or wax blend
- Wick family or wick treatment
- Mold diameter, taper profile, or novelty shape
- Cure time or production process in a way that changes burn results
Testing rule: If a molded candle passed with no fragrance but fails after fragrance or dye is added, do not assume the mold size was wrong. Keep the mold constant and retest the wick size in the finished formula.
Burn Test the Starting Wick and Adjust Up or Down
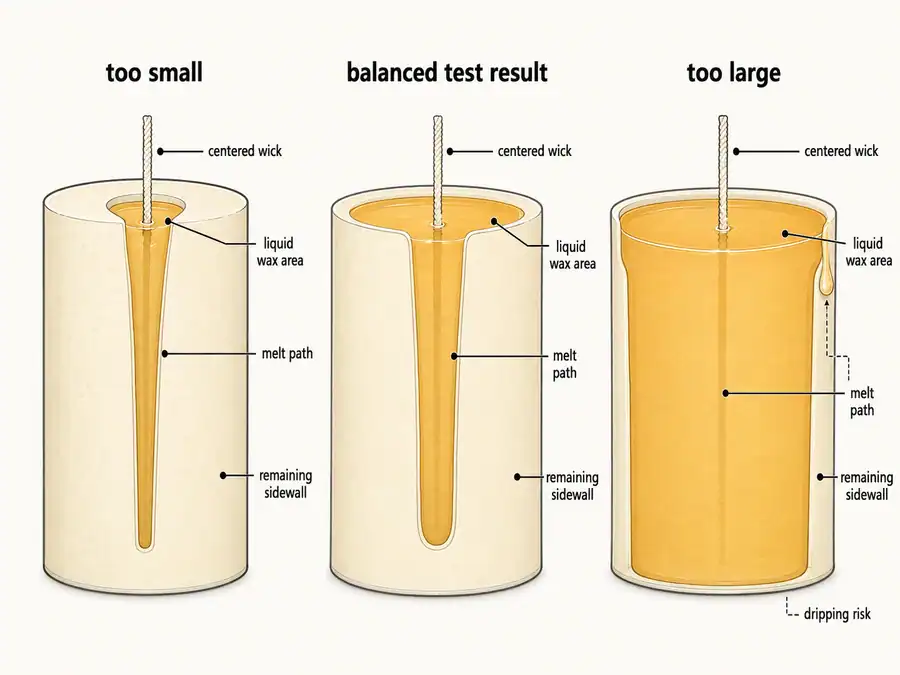
Burn test the starting wick, then move one size up or down based on flame, melt path, and sidewall behavior.
A wick chart only narrows the first sizes to test; the final wick must pass burn testing in the actual candle. For molded candles, the test must judge flame behavior, melt path, and sidewall strength together.
Use a candle burn testing guide when you need a full testing routine. Keep this section as the decision loop: choose a starting wick, test the molded candle, observe the symptoms, adjust one step, then retest.
Use this matrix to adjust without changing too many variables at once:
| Burn-test result | Likely direction | Next action |
|---|---|---|
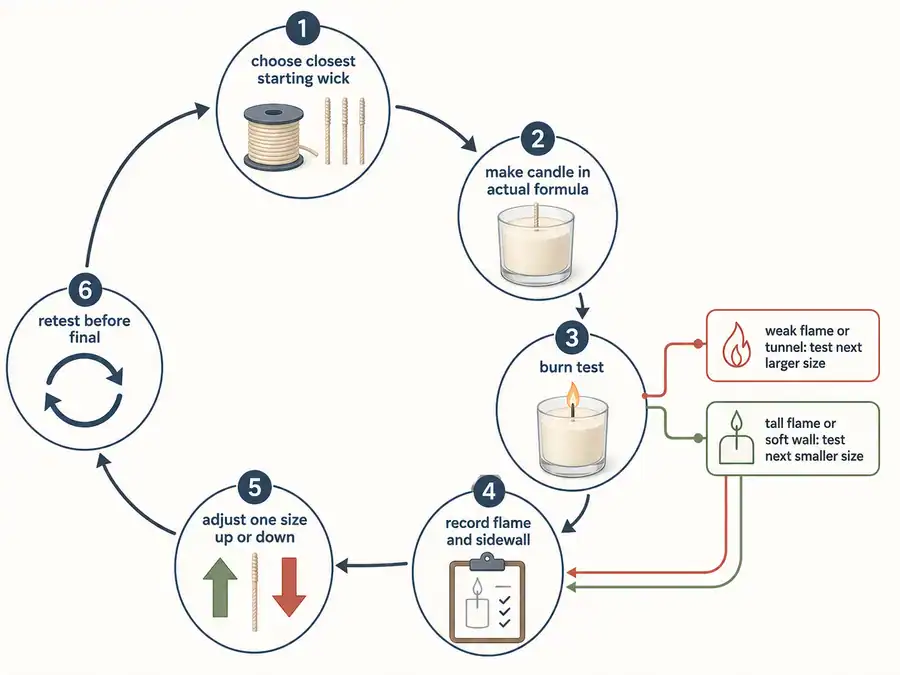
| Small flame, weak melt path, or deep center tunnel | Wick may be too small | Test the next larger size in the same wick family. |
| Tall flame, fast melt, or soft sidewall | Wick may be too large | Test the next smaller size. |
| Good flame but poor burn in one wax blend | Wax may be changing burn resistance | Retest after checking the wax blend or supplier change. |
| Correct melt path but unstable flame | Wick family, draft, or shape may be involved | Do not change several variables at once. |
| Large flame but outer wax still remains | Shape may exceed what one wick can solve | Stop sizing up and revisit the candle design. |
| Blowout, heavy dripping, or wall failure | Heat is unsafe for the sidewall | Stop the test and wick down or redesign. |
Follow this adjustment loop:
- Start with the closest wick size from your chart or supplier range.
- Make the candle in the actual mold, wax, wick family, dye, and fragrance load.
- Burn test it under repeatable conditions.
- Record flame height, melt path, smoke, dripping, and sidewall condition.
- Move one size up or down based on symptoms.
- Retest before treating the wick as final.
Diagnose Over-Wicking vs. Under-Wicking Symptoms
Over-wicking shows excessive heat; under-wicking shows weak burn or tunneling, but symptoms can have non-wick causes.
Use the symptoms as clues, not proof. Wax hardness, fragrance load, dye, draft, wick family, and irregular candle geometry can copy some wick-size problems, so adjust carefully before blaming one variable.
Use this table to choose the next correction step:
| Symptom in a molded candle | More likely issue | What to do next |
|---|---|---|
| Deep tunnel down the center | Under-wicking, hard wax, or short burn sessions | Test one size up only after checking burn time and wax behavior. |
| Tiny flame or drowning wick | Wick too small or poor wax draw | Test one size up in the same wick family. |
| Tall flame | Wick too large or draft exposure | Test one size down and check burn location. |
| Heavy mushrooming | Wick too large, wick-family mismatch, or formula issue | Wick down or test a different family only after a controlled comparison. |
| Sidewall thinning | Too much heat for the free-standing wall | Wick down or stop the test. |
| Dripping in tapers | Over-wicking, soft wax, draft, or candle angle | Wick down only after checking wax and burn position. |
| Blowout in a pillar | Unsafe wall failure | Stop burning, record the failure, and redesign or wick down. |
| Uneven burn in a novelty shape | Shape geometry or off-center burn path | Map the burn-relevant cross-section before changing wick size. |
A candle burn troubleshooting guide can handle wider failure causes, but this wick-sizing page should stay focused on the adjustment decision: wick up, wick down, retest, or stop and change the candle design.
Protect the Sidewall: Blowout, Drip, and Safety-Stop Signals
A blowout happens when the free-standing wax wall fails and releases melted wax; it is a stop or correction signal.
The sidewall is the outer wax wall that holds melted wax inside a pillar, taper, or novelty candle. A molded candle can look well-wicked at first and still fail if the wick produces too much heat for that wall.
Use a candle safety guide for wider fire-safety rules, but treat these signals as wick-sizing stop points. A molded candle should not need an oversized flame to overcome tunneling.
Use this safety-stop table during testing:
| Sidewall signal | What it means for wick sizing | Action |
|---|---|---|
| Outer wall becomes thin too early | The wick may be too hot for the candle body | Test a smaller wick. |
| Melted wax leaks through the side | The candle has reached blowout risk | Stop the test and redesign or wick down. |
| Taper drips heavily | Heat, wax softness, draft, or angle may be wrong | Wick down after checking burn position. |
| Flame grows tall and active | Heat is exceeding the candle’s stable burn range | Stop sizing up. |
| One side collapses in a novelty candle | Shape geometry is failing under heat | Choose a smaller wick or change the mold design. |
| Soot appears with wall thinning | Wick may be too large or poorly matched | Wick down or retest within the same family. |
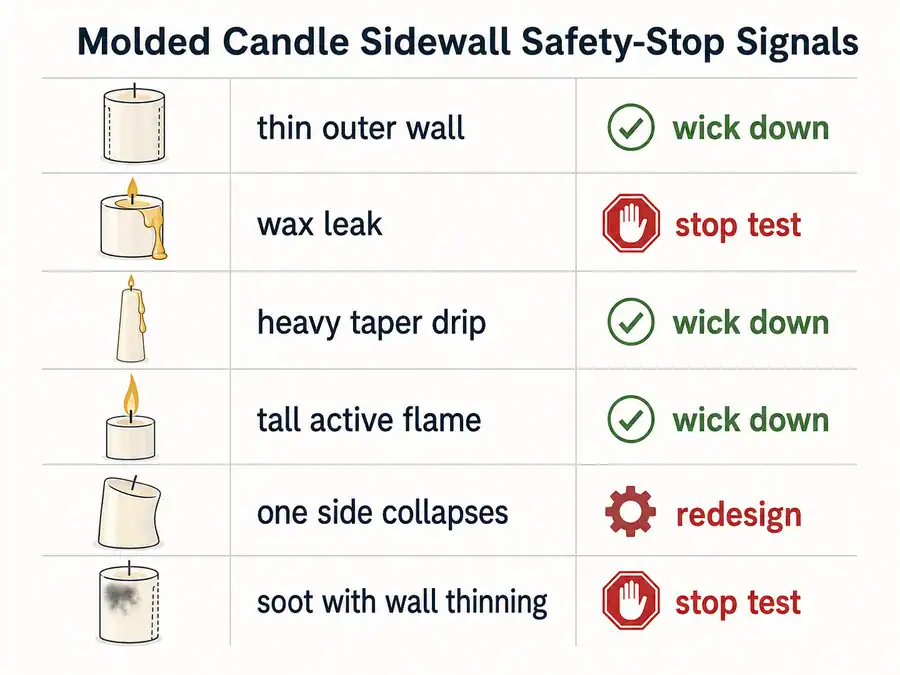
Safety-stop rule: If a molded candle leaks, blows out, forms an oversized flame, or loses wall control, stop the test. Do not keep burning to see whether it fixes itself.
Use Wick Charts as Starting Estimates, Then Validate Them
Wick charts are useful starting estimates, but wax, wick family, additives, shape, and sidewall behavior can change the final result.
A wick chart can narrow the first test range by diameter, wick family, and wax type. It cannot fully account for a pillar’s sidewall, a taper’s narrow profile, a novelty candle’s uneven body, fragrance load, dye, additives, or supplier variation.
Use a downloadable wick chart or calculator to choose neighboring test sizes, not to skip testing. A supplier wick chart guide and general candle wick types guide can help you confirm which wick family the chart assumes.
Use this table to read charts without over-trusting them:
| Chart input | How to use it | What it cannot decide alone |
|---|---|---|
| Candle diameter | Pick the first test size range | Final sidewall safety |
| Wick family | Compare nearby sizes inside one series | Equivalent size in another series |
| Wax type | Adjust expectations for burn resistance | Exact result after fragrance or dye |
| Pillar range | Choose a reasonable first test | Blowout risk in your exact mold |
| Taper range | Start smaller than pillar logic | Drip behavior in your wax blend |
| Novelty shape note | Stay conservative | Uneven geometry through the full burn |
Chart rule: If the chart and the burn test disagree, trust the burn test. The candle must prove the wick works in the actual molded shape before you repeat the formula.
Final Wick Choice
Measure the effective burn diameter, choose a starting range by candle type and wax, account for shape and wick family, burn test, then adjust.
Start with the burn-relevant body of the candle, not only the outside mold width. Treat pillars, tapers, and novelty shapes differently because each shape changes how heat moves through the wax.
Keep wick-family comparisons separate, retest after wax or formula changes, and stop sizing up when the sidewall, flame, or shape shows unsafe heat. A good molded-candle wick is not the biggest wick that melts the most wax; it is the smallest tested wick that gives a stable flame, a suitable melt path, and enough wall strength for the candle shape.