
Beginners should dip taper candles for a handmade look and use molds when they need faster, more repeatable matching pairs.
Taper candles are slim candles made to stand upright in taper holders, with a narrow body, centered wick, and fitted base. You can make them by dipping a primed wick into wax many times or by pouring wax into a taper mold. This guide helps you choose the better method, gather supplies, select wax and wick, make both styles, and fix common problems. It stays focused on home-scale taper candles, not commercial production, decorative twisting, or full dye and fragrance work.
Taper candle basics: dipping vs molds (choose your method)
Choose dipping for handmade taper candles and choose molds for straighter, faster, more repeatable pairs.
Dipping builds taper candles one thin wax layer at a time around the wick. Molds shape the candle in one pour, so they work better when you want matched dinner tapers with cleaner lines and less hand-shaping.
| Goal | Best method | Why | Starter buy list |
|---|---|---|---|
| Handmade look | Dipping | Each wax layer leaves a softer hand-built finish | Wax, wick, tall dip vessel, drying rack |
| Straight dinner tapers | Molds | The mold cavity controls the shape | Taper molds, wick, mold sealer, release |
| Fastest matching pair | Molds | Setup takes time, then repeatability improves | Two or more matching cavities |
| Lowest first setup | Dipping | Fewer taper-specific tools are needed | Tall vessel, wick, wax, rack |
| Small gift batch | Either | The finish matters more than the method | Dip station or two-cavity mold |
| Beeswax-first project | Dipping | Beeswax builds well in repeated layers | Beeswax, square-braid wick, rack |
| Smooth surface | Molds | The mold wall defines the finish | Smooth metal or silicone mold |
| Less open-wax mess | Molds | Wax stays more contained during the pour | Mold, pour pot, lined tray |
| More control per candle | Dipping | You can warm, straighten, and continue | Dip log, rack, holder-fit test |
| Less shape variation | Molds | The same cavity repeats the same form | Wick pins, bands, mold sealer |
Common regret box: Many beginners choose dipping because it looks simple, then discover they need enough vertical clearance for the full candle length plus drip space. Mold beginners more often regret weak sealing, off-center wicks, or buying a mold size that does not fit their holders.
| Difference | Dipping | Molds |
|---|---|---|
| Setup | Tall wax depth and hanging space | Mold prep, wick centering, leak sealing |
| Learning curve | Dip rhythm, layer control, straightening | Wicking, sealing, pouring, demolding |
| Finish | Softer handmade surface | Cleaner, more uniform surface |
| Repeatability | Lower unless you track each pass | Higher once the mold is prepared |
| Main failure mode | Ridges, thick bottoms, bends | Air bubbles, seam lines, sinkholes |
| Best beginner path | Best when you like hand control | Best when you need matching pairs |
Burn quality is not decided by dipping or molding alone. Wax type, wick size, wick position, holder fit, drafts, and safe use affect whether a taper candle drips, smokes, or burns evenly. For nearby shape decisions, compare this choice with candle molds, pillar candles, and other dinner-candle formats.
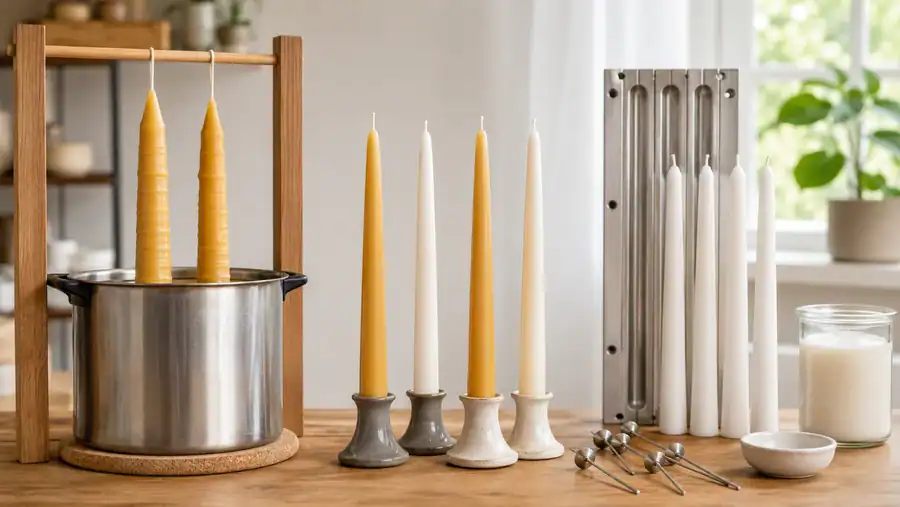
Supplies checklist for taper candles
Taper candles need wax, suitable wick, controlled heat, and a stable workspace; dipping adds a tall dip station, while molding adds molds and sealing tools.
For taper candles, the non-negotiables are heat control, wick control, and a clean work area. Start with a small first batch, because wax, wick, and method choices become clearer after you can inspect one finished pair.
Printable first-batch checklist: 6–12 taper candles
A first batch of 6–12 taper candles needs shared wax tools plus either dipping equipment or mold-sealing tools.
Shared essentials
- Wax for 6–12 taper candles
- Taper-suitable wick
- Heat-safe wax melting pot or pouring pitcher
- Larger pot or controlled heat source for a double-boiler-style setup
- Thermometer
- Digital scale
- Stirring tool used only for wax
- Heat-safe gloves or mitts
- Lined tray or protected work surface
- Paper towels or cloths for wax drips
- Labels or notes for wax type, wick, and batch result
Dipping-only supplies
- Tall, narrow dipping vessel deep enough for the candle length
- Wick hanging rack, dowel, or drying bar
- Small weight or other method for keeping wick pairs straight
- Drip tray under the hanging area
- Dip log for coat count, surface notes, and holder fit
Mold-only supplies
- Taper candle molds
- Wick pins or wick-centering method
- Mold sealer or plug for wick holes
- Rubber bands, clips, or mold supports
- Mold release if the mold material calls for it
- Skewer or thin tool for releasing trapped air
| Item | Why it matters | Common beginner mistake |
|---|---|---|
| Thermometer | Helps keep wax behavior consistent | Guessing by appearance only |
| Tall dip vessel | Lets the full taper coat evenly | Using a shallow pot |
| Wick centering tool | Keeps the flame path centered | Letting the wick drift in the mold |
| Mold sealer | Prevents leaks at wick holes | Pouring before leak-checking |
| Lined tray | Contains drips and spills | Working directly on a counter |
Do not turn the supply list into a shopping race. Start with the shared items, then add either the dipping-only or mold-only set. Mold accessories help only when they solve a real taper problem: centering, sealing, release, or repeatability.
Best wax for taper candles (and why)
Beeswax and taper-focused paraffin or pillar blends are the most reliable starting points for home-scale taper candles because they support shape, release, and beginner testing.
The best taper wax depends on rigidity, surface finish, drip behavior, and method fit. Dipping needs wax that builds thin layers without slumping. Molds need wax that releases cleanly without cracking, sticking, or leaving deep sink marks.
Method box: how to choose wax for dipping vs molds
- Pick the method first: dipped or molded.
- Choose the finish: handmade surface, smooth surface, or matched pairs.
- Check hardness: taper wax should hold a slim shape without bending at room conditions.
- Match shrink behavior to the method: mild shrinkage can help molded candles release, but too much can leave craters or gaps.
- Test one pair before making a gift batch.
| Wax type | Dipped tapers | Molded tapers | Expected finish | Common failure |
|---|---|---|---|---|
| Beeswax | Strong choice for classic hand-dipped tapers | Works, but may need careful release | Natural, firm, warm-toned | Bloom or haze mistaken for damage |
| Paraffin taper blend | Builds evenly when managed well | Strong choice for smooth repeat pairs | Smooth, clean mold detail | Sink marks if cooling is rushed |
| Beeswax blend | Useful when pure beeswax feels too sticky or costly | Can improve release or handling | Firm with more control than pure wax | Cracking if the blend becomes too hard |
| Soy-heavy wax | Usually weak for slim unsupported tapers | Often poor unless blended for pillars or tapers | Softer and less rigid | Drooping, heavy dripping, weak shape |
| Pillar/taper blend | Good beginner middle ground | Good mold candidate | Predictable, firm, less fussy | Wrong blend chosen for container candles |
Wax scorecard for first batches
| Wax | Finish score | Release score | Drip-control score | Best use |
|---|---|---|---|---|
| Beeswax | 4/5 | 3/5 | 4/5 | Traditional dipped tapers |
| Paraffin taper blend | 5/5 | 4/5 | 4/5 | Smooth molded tapers |
| Beeswax blend | 4/5 | 4/5 | 4/5 | Balanced handmade or molded batches |
| Soy-heavy wax | 2/5 | 2/5 | 2/5 | Better left to containers unless blended for tapers |
| Pillar/taper blend | 4/5 | 4/5 | 4/5 | Beginner-friendly testing |
The scores are a selection rubric, not lab results. Use them to pick a first wax, then judge your own pair by straightness, surface marks, release, holder fit, and burn behavior.
Myth vs reality: Soy can make candles, but a soy-heavy wax is usually not the easiest path for slim dinner tapers. Use a wax sold for tapers or pillars when you need the candle to stand straight, hold shape, and release from a mold.
Wick size for taper candles (chart + quick rules)
Start with wick size based on taper diameter and wax type, then test-burn and change one variable at a time.
Taper candles need a wick that keeps a steady flame without smoking, dripping heavily, or burning too fast. The starting point is the candle’s base diameter, then wax rigidity, room drafts, wick position, and holder fit decide the final choice.
This chart gives a starting direction only; final wick size must come from the wick supplier’s series chart and a test burn.
| Taper base diameter | Starting wick direction | Wax note | First test signal |
|---|---|---|---|
| Under ½ in / 12 mm | Small taper wick family | Use only if the candle is very slim and stable | Flame should not drown or flicker weakly |
| ½–⅝ in / 12–16 mm | Small-to-medium taper wick family | Common range for slim dinner tapers | Watch for one-sided dripping |
| ⅝–¾ in / 16–19 mm | Medium taper wick family | Beeswax may need a different wick than soft blends | Watch for smoke after trimming |
| ¾–⅞ in / 19–22 mm | Medium-to-large taper wick family | Drafts affect wider tapers more | Watch for fast sidewall loss |
| Over ⅞ in / 22 mm | Supplier chart plus test burn | May behave more like a narrow pillar | Watch for tunneling or excess flame |
Method box: two-burn wick test protocol
- Make two identical tapers with the same wax, wick, diameter, and method.
- Trim both wicks to the same length before the first burn.
- Burn one candle in a draft-free spot and note flame size, smoke, dripping, and straightness.
- Burn the second candle in the same holder to confirm the pattern.
- Change only one variable: wick size, wax, cooling method, or holder position.
- Repeat before making a full set.
| Symptom | Likely wick issue | Adjustment |
|---|---|---|
| Weak flame or drowning wick | Wick may be too small | Test one size up |
| Heavy smoke after trimming | Wick may be too large | Test one size down |
| Dripping down one side | Wick may be off-center, too large, or exposed to draft | Recenter, move from draft, retest |
| Candle burns too fast | Wick may be too large for diameter | Test smaller wick |
| Narrow melt pattern with weak light | Wick may be too small or wax too hard | Test larger wick or different wax |
| Flame leans hard to one side | Draft or crooked wick path | Fix airflow or wick centering |
Wick test log template
| Test # | Wax | Method | Diameter | Wick used | Trim length | Flame | Drip | Smoke | Next change |
|---|---|---|---|---|---|---|---|---|---|
| 1 | Dipped / molded | Normal / weak / high | None / light / heavy | None / light / heavy | |||||
| 2 | Dipped / molded | Normal / weak / high | None / light / heavy | None / light / heavy |
For molded taper candles, wick centering matters as much as size. A correct wick in the wrong position can still drip, smoke, or burn unevenly because the flame path no longer runs through the center of the candle.
How to make taper candles by dipping (step-by-step)
Dip primed wick pairs into stable melted wax, let each coat set briefly, and repeat until the taper reaches the target thickness.
Dipping works by building thin wax layers around a straight wick. Stop by diameter and holder fit, not by a fixed number of dips, because wax type, vessel depth, pause time, and room temperature all change the result.
Six-photo key-moments strip
| Photo | Moment to capture | What good looks like |
|---|---|---|
| 1 | Wick pair prepared | Wick hangs straight with no twist |
| 2 | First dip | Wax coats the wick without clumps |
| 3 | Early build | The taper is thin but evenly covered |
| 4 | Mid-build | The sides look even, not stair-stepped |
| 5 | Warm straightening | Minor bends can still be corrected |
| 6 | Finished pair | Both candles match closely enough for the same holder |
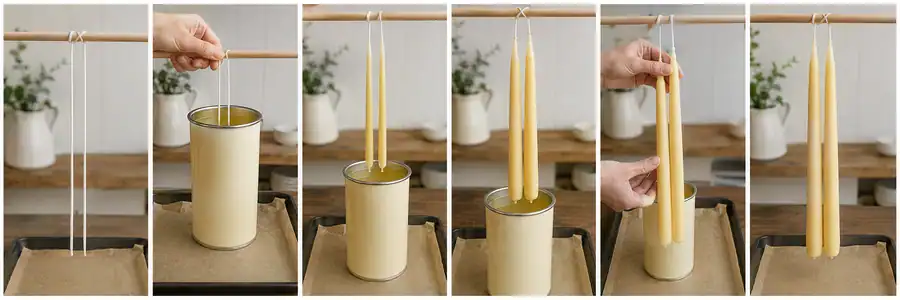
- Prepare the wick pair. Cut the wick longer than the finished taper so you have room to hold or hang it. Prime the wick if your wick is not already treated, then hang it straight before dipping.
- Set up a stable wax bath. Use a tall, narrow dipping vessel so the taper can enter and leave the wax in one smooth motion. Keep the wax fully liquid and steady. If the surface skins over, it is cooling too far; if thin wax runs heavily down the candle, the bath may be too hot or the pause may be too short.
- Make the first dip. Lower the wick into the wax, pause just long enough to coat it, then lift it out smoothly. Hang it over a drip tray.
- Let the coat set briefly. The surface should lose its wet shine before the next pass. Do not wait so long that the candle becomes cold and brittle between every pass.
- Repeat the dip-and-set cycle. Build the taper gradually. Thick bottoms often come from pausing too long at the bottom of the dip or letting wax collect before hanging.
- Straighten while the candle is slightly warm. Roll or guide minor bends gently. If the taper feels firm and resists movement, stop correcting and warm the process through the next dip instead of forcing it.
- Check holder fit before the final passes. Test the base against the intended holder or sizing guide. Stop by fit and shape, not by a fixed dip count.
- Finish the base and wick. Trim the bottom so the taper sits cleanly in a holder. Trim the top wick after the candle has cooled and the shape is stable.
Copyable dip log
| Batch | Wax | Wick | Dip pass group | Set cue | Surface note | Diameter/fit note | Next change |
|---|---|---|---|---|---|---|---|
| 1 | Early | Wet shine gone | Smooth / ridged / drippy | Too thin / close / fits | |||
| 1 | Middle | Surface firming | Smooth / lumpy / bending | Too thin / close / fits | |||
| 1 | Final | Stable shape | Smooth / uneven / thick base | Too thin / close / fits |
Cadence checkpoint: Two recurring beginner problems are uneven rhythm and waiting for a fixed “perfect” number. A better rule is to log the visible result: whether the coat sets cleanly, whether the bottom is swelling, and whether the pair still hangs straight.
Mini FAQ
| Question | Practical answer |
|---|---|
| How many dips does it take? | It varies by wax, vessel depth, taper length, and pause time. Use diameter and holder fit as the stop point. |
| Can I dip several wicks at once? | Yes, but only if you can keep them separated, straight, and evenly timed. Start with one pair before using frames. |
| Why is the bottom getting bulky? | Wax is collecting at the lowest point. Lift smoothly, reduce lingering at the bottom, and let excess drip before hanging. |
| Why are the sides lumpy? | The wax condition or pause rhythm is inconsistent. Stabilize the bath and change one timing variable at a time. |
Dipping temperature & timing (the control knobs)
In dipped taper candles, temperature and timing control layer thickness, ridges, drips, and straightness; adjust one variable and use visible cues.
In dipped taper candles, wax condition sets the coat thickness, timing sets how each layer bonds, and hanging controls straightness. Avoid chasing a universal temperature unless your wax supplier gives a range for that exact wax.
| Wax condition or timing cue | Visible problem | Adjustment |
|---|---|---|
| Wax skins over on top | Rough, uneven coats | Warm and stabilize the wax before continuing |
| Wax runs heavily after each dip | Drips, thick base, poor build control | Let each coat set longer before the next pass |
| Candle goes fully cold between passes | Layer lines or weak bonding | Shorten the pause slightly |
| Wick pair hangs at an angle | Curved or lopsided taper | Reset the hanging point and straighten while warm |
| Dip motion changes each pass | Uneven sides | Use the same entry, pause, lift, and hang rhythm |
| Surface shows ridges | Layers are building unevenly | Slow the process and change one cue at a time |
| Bottom keeps swelling | Excess wax is collecting at the low point | Lift smoothly and let the drip finish before hanging |
Control rule: Change only one variable per test pair. If you change wax heat, pause time, dip depth, and hanging angle together, you will not know which change fixed the taper.
Quick “if you see X → do Y” list
- Ridges: Stabilize the wax and make the dip rhythm more even.
- Drips: Pause longer before the next dip and let runoff finish before hanging.
- Bends: Straighten earlier, while the taper is warm but not soft enough to dent.
- Thick bottoms: Reduce lingering at full depth and keep the candle vertical after lifting.
- Slow build: Check whether the wax is too thin on each coat or whether the candle is staying too warm between passes.
Treat this control process as part of dipping, not as general wax chemistry. Save full dye, scent, and advanced wax-blend testing for separate candle-making guides.
How to make taper candles in molds
Molded taper candles need a tensioned wick, sealed taper candle mold, controlled pour, managed shrinkage, full cooling, gentle demolding, and trimming.
A mold gives the taper its shape, but the wick still decides the flame path. Secure the wick before pouring, manage trapped air and shrinkage while the wax sets, and demold only after the candle feels firm enough to hold its shape.
- Prepare the mold. Clean the cavity, check the seam, and place the mold on a lined, level surface.
- Thread and tension the wick. Pull the wick through the mold opening, seal the bottom hole, and hold the top end centered. The wick should run through the middle from base to tip, not lean against one side.
- Seal before pouring. Press mold sealer around the wick hole and check that the mold stands upright. A slow leak usually starts from weak bottom sealing or uneven mold support.
- Pour in a controlled window. Use your wax supplier’s range when available. Without a supplier range, watch the wax: it should pour cleanly without looking slushy or smoking.
- Release trapped air. Tap the mold lightly or use a thin tool near the edge if your mold type allows it. Do not scrape the wick out of center.
- Watch for shrinkage. As wax cools, the top may dip into a crater. Add a small top-off pour when the surface has started to set but the center still shows a low spot.
- Let the mold cool fully. The outside should feel firm and stable, not soft or bendable. Rushing this step can pull seams, dents, or broken tips into the taper.
- Demold gently. Loosen according to mold type. Silicone flexes; metal usually needs release support, patience, or a light tap. Avoid forcing the candle if it resists.
- Trim and finish. Cut the wick, flatten the base if needed, and check that the taper stands straight in its holder.
Leak-proofing checklist
- Wick hole is sealed before wax enters the mold.
- Mold seam is aligned and supported.
- Wick tension does not pull the seal loose.
- Mold sits level on a lined tray.
- Pour starts slowly so pressure does not break the seal.
- The mold is checked for seepage before the full pour continues.
Demold-readiness checklist
| Cue | Ready | Not ready |
|---|---|---|
| Surface feel | Firm and dry to touch | Soft, tacky, or dentable |
| Shape | Holds without flexing | Bends when handled |
| Base | Solid around wick exit | Warm, weak, or leaking |
| Release | Loosens with gentle help | Sticks hard or tears surface |
Mini FAQ
| Question | Answer |
|---|---|
| Do I need mold release? | Use it only if your mold material or wax blend tends to stick. Test one candle before treating every mold. |
| Why did the top crack? | The wax may have cooled unevenly, shrunk hard around the center, or been topped off too late. |
| Why is the wick off-center? | The wick shifted during pouring, the top was not held, or the bottom seal pulled it sideways. |
| Why did the mold leak after sealing? | The seal may have been thin, the wick tension may have moved it, or the mold was not standing level. |
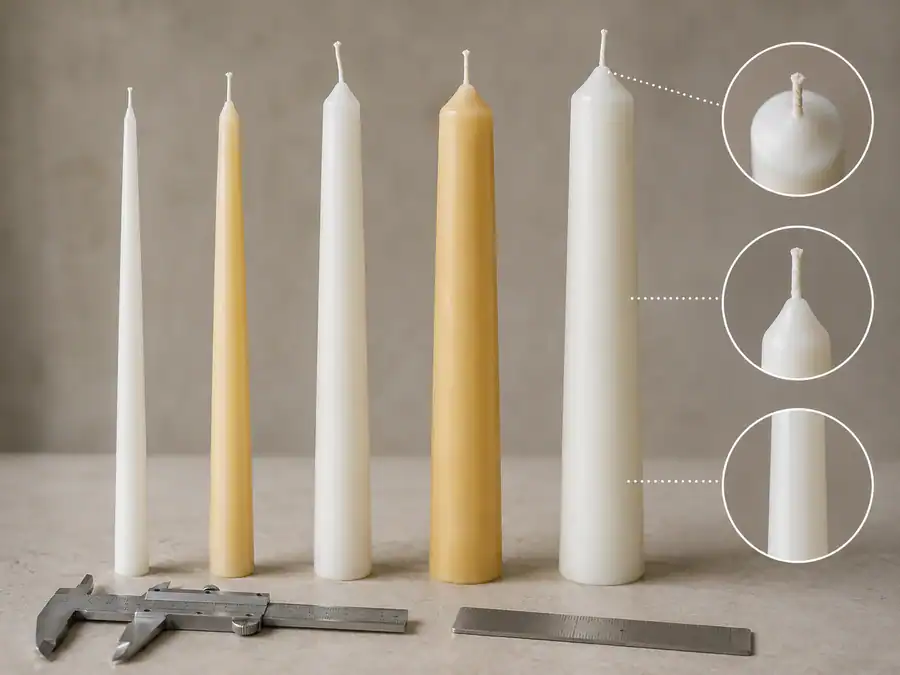
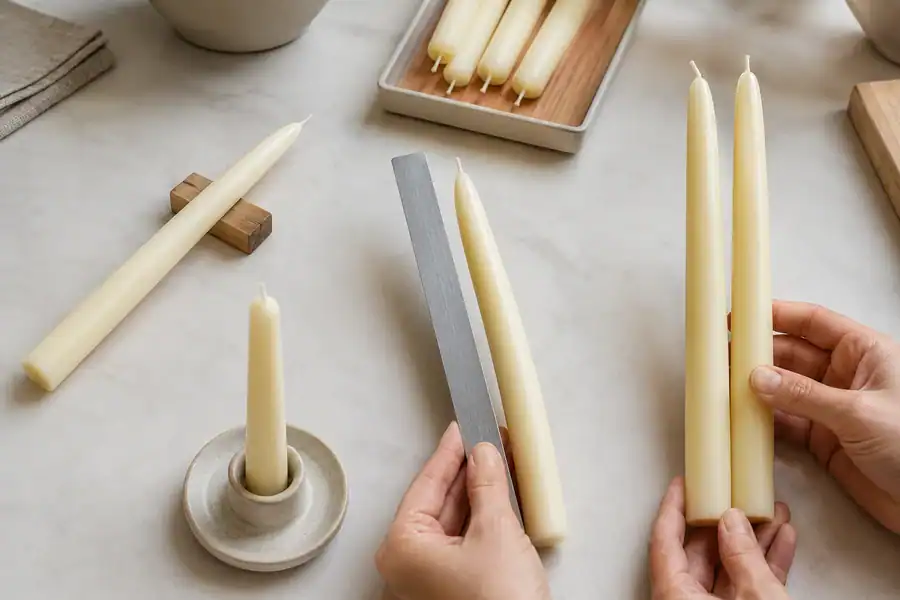
How to get straight, smooth taper candles
Straight, smooth taper candles come from stable alignment, steady wax behavior, and correction while the candle is slightly warm.
This quality-control process applies to both methods. Dipped tapers need even hanging and repeatable passes. Molded tapers need centered wicks, stable cooling, and clean release.
| Finish standard | What it shows | Likely cause |
|---|---|---|
| Good taper | Straight body, even surface, centered wick | Stable alignment and careful handling |
| Slight warp | Candle curves after cooling | Uneven hanging, draft, or handling too late |
| Ridges | Visible step-like bands | Uneven dip rhythm or wax surface changes |
| Seam line | Raised or rough side mark | Mold seam, release issue, or rough demolding |
Method box: quality-control checklist and correction window
- Check straightness while the taper is firm enough to hold but still slightly pliable.
- Roll the candle gently on a flat surface to spot bends.
- Compare paired tapers side by side before trimming the base.
- Correct minor bends early; remake badly warped candles instead of forcing them.
- Handle smooth surfaces with clean hands or a soft cloth to avoid fingerprints and scuffs.
- Record the wax, wick, method, and visible defect before changing the next batch.
Dipping-specific finish tips
- Keep the wick pair hanging straight from the first dip.
- Use the same dip depth and lift speed for each pass.
- Let the wet shine dull before the next pass.
- Rotate or reposition only when it helps even out one-sided buildup.
- Trim wax skirts at the bottom before they harden into a bulky base.
- Straighten while warm; do not bend a cold taper until it cracks.
Mold-specific finish tips
- Keep wick tension centered from top to bottom.
- Support the mold so it does not lean while cooling.
- Avoid moving the mold once the surface starts to set.
- Treat seam lines as a mold-fit and release issue, not only a wax issue.
- Top off shrinkage before the crater becomes a hard, sunken pocket.
- Demold slowly so the surface does not tear or scuff.
Pairing and finishing checklist
| Finish task | What to do | Pass condition |
|---|---|---|
| Straightness test | Roll each taper on a flat surface | No obvious wobble |
| Pair match | Set two tapers side by side | Similar length and base width |
| Base flattening | Trim or level the bottom | Fits holder without rocking |
| Wick alignment | Look from base to tip | Wick path appears centered |
| Surface handling | Wipe or polish only when cool | No fingerprints or drag marks |
| Holder fit | Test before gifting or burning | Snug, upright, and stable |
When a taper candle is badly warped, cracked, or wicked far off-center, treat it as a remake candidate instead of hiding the issue with more wax.
Troubleshooting taper candle problems
Fix one taper candle variable at a time; save cosmetic defects, but remake candles with cracks, severe warps, or unsafe burns.
Troubleshooting works best when you separate appearance defects from burn defects. Ridges, seam lines, and mild haze can often be corrected. A crooked wick path, broken molded body, unstable base, or heavy smoke during a test burn usually means the candle needs a remake or controlled retest.
| Defect | Fast read | Save or remake? |
|---|---|---|
| Light ridges | Dip rhythm or wax condition changed | Usually save |
| Heavy drips while dipping | Wax is running or wick is off-center | Usually save if shape is stable |
| Bent dipped taper | Cooling, handling, or hanging was uneven | Save only if mild |
| Beeswax haze or bloom | Surface change, often cosmetic | Usually save |
| Mold sinkhole | Shrinkage pulled wax inward | Save if shallow; remake if deep |
| Air bubbles | Trapped air or rough pour path | Save if cosmetic; remake if weak |
| Off-center wick | Wick moved during pour or dipping | Remake if it affects burn |
| Cracked molded taper | Release, cooling, or wax stress failed | Usually remake |
Save vs remake rubric
| Situation | Best move | Why |
|---|---|---|
| Small surface flaw, straight candle, centered wick | Save or polish lightly | The burn path is still usable |
| Bulky dipped base | Trim and test holder fit | The problem is mostly fit |
| Minor bend while still warm | Straighten gently | The wax can still move without cracking |
| Deep mold void | Remelt or remake | The body may break or burn poorly |
| Wick visibly near one side | Remake | The flame path is not centered |
| Candle smokes heavily after trimming | Retest with smaller wick or harder wax | The burn setup is wrong |
Method box: change-one-variable protocol
- Name the defect before changing anything.
- Pick one likely cause: wax behavior, wick position, cooling, timing, or holder fit.
- Change one variable in the next test pair.
- Keep the same wax, wick, mold, holder, and room setup unless that variable is the test.
- Log the result before making a full batch.
Use the dipped-problems list when the candle was built layer by layer. Use molded taper fixes when the problem came from sealing, pouring, cooling, or demolding.
Dipped taper candle problems and fixes
Dipped taper problems usually come from wax condition, dip rhythm, hanging angle, or handling before the candle is firm.
Use this section as a fast scan. Find the defect, apply the quick fix, then prevent it in the next pair.
| Defect | Likely cause | Quick fix | Prevention |
|---|---|---|---|
| Ridges or steps | Wax changed condition, pause was too long, or dip motion was uneven | Re-dip with steadier rhythm if the shape is still straight | Keep the same dip depth, lift speed, and set cue |
| Thick bottom | Wax collected at the lowest point | Trim the base, then test holder fit | Lift smoothly and let runoff finish before hanging |
| Lopsided build | Wick hung at an angle or entered wax unevenly | Warm slightly and straighten if still pliable | Hang from a centered point and check after early coats |
| Heavy drips | Wax ran too freely or the pause was too short | Let the coat set longer before the next pass | Wait until wet shine dulls before re-dipping |
| Bent taper | Uneven cooling, draft, or handling too early | Straighten only while slightly warm | Hang in still air and avoid moving early |
| Haze or bloom | Beeswax surface change or handling mark | Buff lightly if cosmetic | Handle with clean hands and store dust-free |
| Rough surface | Wax bath was unstable or debris entered wax | Strain or reset wax only if needed | Keep the vessel clean and covered between batches |
| Pair mismatch | Dip count, timing, or start thickness differed | Add controlled finish passes to the thinner candle | Dip pairs together and log the same pass groups |
Fast salvage moves
- Ridges: Re-dip only if the taper is straight and the base still fits.
- Thick base: Trim first; do not add more wax until the holder fit is checked.
- Mild bend: Correct while warm; stop if the surface cracks or dents.
- Messy surface: Use one smoothing pass rather than repeated random dips.
- Bad wick path: Remake instead of trying to hide the problem with more wax.
Mini FAQ
| Question | Answer |
|---|---|
| Are ridges temperature or timing? | Treat them as a sequence problem first: wax condition, dip pause, lift speed, then cooling. |
| Why did the taper bend after it looked set? | The outside firmed before the whole candle stabilized, or the candle cooled unevenly. |
| Should I re-dip or heat-smooth a messy taper? | Re-dip when the shape is straight; remake when the body is warped, cracked, or off-center. |
Molded taper candle problems (quick fixes)
Molded taper problems usually happen before the wax fully sets, so fix air, wick position, sealing, and top-off timing early.
| Mold defect | Fix | Prevention |
|---|---|---|
| Bubbles | Tap the mold lightly or release trapped air with a thin tool if the mold allows it | Pour slowly and avoid knocking the wick off-center |
| Sinkhole or crater | Add a small top-off pour while the center is still receptive | Watch the top as shrinkage appears instead of leaving it unattended |
| Wick off-center | Re-center before the wax sets; remake if the path is already locked | Hold tension at both ends and support the mold upright |
| Stuck candle | Pause, flex or release by mold type, and avoid force | Use the right release method and let the candle firm fully |
| Seam line | Trim or smooth only if shallow | Align the mold seam and avoid over-tight or distorted closures |
| Leaking mold | Stop the pour, let wax set, reseal, and restart if needed | Seal the wick hole and test support before filling |
| Cracking during release | Remake if the body is weak or split | Cool fully and avoid pulling on the wick |
| Broken tip | Re-melt or remake if the shape matters | Demold slowly and support narrow ends |
Before-pour / during-pour / before-demold checklist
| Stage | Check |
|---|---|
| Before pour | Mold is clean, level, sealed, and supported |
| Before pour | Wick runs through the center without side pull |
| During pour | Wax enters steadily without splashing or trapping obvious air |
| During pour | Wick stays centered after the first fill |
| During pour | Top-off is done when shrinkage appears, not after the crater is fully cold |
| Before demold | Candle feels firm, holds shape, and does not bend under light handling |
| Before demold | Mold releases without tearing, dragging, or pulling from the wick |
Molded taper mini FAQ
| Question | Answer |
|---|---|
| Can I fix a crater without re-melting? | A shallow crater can often be topped off; a deep void or weak body is safer to remake. |
| Why will the taper not release? | The wax may be too soft, the mold may need release support, or the candle may not be fully firm. |
| How do I stop bubbles without special equipment? | Pour steadily, tap lightly, release visible trapped air, and avoid shifting the wick. |
| When should I top off? | Top off when the surface has started to set and the center shows shrinkage, before it becomes a hard crater. |
Fit + burn performance in holders (diameter, dripping, smoke)
Most taper candle dripping or smoking comes from drafts, a loose or tilted holder fit, or an oversized wick.
Before changing wax or remaking the batch, check the candle in real use: holder fit, upright alignment, wick length, and airflow. A finished taper must sit straight before it can burn predictably.
Holder-fit and draft checklist
| Check | Pass | Fix |
|---|---|---|
| Holder grip | Taper stands upright without wobbling | Use a better-fitting holder or adjust the base before lighting |
| Base shape | Bottom sits straight and stable | Flatten or trim the base |
| Wick length | Wick is trimmed before lighting | Trim before each burn |
| Wick path | Wick appears centered through the taper | Use wick-sizing and centering fixes in the next batch |
| Airflow | Flame does not lean hard to one side | Move away from windows, vents, fans, or walkways |
| Surface below | Holder sits on a stable, heat-resistant surface | Move to a safer surface before lighting |
| Nearby items | Flame is clear of anything that can catch | Reset the table before burning |
Burn-symptom table
| Symptom | Likely cause | Quick fix | Prevention |
|---|---|---|---|
| Drips down one side | Draft, tilted holder, or off-center wick | Move the candle and check upright fit | Test holder fit before lighting |
| Heavy dripping all around | Wick may be too large or wax too soft | Test a smaller wick in the next pair | Use the taper wick sizing chart |
| Smoking flame | Wick is too long, too large, or in a draft | Extinguish, cool, trim, and relight in still air | Trim before each burn and avoid drafts |
| Weak flame | Wick may be too small or drowning | Retest with a slightly larger wick | Log wax, wick, and diameter |
| Uneven melt path | Candle is tilted, warped, or in moving air | Straighten fit or move location | Use straightening and finishing for even burn |
| Flame leans hard | Airflow is pushing the flame | Move away from vents or windows | Burn in a still, supervised spot |
| Base will not fit holder | Diameter mismatch or bulky dipped base | Trim carefully before burning | Check fit before final dipping passes |
| Wax tracks onto holder | Tilt, draft, or oversized wick | Stop, cool, clean, and retest | Pair holder fit with wick testing |
Method box: burn test loop
- Observe. Watch the first burn for flame height, smoke, side dripping, tilt, and wax tracking.
- Adjust one variable. Change only placement, holder fit, wick trim, or wick size.
- Retest. Use the same candle type and holder setup so the change is readable.
- Stop and reset. Extinguish the candle if the flame smokes heavily, leans hard, flares, or drips near anything unsafe. Let the wax cool before moving it.
Real-life causes box: In home taper use, messy burns blamed on wax often come from table conditions: a holder that lets the candle lean, a dinner-table draft, or a wick that is too large for the finished diameter.
Do not use burn testing as a substitute for supervision. Burn taper candles only in stable holders, away from drafts and flammable items, and never leave a lit candle unattended.
How to store taper candles and clean leftover wax
Store taper candles flat or supported, cool and dust-free; label dry leftover wax and clean molds gently.
Storage protects straight shape, clean finish, and reusable materials. Heat, pressure points, leaning, dust, and rough handling can turn a good taper into a bent or scuffed one before it is burned.
Store / don’t store checklist
| Store | Don’t store |
|---|---|
| Flat in a box, tray, or divider | Leaning in a jar or loose bundle |
| Wrapped or separated to prevent scuffs | Pressed together where surfaces can mark |
| Away from warm windows, radiators, or hot shelves | Anywhere heat can soften the candle |
| With pairs labeled by wax, wick, and batch | Mixed with unknown test candles |
| Dust-free until use or gifting | Exposed on a workbench for days |
| Fully cooled before wrapping | Wrapped while still warm or tacky |
Leftover wax routine
- Let leftover wax cool fully.
- Label it by wax type, color, scent status, and date.
- Keep dry wax sealed or covered.
- Store dyed or scented leftovers separately from plain wax.
- Reuse mixed scraps only when you accept less predictable color, scent, or burn behavior.
Mold and tool cleanup routine
| Item | Clean gently by | Avoid |
|---|---|---|
| Taper molds | Wiping residue after wax firms but before it becomes hard to remove | Scratching the cavity |
| Wick pins or skewers | Removing wax buildup before storage | Leaving residue that offsets the next wick |
| Pour pot | Wiping excess wax for the next compatible batch | Washing wax down a sink |
| Dipping vessel | Covering or storing clean for the next matching wax | Mixing unknown waxes without labels |
| Work tray | Scraping loose drips after cooling | Handling hot pooled wax |
Good storage supports the next batch. Labeling wax, keeping molds clean, and storing finished tapers flat makes the next dipping or molding session easier to repeat without guessing what changed.