
A candle mold’s wax capacity comes from its inside cavity dimensions and usable pour height, not from the mold’s outside size.
Getting the wax amount wrong can leave you short on a pour or stuck remelting leftovers. The clean method is to measure the inside of the mold, set the usable fill height, and turn that volume into wax weight. Round, square, and rectangular molds follow formula steps, while odd shapes usually need a water test. Once those inputs are set, wax, fragrance, and reserve planning become much easier to manage.
Measure the Inside of the Mold First
A candle mold’s wax capacity starts with the inside cavity, because outside measurements include wall thickness and can make you melt too much wax.
For the broader mold overview, see candle molds and shapes.
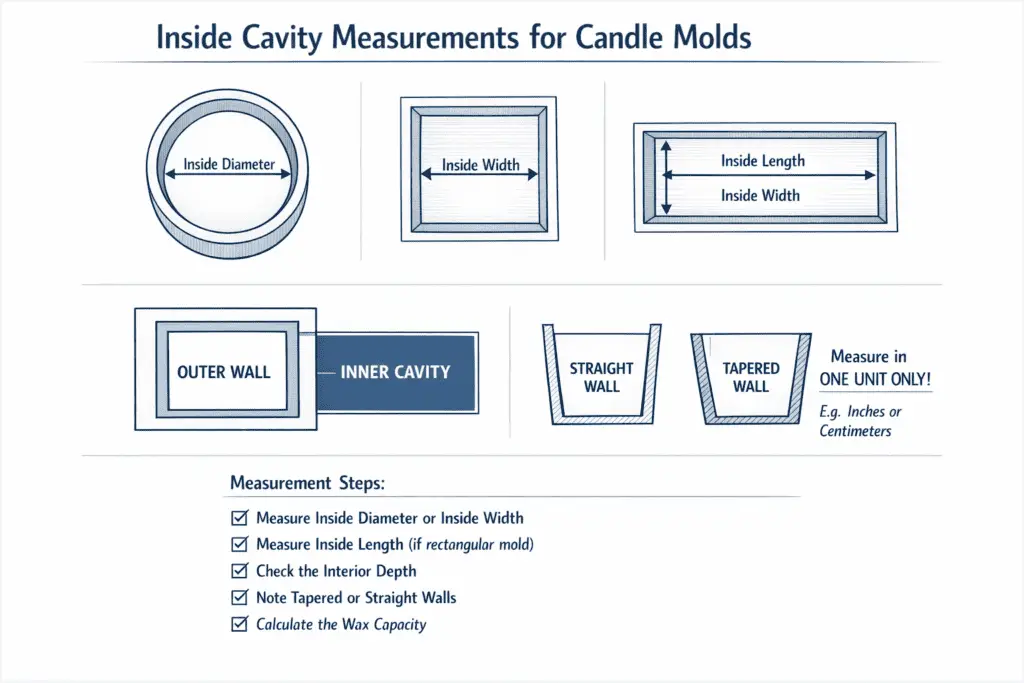
The only measurements that count for wax planning are the ones inside the cavity where wax will sit. A round mold needs the inside diameter. A square mold needs the inside width on each side. A rectangular mold needs the inside length and inside width. Write those numbers in one unit before you move on, such as inches or centimeters. That is how candle mold measurements affect wax estimates from the first step.
Outside size tells you how large the mold body is. Inside size tells you how much space the wax can fill. On a thick-walled mold, those two numbers can be far apart.
Use this order every time:
- Identify the mold shape.
- Measure the inside diameter for a round mold, or the inside width and length for a square or rectangular mold.
- Check whether the walls are straight or tapered.
- Record the numbers in one unit only.
- Move to usable pour height before any wax math.
Tapered molds need one extra note. If the cavity gets narrower or wider from top to bottom, a single top measurement can mislead you. In that case, write down the top and bottom cavity size so you do not treat a tapered mold like a straight one.
Use geometry for straight-walled round, square, and rectangular cavities, but switch to a water test when the mold is tapered, sculpted, or uneven enough that one set of dimensions stops describing the real fill space.
Once those cavity numbers are written down, a candle wax amount calculator becomes far more useful because the inputs match the real space that wax will fill.
Common mistakes are easy to spot:
- Measuring the outer shell instead of the cavity
- Mixing inches and centimeters in one formula
- Using diameter and radius as though they mean the same thing
- Ignoring taper in molds that narrow toward one end
Set the Fill Line and Usable Pour Height
Usable pour height is the cavity height you can actually fill after leaving headspace and any clearance the mold setup requires.
Total cavity height and fill height are not the same number. The wax estimate should use the height up to your real fill line, not the full inside wall. Start this step after you measure the inside of the mold first so width, length, or diameter are already settled.
The fill line matters because wax rarely belongs right at the rim. A little space can help you leave room for a clean top, a wick pin, or another part of the setup that takes up height. The exact gap depends on the mold and the finish you want, so treat the fill line as a planned stop point, not a fixed rule.
Use this repeatable setup before melting wax:
- Look at the full inside cavity height.
- Decide where the finished top should sit.
- Leave the needed clearance for the mold setup.
- Mark that line.
- Measure from the bottom of the cavity to that mark.
- Use that result as your usable pour height.
A pillar candle pouring guide often follows the same logic because a clean top starts with a controlled fill line, not a rim-level pour. The same habit helps later when you are fixing sinkholes in molded candles, since a small reserve pour is easier to plan when the first fill height was set on purpose.
Calculate Capacity for Standard Mold Shapes
For standard molds, calculate volume from interior dimensions and usable height, then convert that capacity into wax weight for your wax type.
This is the core math for round, square, and rectangular molds. Use the inside cavity measurements and the usable pour height, then pick the formula that matches the shape. That is the basis of candle mold capacity formulas.
The short path is simple: calculate cavity volume from the interior shape formula and usable pour height, then convert that capacity into wax weight with the wax-family factor or supplier conversion for your wax.
These formulas cover the most common standard shapes:
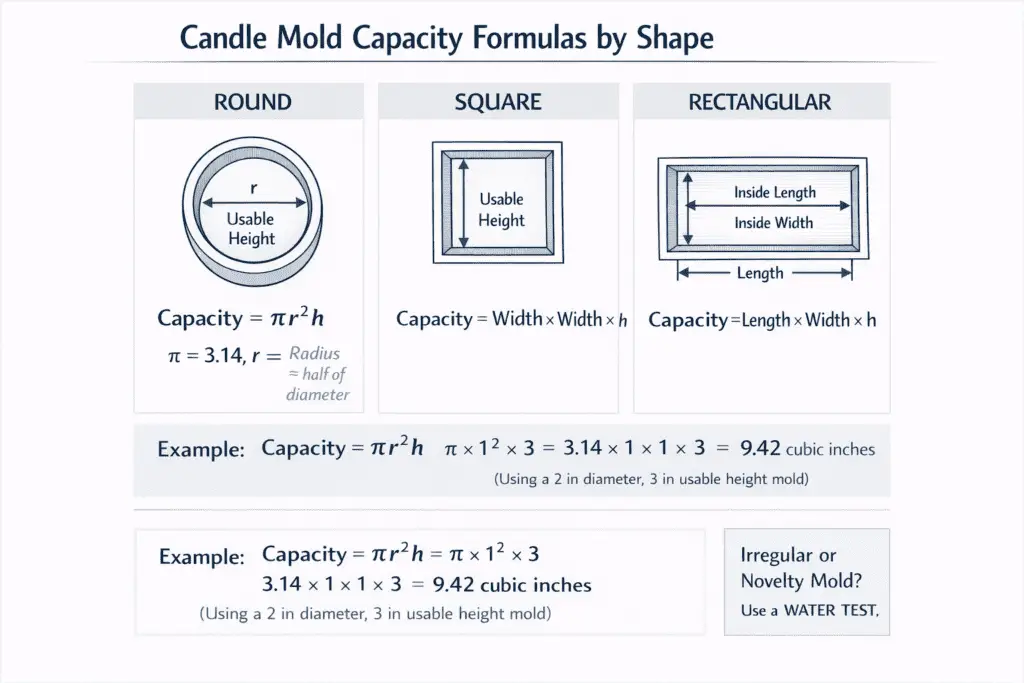
- Round mold: volume = π × radius × radius × usable height
Radius is half of the diameter. - Square mold: volume = side × side × usable height
- Rectangular mold: volume = length × width × usable height
A simple worked example makes the path clearer. Say a round mold has an inside diameter of 2 in (5.1 cm) and a usable pour height of 3 in (7.6 cm). The radius is 1 in. The volume is about 3.14 × 1 × 1 × 3, which gives about 9.4 cubic inches of cavity space. The next step will use a water test for irregular molds only when the shape stops behaving like a true round, square, or rectangle.
Use this order for manual math:
- Measure the inside cavity.
- Set the usable pour height.
- Pick the formula that matches the shape.
- Calculate the mold volume.
- Move to wax-weight conversion or a candle wax amount calculator.
The formula path is best for simple shapes because the math is clean and repeatable. The water-test path is better when the mold has curves, deep detail, or a shape that breaks the standard formulas. One more error shows up often in round molds: diameter is the full width across the circle, while radius is half of that number.
Two mistakes cause most bad estimates:
- Using diameter where the formula needs radius
- Using total cavity height instead of usable pour height
Use a Water Test for Irregular or Novelty Molds
For irregular molds, a water test gives the fastest practical capacity estimate because the measured fill amount becomes your conversion baseline.
This method works when a standard formula stops matching the real cavity. Calculate capacity for standard mold shapes first when the mold is clearly round, square, or rectangular. When the shape has curves, embeds, or uneven walls, fill the dry mold to the planned line with water, then measure or weigh that amount.
Use this sequence:
- Dry the mold.
- Mark the same fill line you would use for wax.
- Fill the cavity with water to that line.
- Pour the water into a measuring cup or weigh it.
- Record the result.
- Dry the mold again before any wax goes in.
That recorded amount becomes the planning baseline you will use to convert mold capacity into wax weight in the next main section. A candle wax amount calculator still helps here, but only after the water test gives you a real capacity number to enter.
Convert Mold Capacity Into Wax Weight
The same mold can need different wax weights because soy, paraffin, beeswax, and blends do not share one conversion factor.
Start with mold capacity in one unit, such as milliliters or fluid ounces, then apply the wax-family conversion that matches the wax you plan to pour. A density factor is the weight a fixed volume of one wax family produces. That is why you must convert mold capacity into wax weight before you decide how much wax to melt.
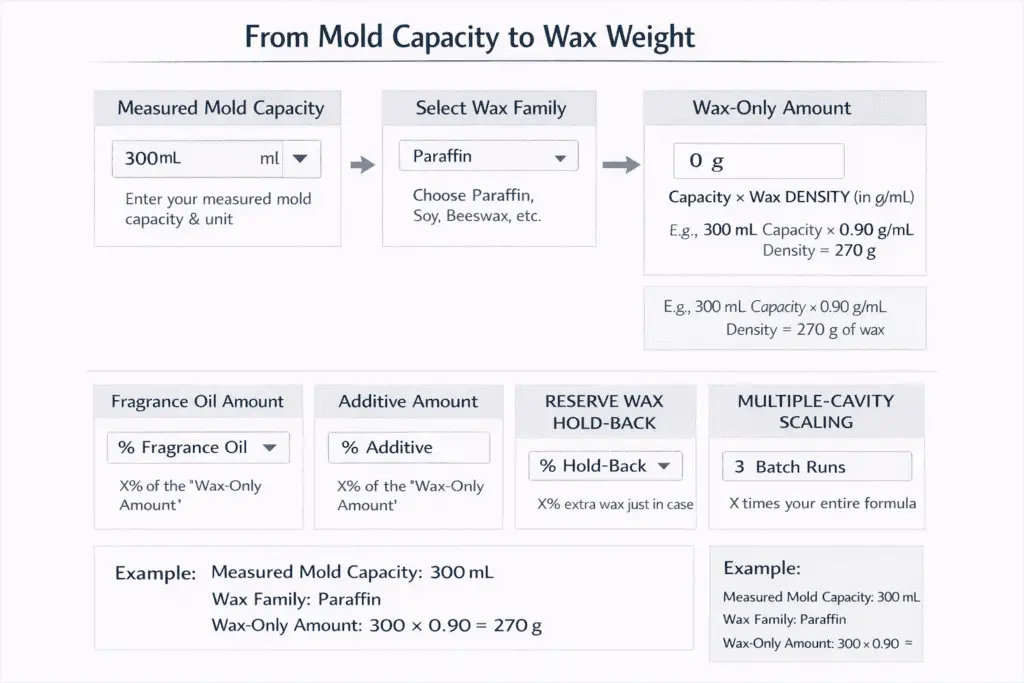
For example, if a water test gives 300 mL of capacity and your supplier conversion for that wax turns that amount into 270 g, use 270 g as the wax-only figure before fragrance, additives, or reserve wax are added.
The clean sequence stays the same each time:
- Start with the measured mold capacity or water-test result.
- Pick the exact wax family you are pouring.
- Apply the supplier conversion for that wax.
- Round up slightly only when you know the mold or recipe tends to come up short.
- Keep the recipe additions separate from the wax-only figure.
One mold can hold the same volume and still need a different wax weight across soy, paraffin, beeswax, and blends. The volume stayed the same. The weight changed because the wax changed. That is why a single universal factor causes rough melt plans.
The fallback path stays simple. Use a water test for irregular molds when the cavity shape does not fit a standard formula, then convert that measured capacity with the wax-family factor that matches the wax on your bench. A wax amount calculator for candle molds makes that step faster because the capacity input stays the same while the wax-family setting changes the returned wax estimate.
Adjust for Fragrance Oil and Additives
Calculate the wax amount first, then add fragrance oil and other recipe extras so the total melt plan stays accurate.
After you convert mold capacity into wax weight, keep the wax-only figure separate from the rest of the recipe. That is where fragrance load by wax type matters, because the wax estimate and the full melt amount are not the same number. A fragrance load is the amount of fragrance oil added to the batch.
This worksheet-style sequence keeps the numbers clean:
- Wax-only amount: the converted wax figure for the mold
- Fragrance oil amount: the planned fragrance addition
- Additive amount: dye or other extras
- Total melt amount: wax-only amount plus every recipe addition
A quick example shows the split. A mold plan might call for 500 g of wax, 30 g of fragrance oil, and 5 g of additive. The wax-only estimate is still 500 g. The total melt plan becomes 535 g. A wax amount calculator for candle molds helps here because it can keep those values in separate fields instead of blending them into one unclear number.
Reserve Wax for Sinkholes and a Second Pour
Do not pour every ounce right away when shrinkage is likely, because a small hold-back can save a second melt.
Once you convert mold capacity into wax weight, decide whether the first pour should leave a little wax in reserve. Fixing sinkholes in molded candles starts with planning, not guessing after the candle cools. A reserve wax hold-back is a small amount of melted wax saved for a top-off if the surface sinks.
This reserve flow keeps the process tidy:
- Set the full wax plan.
- Hold back a small amount instead of pouring the whole batch at once.
- Let the candle cool and inspect the top.
- Top off only when the mold and wax behavior call for it.
Some pours need that reserve. Some do not. Mold depth, wax behavior, and cooling speed all change the chance of a sinkhole or a second pour. A wax amount calculator for candle molds can help you build that reserve into the melt plan, but it should stay as a separate field rather than being hidden inside the main wax number.
Scale Capacity for Multiple Cavities or Batch Runs
Once one mold is dialed in, scale the same capacity math by the number of cavities or the number of identical molds in the run.
Use this short sequence:
- Find the wax-only amount for one cavity or one mold.
- Multiply by the total number of cavities or identical molds.
- Add fragrance oil and additives after that figure is set.
- Keep any reserve wax as a separate planning number.
Wax Amount Calculator for Candle Molds
For a faster input-and-output version of this same process, use a wax amount calculator for candle molds after you know the inside size, usable pour height, or water-test result. It works best as a companion to this formula page, not as a replacement for measuring the cavity correctly first.