Test candle dye by using a wax sample large enough to measure each dose, changing one color variable, comparing matched cooled samples, and recording the accepted dye-to-wax relationship before confirming it separately.
This article is for candle makers who need a cured-color formula tied to one identified wax, dye product, dye form, and measuring method. Here, controlled means fixed relevant conditions with one declared color change; a formula records the dye-to-wax relationship, and repeatable requires a separate matched-condition confirmation sample. The process is to choose a measurable batch, calculate dye percentage, fix test variables, make a measured shade ladder, compare cured samples, record the formula, scale it provisionally, and confirm it. It does not provide a universal dye dose, convert formulas between dye products or forms, or confirm wick suitability, burn performance, product safety, or digital color equivalence; the first step is setting a measurable batch size.
What Is a Practical Small Candle Dye Test Batch?
A practical small candle dye test batch is the smallest wax mass that keeps the planned dye dose above your measuring method’s repeatable limit.
The smallest reproducible dye increment is the lowest dye amount your method can deliver repeatedly, not the smallest number displayed by the equipment. Practical batch size depends on that verified increment and the planned dye fraction rather than one universal wax weight.
Use this formula:
Minimum test wax mass (g) = smallest reproducible dye increment (g) ÷ planned dye fraction
Convert the dye percentage to a decimal before calculating. For example, 0.10% becomes 0.001.
The following arithmetic examples show how measurement limits change the minimum test mass. The percentage values are examples, not dye-load recommendations.
| Reproducible dye increment | Planned dye percentage | Calculation | Minimum wax mass | Measurable verdict | Adjustment when unsuitable |
|---|---|---|---|---|---|
| 0.01 g | 0.05% | 0.01 ÷ 0.0005 | 20 g | Measurable at the stated increment | Use at least 20 g of wax |
| 0.01 g | 0.10% | 0.01 ÷ 0.001 | 10 g | Measurable at the stated increment | Use at least 10 g of wax |
| 0.02 g | 0.10% | 0.02 ÷ 0.001 | 20 g | A 10 g batch would be below the limit | Increase the wax mass to 20 g |
| 0.05 g | 0.10% | 0.05 ÷ 0.001 | 50 g | Smaller batches cannot represent the dose reliably | Increase the batch or change the measuring method |
| 0.05 g | 0.25% | 0.05 ÷ 0.0025 | 20 g | Measurable at the stated increment | Use at least 20 g of wax |
A proposed dose is unsuitable when it falls below the verified dye increment. Increasing wax mass raises the dye amount while preserving the planned percentage.
Methods: Repeat the same dye measurement at least three times and record each result before accepting an increment as reproducible. Treat scale display resolution and repeatable measurement as separate values until those checks agree. The table is arithmetic and does not measure color strength, dye concentration, or dispersion behavior.
Choose the smallest wax mass that keeps every planned dose measurable with the same verified method.
How to Calculate Candle Dye Percentage by Wax Weight
Calculate candle dye percentage by dividing measured dye mass by wax mass and multiplying by 100.
Dye percentage by wax weight expresses the recorded dye mass as a percentage of the wax mass. Wax is the denominator, and the raw dye amount must remain in the record beside the calculated percentage.
Use this formula:
Dye percentage = (dye mass ÷ wax mass) × 100
A worked example using 0.10 grams of dye and 100 grams of wax produces the following record:
| Formula field | Recorded value |
|---|---|
| Wax mass | 100 g |
| Dye mass | 0.10 g |
| Division | 0.10 ÷ 100 = 0.001 |
| Percentage | 0.001 × 100 = 0.10% |
| Normalized formula | 0.10 g dye per 100 g wax |
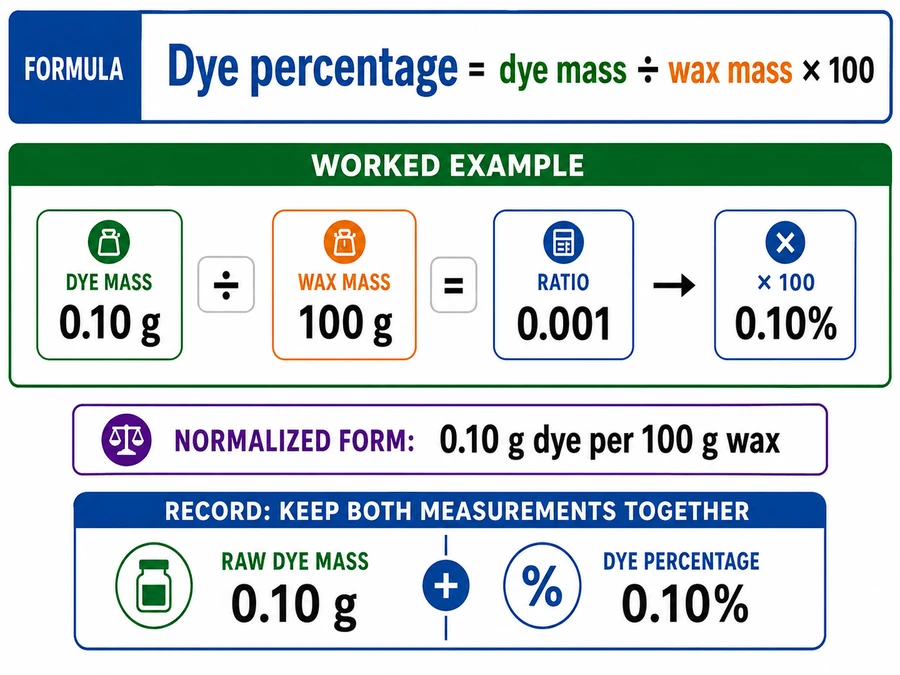
Record both 0.10 g and 0.10%. The percentage supports comparison between batch sizes, while the raw value preserves what was actually measured.
The result belongs only to the identified wax, dye product, dye form, and measuring method. A percentage calculated for one liquid dye, block, chip, or powder does not create an equivalent dose for another product or form.
Weight-based dosing and counted dosing produce different kinds of records:
| Dosing method | What the record contains | What must be checked |
|---|---|---|
| Measured mass | Dye mass in grams | The intended mass is above the verified measuring limit |
| Drops | Number of drops | Repeated equal-drop counts must be weighed for the same product and dropper |
| Counted pieces | Number of chips, flakes, or block portions | Repeated equal counts must be weighed for the same product and piece type |
Drops and counted pieces can support repeatable work only after their product-specific mass variation has been measured. A count alone cannot be converted into a universal dye mass.
Use this three-repetition worksheet to test a counted method without inventing a conversion:
| Represented method | Repetition 1 | Repetition 2 | Repetition 3 | Recorded comparison |
|---|---|---|---|---|
| Equal drop count from the same dropper | ___ g | ___ g | ___ g | Record the lowest, highest, and range |
| Equal number of the same chips or flakes | ___ g | ___ g | ___ g | Record the lowest, highest, and range |
| Target weight measured directly | ___ g | ___ g | ___ g | Record whether the target can be repeated |
Methods: Test one identified dye product and form with the same measuring equipment and procedure across three repetitions. Weigh each counted dose rather than assuming that equal counts have equal mass. The results apply only to the tested product, dispenser, piece type, and measurement setup.
Keep the raw dose, calculated percentage, denominator, unit, and product identity together so the color formula remains interpretable.
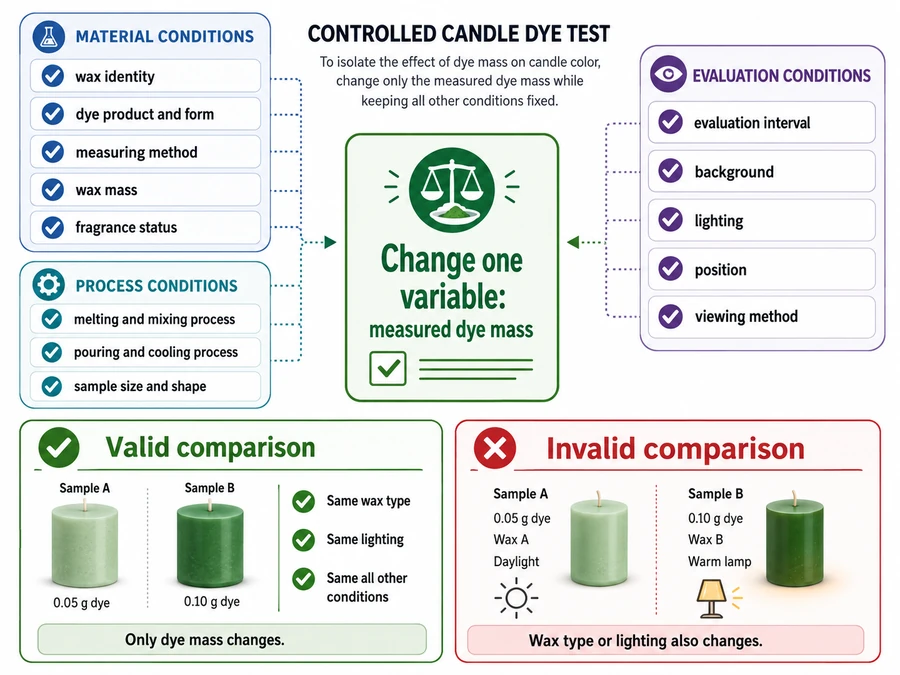
Which Variables Must Stay Constant During Candle Dye Testing?
Keep every relevant test condition fixed except one declared color variable, so differences between candle dye samples can be traced to that change.
A controlled candle dye test uses the same wax, dye product and form, measuring method, wax mass, fragrance status, processing conditions, sample geometry, evaluation interval, background, and lighting. Only the declared dye amount or another named color variable changes between comparable samples.
Use this sequence before comparing samples:
- Identify the control sample and assign it a unique sample ID.
- State the single variable that will change, such as measured dye mass.
- Record the wax identity, dye identity, dye form, measuring method, and wax mass.
- Keep fragrance either present at the same recorded amount or absent from every sample.
- Apply the same melting, dye-addition, mixing, pouring, and cooling procedure.
- Make every sample the same size, thickness, shape, and container type.
- Evaluate every sample after the same cooling or cure interval.
- Compare the samples under the same background, lighting, position, and viewing method.
Changing two conditions at once makes the result non-diagnostic because the observed shade difference cannot be assigned to either change.
| Sample comparison | Declared color change | Unintended change | Status | Corrective next test |
|---|---|---|---|---|
| C0 versus S1 | Dye mass | None recorded | Valid comparison | Continue with the planned increment |
| S1 versus S2 | Dye mass | Wax type changed | Invalid comparison | Repeat S2 with the original wax |
| S2 versus S3 | Dye mass | Fragrance added only to S3 | Invalid comparison | Repeat with matching fragrance status |
| S3 versus S4 | Dye mass | S4 is thicker | Invalid comparison | Remake equal-size samples |
| S4 versus S5 | Dye mass | S5 evaluated later | Invalid comparison | Compare both at one declared interval |
| S5 versus S6 | Dye mass | Lighting changed | Invalid comparison | Recheck both under the same lighting |
The table records the confounding variable rather than claiming why a candle behaved differently. It supports the next color test without expanding into wax, fragrance, wick, temperature, or burn-failure diagnosis.
Methods: Complete the fixed-condition record before preparing the samples. Mark a comparison invalid when any unplanned material, process, timing, geometry, or viewing difference appears, then repeat the affected sample with that condition restored.
Once the fixed conditions are recorded, the shade ladder can change dye dose in measured steps without mixing possible causes.
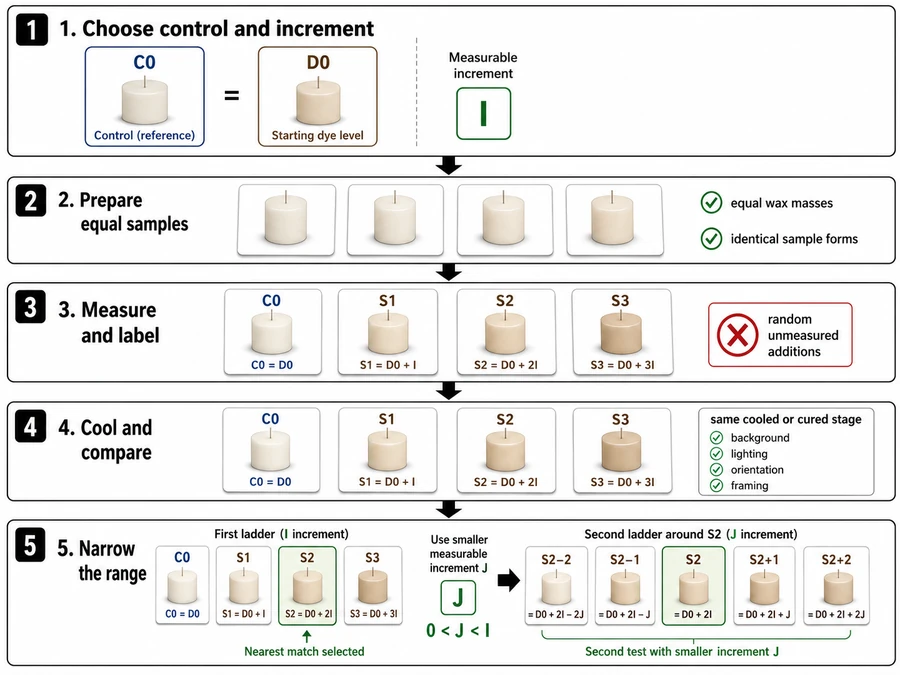
How to Make a Measured Candle Dye Shade Ladder
Make a shade ladder by testing equal wax samples against one control with dye doses that increase by a declared, measurable increment.
A shade ladder is an ordered set of labeled wax samples in which the dye dose follows a recorded numerical sequence. The control may contain no dye or a known formula, while every later sample changes by the same measured increment.
Let:
- D₀ = the control dye dose
- I = the declared dye increment in grams
- Dₙ = D₀ + nI
The first four samples would therefore use:
| Sample ID | Dye-dose rule | Difference from previous sample | Fixed conditions |
|---|---|---|---|
| C0 | D₀ | Control | Wax, mass, process, geometry, interval, background, and lighting |
| S1 | D₀ + I | I | Same as C0 |
| S2 | D₀ + 2I | I | Same as C0 |
| S3 | D₀ + 3I | I | Same as C0 |
The increment must be selected before testing and must remain above the measuring method’s repeatable limit. Random visual additions do not create a measured ladder because the amount separating adjacent samples is unknown.
- Choose an undyed sample or an accepted known formula as the control.
- Select an increment that your measuring method can repeat.
- Prepare equal wax masses and identical sample forms.
- Measure each dose from the recorded sequence rather than estimating by sight.
- Label every physical sample with its sample ID before the samples can be mixed up.
- Apply the same preparation and cooling procedure to every sample.
- Compare all samples at the same declared cooled or cured stage.
- Identify the sample nearest to the intended shade.
- Run a narrower second ladder around that sample using a smaller increment that remains measurable.
Use a worksheet that keeps the physical samples and recorded doses connected:
| Sample ID | Wax mass | Dye dose | Increment | Evaluation stage | Cured observation | Next action |
|---|---|---|---|---|---|---|
| C0 | ___ g | D₀ | Control | ___ | ___ | Retain as control |
| S1 | ___ g | D₀ + I | I | ___ | ___ | Keep, reject, or retest |
| S2 | ___ g | D₀ + 2I | I | ___ | ___ | Keep, reject, or narrow range |
| S3 | ___ g | D₀ + 3I | I | ___ | ___ | Keep, reject, or retest |
If S2 is nearest to the intended shade, place the second ladder around S2 rather than extending the first ladder indefinitely. Set a new increment J, where 0 < J < I, and confirm that J remains measurable before preparing the narrower samples.
Methods: The symbols describe the spacing between samples and do not prescribe a dye dose. The chosen control, increment, wax mass, and measuring limit must come from the identified wax-and-dye test setup.
If the ladder is photographed for documentation, retain the same background, light, sample orientation, and framing; accept the formula from the physical cooled or cured samples rather than the image alone.
A measured ladder turns the closest cured sample into the starting point for a narrower, more informative color test.
Should You Judge Candle Color While Melted or After It Cools?
Judge candle color from a cooled or cured sample at a declared interval; treat molten wax color only as a process-stage observation.
Molten wax can help you monitor mixing and dispersion, but it does not establish the accepted candle color formula. Compare and approve physical wax samples at the same cooled or cured stage, under matched lighting, background, thickness, geometry, and viewing conditions.
A declared interval is the recorded elapsed time between pouring the sample and evaluating its color. It is not a universal cure period. Select the interval for the identified wax and test procedure, then apply it to every comparable sample.
| Observation stage | What it can show | Required record | Can it establish the accepted formula? |
|---|---|---|---|
| Molten | A process-stage appearance during preparation | Sample ID, observation stage, and any visible mixing note | No |
| Recently solidified | An early appearance after the wax changes from liquid to solid | Elapsed time, sample geometry, background, and lighting | No, unless this is the declared comparison stage |
| Cooled | The physical shade at a recorded cooled interval | Elapsed time, thickness, background, lighting, and viewing position | Yes, when this is the declared stage for every sample |
| Cured | The physical shade after a longer recorded interval | Exact elapsed interval and all matched viewing conditions | Yes, when this is the declared stage for every sample |
| Recorded acceptance stage | The selected cooled or cured point used for the formula decision | Full comparison conditions and acceptance status | Yes |
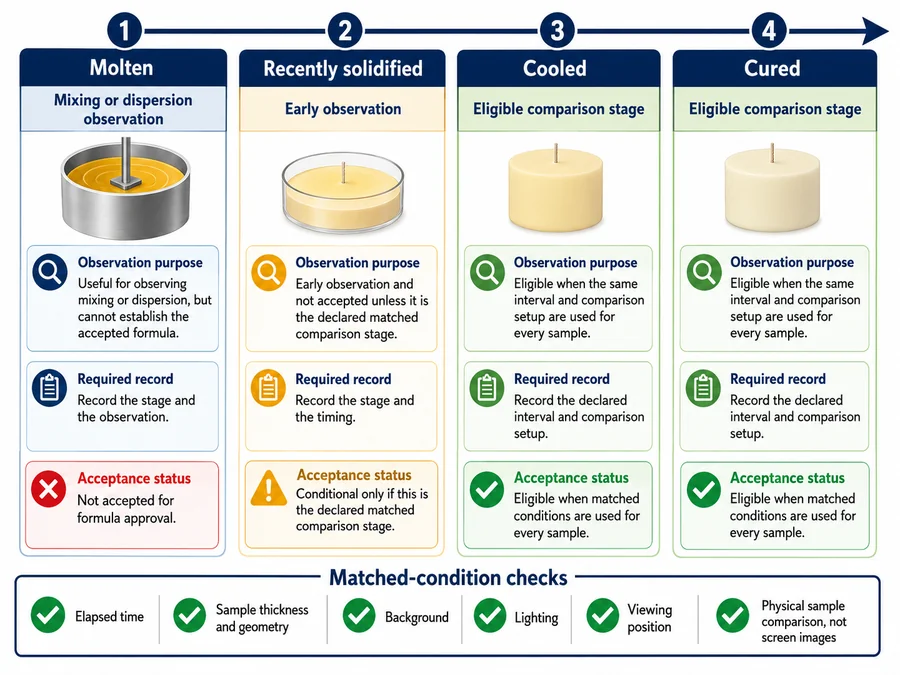
The important distinction is not the label “cooled” or “cured” by itself. The formula evidence comes from using one clearly stated interval and one matched comparison setup.
Use this checklist before accepting a shade:
- Confirm that every sample has a visible sample ID.
- Record the elapsed time since pouring.
- Compare samples with the same thickness, shape, and orientation.
- Use the same background and light source.
- Keep the viewing position consistent.
- Compare physical samples rather than screen images alone.
- Record the observation stage beside the formula result.
- Reject the comparison when one sample was viewed under different conditions.
A matched photo sequence may document the molten, cooled, and selected record stages. Each image needs the sample ID, elapsed time, stage, and matched setup, but the image does not replace the physical wax comparison.
Differences caused by cameras, screens, editing, print processes, or digital color codes are outside this test. A controlled physical comparison does not claim exact Pantone, Hex, RGB, print, packaging, or laboratory equivalence.
Methods: Evaluate all samples together at the declared interval. Keep the background, lighting, sample geometry, and viewing position unchanged, and note any deviation before assigning an acceptance result.
Accept the candle color formula only from the declared cooled or cured comparison stage, not from molten appearance alone.
What to Record in a Repeatable Candle Color Formula
A repeatable candle color formula record must link one physical sample to its materials, measurements, process, evaluation conditions, result, status, and next action.
The record is color-test-specific and belongs to one identified wax-and-dye combination. It needs enough detail to reproduce the test conditions and interpret the accepted shade without expanding into production inventory, costing, regulatory administration, or full lot-control records.
Record these minimum fields:
| Field | What to enter |
|---|---|
| Sample ID | A unique code written on both the physical sample and its record |
| Test or revision ID | The test round or formula revision |
| Test date | The date the sample was prepared |
| Wax identity | Product name or internal identifier for the tested wax |
| Dye identity | Product name or internal identifier for the tested dye |
| Dye form | Liquid, block, chip, flake, powder, or another identified form |
| Wax mass | Measured wax amount with its unit |
| Raw dye amount | The amount actually measured, with its unit or verified counted method |
| Dye percentage | Dye mass divided by wax mass, multiplied by 100, when mass is measurable |
| Measuring method | Scale, verified drop method, counted pieces, or another recorded method |
| Fragrance status | Absent or present at the same recorded condition used across samples |
| Relevant process conditions | The fixed preparation conditions used for the color test |
| Sample geometry | Shape, thickness, size, and container or mold type where relevant |
| Evaluation interval | Elapsed time between pouring and color evaluation |
| Viewing conditions | Background, lighting, position, and other fixed comparison conditions |
| Acceptance rule or physical reference | The predeclared condition used to decide whether a cooled sample passes, including the reference sample ID when one is used |
| Cured observation | A factual description of the physical shade and visible comparison |
| Acceptance status | Accepted, rejected, unconfirmed, or another clearly defined status |
| Next adjustment | The one planned change for the next test |
| Revision history | The prior sample or formula revision from which this test developed |
The physical sample ID and formula record must remain paired. A formula row without its matching sample loses the direct evidence needed to review the shade, while an unlabeled sample cannot be assigned confidently to a recorded dose.
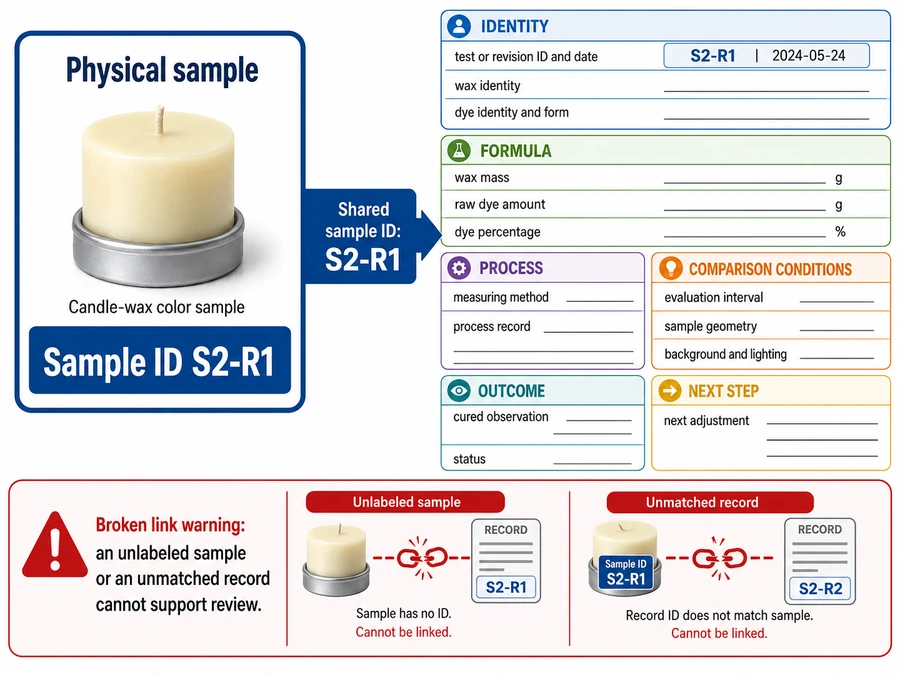
Here is one modeled example row:
| Sample ID | Revision | Wax identity | Dye identity and form | Wax mass | Raw dye amount | Dye percentage | Process record | Evaluation interval | Viewing conditions | Cured observation | Status | Next adjustment |
|---|---|---|---|---|---|---|---|---|---|---|---|---|
| S2-R1 | Revision 1 | Wax W-01 | Dye D-01, liquid | 100 g | 0.10 g | 0.10% | Fixed test procedure P-01 | 48 hours | Neutral background, fixed lamp, equal sample thickness | Darker than S1 and nearest to the selected physical reference | Unconfirmed | Prepare a separate matched-condition confirmation sample |
This example does not recommend a dye amount or predict a result for another wax or dye. It only shows how a measured dose, percentage, observation, status, and next action can appear in one connected record.
Use factual observation language such as “darker than S1,” “closest to the reference sample,” or “uneven appearance across the sample.” Do not replace the physical comparison with an unsupported digital color value.
Methods: The example row is a modeled documentation specimen based on arithmetic already shown in the article. It does not represent private test data, a manufacturer recommendation, or evidence that the stated shade will occur with another material combination.
A complete formula record keeps the measured recipe, physical sample, comparison result, decision status, and next test visibly connected.
How to Scale a Candle Dye Formula to a Larger Batch
Scale a candle dye formula by multiplying the accepted dye fraction by the target wax mass, then verify the rounded dose in a larger confirmation batch.
This calculation applies only when the wax, dye product, dye form, and measuring method remain unchanged. Proportional arithmetic predicts a dose; it does not establish that the larger batch will produce an equivalent cured shade.
Use these formulas:
Dye fraction = accepted dye mass ÷ test-wax mass
Unrounded target dye mass = dye fraction × target wax mass
Rounding effect = measurable target dose − unrounded target dose
A formula recorded as a percentage may be scaled with:
Target dye mass = target wax mass × (recorded dye percentage ÷ 100)
The following example shows the unrounded result, the measurable dose, and the rounding difference. Its numbers demonstrate arithmetic and are not dye-dose recommendations.
| Scale-up field | Example value |
|---|---|
| Accepted test-wax mass | 60 g |
| Accepted dye mass | 0.07 g |
| Dye fraction | 0.07 ÷ 60 = 0.0011667 |
| Recorded dye percentage | 0.11667% |
| Target wax mass | 500 g |
| Unrounded target dye mass | 0.0011667 × 500 = 0.5833 g |
| Verified reproducible increment | 0.01 g |
| Measurable target dose | 0.58 g |
| Rounding effect | 0.58 − 0.5833 = −0.0033 g |
| Formula status | Provisional until confirmed |
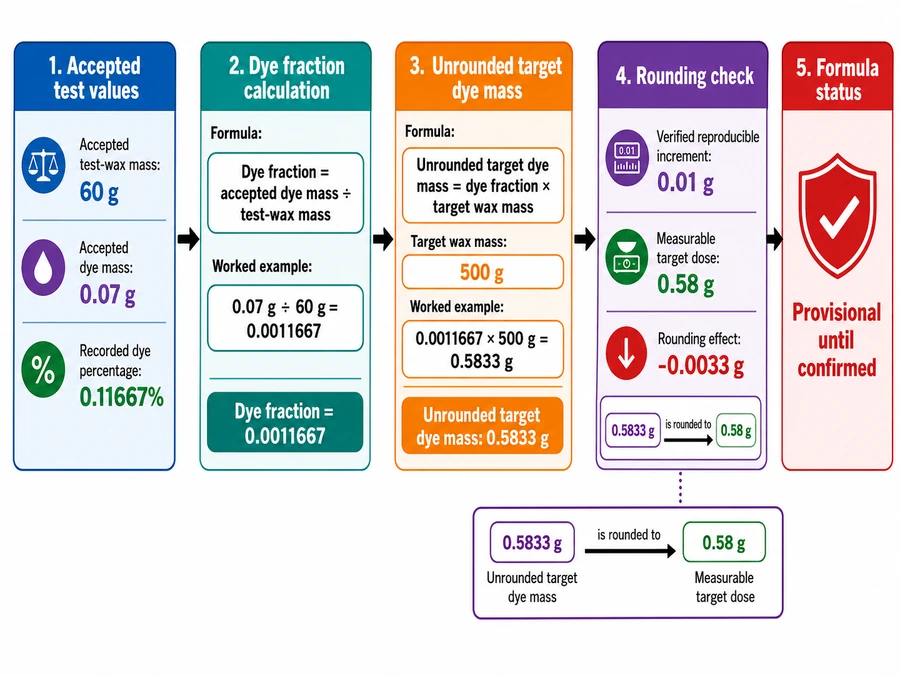
Do not hide the unrounded result after selecting a measurable dose. Recording both values shows whether the measuring method altered the intended proportion.
Follow these validation steps:
- Confirm that the accepted test record identifies the wax and dye system.
- Divide the accepted dye mass by the original test-wax mass.
- Multiply the resulting fraction by the target wax mass.
- Retain the full unrounded result in the formula record.
- Compare the result with the verified reproducible measuring increment.
- Select a measurable dose and record the rounding direction and amount.
- Prepare the larger batch with the same relevant material, process, evaluation, and viewing conditions.
- Evaluate a separate cured sample before changing the formula status to confirmed.
A target dose below the measuring method’s verified increment is not suitable for that setup. Increase the wax mass or use a measurement method that can repeat the intended dose.
A spreadsheet or calculator can use the accepted dye mass, accepted test-wax mass, target wax mass, verified measuring increment, wax identity, and dye identity. Its record must retain the dye fraction, percentage, unrounded target dose, measurable dose, rounding effect, and confirmation status.
Methods: This example uses modeled values to show proportional scaling and rounding. It does not demonstrate production equivalence or predict the color produced by another wax, dye, concentration, or measuring setup.
Treat the scaled dose as a new test value until its separate larger confirmation sample passes the recorded comparison conditions.
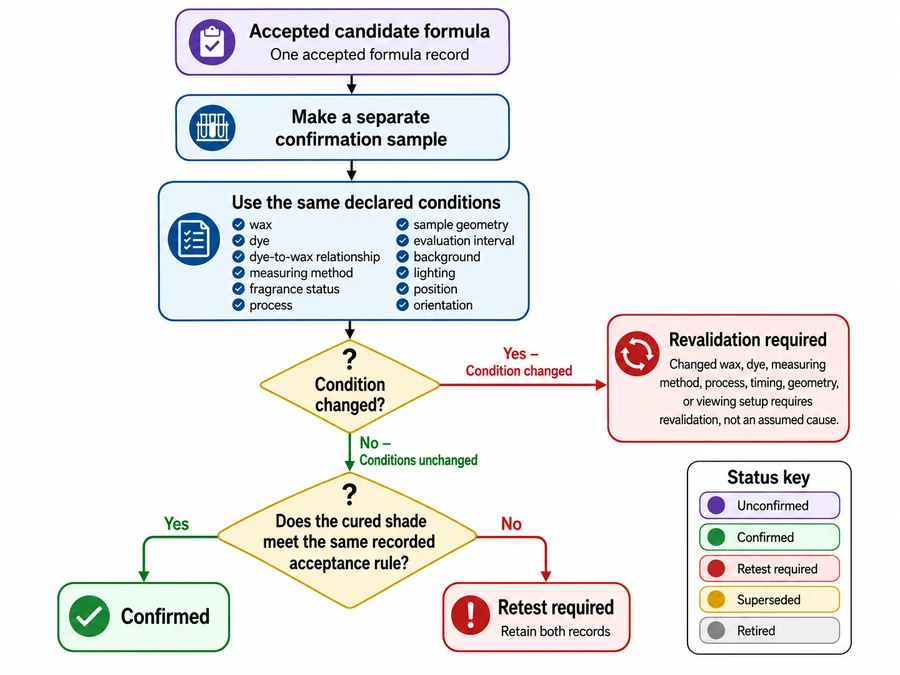
How to Confirm a Candle Color Formula Is Repeatable
A candle color formula is repeatable only when a separate confirmation sample produces a comparable cured shade under the same recorded conditions.
The first accepted sample identifies a candidate formula. It does not prove repeatability because the result has not yet been reproduced independently. The confirmation sample must use the same wax, dye, measurement method, process, evaluation interval, sample geometry, background, lighting, and viewing method.
Use this matched-condition checklist:
| Confirmation condition | Required match |
|---|---|
| Wax | Same identified wax |
| Dye | Same identified product, concentration, and form |
| Formula | Same recorded dye-to-wax relationship |
| Measuring method | Same method with a verified reproducible increment |
| Fragrance status | Same recorded presence, absence, and test condition |
| Process | Same relevant preparation conditions |
| Sample geometry | Same shape, size, and thickness |
| Evaluation interval | Same elapsed time after pouring |
| Viewing setup | Same background, lighting, position, and orientation |
| Physical comparison | Comparable cured shade against the accepted sample |
Assign the formula status from the evidence available:
| Status | Meaning |
|---|---|
| Unconfirmed | One accepted sample exists, but no separate matched confirmation has passed |
| Confirmed | A separate matched-condition sample produced a comparable cured shade |
| Retest required | Confirmation failed or a relevant test condition changed |
| Superseded | A newer confirmed formula replaced the earlier formula |
| Retired | The formula is no longer used or maintained |
Apply the same acceptance rule recorded for the candidate formula; do not create a new pass condition after viewing the confirmation sample.
“Comparable” means the confirmation sample meets the visual acceptance rule recorded for the original physical samples. It does not claim exact digital, print, laboratory, or commercial tolerance equivalence.
A change in a relevant condition ends the prior evidence boundary and requires another test:
| Event or change | Formula status | Immediate action | What the event does not prove |
|---|---|---|---|
| Confirmation shade is not comparable | Retest required | Compare the two records and repeat matched conditions | It does not identify the cause |
| Dye supplier, lot, concentration, or form changes | Retest required | Mark the prior formula for revalidation | It does not prove the new dye will fail |
| Wax identity changes | Retest required | Test the formula with the new wax as a separate system | It does not establish equivalent color behavior |
| Measuring method or reproducible increment changes | Retest required | Recheck the measurable dose and rounding | It does not prove the formula ratio was wrong |
| Relevant processing condition changes | Retest required | Restore the recorded condition or test the changed process separately | It does not identify a drift mechanism |
| Evaluation interval or sample geometry changes | Retest required | Repeat the comparison at the recorded interval and geometry | It does not prove the physical formula changed |
| Background, lighting, or viewing method changes | Unconfirmed comparison | Re-evaluate both samples under matched viewing conditions | It does not prove the wax shades differ |
Record confirmation as a separate sample rather than editing the original sample row. The confirmation record should identify the candidate formula, confirmation sample ID, matched conditions, cured observation, result, and resulting formula status.
A compact failure log may use this form:
| Candidate formula | Confirmation sample | Observed result | Mismatched or unknown condition | Status | Next action |
|---|---|---|---|---|---|
| S2-R1 | C-S2-R1 | Cured shade not comparable | None identified from the current records | Retest required | Repeat once under matched conditions and retain both records |
The failure log records what happened without assigning an unsupported cause. Repeated failure may justify a wider investigation, but this page stops at the immediate retain, confirm, or retest decision.
Methods: Confirmation compares two separate physical samples made from one recorded formula under matched conditions. The result applies to that identified wax-and-dye system and acceptance method; a relevant material, process, timing, geometry, or viewing change requires revalidation.
A formula becomes repeatable when its separate confirmation sample passes the same recorded cured-color comparison that established the candidate formula.