
Decorative shaped candles come out clean and detailed when you match wax hardness to the mold, size the wick by cross-section, control pour temperature, and test-burn every new shape.
Shaped candles look simple until the first demold chips a petal or the wick tunnels through a narrow waist. The fastest wins come from firm wax blends, mold prep that prevents suction, and pours that let air escape. Once you can predict frosting, sinkholes, and warping, the fancy shapes become repeatable. A short test-burn routine also helps you separate candles that are safe to burn from candles that should be labeled for display only.
For the broader category context, see our guide to candle types before you choose a mold, wax, and burn style.
Before you start, set out the core materials and tools you will use for every test batch.
- firm pillar-style wax or another molded-candle blend
- a mold that matches the shape and level of detail you want
- a wick sized for the candle’s widest cross-section
- pouring pitcher, thermometer, and scale
- wick holder, wick pin or needle, and sealant for the wick hole if needed
- basic tools for venting, tapping, trimming, and small surface repairs
Use this order each time so the process stays repeatable.
- Choose a wax that cures firm enough for the mold and shape.
- Prep the mold, thread and secure the wick, and support the mold if it flexes.
- Measure the widest cross-section and choose a wick family that matches the wax.
- Add color or fragrance only within the wax’s safe working limits.
- Pour with a controlled path, vent trapped air, and plan a small top-off.
- Let the candle cool fully, then demold with support under thin details.
- Test-burn the finished shape before you decide whether it is safe to sell as a burnable candle.
Choose the Right Wax for Shaped Molds
For crisp shaped candles, use a firm pillar wax with some shrink and pour within the temperature range recommended by your supplier for that specific blend.
Firmer waxes hold detail better, while softer blends can bend or dent during demolding.
If you are new to candle making, start with a wax-selection baseline in our guide to choosing candle wax so melt point, cure time, shrink behavior, and wick performance do not surprise you later.
What the right wax means for molded shapes
Shaped molds reward waxes that cure with enough rigidity to hold thin petals, ribs, points, and corners. At the same time, the wax needs some controlled shrink so the candle can release from the mold wall instead of vacuum-locking.
Use this quick filter before confirming with the supplier’s technical sheet:
- Best for sharp detail and easier demolding: pillar blends, harder paraffin blends, and pillar-friendly hybrids
- Usually frustrating for molded shapes: very soft soy container blends, which are great for jars but often too soft for detailed demolding
- Best for high-relief molds: waxes that cure firm and resist edge rounding during handling
If you are unsure, compare waxes by hardness, shrink behavior, and how sensitive they are to temperature swings before choosing a base.
Practical checks that prevent mystery failures
- Thumb press test: if a cooled test puck dents easily, fine details will dent too
- Shrink test: if a puck still clings tightly to a silicone cup after cooling, expect sticking and edge tears
- Handling test: if the candle fingerprints quickly, plan to use gloves or switch to a firmer blend
Working method
Treat supplier guidance as the primary source. Test one cavity first, then compare the result immediately after full cooling and again after 24 hours. Edge strength, shrink, and release often improve after the candle has fully settled.
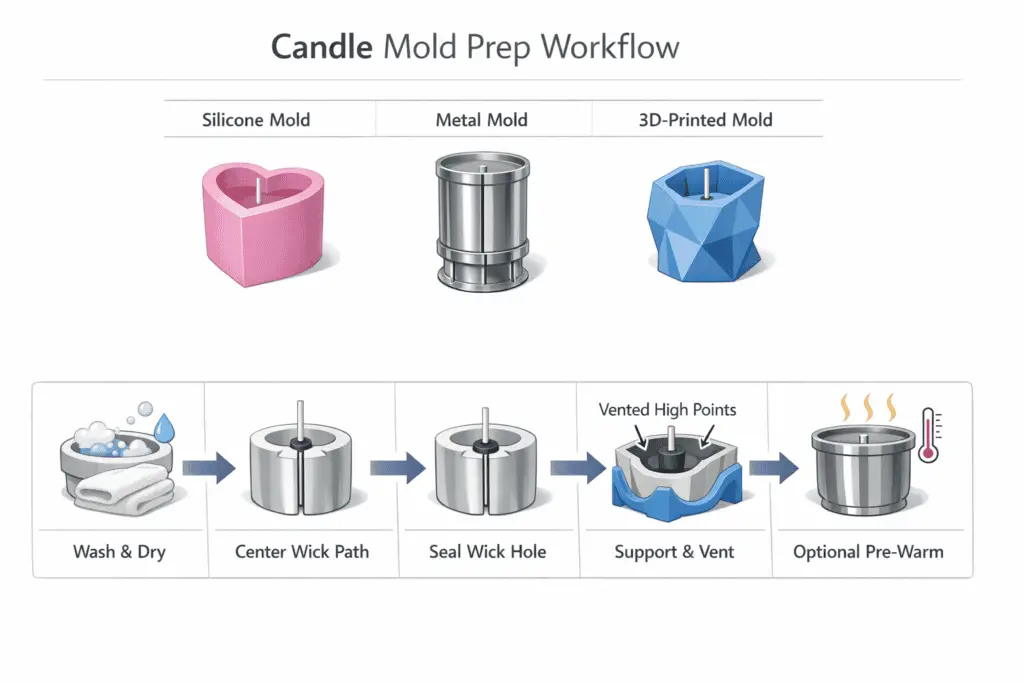
Select and Prep Candle Molds
Use silicone for undercuts, metal for crisp straight lines, and sealed 3D-printed molds or masters for custom shapes; our candle molds and shapes guide can help you compare them. Clean, dry, thread and seal the wick hole, support the mold, and vent it before pouring.
The same wax can demold perfectly or fail completely depending on mold prep and support.
Match the mold material to the shape
- Silicone: best for undercuts, deep texture, and shapes that need to be peeled out gently
- Metal: best for crisp edges and smooth walls, but less forgiving with undercuts
- 3D-printed molds or masters: useful for custom designs, but surface quality and sealing decide whether they work well or fail badly
Prep steps that prevent most failures
- Wash and dry the mold fully, because residue and moisture cause sticking and surface defects
- Thread the wick path cleanly and seal the wick hole before pouring so wax does not leak and pull the wick off center
- Support flexible silicone molds in a cup or cradle so they do not bulge during the pour
- Seal seams and porous surfaces, especially on printed parts and DIY builds
- Vent high points so trapped air does not leave voids in the most visible details
- Pre-warm rigid molds lightly when the first contact layer tends to seize too fast
Release agents, only when needed
Most good silicone molds do not need release. In fact, unnecessary release can blur detail and soften the surface look. Use release only when the shape is unusually complex, the wax is tacky, or the mold interior is rough, and test first on a small area.
If you are using a 3D-printed mold or printed master, do not skip sealing. Tiny pores and gaps create wax fins, surface tearing, and hard release.
Calculate Wick Size for Unusual Shapes
Measure the widest cross-section, choose a wick family from a wick sizing guide that suits your wax, start slightly conservative, and confirm performance with a controlled test burn.
Wick selection follows the candle’s widest fuel zone, not the visual center.
Most odd shapes fail because the wick is chosen by appearance instead of by the widest melt area. The wick has to melt enough wax to feed itself without overheating narrow necks or fragile protrusions.
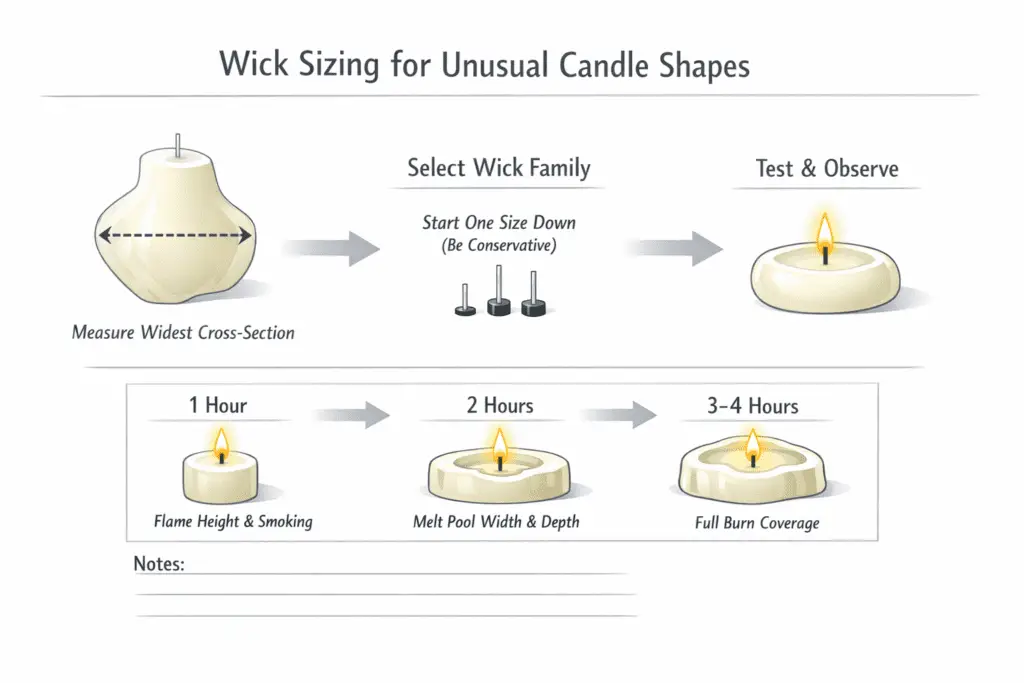
Start with this process
- Identify the widest cross-section that will eventually form the melt pool
- Pick a wick family known to work with your wax type
- Start slightly conservative, usually one size down
- Test, record, and adjust from there
A wick chart is only a baseline. Shapes change airflow, melt behavior, and fuel access, so you still need a burn test.
A simple test-burn routine for unusual geometry
Run short, controlled burns and record the same checkpoints every time. For a fuller process, use a dedicated candle burn test routine alongside your wick notes:
- At 1 hour: check flame height, leaning, smoking, and mushrooming
- At 2 hours: check melt pool width and depth
- At 3 to 4 hours: check whether the pool reaches the widest section without overheating the candle
Treat those checkpoints as a simple log template, not a universal pass-or-fail standard. Exact timing shifts with the candle size, wax, and wick family.
Keep a basic test log. Otherwise, you will end up changing the wrong variable and wasting time.
What you are aiming for
Choose the smallest wick that still creates an even, stable melt pool within a safe burn window. Bigger is not better. Oversizing the wick is one of the fastest ways to ruin a shaped candle.
Color and Fragrance Without Weakening Structure
Keep fragrance and dye within your wax’s recommended limits, add them at the correct temperature, and let the candle cure fully so the structure stays firm.
Overloading fragrance or adding dye poorly can soften edges and trigger sweating, streaking, or frosting.
The real job here is balancing scent and structure. The more oil-like material you add, the greater the risk of weakening a candle that already has thin details or fragile geometry.
Fragrance, stay inside the wax limit
Every wax has a practical fragrance range. Treat that range as a real limit, not as a suggestion, and use a proper fragrance-to-wax process when you test new loads.
Common failure patterns include:
- too much fragrance, which can cause sweating, softness, and poor detail retention
- too little cure time, which can lead to weak scent throw and surface haze
- adding fragrance too hot or too cold, which can reduce consistency and affect texture
For deeper dye and recipe testing, keep those experiments in a separate test batch so this candle stays focused on structural performance first.
Pouring Technique for Intricate Molds
Pre-warm the mold, pour in a thin stream down the wall, vent high points, and plan a small top-off to reduce bubbles, voids, and sinkholes.
A controlled pour path and a planned top-off reduce trapped air and shrink holes.
Intricate shapes trap air at the peaks and shrink unevenly where thick and thin sections meet. Good pouring technique gives the air a way out and gives the shrinking wax somewhere to pull from.
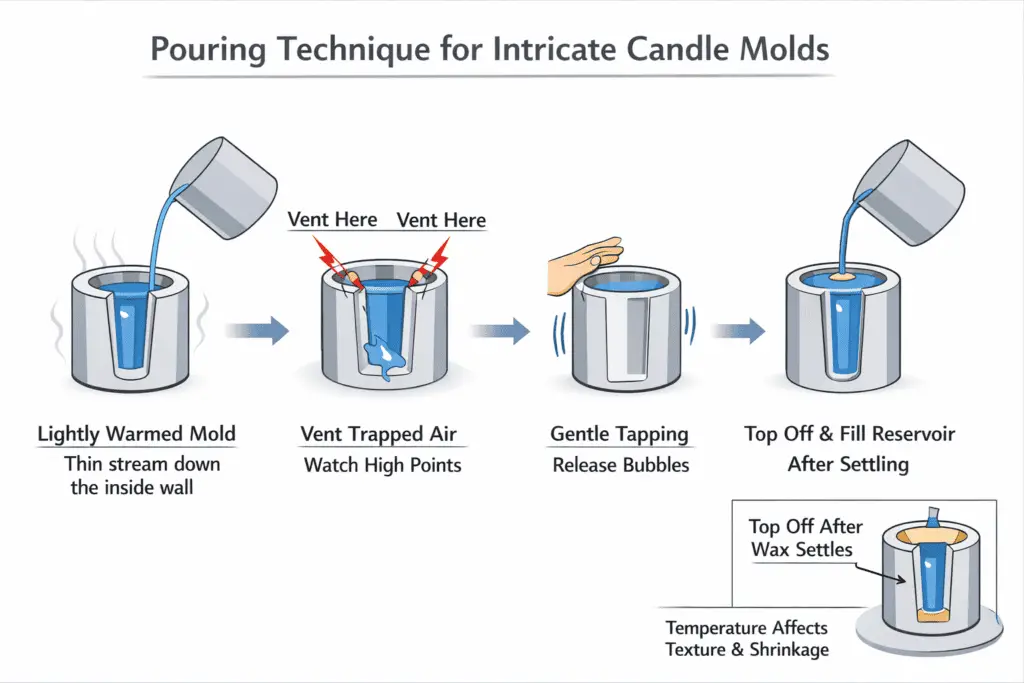
Four moves that prevent most bubbles and voids
- Warm the mold slightly, especially metal molds, so the first contact layer does not seize immediately
- Pour in a thin stream down the inside wall to reduce turbulence
- Tap gently and vent where air gathers at high points
- Leave room for a planned top-off so shrink happens into the reservoir, not into the finished surface
Temperature is a tool, not a checkbox
Pour temperature affects texture, adhesion, shrink behavior, and how long air stays mobile in the wax. Small swings can show up as ripples, frosting, haze, or hidden voids in tight designs.
If the shape has tall ridges, leaf tips, or narrow peaks, even tiny vents can save the cast.
Sinkholes, fix the cause, not just the crater
A second pour can level the top, but if the interior structure is still collapsing you will keep losing detail. The real fix usually combines:
- correct pour temperature
- stable cooling
- a deliberate refill or top-off
Top off after the first pour has visibly settled but before the refill hardens as a separate layer. If bubbles and voids keep repeating, work through a dedicated molded-candle bubble fix guide instead of changing several variables at once.
Demolding Without Cracks or Warps
Demold only when the candle is fully cool and firm, then peel the mold away while supporting thin details.
Most cracks happen because the candle is twisted out instead of the mold being peeled away from the wax.
Shaped candles punish impatience. The surface can look set while the interior is still warm and weak.
A safer demolding routine
- Let the candle cool to room temperature all the way through
- Peel silicone away from the candle, instead of pulling the candle out
- Support petals, spikes, narrow necks, and other weak areas with your free hand
- Use the same cooling window each time so your process stays repeatable
Timing matters more than force
Wax behaves very differently at 2 hours, 12 hours, and 24 hours. If your results vary, the problem may be timing rather than wax or mold quality.
Before blaming the mold, check whether the candle has actually shrunk away from it slightly. If it has not, release will always be a fight, and a guide to using silicone candle molds properly can help you isolate prep and release problems.
Small repairs
A chipped edge does not always mean total failure. Minor damage can often be blended back with a slightly warmed spoon or similar tool, then left to reset without extra handling.
Fix Common Defects in Shaped Candles
Fix defects by matching the symptom to the cause, then smooth, refill, or rework gently so you do not erase detail.
A defect is rarely random. Usually it comes from trapped air, shrink, temperature swings, overload, or poor timing.
Use the table below to troubleshoot quickly, but change only one variable at a time between tests. Otherwise you will never know what actually worked.
| Symptom | Likely Cause | Quick Fix | Prevent Next Time |
|---|---|---|---|
| Bubbles at tips or peaks | Air trapped at a high point | Warm the spot lightly, refill if needed | Add pin vents, pour slower |
| Sinkhole under a skin | Shrink with early surface set | Poke, refill, level | Pour slightly warmer, stabilize cooling |
| Frosting or haze | Crystallization, temperature swings | Gentle heat polish | Keep room temp steady, hold a consistent pour range |
| Warped thin areas | Demolded too warm | Recast if severe | Cool longer, use a firmer blend |
| Rough seam or wax fin | Seam gap or mold misalignment | Trim and warm smooth | Clamp, support, and seal seams |
| Wet spots or pull-away | Shrink pattern and uneven cooling | Light cosmetic warm pass | Cool evenly and avoid cold surfaces |
For deeper symptom-by-symptom troubleshooting, use the dedicated guide on how to fix common issues with decorative candles.
Why fixes keep failing
If your fixes do not hold, batch conditions are probably changing. Keep the same:
- room temperature
- cooling surface
- airflow
- hands-off cooling time
That is how you stop blaming the wrong cause.
Make Embed and Shell Candles
Cast a thin, even shell, let it firm, dry-fit the insert, then seal with a small warm pour using compatible waxes.
Shell thickness and wax compatibility decide whether the seam holds or splits.
These candles look advanced, but the core job is simple: keep wall thickness even and make sure the shell and insert behave well together.
A basic shell-and-insert sequence
- Pour a small amount and rotate or slush it around the interior
- Pour out the excess and let the shell firm
- Repeat until the wall thickness is even
- Dry-fit the insert and confirm clearance around the future melt pool
- Seal with a small warm pour so the seam fuses instead of sitting loosely on top
What usually goes wrong
- walls that are thin at the top and thick at the bottom
- incompatible waxes that separate or crack at the seam
- inserts placed too close to the eventual flame zone
If you plan to add botanicals or other objects, use a separate guide on embedding botanicals and objects safely in candles before you treat the finished piece as burnable.
Seasonal and Themed Shapes
Keep seasonal runs simple by changing only the shape, color family, or scent set that matters most for that release.
Use seasonal ideas as a light variation on the same molded-candle process, not as a second production system with new variables everywhere.
Finish Surfaces: Polishing, Painting, Gilding
Finish only fully cured candles, keep decorative coatings away from the wick zone, and use products that will not add unnecessary burn risk.
Finishes should sharpen the look, not introduce flammable layers near the flame.
If a candle is decorative and not meant to be burned, label it clearly as display only. Do not rely on subtle wording. People skim, and if it looks like a candle, many will try to light it.
Safety and Compliance for Decorative Candles
Add clear fire-safety warnings, document materials, and test-burn each new shape. Also verify the current requirements for the markets where you sell.
If a candle can be lit, assume someone will light it.
Basic safety labeling mindset
For consumer candles, the familiar warning block usually centers on three messages:
- burn within sight
- keep away from things that catch fire
- keep away from children and pets
That is only the baseline. Decorative shapes may need extra instructions if they have unusual geometry, narrow burn zones, unstable forms, or special use limits.
US and EU reality, keep it practical
Use a current candle safety and compliance guide to check the broader rule set for your market, then verify any marketplace-specific requirements before you sell a shaped candle.
When you need label details, review the current required candle labels for your sales channel and keep dated copies of the warnings and documents you actually use.
Decorative-only pieces must be labeled clearly
If a piece is not safe to light, because of unstable shape, flammable decorations, botanicals near the flame zone, or another hazard, say so directly.
If it is meant to burn, remove flammable decoration from the burn area and test the exact finished version before selling it.
Keep a compliance folder
For each design, keep:
- material list
- fragrance documentation
- batch notes
- test-burn logs
- label proof files
This is basic control, not bureaucracy. If you cannot document what went into the candle and how it behaved, you are not ready to sell it.
Final Takeaway
Decorative shaped candles stop being unpredictable when you control the variables that actually matter: wax hardness, mold prep, wick sizing, pour temperature, cooling, and burn testing.
If you want clean edges, fewer defects, and safer finished products, do not chase random fixes. Use a repeatable process, test one variable at a time, and keep records. That is what turns shaped candles from hobby-level guesswork into something you can publish, sell, or scale with confidence.