
Pillar is best for long burns without a holder, votive is best for flexible scent in a compact setup, and taper is best for elegant centerpieces when drips and stability are managed.
The candle shape you choose changes how safely it stands, how it melts, and how much attention it needs. Pillars act like freestanding workhorses, votives shine when you want scent in a small footprint, and tapers deliver drama but demand stable holders. Start with where the candle will sit—open-air centerpiece, drafty patio, or a tight shelf—because airflow and heat management decide most problems. Once the setting is clear, burn time, wax drips, and cleanup become simple trade-offs instead of surprises.
What is a Pillar, Votive, and Taper Candle?
A pillar candle is a thick, freestanding candle designed to burn on a plate, a votive is a small candle meant to burn inside a cup, and a taper is a tall, slender candle meant to burn in a snug holder.
For a broader overview of formats and use cases, see the full guide to candle types.
Pillar: Wide base, stands on its own. It forms a melt pool on top and may spill wax if the plate is too small. Pillars are the easiest “set-and-forget” style once placed safely.
Votive: Small, cup-sized candle. It’s designed to liquefy across the container’s bottom, so the cup is part of the system—not optional. Votives are great when you want to spread light or fragrance in several small zones.
Taper: Tall, narrow candle. It relies on the holder for stability and for catching drips (or a drip guard). Tapers look formal and photograph beautifully, but they’re the most sensitive to drafts and wobble.
If you’re unsure, decide by setup: if you can’t use a cup or a tight holder, don’t choose a votive or a taper.
Here’s a quick size-and-use snapshot you can use at a glance:
| Type | Holder need | Burn time trend | Stability | Drip / cleanup | Best for | Main trade-off |
|---|---|---|---|---|---|---|
| Pillar | Plate or tray | Often best for longer single burns | High on a level surface | Needs a plate to catch overflow | Long ambient burn, centerpieces, outage light | Needs a plate to protect surfaces |
| Votive | Heat-safe cup required | Good for shorter or modular sessions | High once the cup is stable | Wax stays contained in the cup | Flexible clusters, mixed-height styling, easy swaps | Usually needs a cup; can look “busy” if overused |
| Taper | Snug holder required | Often chosen for look over total hours | Depends on holder fit and airflow | Highest drip risk in drafts or tilt | Formal tables, ceremonies, classic candlesticks | Needs a snug holder; sensitive to drafts/tilt |
X-vs-Y: Pillar vs Votive — When Each Is Best
Choose a pillar when you want fewer pieces and longer, steadier light; choose votives when you want flexibility—more candles, more placement options, and easier “dialing” of scent and brightness.
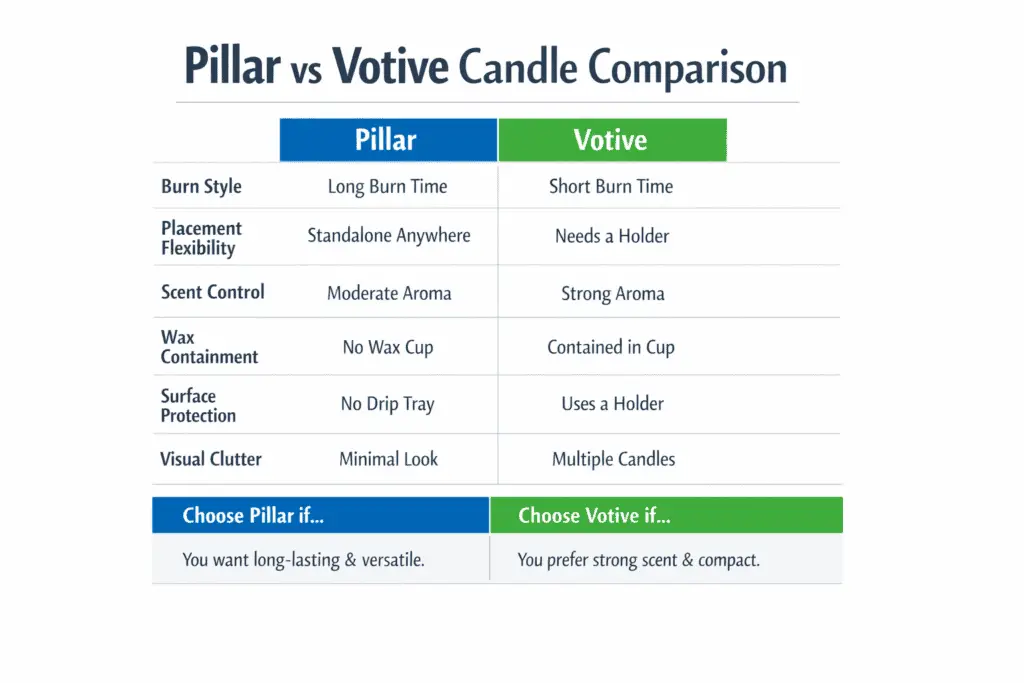
Pillars excel when you need one strong focal candle that won’t tip easily. They’re ideal for power-outage backup, mantels, and centerpieces where you have room for a proper plate.
Votives excel when you want modular control. Two votives spread across a table can feel brighter and more even than one candle at the end, and swapping scents is easier because each unit is small.
A quick decision shortcut:
- Pick pillar if you want longer burn sessions with minimal relighting.
- Pick votives if you want to control intensity by adding or removing one cup at a time.
- Pick votives if you need contained wax (restaurants, rentals, delicate surfaces).
- Pick pillar if you prefer a cleaner, less “busy” look with fewer objects.
Common question → direct answer:
- “Can a votive burn without a cup?” → It’s not recommended; it’s designed to liquefy and needs a container.
- “Do pillars always drip?” → Not always, but overflow happens if the plate is too small or the flame is draft-leaning.
- “Which is better for scent?” → In most rooms, a cluster of votives or one medium pillar tends to outperform a single thin candle.
X-vs-Y: Pillar vs Taper — Ambience and Safety Trade-offs
Pick a taper for a classic, elevated look; pick a pillar for a calmer, more stable setup that usually needs less babysitting.
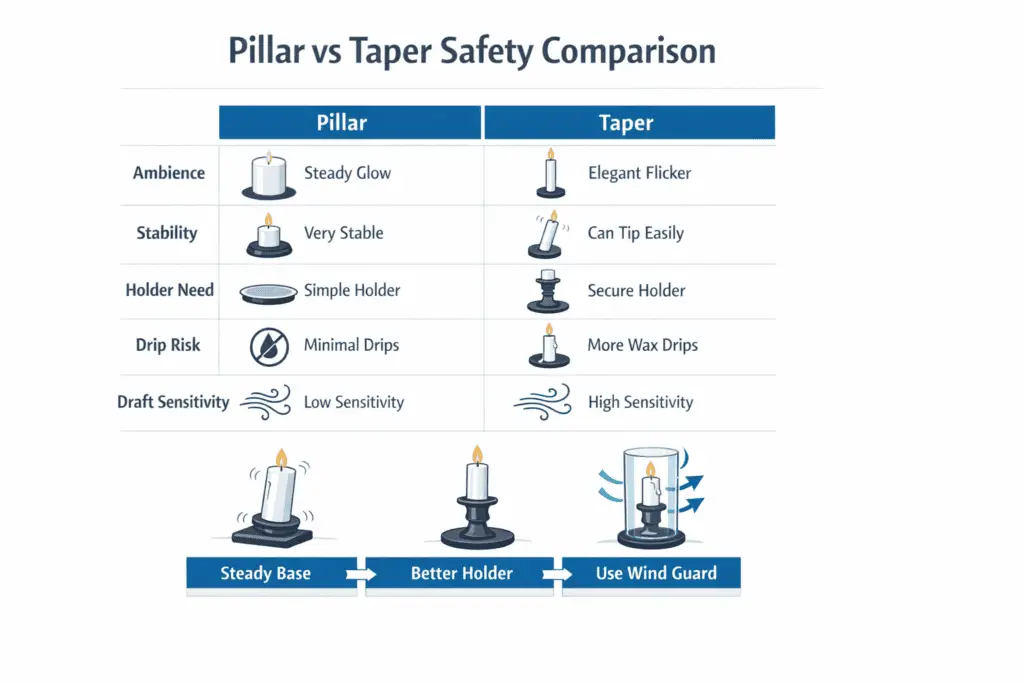
Tapers create vertical lines that instantly feel “formal.” They’re great for dinner tables and ceremonies because they keep the footprint small while adding height. The trade-off is that they depend on a snug holder and calm airflow; a leaning flame makes drips more likely.
Pillars feel grounded and cozy. They’re easier to secure, less likely to tip, and usually behave better in imperfect airflow—especially when placed in a stable lantern or on a wide plate.
Safety reality check:
- A taper is only as safe as its holder fit and table stability.
- A pillar is only as safe as its clearance and the size of the plate under it.
A simple stability ladder (fast “fix-or-swap”):
- If a taper wobbles → seat it deeper or change to a snugger holder socket.
- If it still wobbles → swap to a shorter taper or a pillar.
- If the flame leans or flickers hard → move it away from drafts or add a hurricane-style shield.
X-vs-Y: Votive vs Taper — Table Use and Drip Risks
Choose votives when you want contained wax and easy cleanup; choose tapers when you want height and a traditional candleholder look.
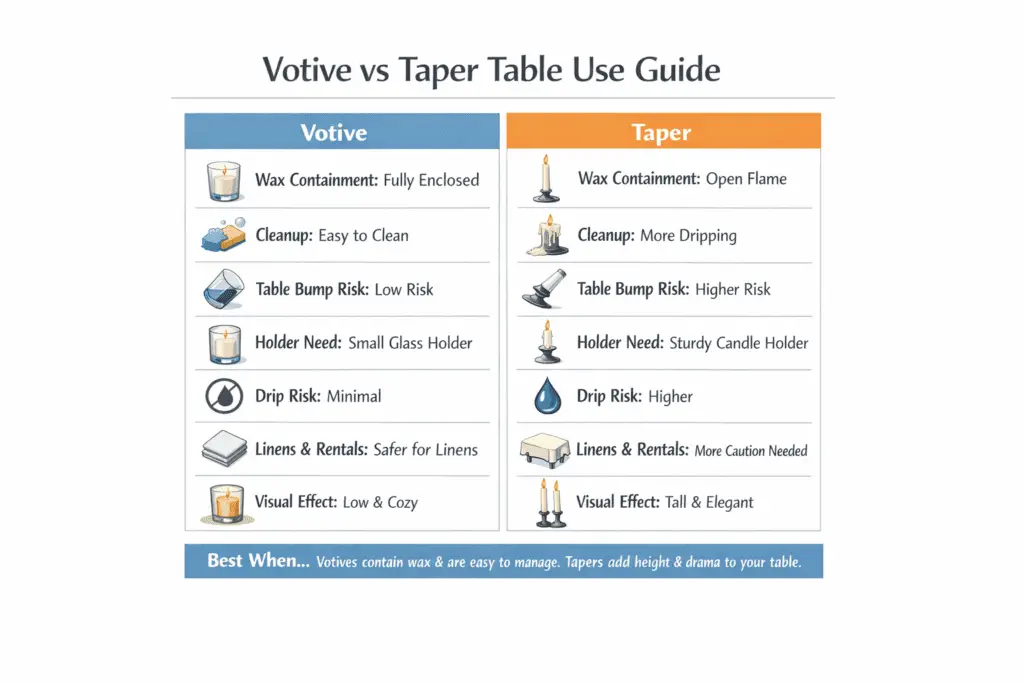
Votives shine on tables because the melt stays inside the cup. They’re also easier on linens, rentals, and venues that worry about wax drips. The trade-off is visual: many small cups can look cluttered if spacing isn’t intentional.
Tapers look airy and elegant, but drip risk rises when airflow is unpredictable, wicks are too long, or the candle is too hot for the setting. A taper setup succeeds when the holder grips the base and the flame stays calm.
Quick table guidance:
- If the table will be bumped (kids, tight seating, serving) → votives are usually safer.
- If you want tall light without a wide base → tapers are the cleanest silhouette, but only with secure holders.
- If you’re using greenery or fabric runners → contained cups reduce risk.
Common question → direct answer:
- “Are ‘dripless’ tapers actually dripless?” → They can still drip in drafts or if the flame is disturbed.
- “Will votives be bright enough?” → Usually yes when you use 2–4 cups spaced evenly instead of one cluster.
How to Choose by Burn Time and Cost per Hour
To compare value, use cost per hour: price ÷ realistic burn hours, then adjust for your actual burn sessions and how often you relight.
Manufacturers often print burn time ranges, but real results change with wick size, wax blend, drafts, and how long you let the candle burn per session. A tall, thin candle can burn faster than it looks because the flame has less wax mass to stabilize heat.
A practical way to estimate without overthinking:
- Start with the label burn time (if provided).
- Do one controlled test burn (about 2 hours) and log behavior: steady flame, smoke, melt pool width, and drip amount.
- If it burns too hot (smoke, fast dripping) → your “realistic hours” are lower. If it tunnels or self-extinguishes → your “realistic hours” are also lower.

A quick cost/hour example can still help when you’re comparing your own candles rather than trying to create a universal benchmark.
- Candle price: €10
- Realistic burn time: 40 hours
- Cost per hour: €10 ÷ 40 = €0.25/hour
Methods note: This example is simple arithmetic for your own price and label burn time, not a standardized test result or a market-wide benchmark. Real burn time varies with wax, wick, drafts, and session length, so use your own candle’s label and test notes when comparing options.
Common question → direct answer:
- “Do bigger candles always cost less per hour?” → Often, but not always; wick choice and burn stability can erase the advantage.
- “Do multi-wick pillars last longer?” → They can burn brighter and more evenly, but they may consume wax faster per hour.
How to Match Candle Size to Room and Table
Pick size by surface area and sightlines first, then choose a candle type that fits the mood and cleanup you can tolerate. Pillars read “solid and steady” because they’re wide and self-supporting, votives are small “modules” you can scatter in clusters, and tapers create tall vertical lines with the smallest base.
For dinner tables, keep flames below eye-line and conversation comfortable across the table. If photos matter, use fewer taller points (tapers) and fewer total items, then add low votives only where you need brightness.
Fragrance flexibility usually follows placement more than candle height. Votives are easiest to adjust by zone, pillars suit one steadier source, and tapers are usually chosen for silhouette before scent coverage.
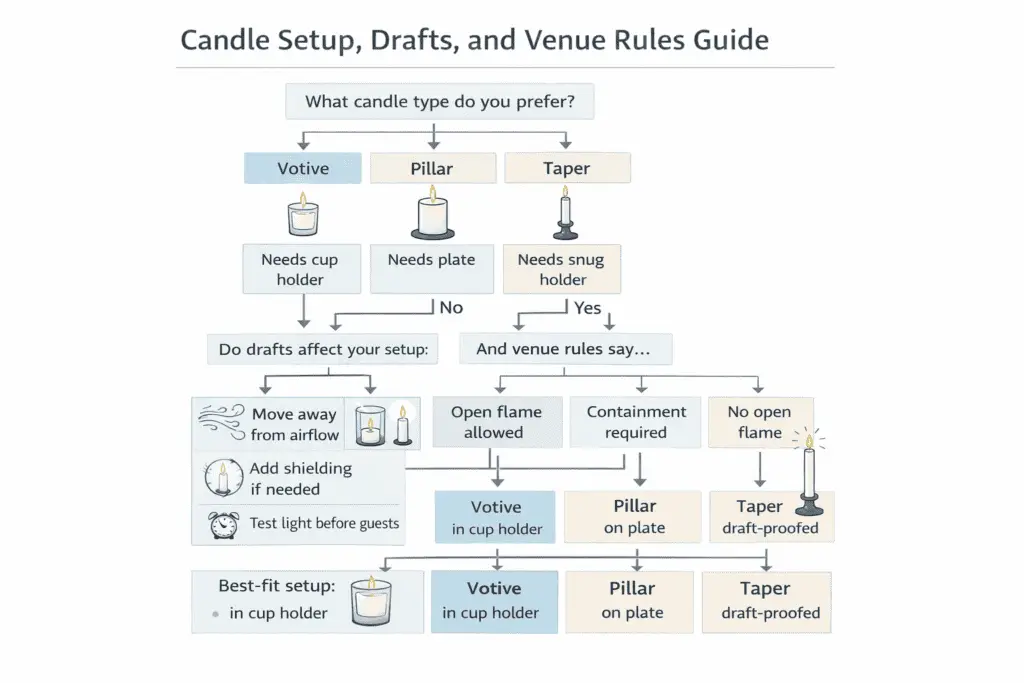
How Setup, Drafts, and Venue Rules Change the Best Candle Type
Setup, airflow, and venue rules can make one candle type safer and easier than another before burn time or style even matter.
Every candle needs a heat-safe surface under it, and two of the three types need a true holder: votives need a cup, and tapers need a snug candlestick.
Use this simple setup flow:
- If wax is designed to pool inside the candle (votive) → use a heat-safe cup.
- If wax is designed to pool on top of a free-standing candle (pillar) → use a plate wide enough to catch overflow.
- If the candle has a narrow base (taper) → use a snug socket holder; test for wobble before lighting.
A reliable clearance checklist (fast and repeatable):
- Center candles away from edges where sleeves, bags, or pets can brush them.
- Keep flames away from décor that can dry out, melt, or blow into the flame.
- Space multiple candles so heat doesn’t compound in one hot spot.
Drafts tilt flames. A tilted flame heats one side more, which increases dripping on tapers, uneven melt pools on pillars, and soot on containers. Outdoors, stability and shielding matter more than the candle’s label.
A quick “draft-proofing” routine:
- Place candles away from open windows, door paths, and fans.
- Use a hurricane-style shield or lantern when airflow is unpredictable.
- Test light for a few minutes before guests arrive so you can reposition early.
If you need a fast fix ladder:
- If the flame flickers hard → move it out of the airflow path.
- If it still flickers → add shielding (hurricane/lantern).
- If dripping continues on a taper → shorten the taper or switch to votives/pillars for that setting.
Tapers are the traditional default for many ceremonies, but acceptable alternatives depend on the venue’s open-flame policy and wax-containment rules.
In practice, “required” usually means a specific venue or officiant expects a certain look and safety setup. A unity ceremony often uses two tapers plus a center pillar; other venues prefer fully contained candles to protect linens, wood, and historic surfaces.
A safe way to match tradition to rules:
- If open flame is allowed but drips are a concern → use tapers with drip catchers and snug holders.
- If open flame is restricted → LED tapers usually preserve the classic silhouette better than short candles.
- If the ceremony is long → a pillar can be a practical substitute (or complement) because it carries more wax and tends to burn steadily once placed correctly.
- If glass containment is required → choose a contained candle designed for that vessel rather than improvising.
Before buying in bulk, confirm whether the venue requires drip guards, specific holder materials, or fully enclosed flames, and do one test setup at home so nothing surprises you on the day.
Common question → direct answer:
- “How wide should the plate be under a pillar?” → Wider than the candle by enough margin to catch overflow as the melt pool grows.
- “Why do my tapers lean?” → Usually a loose holder fit, uneven table, or drafts pulling the flame.
- “Can I put candles on a wood table?” → Yes, but only with a proper plate or cup and generous clearance.