
Fix a leaking or unevenly melting candle by identifying whether the problem is tunneling, side drips, or structural leakage, then correcting the wick, burn routine, airflow, or candle type setup.
This page is for makers and candle users who need a fast way to tell whether a bad burn can be rescued or whether the candle itself is failing. You will learn which problems come from burn habits, which point to wick or placement issues, and which ones signal a true leak.
Tunneling, one-sided drips, and structural leaks do not fail for the same reason, so they should not be fixed the same way. Start with the quick diagnosis below, then move to the deeper sections only if the simple rescue steps do not hold.
How to Tell Whether the Problem Is Tunneling, Dripping, or True Leaking
Tunneling leaves a wax ring, side drips come from one-sided heat, and true leaking means wax is escaping because the candle body, outer wall, or container setup is failing.
If you are troubleshooting pillars, tapers, votives, or other styles, the broader guide to candle types helps you match the fix to the candle form instead of treating every problem like a container-candle issue.
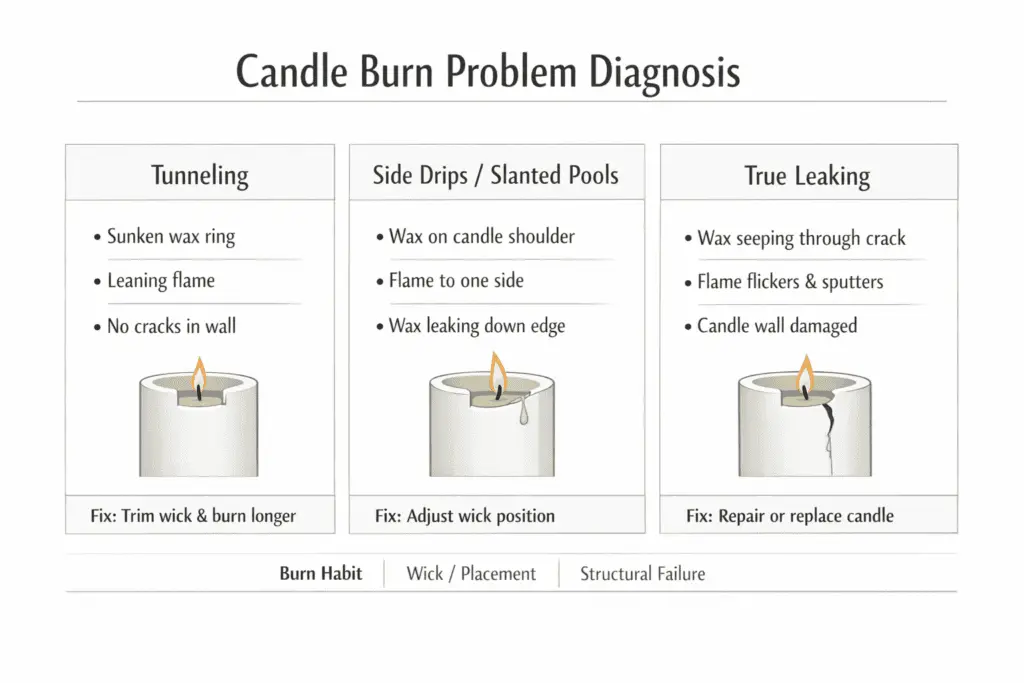
- Tunneling: the melt pool stays narrow and leaves a shoulder or ring of unmelted wax around the edge.
- Side drips or slanted pools: the flame leans, the surface is not level, or the wick is off-center, so one side melts faster than the other.
- True leaking: wax escapes through a crack, seam, collapsed outer wall, or other structural failure, so the safest fix is to stop burning and address the candle itself.
Steps to Fix Candle Tunneling After the First Burn
Trim the wick, burn in still air until the melt pool reaches the edge, then re-melt any thick rim and correct the wick or burn routine if the tunnel keeps returning.
Tunneling is usually burn memory, not true leaking. If the first few sessions end before the melt pool reaches the glass or outer edge, the candle repeats that narrow pool and builds a ring of unmelted wax, but if wax is escaping through a crack or softened outer wall, stop burning and treat that as a structural problem instead.
Quick diagnosis before trying a rescue
- Small flame and narrow pool: you are under-wicked, burning too briefly, or both.
- Flame leans or flickers: airflow is the first problem, not the wax.
- Tall flame, smoke, or fast mushrooming: you are likely over-wicked or the wick is too long.
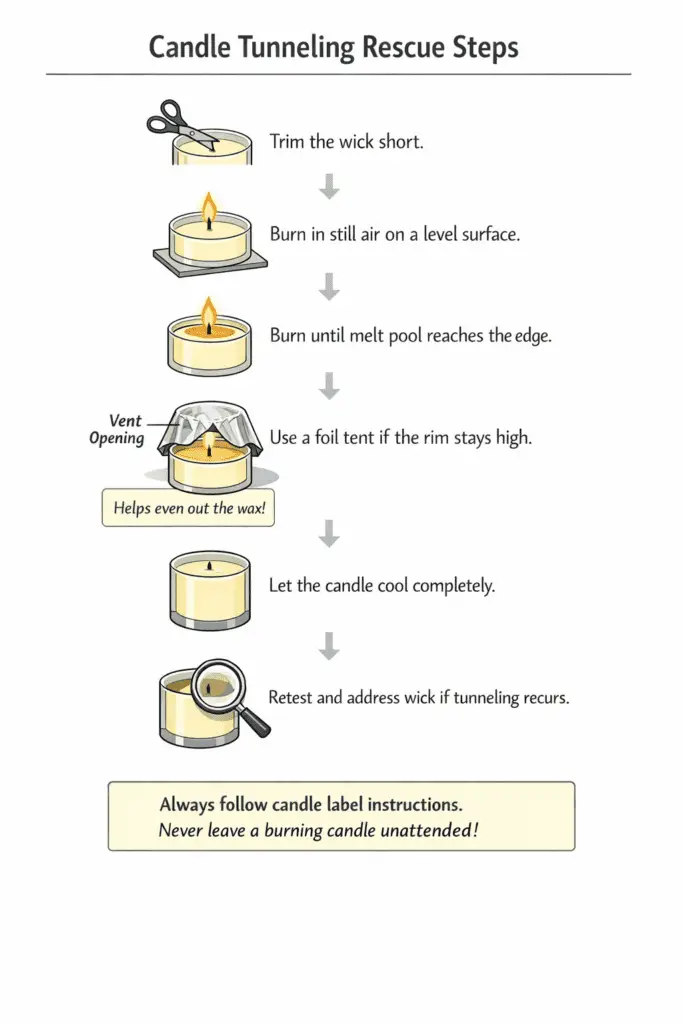
Step-by-step tunneling rescue
- Trim the wick so it is clean and upright. Remove mushrooming and loose debris.
- Burn in still air on a level surface. Watch the flame for the first 5 to 10 minutes. It should stay mostly vertical.
- Keep the candle burning until the melt pool reaches the glass. Many container candles need a few hours, but always follow the candle’s safety label and never leave it unattended.
- Use a foil tent if a thick rim remains. Wrap a loose collar of foil around the rim and pinch the top slightly to reflect heat outward. Leave a vent opening at the top. Remove the foil as soon as the edge liquefies and the pool levels out.
- Let the candle cool completely, then do one more burn that reaches the edge.
- Treat repeat tunneling as a wick issue. If the tunnel starts rebuilding, stop blaming luck. The wick is wrong or the burn sessions are too short.
Common questions
Can tunneling be fixed just by burning longer?
Yes, if the flame is stable and the pool keeps widening toward the wall. No, if it stalls with a thick shoulder. In that case, you need more edge heat.
Is tunneling ever a wax problem?
Sometimes, but most wax problems show up consistently across multiple candles. Rule out wick size, airflow, and first-burn length first.
How to Choose the Right Wick Size for Your Jar Diameter
Wick size still matters, but this page only needs the diagnosis: if a candle tunnels after full edge-reach burns in still air, the wick may be too small; if it smokes, mushrooms fast, or forms a very deep pool, it may be too large. For exact pairings, use the wick size chart by jar diameter and wax type instead of guessing.
What Causes Side Drips, Slanted Melt Pools, and Wax Leaks
Side drips and uneven pools usually come from a leaning flame, a tilted surface, an off-center wick, or too much heat in one spot, while true leaking usually means the candle body or outer wall is failing.
If the flame leans, heat leans too. That tilts the melt pool, softens one side faster than the other, and creates one-sided drips, but a crack, seam failure, or collapsing outer shell points to a structural leak that should not be burned through.
Symptom, likely cause, and what to try
| Symptom | Likely Cause | What to Try |
|---|---|---|
| Drips down one side and a slanted pool | Draft, tilted surface, or wick off-center | Move to still air, level the surface, and re-center the wick |
| Narrow pool and wax stuck to the glass | Under-wicked or short burn sessions | Burn to edge reach, then consider a larger wick |
| Deep pool with smoke or soot | Over-wicked or wick too long | Trim the wick, then size down if needed |
| Thick ridges on the wall | Cold glass, rapid cooling, or adhesion issues | Keep room conditions steady and review pour and cure setup |
| Wax escaping through a crack, seam, or softened outer wall | Structural failure in the candle body or outer support | Stop burning and replace, reform, or rebuild the candle before relighting |
Consistent wick trimming, draft-free placement, and burns that reach the walls solve many uneven-melt problems before you ever need to change wax or fragrance.
How to Set Pour Temperature and Cure Time for Even Melts
Pour temperature and cure time matter when the candle was made incorrectly, but they are not the first fix for a candle that is already burning unevenly. If you are troubleshooting your own batches, check the recommended pour temperatures by wax and container and retest after the candle has fully cured.
How to Center and Anchor Wicks to Prevent Leaning Flames
Anchor the wick firmly at the base and keep it centered and taut during cooling so the flame stays vertical and the melt pool stays level.
Even perfect wick size will not save a wick that is leaning. Off-center placement pushes the hottest point of the flame toward one side, which encourages drips and uneven pools.
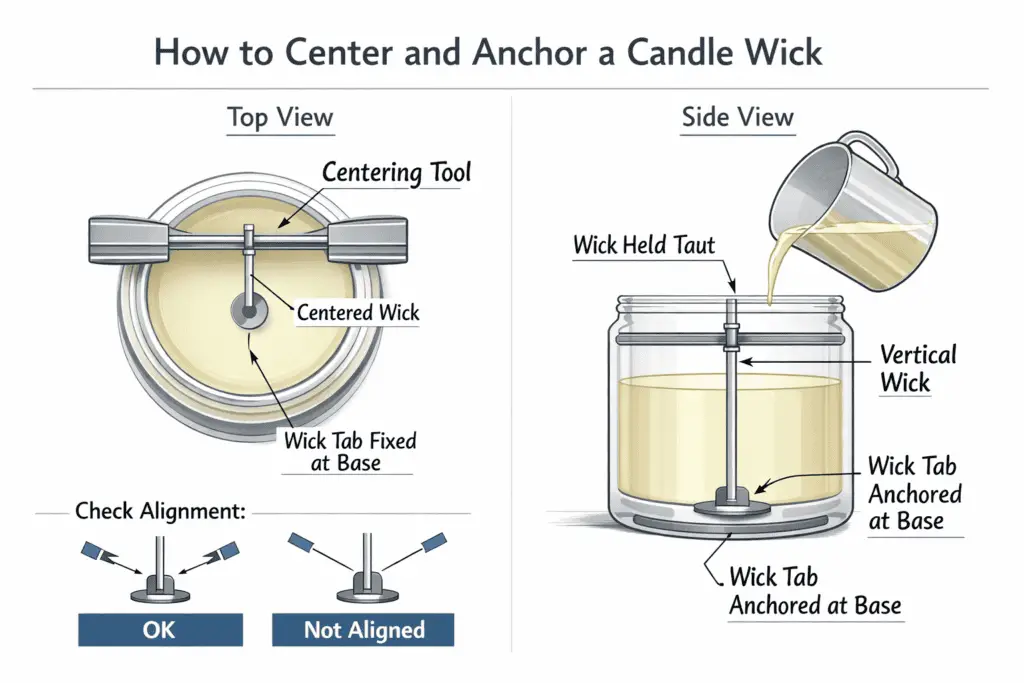
Clean and dry the jar interior, attach the wick tab firmly, use a centering tool, check alignment from two angles, and pour slowly so the wax flow does not shove the wick sideways.
If the wick shifts later
If the flame leans because the wick moved, fix drafts first. Then re-center only when the wax is just soft, not fully liquid. If you start poking at a fully melted candle, you are more likely to create a weak spot or drown the wick.
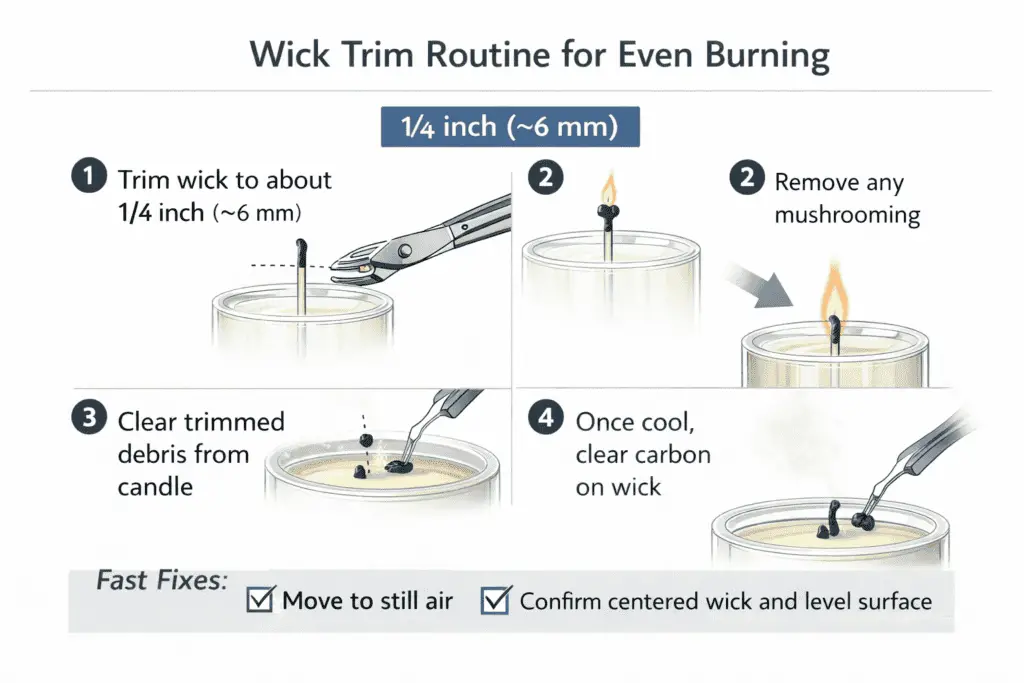
Steps to Trim Wicks Before and After Burns to Prevent Side Drips
Trim to about 1/4 inch, or roughly 6 mm, before each burn unless the candle’s label says otherwise, remove mushrooming, and clear debris so the flame stays steady and does not overheat the melt pool.
A long wick behaves like an oversized wick. It increases flame height, deepens the pool, and makes side drips more likely, especially in any airflow.
Repeatable trim routine
- Before lighting: trim the wick to a consistent length and remove any mushroom cap.
- Clear debris: remove trimmed bits so they do not clog the wick or float and smoke.
- After extinguishing: once the candle is cool, flick off brittle carbon before the next burn.
Two fast fixes that often stop dripping immediately
- Move the candle to still air
- Confirm the wick is centered and the surface is level
Many dripping problems come from a long wick plus a draft, not from an exotic wax failure. For a dedicated routine, see how to trim candle wicks for an even burn.
Why Ambient Humidity and Room Temperature Increase Uneven Melting Risk
Drafts, cold glass, and room-temperature swings affect flame shape and wall cling, so the same candle can burn evenly in one room and unevenly in another.
Cold surfaces encourage wax to hang on the walls, while vents, fans, and quick temperature shifts make flames lean and pools slope. Treat humidity as a secondary condition, and fix airflow, surface level, and room stability before you change the candle itself.
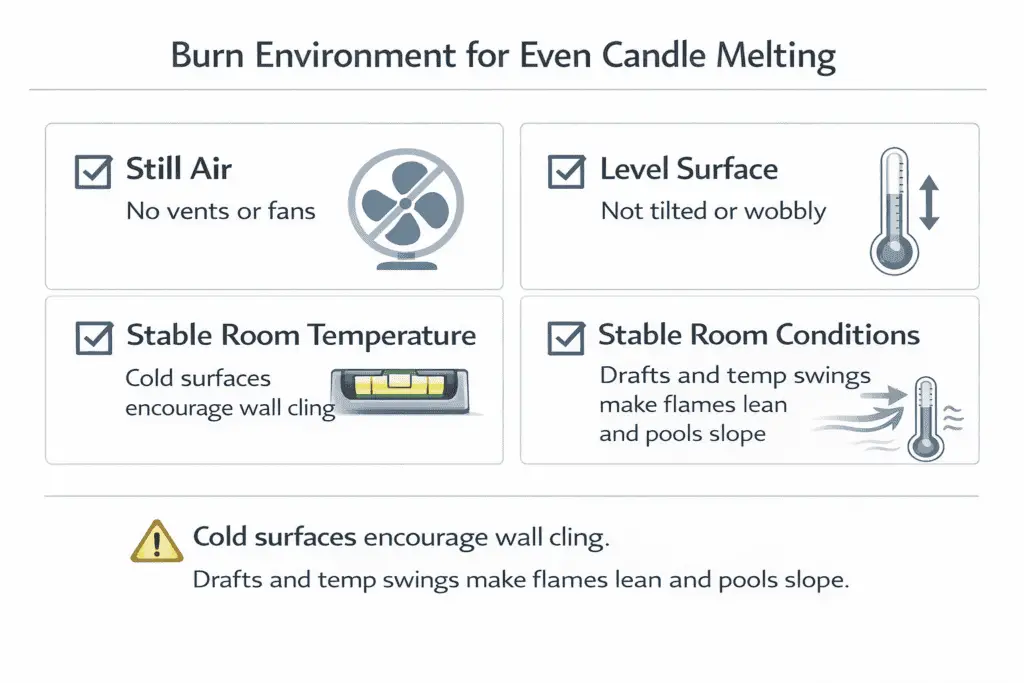
Burn environment
- still air, no vents or fans
- level surface
- stable room temperature
If results change by season, adjust placement and room conditions first. Do not touch wax, wick, and fragrance all at once unless your goal is confusion.
Why High Fragrance Load and Additives Can Cause Uneven Melts
Too much fragrance oil or incompatible additives can soften wax, change how the wick feeds, and make a candle sweat, soot, or burn unevenly. If the candle looks oily or keeps misbehaving after basic wick and airflow fixes, review fragrance load in candle making before changing multiple other variables.
How to Double-Wick a Wide Jar
If one wick leaves cold walls and the next larger wick runs too hot, a wide jar may need two smaller wicks instead of one oversized one. Use the double wicking guide for spacing and test-burn details rather than guessing.
Steps to Run a 30-Minute Melt Pool Test
A short timed melt-pool test is useful only after the basic fixes above fail, because it turns wick and airflow changes into repeatable comparisons instead of guesswork.
Soy vs. Paraffin for Even Melting
Wax family changes how forgiving a candle is, but uneven melting is still most often a wick, airflow, surface-level, or structural issue first.
Final Troubleshooting Rule
If your candle is still melting unevenly after you have verified wick centering, trimming, still-air placement, and a consistent test burn, treat it like a controlled experiment.
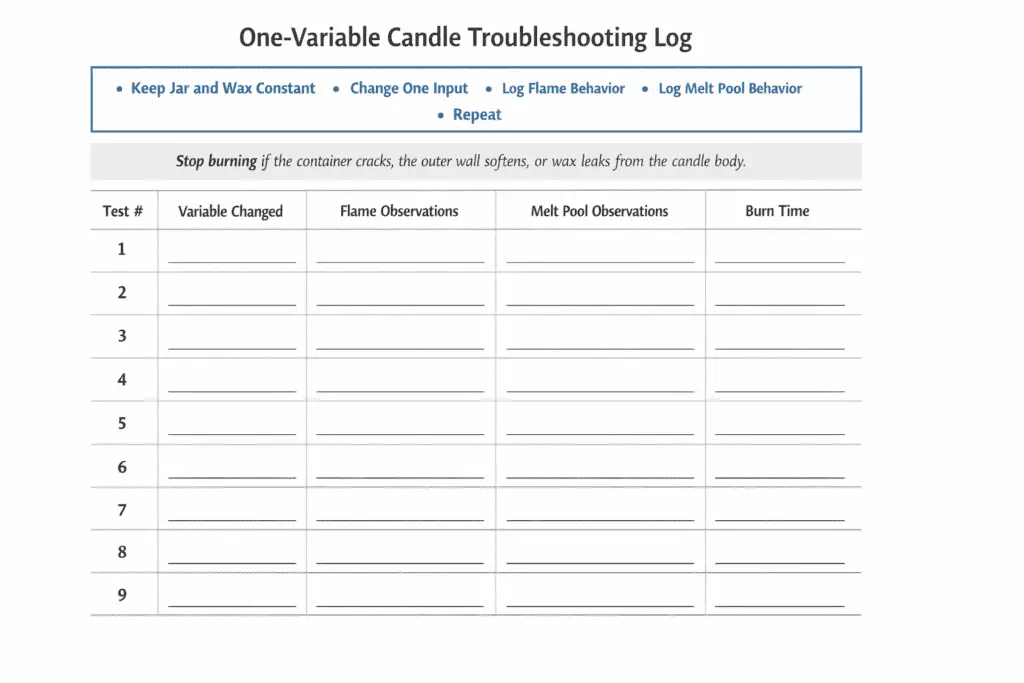
Keep the jar and wax constant. Change one input. Log what the flame and melt pool do. Repeat.
That is how you get a bulletproof answer instead of wasting materials and lying to yourself about what changed.
If the container cracks, the outer wall softens, or wax leaks out of the candle body, stop burning and replace or reformulate the candle instead of trying to rescue it.