Cure time is the post-cooling rest period before a scented container candle gives more reliable scent and burn-test results. Typical cure time ranges from a few days for paraffin to 1–2+ weeks for soy and some blends, with coconut and beeswax often landing in between under normal container-candle conditions.
If you make container candles, curing can feel like the longest step between pouring and getting a reliable test burn. Knowing the typical window for each wax family helps you plan batches, launches, and gift deadlines without guessing. Because candle wax types bind fragrance and settle at different speeds, paraffin, soy, coconut, beeswax, and blends can need very different resting periods after the wax fully cools. Getting clear on what “cure time” means makes the chart easier to use and your testing more predictable.
In this article, “ideal cure” means the usual waiting window before scent throw and burn behavior become more repeatable for testing. It does not mean a safety certification, a shelf-life guarantee, or a rule that overrides your wax supplier’s instructions.
What is candle cure time (by wax type)?
Candle cure time is the period after a candle fully cools when the wax and fragrance stabilize for best scent and burn performance.
If you’re new and want the bigger workflow context, start with Candle making basics.
Cooling is simply the candle turning from liquid to solid; curing is what happens after it’s already solid and sitting at room temperature. Think of it like letting flavors settle in a stew: you can eat it right away, but the “real” taste shows up after it rests. Different wax families settle at different speeds, which is why planning around cure time is part of the learning curve.
cold throw is the scent you smell from an unlit candle; hot throw is the scent released while it burns and warms the wax.
Unscented candles do not need the same fragrance-binding cure window, but they still need enough rest to cool, harden, and produce repeatable burn-test observations.
Caption: Timeline separates cooling from curing and shows when test burns become reliable.
Here’s where cure time sits in the real workflow most container makers follow:
- Melt wax
- Add dye + fragrance, mix well
- Pour into the jar
- Cool & set (until fully firm and room-temp)
- Cure (resting period where performance stabilizes)
- Test burn (wick, melt pool, hot throw)
- Release/sell/gift
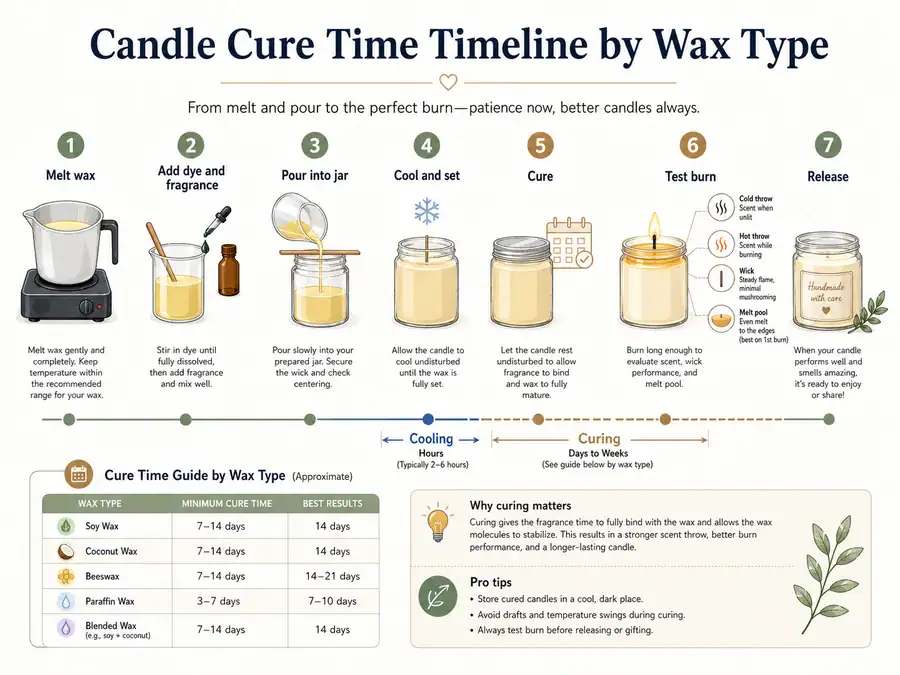
What’s actually “stabilizing” during cure is simple to picture: the wax structure finishes settling, and fragrance distributes more evenly through the wax. When you burn too early, you can get that frustrating experience where cold throw seems fine but hot throw is weak, or the candle burns a little differently than it will a week later.
One practical habit that prevents a lot of wasted testing: write the pour date on every candle, then pick a “first test” day and a “best test” day. This pairs nicely with a process like Beginner candle testing checklist, because you stop guessing whether a batch is under-cured or if something else (wick, fragrance load, or room conditions) is the real issue.
For wax comparisons and why some families “settle” faster than others, see Candle wax types explained.
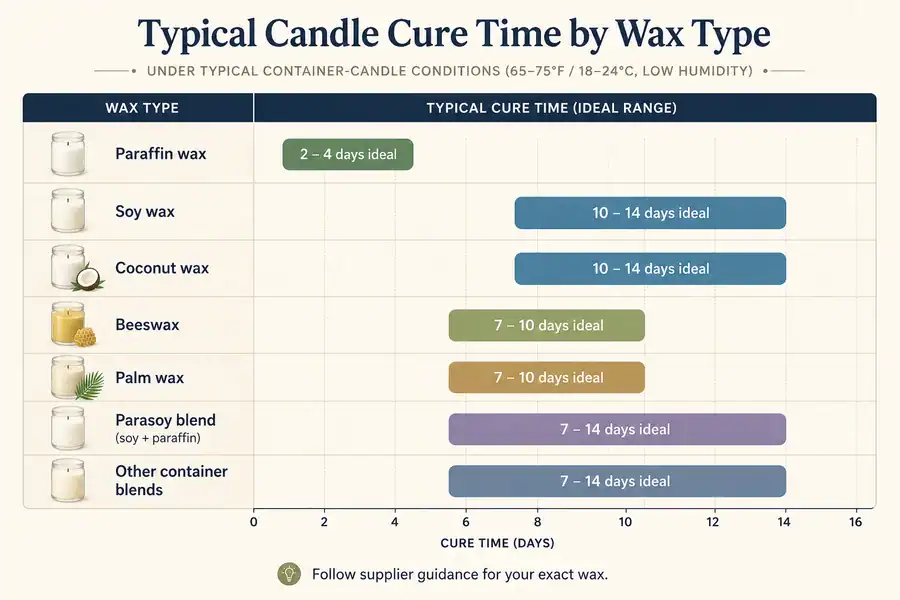
Cure time by wax type (benchmark chart)
Typical candle cure times vary by wax type, with paraffin needing days, soy and coconut often needing about a week or more, and many blends landing between them.
For a deeper “why” behind these families and how they behave, the broader hub is Candle wax types.
Before using the chart as a decision tool, it helps to know what reputable suppliers commonly recommend as baselines. For example, CandleScience notes that natural waxes like soy and coconut often perform best after longer curing, even when the minimum test window is shorter.
How to read it:
- Minimum cure = the earliest point most people start a meaningful test burn
- Ideal cure window = where performance usually feels more “settled” and repeatable
- Notes = the common reason you might land toward the low or high end
Use this chart as a planning benchmark. If your wax supplier gives a specific cure window for that exact wax, follow the supplier’s range first and use your own test burns to confirm when the candle is ready to evaluate.
Table 1. Benchmark cure-time ranges by wax family (typical container-candle conditions).
| Wax type / family | Minimum cure (typical) | Ideal cure window (typical) | Notes / when to lean longer |
| Paraffin wax | 1–2 days | 2–4 days | Often stabilizes quickly; still benefits from a short rest before judging hot throw |
| Soy wax | 3–5 days | 10–14 days | Frequently improves over the first 1–2 weeks, especially with stronger scent loads |
| Coconut wax (often blended) | 3–7 days | 10–14 days | Many coconut-heavy blends reward patience; softness and fragrance behavior vary by blend |
| Beeswax | 3–7 days | 7–10 days | Naturally aromatic; added fragrance may need time to feel “even” |
| Palm wax | 3–5 days | 7–10 days | Crystal structure can keep evolving; pillars vs containers may differ |
| Parasoy blend (soy + paraffin) | 3–7 days | 7–14 days | Usually quicker than pure soy, but still often benefits from a full week+ depending on formula |
| Other container blends | 3–7 days | 7–14 days | Treat blends by what dominates the formula (more paraffin = faster; more veg wax = slower) |
A quick way to use the chart to plan: pick your wax family, choose a realistic “ideal” day to test, and count backward from any deadline. If you need candles ready for a specific date, this also helps you decide whether a slower-curing wax family fits your timeline or whether you should rethink the formula.
If you’re choosing wax partly based on turnaround time, Choosing candle wax types by desired cure speed is the fastest way to align your timeline with your wax family. If you’re producing in batches, Production planning & batching helps you treat cure time as normal lead time rather than a surprise.
Where these ranges come from: supplier education and troubleshooting guidance commonly describe longer stabilization for soy and many natural blends. Bramble Berry, for example, notes soy cure-time recommendations that can run from several days up to around two weeks depending on the formula and testing results.
Methods note (how to use this chart): These are working ranges for typical container candles. Brand-specific waxes, fragrance chemistry, and room conditions can shift results, so staged test burns (two cure ages) are used to confirm what’s “ready” for a given recipe. If you test before the ideal cure window, label that result as an early checkpoint rather than the final read on hot throw.
Factors that change cure time (FO, additives, environment)
Cure time isn’t a fixed countdown – it shifts with your fragrance load, additives, and how (and where) the candle rests after pouring.
For a broader framework that helps you isolate variables (instead of changing everything at once), see Candle troubleshooting & optimization.
If you’re building a repeatable routine, think of cure time as a range you “land in,” not a number you “hit.” Same wax, same jar, same wick can still cure differently if you change what you put into the wax or the conditions you leave it in. The good news: most cure-time surprises trace back to a small set of levers you can control and log.
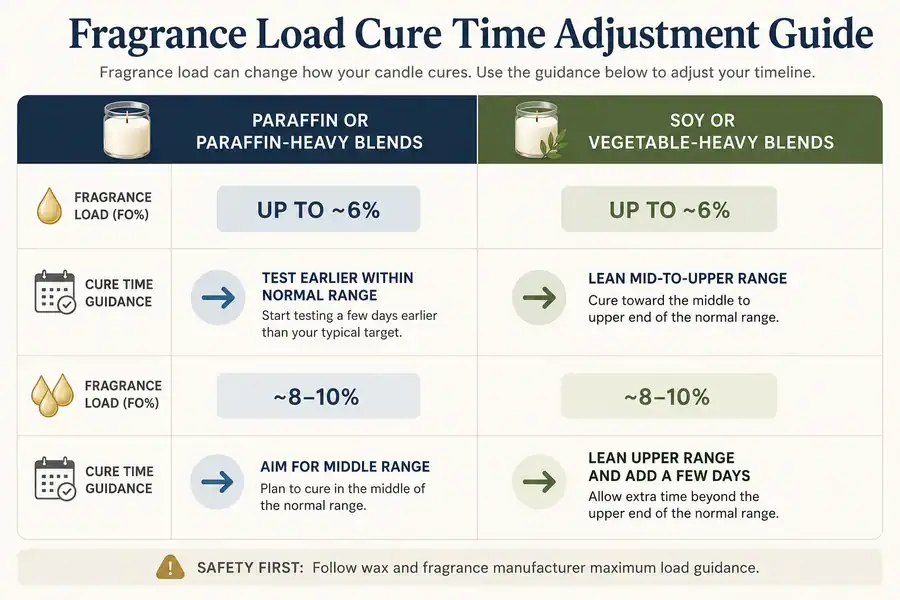
Effect of fragrance load & additives on cure time
A heavier fragrance system often pushes you toward the upper end of your wax’s cure window, especially for vegetable-heavy waxes that tend to improve over time.
FO (fragrance oil) is the scented oil blend added to wax; higher FO can change how quickly the candle reaches stable scent performance.
Here’s a practical way to think about it: raising fragrance load doesn’t just increase scent strength; it can change how quickly the wax and fragrance reach a stable, testable baseline. Two candles can be poured on the same day, but the one with a higher FO% (or a more complex fragrance) may need extra rest before it shows its true cold throw and hot throw.
Quick adjustment cheat sheet (start here, then log and refine):
| Wax family (general) | FO% band (planning example) | What to expect | Simple cure-time adjustment |
| Paraffin / paraffin-heavy blends | ~6% | Often settles quickly | Test earlier within your normal range |
| Paraffin / paraffin-heavy blends | ~8–10% | Can need a bit more time to smooth out | Lean mid-to-upper range; re-test before changing anything |
| Soy / vegetable-heavy blends | ~6% | May improve noticeably after the first few days | Aim for the middle of your normal range |
| Soy / vegetable-heavy blends | ~8–10% | More likely to improve later | Lean upper range; add a few days, then evaluate |
A few grounded rules that keep you out of trouble:
- Always follow the wax and fragrance manufacturer’s maximum load guidance and safety notes, even if a “higher load” seems tempting.
- Treat additives as cure-time modifiers, not miracle fixes. A hardener, a little paraffin in a blend, or a stabilizer can change texture and scent performance – but it may also change how long the candle needs before it gives reliable test results.
- If your goal is Weak scent troubleshooting, separate “needs more cure” from “needs a different formula.” The easiest way is staged testing: sniff and burn the same candle at more than one cure age.
A concrete example that helps with expectations: a vanilla bakery profile at a higher load in a soy container can smell muted early on, decent around the first week, and fuller near the second week—while a similar profile in a parasoy blend may show a truer read earlier. That doesn’t mean one is “better”; it means they reveal their final performance on different timelines.
How temperature, humidity and storage affect cure time
Temperature and storage affect cure time by changing how evenly wax and fragrance settle, with cool rooms and drafts often increasing variability.
RH (relative humidity) is the percentage of moisture in the air compared to the maximum it can hold at that temperature.
If you want a simple, source-backed baseline for “room temp,” CandleScience suggests letting candles cool at room temperature and notes that 70–76°F (about 21–24°C) is ideal for consistent cooling in a draft-free space.
Even if your wax “sets” and looks finished, the environment can keep quietly influencing how evenly the candle stabilizes. What matters most is stability: steady room conditions beat perfect lab conditions you can’t maintain.
Working bands for consistent curing and repeatable testing (home/studio reality):
| Factor | Practical target | If you’re outside the target, expect… |
| Temperature | ~21–24°C (70–76°F) | Cooler rooms: longer cure + more variability; hotter rooms: softer wax + inconsistent readings |
| Relative humidity | ~40–55% RH (working band) | Higher RH: more variability in storage and surfaces; large swings can make results inconsistent |
| Airflow | Gentle / indirect | Strong drafts can settle and cool candles unevenly across a batch |
| Light / heat sources | No direct sun / radiators | Local overheating can skew cure and appearance |
A simple setup that works in most homes and small studios:
- Pick one room you can keep the most consistent (avoid kitchens and laundry rooms if humidity swings are big).
- Place candles on a flat shelf or rack away from windows, vents, and heaters.
- Keep handling consistent: if you cure with lids on, do it for the whole batch; if lids off, keep it consistent too.
- Treat the first 48 hours as “do not disturb” time – no moving from warm to cold, no drafty window experiments.
- If the space was clearly too cold, too hot, or too drafty, extend cure by several days and re-test before you touch the recipe.
Nature’s Garden also flags “do not place in the refrigerator or freezer” style shortcuts and recommends letting candles cool in a warmer environment when cooling too quickly causes issues.
Methods note (why these bands work): These ranges are for repeatable testing, not industry standards. The goal is stable conditions so cure-age comparisons (day X vs day Y) reflect recipe changes, not room swings.
How to tell if candles are cured enough to test
A candle is cured enough to evaluate when cold throw, hot throw, surface behavior, and burn performance stop changing meaningfully between planned cure-age checks.
If you want a bigger diagnostic framework before changing wicks or fragrance, start at Fixing candle scent and burn issues.
The most helpful approach is a two-part workflow. First, use a simple protocol to decide “ready to evaluate.” Then use a targeted matrix to decide “wait longer or change something.” For deeper branches—like Weak hot throw troubleshooting or a Full wick selection guide—those steps make far more sense once you’ve ruled cure in or out. For safe, consistent testing habits, keep a basics reminder like Customer care: how to burn candles safely nearby.
How to tell if candles are cured enough to test by wax type
To tell if a candle is cured enough to test, follow a simple protocol of sniff tests, surface checks, and short test burns at specific days after pouring.
This is a practical “ready to evaluate” protocol, not a formal certification. Wax brands and fragrances vary, so treat it as a starting point—then adjust based on your own logs and the cure ranges you’re using.
Cure Check Protocol (repeatable and fast):
- Label and schedule: Write the pour date on the jar (or underside) and pick two check days in advance.
- Cold-throw sniff test: Smell the candle at room temperature from the same distance each time (keep your method consistent).
- Surface and texture check: Look for sweating, odd softness, or major surface changes. Don’t dig into the wax – just note “still soft” versus “firm and stable.”
- Short test burn: Burn long enough to get meaningful data, and keep it consistent each time. Watch flame behavior, early melt pool development, and whether scent starts to present cleanly.
- Compare against the previous check: The key is change over time. If the candle is meaningfully better at the later check—stronger, cleaner scent and steadier burn behavior—it likely wasn’t cured enough at the earlier one.
Simple timeline checkpoints (use as a guide, then refine):
| Wax family (general) | Early check | Mid check | “Confidence” check |
| Paraffin / paraffin-heavy blends | Day 2–3 | Day 4–7 | When two checks are similar |
| Soy / vegetable-heavy blends | Day 3–5 | Day 7–10 | Often closer to week 2 for a stable read |
| Blends (parasoy, coconut blends, etc.) | Day 3–5 | Day 7–10 | When results stop changing meaningfully |
What “cured enough to judge” looks like in real life:
- Cold throw smells clearer (not just stronger).
- Hot throw is less “patchy” between burns.
- Burn behavior is more repeatable (less dramatic change from one test day to the next).
If you’re unsure, don’t guess – stage it. Run the same short test burn on two different cure ages and compare notes. That comparison is often more reliable than a single “final” test.
Cure-time mistakes and how to fix them (by wax type)
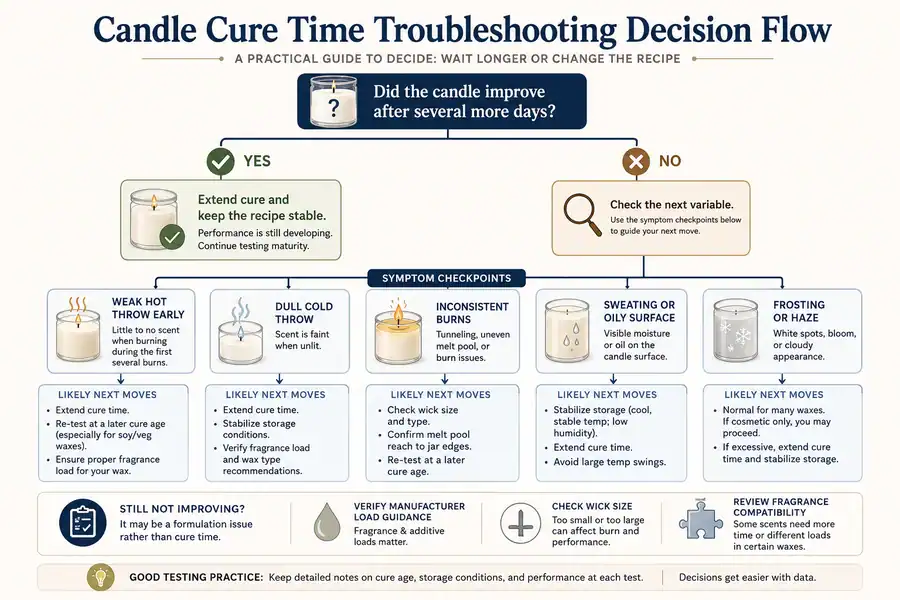
Cure-time mistakes are fixed by comparing the same candle at two cure ages, then extending cure only when scent or burn behavior clearly improves with time.
A quick way to tell if cure time is involved is to ask: “Did this candle improve after several more days?” If yes, cure was likely part of the issue. If nothing changes with time, you’re probably dealing with a different variable (wicking, fragrance choice, vessel, or load).
Cure-time troubleshooting matrix (scan, pick a move, re-test):
| Symptom | Likely cure-related cause | What to do now |
| Weak hot throw early on (especially in soy) | Under-cured for that wax/fragrance combo | Extend cure, re-test at a later checkpoint before changing formula |
| Cold throw feels dull or “flat” | Fragrance still settling or environment too cool/drafty | Move to a stable curing spot, wait several days, re-sniff under the same conditions |
| Inconsistent performance between burns | Uneven cure from drafts/temperature swings or heavy scent system | Stabilize storage and extend cure; test the same candle again rather than pouring a new batch |
| Sweating / oily surface | Load too high for the wax or fragrance not binding well yet | Verify manufacturer guidance; if within spec, extend cure and re-check before reformulating |
| Frosting / cosmetic haze on soy | Often influenced by temperature swings (not just cure length) | Stabilize room conditions; focus on consistency first, then decide if it’s purely cosmetic |
One anonymized “maker reality” example that shows why staged testing matters: a soy candle tested at day 2 may smell weak and burn unpredictably, but the same jar tested again around day 10 can show a noticeably stronger hot throw and steadier behavior. When that happens, “wait longer in better conditions” was the fix—not a full reformulation.
Two concrete examples to keep decisions grounded:
- Soy container, early test: weak scent and slightly soft feel in a cool room. Move it to a steadier spot, wait several more days, then re-test. If it’s clearly better later, “wait + stabilize” was the right move.
- Paraffin blend, later test: scent and burn don’t change between checks. That’s a hint cure time may not be your main bottleneck—your next lever is usually wick selection or fragrance compatibility, not more waiting.
Quick Q&A (the questions makers ask most):
- Will curing longer fix weak hot throw? Sometimes – if hot throw improves meaningfully between two cure-age tests, extend cure before changing wicks or fragrance.
- My soy candles look frosty—did I not cure them long enough? Not necessarily. Frosting often tracks temperature swings and cooling conditions more than cure days.
- If a candle still smells weak after curing, what should I change next? Change one variable: wick series/size first, then fragrance load or wax family—re-testing at the same cure age.
For candle-safety context during test burns, NFPA’s general candle safety guidance is a useful baseline reference.
If you’re unsure whether cure time is the problem, confirm the pour date, make sure the candle has cooled and rested in a stable spot, then run two identical check-ins on different days. If the second check is clearly better, extend cure and keep the recipe the same; if there is little change, stop waiting and move to the next variable one step at a time.