
Prevent mushrooming in cotton wicks by trimming to about 1/4 inch (6 mm), using the smallest wick that still burns steadily, and controlling burn time, formula load, and drafts.
Mushrooming is the carbon cap that forms when a wick pulls more fuel than the flame burns cleanly. For the main guide, see candle making. This page is for container-candle makers who need to fix repeated carbon buildup without changing every variable at once. You will learn which adjustments to test first and when to move to a smaller wick or lighter formula. The sections below follow the fastest troubleshooting path, then route you to deeper sizing and wick pages only when you need them.
A slight curl is not the same as mushrooming. Wick curl is the bend many cotton wicks use to self-trim, while mushrooming is a growing carbon cap at the tip.
Fast diagnosis: what to change first
Start with trim height, wick size, burn length, and drafts because those four variables cause most mushrooming in cotton wicks. The table below shows the most likely cause and the first change to make. Change one variable at a time so you can tell which fix actually solved the problem.
A tiny cap can be acceptable only when it stays small and is not paired with soot, a taller flame, or extra heat high on the jar wall. Treat repeated cap growth across clean, draft-free burns as a failure signal on this page.
Here, acceptable means acceptable as a troubleshooting result for this recipe and setup, not a legal, certification, or universal pass/fail standard.
For the parent overview of wick selection, see candle wick types and sizing.
| What you see | Most likely cause | First change to make | What to test next |
|---|---|---|---|
| Large black cap forms by the second burn | Wick is too large for the jar or wax | Trim to about 1/4 inch (6 mm) and test one wick size down | Retest in the same jar with the same wax and fragrance load |
| Flame gets tall late in long burns | Burn sessions are too long for that recipe | Shorten the next burn to a controlled test window, often about 2–4 hours | If it still repeats, test one wick size down |
| Soot shows on the rim and the flame leans | Drafts or uneven airflow | Move the candle away from vents, fans and windows | Retest before changing the formula |
| Mushrooming appears after increasing scent or dye | Formula is over-fueling the flame | Reduce fragrance load first, then ease back heavy dye | Keep wick size constant during that test |
| The jar runs hot high on the wall | Wick is too aggressive for the vessel | Step down the wick or move to a wider or less heat-retentive vessel | Confirm with repeat burns |
| Only one wick batch behaves badly | Wick prep or wick batch issue | Compare against a second wick lot or a trusted pre-tabbed wick | Change only the wick, not the full recipe |
Overwicking vs formula overload: how to tell which is driving the cap
If the cap gets worse after you raise fragrance or dye while the wick size and burn routine stay the same, formula overload is the stronger suspect. If the flame stays tall, the jar runs hot, and the cap repeats across clean, draft-free burns, overwicking is more likely. Test one variable at a time so you do not confuse a wick problem with a formula problem.
Quick order of operations
The fastest fix order is to trim first, remove drafts second, shorten the burn session third, and only then change wick size or formula.
- Trim the wick to about 1/4 inch (6 mm).
- Retest in a draft-free room.
- Shorten the burn session to a controlled test window, often about 2–4 hours.
- Only then change wick size or formula.
When only one wick batch flares or builds carbon unusually early under the same recipe, compare it against a second wick lot before you rewrite the whole formula. For the full setup routine, see How to Pre-Tab, Prime & Trim Candle Wicks.
Quick wick-size check when mushrooming suggests overwicking
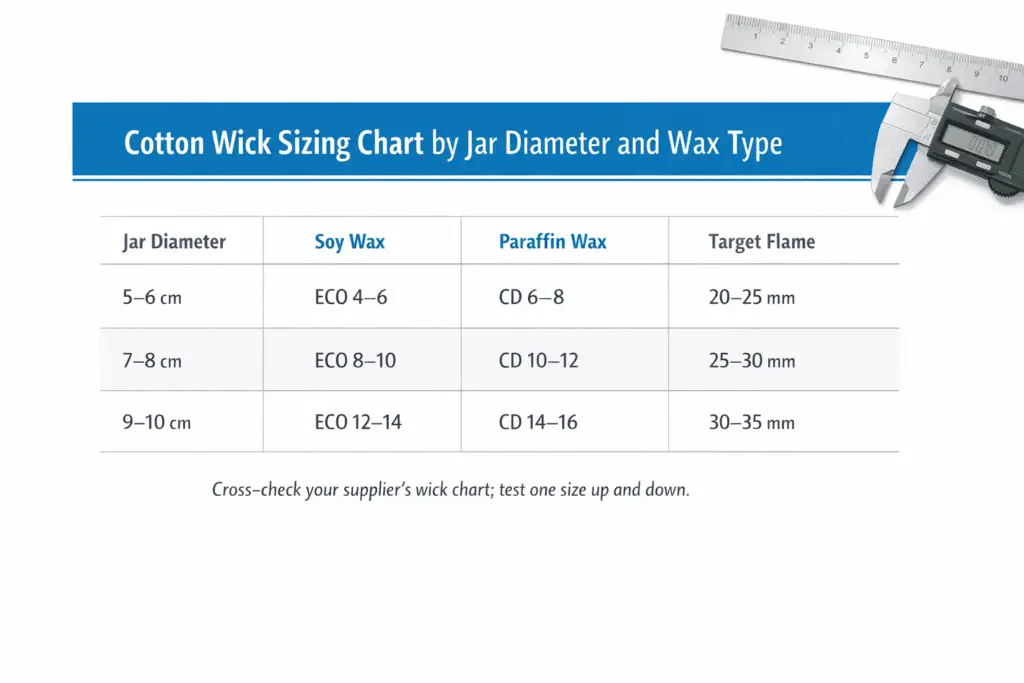
When mushrooming suggests overwicking, check the jar’s inner diameter and wax type before you change the whole recipe. Inner diameter is the usable width of the jar at the wax line. For the parent overview, see candle wick types and sizing, then use how to size your candle wick correctly for the full test process.
| Jar + wax situation | Starting move | Watch for | If mushrooming appears |
|---|---|---|---|
| Small container, soft wax blend | Start with the supplier’s smaller recommended cotton wick | Full melt without a tall flame | Test one size down before changing fragrance |
| Medium container, soy or soy blend | Test your starting wick plus one size down and one size up | Stable flame and clean rim by the second or third burn | Keep the wax the same and step down first |
| Wide container, single-wick setup | Confirm the wick is not trying to do the job of a double-wick layout | Hot jar wall, oversized flame, heavy cap | Test a smaller wick or a multi-wick layout |
| Thick-walled or heat-retentive vessel | Treat the vessel as more heat-sensitive than plain thin glass | Extra heat feedback near the upper wall | Start conservative and only size up if the flame stays too weak |
Oversized wicks pull too much molten wax, drive a taller flame, and build carbon on the tip. Undersized wicks can push you into longer burns that still end in soot or late-session mushrooming. On this page, a wick burns steadily only when the flame stays stable without visible soot, repeated cap growth, or extra upper-wall heat in repeat burns.
Here, steadily means repeatable burn behavior for this jar-and-wax setup, not a universal performance benchmark.
Use the table as a fast screen, not as the full sizing process. Cross-check it against your supplier’s wick size chart by jar diameter and wax type, then move to the full sizing page above when you need deeper wick selection work. Trim to about 1/4 inch (6 mm), keep the candle away from drafts, and judge the fix by repeatable burns in the same jar, wax, fragrance load, and room conditions.
How to trim a cotton wick before each burn
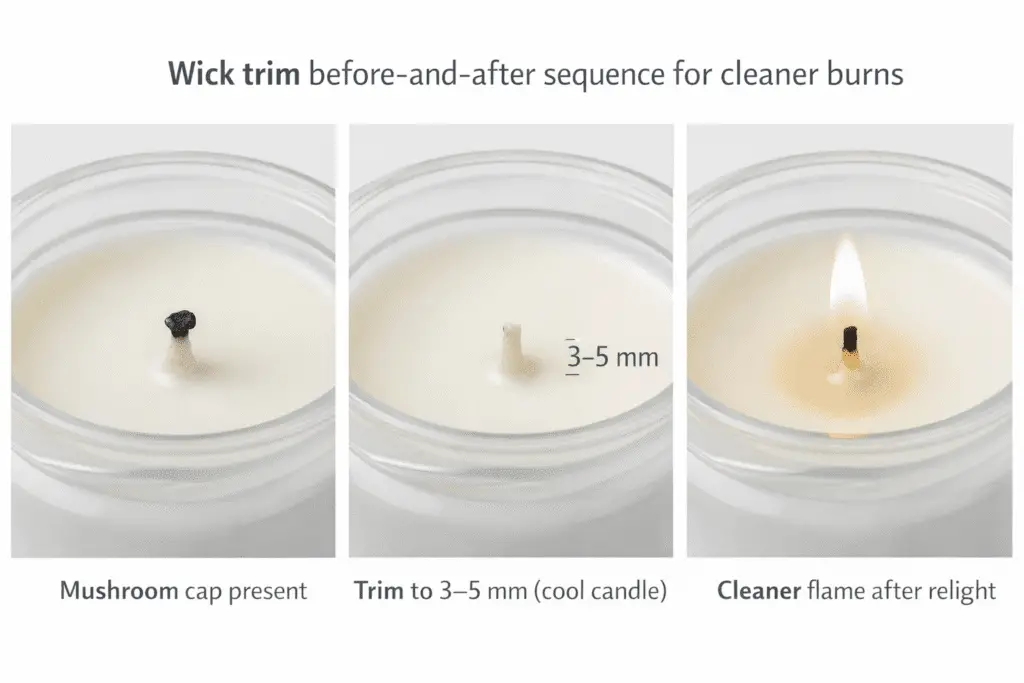
Trim a cotton wick to about 1/4 inch (6 mm) before every burn and every relight to reduce mushrooming and keep the flame steadier. That short trim limits how much fuel reaches the flame at once. It is the fastest fix to test before you change the recipe or the container.
An overlong wick stores more carbon and unburned fragrance at the tip. When you relight it, the extra fuel makes the flame taller, dirtier, and more likely to grow a soot cap. Trimming resets the wick to a cleaner starting point.
Use the same short routine every time you light or relight a candle. If a neat, short wick still misbehaves, use fix common candle wick problems to check the broader wick system instead of blaming trimming alone.
Follow this trimming routine before each burn.
- Let the candle cool fully so the wax is firm and the wick is easy to handle.
- Pinch or snip off the old mushroom cap so only clean wick remains.
- Use scissors or a wick trimmer to cut the wick to about 1/4 inch (6 mm) above the wax surface.
- Remove loose debris from the surface so nothing extra burns in the melt pool.
- On long sessions, extinguish the candle safely, let the wick cool, and retrim if the flame has crept too tall.
When mushrooming keeps coming back after careful trimming, treat the candle as a test. Shorten the burn time, try a smaller wick, review the fragrance load, and confirm that drafts are not pushing the flame around.
Formula factors that make mushrooming worse
Formula changes make mushrooming worse when they overfeed the flame or change how fuel reaches the wick. Fragrance load is the percentage of fragrance oil in the wax. Review the recipe after trim height and wick size are already close, because formula issues often exaggerate a wick that was already near its limit.
These recipe changes are the most common triggers.
- High fragrance load: More fragrance can make the wick burn richer fuel than the flame can finish cleanly.
- Heavy dye: Dark or heavily colored candles can burn dirtier than the same recipe in a lighter shade.
- Wax changes: A wick that behaves well in one wax can mushroom in another when melt behavior or fuel flow changes.
- Additives: Any additive that changes hardness, melt flow, or fuel delivery can push a borderline wick into a sooty burn.
A small amount of mushrooming can still appear in heavily scented candles. Treat growth, soot, an unstable flame, or excess container heat as the stronger signs that the formula or wick still needs work.
Keep the jar and wick series the same while you change one formula variable at a time. That method shows whether the real cause is fragrance load, dye, wax, or additive choice instead of hiding the answer under several changes at once. For broader formula-load and scent-testing context after you narrow the wick variables, see candle fragrance and scenting.
Burn conditions that can push a cotton wick into mushrooming
Burn conditions push a cotton wick into mushrooming when they make the candle run hotter or burn unevenly. Heat feedback is the extra heat the container reflects back toward the flame. Check the vessel, the room, and the session length before you change the formula again.
Here, runs hot means noticeable extra upper-wall heat during comparable burns in the same vessel class, not a formal compliance temperature limit.
These conditions are the most common hidden causes.
- Container heat: Narrow, thick-walled, or heat-retentive vessels can make a wick act larger than it looks on paper.
- Burn duration: Long burns give the wick more time to overheat and collect carbon.
- Drafts: A leaning flame and a one-sided soot line usually mean the room is affecting the test.
- Relights: Every relight carries the last carbon cap forward unless you trim first.
- Cure and pour variables: These can affect burn behavior, but they are usually secondary checks after trim, wick size, formula, and drafts.
Simple prevention checklist
Use this checklist to prevent mushrooming before each burn or retest: trim first, remove drafts, control burn time, and change one variable at a time.
- Trim the wick to about 1/4 inch (6 mm) before each burn.
- Burn in a calm, draft-free spot.
- Keep each session controlled instead of letting the candle run well past your test window.
- Retest one wick size down if the flame stays tall and sooty.
- Change one variable at a time and log the result.
What soot cap shapes mean (diagnostic chart to fix mushrooming faster)
Different soot cap shapes show whether the wick is too large, under-trimmed, oxygen-starved, or overloaded with fuel. Soot cap means the carbon build-up that forms on the wick tip. Reading the shape helps you choose the next fix faster.
Use these shape patterns as a practical diagnosis guide.
- Tall, narrow cap: This usually points to an oversized wick or an overfed flame. Trim to about 1/4 inch (6 mm), shorten the next burn, and test one wick size down if it repeats.
- Squat round cap: This often shows up late in long burns or jars that feed extra heat back to the flame. Shorten the session, retrim before relighting, and test a slightly smaller wick if the pattern keeps returning.
- Flaking cap: This can point to a heavy formula, a dye or additive mismatch, or a poor wick batch. Lower the formula pressure and compare a second wick lot before you change the container.
- Flat cap with black edges: This often reflects under-trimming plus drafts or poor airflow. Improve trimming, move the candle to a calmer room, and retest before changing the formula.
- Tiny nub or no visible cap: This usually means the wick, wax, and burn schedule are close to a good match. Treat it as your reference burn and compare future tests against it.
Keep notes on cap shape, soot, burn length, and jar heat after each session. If one wick family keeps repeating the same failure, compare it against mushrooming causes by wick series to see whether the problem follows the wick line more than the jar or formula. When two adjacent sizes in the same wick family still repeat the same cap under the same trim, burn length, wax, and fragrance load, test a different wick family next.
A simple wick test protocol to reduce mushrooming
Use a fixed three-candle test so each wick candidate burns under the same conditions. A control candle is the version you keep unchanged while you compare one variable at a time. The goal is a steadier, cleaner burn in your own jar and wax, not a universal number.
For this page, use the test only to confirm whether the cap repeats under controlled conditions. Compare your current wick, one size down, and one size up in the same jar, wax, fragrance load, room, trim height, and burn window, and treat repeated soot, repeated cap growth, or extra upper-wall heat as a failed setup.
Use the linked sizing pages above when you need a deeper sizing workflow or chart, and use candle burn test for fire risk: setup, measurement & pass/fail guide when you need the full validation workflow.
Keep a fix only after it repeats in the same jar, wax, fragrance load, trim height, and burn schedule.
Quick triage: which levers to pull first
If the result is still unclear, repeat the same order: trim, control burn time, remove drafts, review formula load, then retest wick size.
FAQ about wick mushrooming
A small mushroom cap can be acceptable, but a growing cap, taller flame, soot, or excess jar heat means the candle still needs adjustment.
Is a small mushroom cap always a failure?
No. A small cap can happen, especially in scented candles. Treat it as acceptable only when the flame stays steady, the rim stays clean, and the cap does not keep growing from burn to burn.
What should I change first if the wick mushrooms?
Trim the wick, retest in a draft-free room, and shorten the next burn. If the problem repeats, test one wick size down before you change multiple formula variables.
Can fragrance oil make mushrooming worse?
Yes. A higher fragrance load can overfeed the flame and increase carbon build-up, especially when the wick was already close to oversized.
Does mushrooming mean the candle is unsafe?
It is a warning sign, not an automatic failure. Stop the burn, trim the wick, and retest because a large cap can lead to a taller flame, more soot, and a hotter container.