

A wood wick usually goes out when its exposed edge is trimmed wrong, covered by melted wax, mismatched to the candle, disrupted by formula or airflow, or rarely damp, dirty, or defective.
Self-extinguishing means the flame dies during normal burn time, not that the candle has reached the end of its wax or a built-in safety state. A wood wick is a wooden candle wick that needs a clean exposed edge above the wax pool, enough oxygen, and a wax system it can feed. Start with the visible fixes: remove loose char, reset the exposed wick height, clear wax away from the flame path, and relight in still air. If it still goes out, narrow the cause to wick size, first-burn melt pool, installation, formula, burn environment, or a rare material problem.
Why a Wood Wick Keeps Going Out: Fast Diagnosis
A wood wick usually keeps going out because its exposed edge is trimmed wrong, covered by wax, mismatched to the candle, disrupted by formula or airflow, or rarely damp, dirty, or defective.
Self-extinguishing means the flame dies before the expected burn session is complete. Check trim and char first, wax drowning second, still-air relight third, then wick size, installation, formula, environment, or defect last.
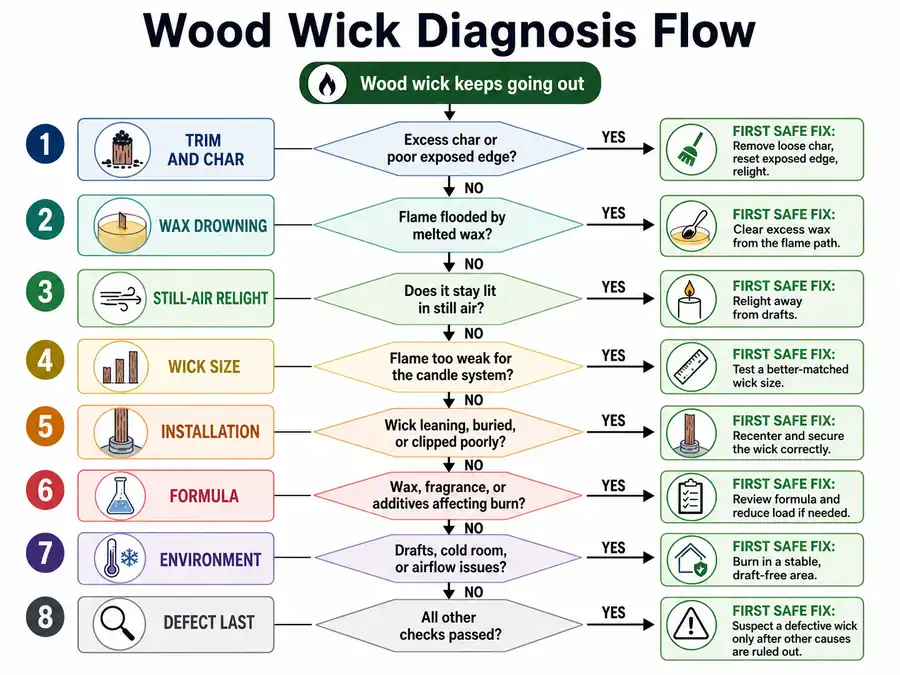
Do not dig a deep crater around the wick, overheat the wax, or keep relighting near drafts. If the flame dies only after melted wax surrounds the wick, move to the wax-drowning branch before blaming the wick material.
Wood Wick Keeps Going Out: Quick Diagnosis Table
Use this table to route a self-extinguishing wood wick by symptom, likely cause, first safe fix, and next diagnostic section.
The table below separates the first visible clue, the likely failure point, the first safe fix, and the section that should answer the next decision.
| Symptom | Most Likely Cause | First Fix | Read Next |
|---|---|---|---|
| Tiny flame dies quickly | Wick is too short or wax-covered | Expose a clean wick edge above the wax | Fix the exposed wood wick height first or Rescue a wood wick drowning in melted wax |
| Flame burns tall, smoky, then dies | Wick is too long or over-charred | Remove loose char and trim back to a cleaner edge | Fix the exposed wood wick height first |
| Flame dies after wax melts around the wick | Wax is drowning the wood wick | Remove a small amount of softened wax around the wick | Rescue a wood wick drowning in melted wax |
| Candle formed wax walls after the first burn | First burn created a melt-pool shape problem | Correct only the wax shape affecting wick exposure | Check whether the first burn created a melt-pool problem |
| Wick goes out after correct trim and wax exposure | Wick size, width, thickness, or construction may not fit the candle | Check whether the failure repeats after a still-air relight | Decide whether the wood wick is the wrong size |
| New candle fails on the first light | Wick may not be primed, seated, centered, or upright | Inspect the clip, centering, and wax-ready wick edge | Inspect priming, clip seating, and wick placement |
| Every candle in the batch fails | Wax, fragrance, dye, or additive may be interfering | Compare the batch against a simpler control candle | Test the candle formula if the whole batch fails |
| Candle burns in one room but not another | Drafts, oxygen restriction, jar shape, or surface instability may be involved | Retest in a stable still-air location | Retest the candle in a stable burn environment |
| Candle fails after all common fixes | Wick may be damp, contaminated, or defective | Check for debris, moisture exposure, and repeat same-batch failure | Rule out contamination or a defective wood wick last |
Do not treat normal black char as proof of a bad wick. A defect is the last explanation after trim, wax level, relight conditions, sizing, installation, formula, and environment have been checked.
Fix the Exposed Wood Wick Height First
A wood wick can self-extinguish when the clean exposed edge is too short to hold a flame or too charred and long to draw wax steadily.
A wood wick is not just a decorative strip of wood; it is the candle’s fuel-delivery edge, so it needs clean exposure above the melt pool. This is the first fix to check before moving into wick types and sizing, formula changes, or replacement.
| Trim State | What It Looks Like | Why It Goes Out | First Fix |
|---|---|---|---|
| Too short | Tiny flame, weak glow, wick barely above wax | The flame cannot hold enough heat above the wax | Expose a clean edge without cutting deeper |
| Wax-covered | Wick disappears under melted or softened wax | Wax blocks the flame edge | Remove only enough softened wax to reveal the wick |
| Too long | Tall flame, soot, unstable burn | The charred fuel path becomes uneven | Trim loose char and relight-test |
| Over-charred | Black crust on top, sparks, then flame dies | Loose char blocks a steady wax draw | Break off loose char after the wax cools |
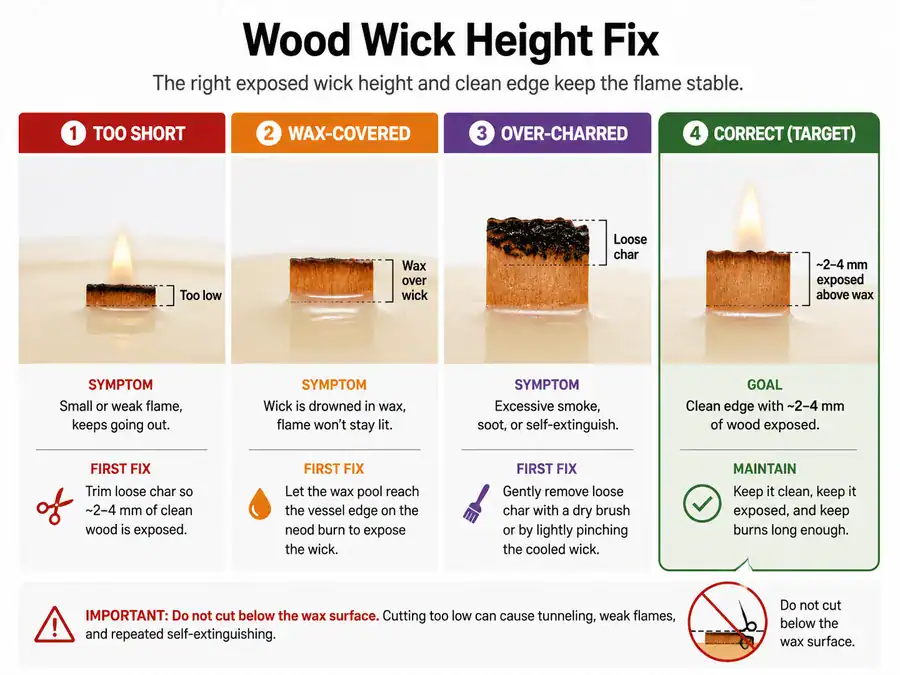
Use wood wick maintenance / wood wick trimming as the broader care topic, but keep this fix simple: cool, clear, expose, relight, observe. Do not cut the wick below the wax surface, because that can create the same weak-flame problem again.
Let the candle cool until the wax is safe to handle. Remove loose black char from the top of the wick. Expose a clean wick edge without digging into the wax. If wax covers the edge, remove only enough softened wax to reveal the wick. Relight in a safe still-air location and watch whether the flame steadies or dies again.
Use candle keeps going out only when the same failure pattern appears across candle types. If the wick is clean and exposed but the flame still dies once wax melts around it, move to the wax-drowning check next.
Rescue a Wood Wick Drowning in Melted Wax
A wood wick is drowning when melted wax covers or overwhelms the exposed wooden edge so the flame cannot stay lit.
Drowning is a wax-level problem, not water contamination, and not the same as a healthy melt pool. A normal melt pool forms around the wick, but the wood edge still needs to stay visible enough for the flame to heat the wood and vaporize wax.
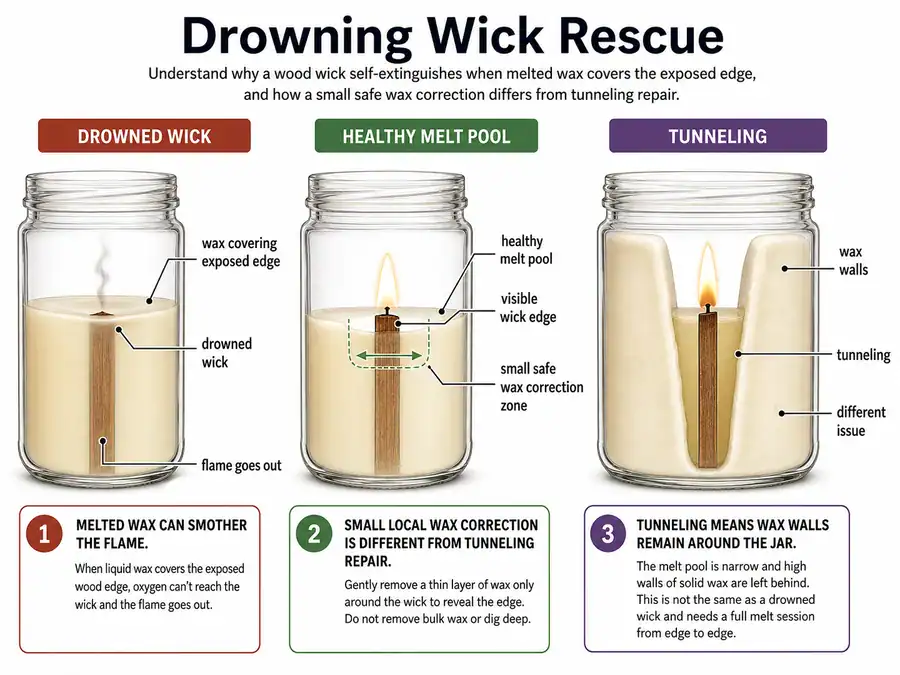
Use candle tunneling repair only when the main problem is wax walls around the jar, not wax covering the wick itself. Drowning means wax is over the wick; tunneling means uneven wax remains around the vessel.
| Problem | Visible Clue | What It Means | Best Next Step |
|---|---|---|---|
| Drowned wick | Melted wax covers the wick edge | The flame cannot stay above the wax | Remove a small amount of softened wax around the wick |
| Tunneling | Wax walls remain around the jar | The melt pool is uneven | Route to tunneling correction instead of over-digging the center |
| Too-short wick | Wick was cut low and cannot emerge | The flame starts weak before wax even pools | Expose the wick edge and retest before resizing |
| Repeated drowning | Wick disappears again after correction | Wick size or formula may be wrong | Check size, wax blend, or fragrance load next |
Fix it in this order: let the wax soften without unsafe overheating, remove only a small amount of wax around the wick, avoid digging a deep crater, expose the wood edge, then relight-test. If the flame dies again after the wax pool reforms, the candle may need wood wick width and thickness selection rather than another surface-level rescue.
Use candle keeps going out for broader flame-failure causes only after the wax-covered wick has been ruled out. If you need the wider wick system view, wick types and sizing is the better parent topic; if the main problem is wax walls around the jar instead of wax covering the wick, use the tunneling repair guide.
Check Whether the First Burn Created a Melt-Pool Problem
A poor first burn matters only if it changed the wax shape around the wood wick enough to starve or drown the flame later.
A short first burn does not automatically ruin a wood wick candle. The problem starts when uneven wax, a partial melt pool, or raised wax walls later push melted wax toward the wick or leave the wick sitting too low.
Use candle tunneling repair when wax is trapped around the jar edge, not when the only issue is a weak or wax-covered wick. Use first burn candle care for the broader burn-time habit, but keep this check focused on whether the first burn caused the current flame failure.
Check these clues:
- Was the first burn very short?
- Did wax melt evenly across the surface?
- Is the wick now sitting lower than the surrounding wax?
- Are wax walls pushing melted wax toward the wick?
- Does the candle fail only after the melt pool starts forming?
| What You See Now | What It Means | What To Do Next |
|---|---|---|
| Wick is clean and exposed, but flame dies after wax pools | First burn may have shaped wax toward the wick | Clear only the wax that affects wick exposure |
| Wax walls remain around the jar | The issue is tunneling-adjacent | Route the full wax-wall fix elsewhere |
| Flame dies before wax starts pooling | First burn is probably not the main cause | Recheck wick height or installation |
| Full melt pool forms, but flame still dies | Wick size, formula, or airflow may be the cause | Move to sizing, formula, or burn-environment checks |
Use candle troubleshooting when the candle has multiple symptoms beyond the wood wick, such as uneven melting, soot, weak scent throw, and flame instability together. Use candle keeps going out when the flame failure is not limited to a wood wick candle.
To recover a small first-burn wax imbalance, expose the wick safely, correct only the wax that is blocking or flooding the wick, then relight-test in still air. When the main issue is wax trapped around the jar edge, follow the full tunneling repair path instead of treating every future flame failure as a first-burn mistake.
Decide Whether the Wood Wick Is the Wrong Size
If a wood wick is clean, exposed, and still-air tested but keeps going out, the wick may be the wrong width, thickness, or construction for that exact wax and vessel.
“Right size” means the wick holds a tested stable burn in the actual candle system, not that it matches jar diameter by itself. A wood wick’s width, thickness, construction, wax blend, fragrance load, and vessel shape work together to control heat, melt-pool behavior, wax draw, and flame stability.
Use how to choose the right wood wick width and thickness for your candle jar for exact ranges, charts, and full testing sequences. This section only decides whether sizing is the likely reason the flame keeps dying.
| Symptom After Basic Fixes | Likely Sizing Issue | Next Action |
|---|---|---|
| Weak flame and incomplete melt pool | Wick may be too small or too thin | Test a stronger wick setup |
| Wick drowns again after wax correction | Wick may be underpowered for the wax system | Compare wick size with formula load |
| Large flame, heavy char, then failure | Wick may be too wide, too thick, or the wrong construction | Test a lower or different construction |
| Works unscented but fails scented | Formula may be overpowering the wick | Move to formula testing before blaming size alone |
| Fails after correct trim, wax correction, and still-air retest | Size mismatch becomes more likely | Use the full sizing guide |
A booster wood wick guide becomes relevant only when the candle needs more flame strength or a different wood-wick construction after basic sizing checks. Do not treat a booster as the first fix when wax drowning, bad trimming, or draft exposure has not been ruled out.
| Test Candle | Wax And Vessel Condition | Wick Behavior | What The Result Suggests |
|---|---|---|---|
| Same wax, cleaner wick edge | No design change | Flame steadies | Trim or wax exposure was the issue |
| Same vessel, stronger wood wick | Same wax and fragrance | Flame steadies without drowning | Previous wick may be underpowered |
| Same wick, unscented wax | Fragrance removed | Flame steadies | Formula may be interfering |
| Same candle, still-air retest | Burn location changed | Flame still dies | Sizing or formula remains likely |
Use candle burn testing to compare one variable at a time, such as wick width, thickness, wax blend, fragrance load, or vessel. Keep wick types and sizing as the parent topic for the full wick system, while this page stays focused on why the wood wick keeps going out.
Inspect Priming, Clip Seating, and Wick Placement
A newly made wood wick candle can self-extinguish if the wick is not primed, seated firmly, centered, or upright enough to draw wax into a stable flame path.
This first-light failure is easy to miss because trimming and wax drowning are not always visible yet. Primed means wax-ready and able to draw fuel, not just inserted into the candle.
Use this inspection before changing the wick size:
| Inspection Point | What To Look For | Why It Matters |
|---|---|---|
| Primed edge | The wick looks wax-ready, not dry or bare | A dry edge may not feed the flame long enough to establish a burn |
| Clip seating | The wick sits firmly in the metal clip | A loose wick can shift and break the flame path |
| Centering | The wick stands near the middle of the vessel | An off-center wick can heat one side and starve the other |
| Upright position | The wick is not leaning into wax | A leaning wick can drown before the melt pool stabilizes |
| Base contact | The clip has not lifted or shifted | A lifted wick may lose steady wax access |
| First-light pattern | Failure happens immediately or very early | Early failure points toward setup before formula or burn-time patterns appear |
If the wick is loose, uncentered, or not wax-ready from the pour, follow how to prime and install wood wicks before retesting. Keep the correction narrow: expose the wick edge, check that it is upright, and confirm it is held securely.
If the candle passes these placement checks but still dies after a stable relight, compare the result with wood wick width and thickness selection rather than rebuilding the candle. Use candle burn testing when you need to compare the same wax and vessel with only one wick variable changed.
Use wick types and sizing for the broader wick system and candle making troubleshooting when the failure includes other symptoms, such as weak scent throw, wet spots, heavy soot, or repeat batch failure. Do not turn this check into a full installation tutorial; the goal here is only to decide whether priming, seating, centering, or wick movement explains the self-extinguishing flame.
Test the Candle Formula if the Whole Batch Fails
If every candle in a batch keeps putting out the wood wick after trim, wax level, and environment checks pass, the candle formula may be the cause.
A wood wick is part of a burn system, so its flame depends on the wick, wax blend, fragrance load, additives, and vessel working together. Too much fragrance means excessive or incompatible fragrance for that wax-and-wick setup, not that fragrance itself is always the problem.
Use a control comparison before changing several variables at once:
| Control Test | Keep The Same | Change Only This | What The Result Suggests |
|---|---|---|---|
| Scented vs. unscented | Wax, vessel, wick, pour method | Remove fragrance | If unscented burns better, fragrance load or compatibility may be involved |
| Dyed vs. undyed | Wax, wick, fragrance, vessel | Remove dye | If undyed burns better, dye may be affecting combustion |
| Additive vs. no additive | Wax, wick, fragrance, vessel | Remove the additive | If the simpler candle burns better, the additive may be interfering |
| Same formula, different wick | Wax, fragrance, dye, vessel | Wick size or construction | If the stronger wick works, the formula may need a different wick |
| Same wick, simpler wax blend | Wick, vessel, basic test shape | Wax blend | If the simpler blend burns better, the wax blend may be the limiting factor |
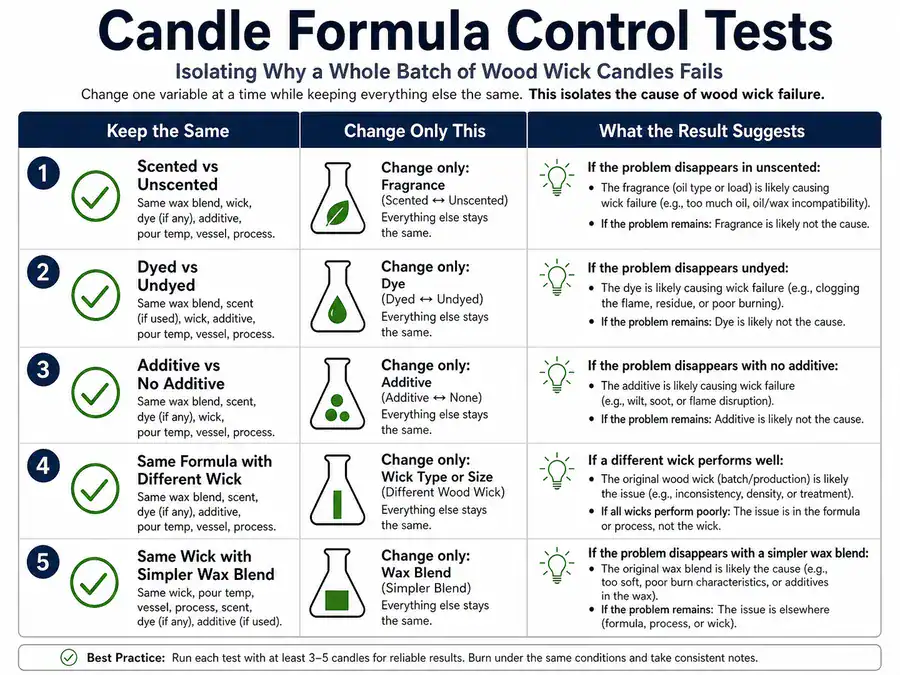
Use fragrance load calculator / fragrance load testing for exact load percentages and controlled fragrance trials. Use wax blend testing for candles when the wick burns in one wax setup but dies in another.
Use candle burn testing to record one change at a time instead of changing fragrance, dye, wax, and wick together. If the test points back to wick power rather than formula interference, return to wood wick width and thickness selection. If several symptoms appear across the batch, candle making troubleshooting is the broader route, but this section should stay focused on wax, fragrance, dye, and additive interference.
Retest the Candle in a Stable Burn Environment
A wood wick can self-extinguish in a drafty, humid, oxygen-limited, or unstable burn environment even when the wick itself is trimmed correctly.
This cause applies when the same candle behaves differently by room, fan or vent location, window exposure, surface stability, humidity, or vessel condition. A draft means disruptive airflow that bends, cools, or weakens the flame, not normal safe ventilation.
Use this controlled retest before changing the wick or formula:
| Retest Step | What To Check | What The Result Means |
|---|---|---|
| Move the candle away from fans, vents, and open windows | The flame should stand steadier | If it stops going out, airflow was likely involved |
| Use a safe, stable, still-air location | The surface should be level and heat-safe | If the flame steadies, placement was part of the failure |
| Watch the flame direction | Leaning or hard flickering points to airflow | If it leans then dies, the wick may not be the main cause |
| Note humidity if known | Damp conditions can make ignition less reliable | If failures cluster in damp conditions, environment may be contributing |
| Compare failure timing across rooms | Same candle, different location | If one room fails and another does not, treat it as location-specific |
| Watch narrow or tall vessels | The flame may weaken inside the jar shape | If it shrinks after the jar heats, vessel behavior may be involved |
Use candle safety / safe candle placement for broader placement rules, but do not treat a stable retest as permission to burn in an unsafe enclosed space. Use candle burn testing when you need to compare the same candle under repeatable conditions, and use candle keeps going out when the failure is not specific to wood wicks.
If other candle symptoms appear at the same time, candle troubleshooting is the broader diagnostic route. If the still-air retest fails too, the cause is more likely wick exposure, wax drowning, sizing, formula, installation, or material quality within wick types and sizing.
Rule Out Contamination or a Defective Wood Wick Last
A defective, damp, or contaminated wood wick should be the last diagnosis after trim, wax level, sizing, installation, formula, and environment checks have failed.
A wood wick must stay dry, clean, and structurally consistent enough to draw wax and support ignition. Defective means repeated controlled failure after common causes are ruled out, not normal black char or one failed relight.
Use this rule-out sequence before blaming the wick material:
- Correct trim and remove loose char.
- Confirm the wood wick edge is exposed above the wax.
- Correct minor wax drowning.
- Retest in still air.
- Check wick sizing and installation.
- Check the formula or batch pattern.
- Inspect for debris, moisture, residue, or structural inconsistency.
- Decide whether to stop troubleshooting and contact the maker or supplier.
| Condition | What It Means | Try Next | Contact Maker Or Supplier? |
|---|---|---|---|
| Normal black char on the top edge | Expected burn residue, not a defect by itself | Remove loose char and relight-test | No |
| Visible dust, debris, or residue near the wick | Contamination may be blocking a clean burn | Clear the surface and retest safely | Only if it repeats |
| Wick feels damp or was stored poorly before pouring | Moisture may be affecting ignition | Compare with a dry wick from the same pack | Yes, if multiple wicks fail |
| Same batch fails after controlled fixes | Material, storage, or batch quality becomes more plausible | Compare another wick lot or supplier batch | Yes |
| One candle fails but similar candles work | Isolated candle damage or setup issue is more likely | Recheck installation, wax level, and environment | Maybe |
| Multiple same-supplier wicks fail across test candles | Wick material or quality control may be involved | Stop changing random variables and document the pattern | Yes |
Use wood wick storage / wick quality guidance if available when the pattern points to damp storage, debris, or wick handling before pouring. Use candle burn testing to compare a suspect wick against a cleaner control, and use candle keeps going out if the same flame failure is happening beyond wood wicks.
Use wood wick supplier quality / wood wick selection if available when the issue is choosing better wicks for future batches rather than fixing this candle. For the wider wick-system view, wick types and sizing should carry the broader selection and material-quality decision.
FAQs About Wood Wicks Going Out
Why does my wood wick light and then go out right away?
The wick edge is usually too short, wax-covered, dry, poorly seated, or blocked by loose char.
Can I relight a wood wick after it goes out?
Yes, relight it only after you clear loose char, expose the wick edge, and place the candle in still air.
Should I pour out wax if the wood wick is drowning?
No, remove only a small amount of softened wax around the wick so the wood edge stays exposed.
Is black char on a wood wick bad?
Black char is normal, but loose buildup can block the flame and should be cleared before relighting.
Does fragrance oil always make a wood wick go out?
No, fragrance becomes suspect only when the load or oil is incompatible with that exact wax, wick, and vessel.
When should I stop trying to fix the candle?
Stop troubleshooting when the wick still fails after trim, wax exposure, still-air testing, sizing, installation, formula, and contamination checks.