Choose wood wick clips by tab/base fit and centering tools by vessel span, grip, and vertical support so the wick stays upright through pouring and early cooling.
In this article, “right” means physically stable before the wax sets, not safest burn behavior, regulatory compliance, or final wick burn size.
Wood wick clip size is the physical match between the metal clip and the wood wick tab or base, so the wick can stand straight before wax is poured. Centering tools are holders, bars, or clips that span the vessel opening and keep the wick both centered from above and upright from the side. The right setup means stable tab fit, holder span, rim grip, and cooling support, not burn sizing, flame behavior, wax defects, or full multi-wick layout. Use the compatibility checker and final checklist to catch loose clips, weak holders, and post-pour movement before the wax sets.
- Choose the Clip Size That Fits the Wood Wick Tab, Not the Flame Size
- Pick the Centering Tool That Holds the Wick Upright, Not Just Centered
- Fix the “Centered but Leaning” Problem Before the Wax Sets
- Use This Clip-and-Tool Compatibility Checklist Before You Pour
- Diagnose the Tilt Cause Before Replacing the Clip or Holder
Choose the Clip Size That Fits the Wood Wick Tab, Not the Flame Size
Wood wick clip size means the physical fit between the metal clip and the wood wick tab or base; it does not mean the wick’s burn size.
When suppliers list wood wick clip dimensions, they may be describing the base diameter, neck height, insertion hole, slot fit, or overall clip footprint, so compare the dimension that controls your tab and vessel fit.
Choose the clip by how securely it holds the wood wick tab before wax is poured. A good clip supports the base so the wick can stand upright, but it does not control flame height, melt pool width, crackle, or burn-test results.
| What you see during dry fit | Likely clip-fit issue | What to check | Next action |
| Tab slides side to side | Clip may be too loose | Tab width and clip slot fit | Choose a matching clip or a pre-tabbed wick |
| Tab must be forced into place | Clip may be too tight | Whether the tab bends, twists, or sits under pressure | Choose a compatible clip instead of relying on pressure |
| Clip sits unevenly on the vessel base | Base may tilt before the pour | Clip shape, vessel base, and tab seating | Reposition or replace the clip |
| Wick leans before wax is added | Base support is failing | Tab fit, clip seating, and dry wobble | Fix the tab/clip connection first |
| Wick burns poorly later | Not a clip-size decision | Wick width, wax system, vessel burn diameter, and burn test results | choose wood wick size for burn performance instead |
| Clip fits but the holder cannot span the jar | Tool fit is the next failure point | Vessel opening and holder span | Move from clip fit to centering-tool fit |
Use the supplier’s listed tab and clip measurements when they are available, and keep the measurement unit consistent while comparing parts. The lowest-risk buying check is simple: the tab should fit the slot, the clip should sit flat, and the wick should not wobble dry.
How to use this table: treat each row as a setup observation, not a burn-performance promise. Clip fit is only one part of broader wick types and sizing decisions, because the clip keeps the wood wick upright while the wick size still needs its own burn-test path.
Before buying separate clips, check whether your wood wick tabs are already paired with compatible clips. Product bundles can reduce mismatch risk, so compare compatible wood wick kits when you want the wick and metal base supplied as a matched set.
Check Whether the Wood Wick Tab Sits Snugly in the Clip
Wood wick tab fit is the way the wick base sits inside the metal clip without wobble, slant, or forced pressure.
The tab should sit fully inside the clip without needing glue to correct movement. A snug fit supports vertical alignment before the wax is poured, while a loose tab can lean even when the centering holder looks correct from above.
| Fit type | What it looks like | Why it matters |
| Snug fit | Tab sits fully in the slot and the wick stands straight | Best setup condition for a stable pour |
| Loose fit | Tab moves side to side or front to back | Wick can lean at the base before the holder helps |
| Forced fit | Tab bends, twists, or needs pressure to insert | Pressure can hide poor compatibility and create slant |
| Misaligned fit | Wick sits in the clip but does not rise straight | Centering from above will not correct the base angle |
A wood wick tab is the base piece that connects the flat wood wick to the metal clip. The clip holds that base against the vessel bottom, while the holder above the jar keeps the wick from drifting during the pour.
Do not treat a wick sticker as a fix for a loose tab. A sticker can hold the clip to the vessel base, but it does not remove wobble between the tab and the clip.
If you are trying to assemble or crimp wick tabs, use a separate assembly process; here, the only question is whether the finished tab-and-clip connection is stable enough for pouring. If the wick is stable before pouring but bends, curls, mushrooms, or changes during the burn, troubleshoot wood wick burn behavior instead of replacing clips at random.
Choose Pre-Tabbed Wicks When You Want Fewer Setup Variables
Pre-tabbed wood wicks reduce one setup variable because the wick and metal clip arrive already paired, but they still need a centering tool and burn test.
Use pre-tabbed wicks when your main problem is mismatch between loose tabs, tight clips, and beginner setup errors. Use self-tabbed wicks when you need more control over wick choice, but expect to verify the finished fit before every pour.
| Choice | Clip match risk | Setup effort | Beginner fit | Still needs centering tool? | Still needs burn testing? |
| Pre-tabbed wood wick | Lower, because the wick and clip are paired | Lower | Better for first batches | Yes | Yes |
| Self-tabbed wood wick | Higher, because you choose and fit parts yourself | Higher | Better after practice | Yes | Yes |
Pre-tabbed does not mean burn-tested for your vessel, wax, fragrance, or dye. It only means one physical connection has fewer ways to fail before the pour.
Do a Dry Wobble Test Before Pouring
A dry wobble test checks whether the wood wick moves inside the clip before wax is poured.
If the base wobbles dry, it is not stable enough for pouring. A stronger centering holder cannot fully fix movement that starts at the tab and clip connection.
Dry wobble test:
- Insert the wood wick into the clip.
- Place the clip flat on the vessel base.
- Gently tap the wick from the front and side.
- Check side-to-side movement.
- Check front-to-back movement.
- Reject loose, forced, or tilted seating before adding wax.
| Test result | What it means | Fix before pouring |
| Wick stays upright | Clip and tab connection passes the dry check | Move on to the centering holder |
| Wick rocks inside the clip | Tab or slot fit is loose | Replace the clip or use a matched pre-tabbed wick |
| Wick springs back from pressure | Fit may be forced | Choose a better-matched clip |
| Clip lifts or sits unevenly | Base contact is unstable | Reposition, replace, or check the vessel base |
Once the tab and clip pass the dry check, the next decision is whether the holder above the jar can keep that same wood wick upright through pouring and early cooling.
Pick the Centering Tool That Holds the Wick Upright, Not Just Centered
For wood wicks, a centering tool must hold the wick upright as well as centered across the vessel opening.
Choose a centering tool that controls three things at once: top-down position, side-view vertical alignment, and rim support. A holder that only marks the middle of the jar can still let a flat wood wick lean while the wax is poured or cooled.
| Centering tool type | Best for | Vertical support | Vessel span | Rim grip | Beginner suitability | Tilt risk |
| Centering bar | Straight single-wick setup | Medium to high if the slot fits the wick | Fixed or limited span | Depends on rim contact | Good | Low to medium |
| Bow-tie holder | Simple small jars | Medium | Limited span | Usually rests on rim | Good | Medium if the wick can lean in the opening |
| Wick holder clip | Extra grip around the wick | High if it holds the flat wick firmly | Depends on clip style | Often stronger than a flat bar | Good | Low if it does not pull the wick sideways |
| Adjustable holder | Mixed vessel sizes | Medium to high | Best for variable openings | Depends on adjustment and rim shape | Good after one setup check | Low to medium |
| Temporary DIY holder | Test or one-off pours | Low to medium | Depends on material | Often inconsistent | Acceptable for testing | Higher if it slips or twists |
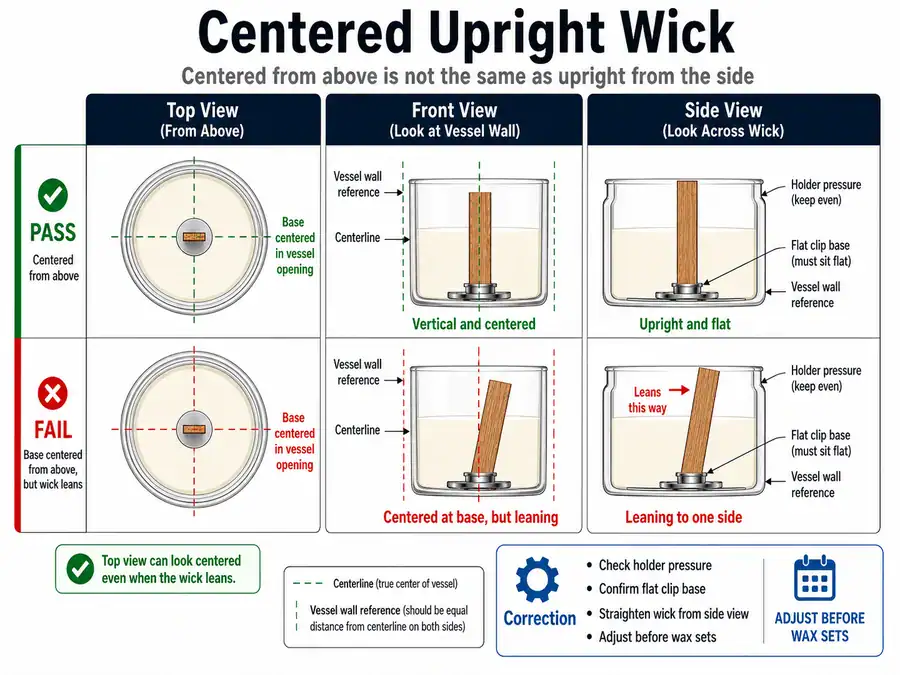
A wood wick can be centered from above and still lean from the side. For wood wicks, “centered” means the base sits in the planned spot and the flat wick stands upright enough to cure straight.
A centering bar is better than a clip only when it spans the vessel securely and holds the wick vertical. A wick holder clip is better when the flat wick needs direct side support, but it can still fail if it pulls the wick off center or does not fit the vessel opening.
A DIY holder can work for a test candle when it keeps the wick straight, rests securely on the rim, and stays in place during cooling. It is a poor choice when it only pinches the wick loosely or balances across the jar without grip.
If you need to center cotton or non-wood wicks, use different centering methods because cotton wicks bend and sit in holders differently. Wood wicks need extra attention because the flat wick can look centered while still leaning.
Measure the Vessel Opening Before Choosing a Holder
For centering tools, vessel size means the usable rim-to-rim opening the holder must span or grip, not the candle’s wax weight or burn diameter.
Measure the vessel opening before choosing the holder because the tool must reach across the jar and stay stable while the wick remains upright. Vessel volume and wax fill amount do not tell you whether a centering bar will fit the rim.
Measurement steps:
- Measure the usable opening from rim to rim.
- Check whether the rim is flat, rounded, thick, or uneven.
- Compare the opening to the holder’s span.
- Confirm the holder has stable resting points.
- Test the holder dry before adding wax.
| Vessel condition | Holder risk | Recommended check |
| Narrow opening | Tool may crowd the wick | Check whether the slot holds the wick straight |
| Wide opening | Tool may not span the jar | Compare opening width to holder span |
| Rounded rim | Holder may slide | Test rim grip before pouring |
| Thick rim | Holder may sit unevenly | Check resting points on both sides |
| Irregular handmade vessel | Holder may twist | Use a dry setup test from front and side |
If the main task becomes jar selection, wax volume, or burn diameter, choose the right candle vessel size in a separate vessel decision path. Here, the vessel only matters because its opening affects holder span, rim contact, and wick stability.
Check Holder Grip on the Jar Rim
The holder should not slide, twist, or pull the wood wick off vertical; stable means secure support, not forceful pressure.
A loose holder lets the wick drift during pouring, while a too-tight holder can pull the wood wick into a slant. The best holder grips or rests evenly enough to keep the wick upright without bending the flat wick.
| Holder grip condition | What you see | What it means | Fix |
| Loose | Holder slides when touched | Rim contact is weak | Use a better-fitting or adjustable holder |
| Stable | Holder stays level and wick remains upright | Good setup condition | Keep it on through pouring and early cooling |
| Too tight | Wick is pulled, twisted, or angled | Grip is distorting alignment | Reposition or change holder type |
| Uneven | One side of the holder sits higher | Rim shape or tool span is mismatched | Test another holder or vessel-compatible tool |
| Slipping after pour | Wick was stable dry but moves later | Pour motion or cooling support is weak | Leave support in place longer and recheck alignment |
Tool choice belongs inside broader wick types and sizing decisions only when the reader needs the parent view of wick setup. For this page, the holder’s job is narrower: keep the wood wick centered, upright, and supported until the wax can hold it in place.
After the clip, tab, holder span, and rim grip all pass the dry setup checks, the next problem to catch is the wick that looks centered from above but leans before the wax sets.
Fix the “Centered but Leaning” Problem Before the Wax Sets
A wood wick can be centered in the jar and still be wrong if it is leaning instead of standing upright.
Fix the lean before the wax sets by checking both views: the base position from above and the wick posture from the side. Centered means the wick is in the planned spot; upright means the flat wood wick stands straight enough to cure without a visible tilt.
| What you check | Pass | Fail | Fix before the wax sets |
| Top view | Wick base sits in the planned center point | Base is off-center | Reposition the clip before pouring or while wax is still liquid |
| Front view | Wick rises straight from the base | Top leans left or right | Adjust the holder and clip together |
| Side view | Wick stays vertical from another angle | Wick looks straight from one side but tilted from another | Rotate the vessel and correct the angle |
| Holder pressure | Holder supports the wick without pulling it | Holder bends or twists the wick | Change holder position or holder type |
| Clip base | Clip sits flat on the vessel bottom | Clip rocks or sits at an angle | Reset the base before the wax firms |
| Burn stage | Tilt happens before or during curing | Wick curls, mushrooms, or changes during burning | Use the wood wick troubleshooting guide |
Vertical alignment means the wick stands straight from the vessel base through the vessel opening. It is different from top-down centering because a wick can be placed in the middle and still lean from side pressure, loose clip fit, or weak holder grip.
Use this quick alignment check before the wax hardens:
- Look straight down and confirm the base is centered.
- Look from the front and check whether the wick is vertical.
- Rotate the vessel and check the side view.
- Compare the wick angle to the vessel wall.
- Check whether the holder is pulling the wick sideways.
- Check whether the clip is flat on the vessel base.
- Adjust the clip and holder while the wax can still move.
If the question is flame height, melt pool width, or wick width, use the wood wick sizing guide because visual alignment does not choose burn size. When the issue is simply how this wick setup fits into broader wick types and sizing decisions, keep the distinction clear: clip and holder choices stabilize the wood wick, while burn performance needs its own test path.
Keep the Holder On Through Pouring and Early Cooling
Pour-stage stability means the clip and centering tool keep the wood wick upright during pouring, topping off, and early cooling, not just during dry setup.
The holder should stay in place until the wax is stable enough that the wick no longer moves. Removing support too early can let a straight wick drift after it looked correct at the start.
Use this pour-stage sequence:
- Dry-fit the wood wick tab and clip.
- Attach the clip flat to the vessel base.
- Place the centering holder across the opening.
- Pour carefully so the stream does not push the wick.
- Recheck the wick immediately after pouring.
- Recheck again after topping off.
- Leave the holder in place through early cooling.
| Symptom | Likely setup cause | Check first | Fix |
| Wick was straight before pour, then leaned after pour | Pour movement disturbed the wick | Holder position and clip base | Reset while wax is still liquid |
| Wick shifts after topping off | Added wax moved the wick | Holder grip and wick angle | Recheck after each top-off |
| Wick leans as wax cools | Support was removed too early | Whether the holder stayed in place | Leave support on longer next time |
| Wick moves but wax surface has defects too | Wax issue may be separate | Sinkholes, adhesion, cracking, or fragrance-related cure defects | Use the candle wax troubleshooting guide |
| Whole pouring process feels unclear | Setup steps may be too broad for this decision | Pour order and basic candle process | Use the beginner candle making guide |
| Wick changes only during burning | Cause may not be clip or holder choice | Curling, mushrooming, flame behavior, or crackle changes | Use the wood wick troubleshooting guide |
The holder can prevent wick movement during pouring and early cooling, but it cannot fix wax formula problems, cure defects, or a wick chosen for the wrong burn diameter.
Recheck the Wick While the Wax Is Cooling
A wood wick can shift after pouring while the wax is still liquid or semi-set, so the holder should stay in place through early cooling.
A straight wick before pouring is only the first check. The final setup check happens while the wax is cooling, because movement can appear after the pour stream, top-off, or holder removal changes the wick position.
Common troubleshooting phrasing: “My wood wick was perfectly straight when I poured, but now it’s tilted after cooling. Did I pull the holder off too early, or is this a wax issue?”
| Symptom | Likely setup cause | What to check | Fix | Route if not fixed |
| Straight before pour, tilted after cooling | Holder removed too early or support did not resist movement | Holder timing and wick angle during early cooling | Keep support longer and recheck before wax sets | Candle wax troubleshooting guide or wood wick troubleshooting guide |
| Straight after pour, leaning after top-off | Added wax disturbed the wick | Top-off flow and holder grip | Recheck after topping off | Beginner candle making guide |
| Wick leans while holder is still on | Holder may be pulling the wick | Holder slot and rim contact | Reposition or change holder | Wood wick troubleshooting guide |
| Wick shift appears with sinkholes or adhesion issues | Wax defect may be involved | Whether wax movement is the main problem | Keep wick support stable, then review wax defect causes | Candle wax troubleshooting guide |
If the candle has sinkholes, adhesion problems, cracking, frosting, or fragrance-related cure problems, route the wax issue away from clip and holder selection. If the wood wick is still physically moving during setup or cooling, keep working through the clip, holder, and cooling support checks before the wax sets.
Use This Clip-and-Tool Compatibility Checklist Before You Pour
A wood wick setup is compatible only when the wick tab, clip, vessel opening, centering holder, and cooling support all work together before the wax sets.
Compatible means the parts work together as a physical setup. It does not mean the candle is burn-tested, the flame is correct, the wax formula is fixed, or the vessel is right for every wick.
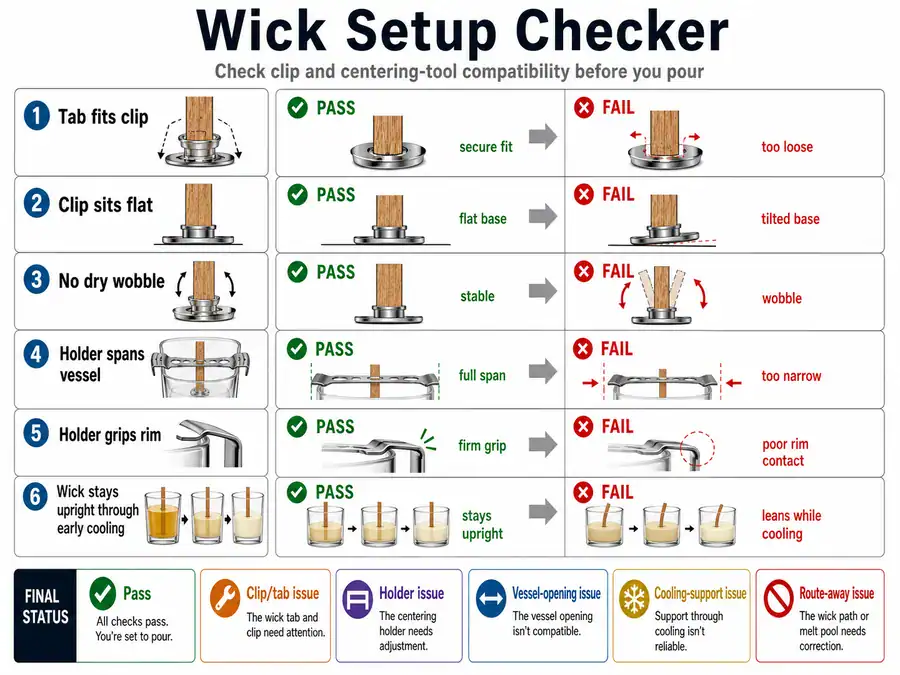
Use this pass-or-fail checklist before buying supplies or pouring wax:
| Compatibility check | Pass condition | Fail action |
| Wood wick tab fits the clip | Tab sits fully in the clip without wobble or force | Replace the clip or choose a pre-tabbed wick |
| Clip sits flat on the vessel base | Metal base does not rock or tilt | Reset the clip or choose a better-fitting base |
| No dry wobble at the tab and clip connection | Wick stands straight when tapped gently | Change clip, tab, or pre-tabbed wick format |
| Holder spans the vessel opening | Tool reaches the rim and supports the wick | Remeasure the opening or choose a wider holder |
| Holder grips or rests securely on the rim | Holder does not slide, twist, or pull the wick | Choose an adjustable or better-fitting holder |
| Wick is centered from above | Base is in the planned position | Reposition before wax firms |
| Wick is upright from the side | Flat wick rises straight, not angled | Adjust holder pressure and clip position |
| Holder remains during pour and early cooling | Wick stays supported while wax can still move | Leave support in place longer |
| Setup does not need multi-wick spacing help | Single-wick setup only needs clip and holder stability | Use multi-wick candle layout if wick count or spacing is the real issue |
| Burn-size question is separate | Clip and holder checks do not choose flame size | Use the wood wick sizing guide |
The fastest dry-fit check is to assemble the wick, clip, vessel, and holder before adding wax. That dry setup should show whether the clip fits, the holder spans the vessel, and the wick can stay centered and upright without hand support.
Wood Wick Clip + Centering Tool Compatibility Checker
Use this checker as a plain setup decision tool before pouring:
The checker should return one setup status: pass, clip/tab issue, holder issue, vessel-opening issue, cooling-support issue, or route-away issue.
| Input | What to enter or observe | Good result | Failed result |
| Wood wick tab width | Does the tab fit the clip slot? | Fits without wobble or force | Loose, forced, or crooked fit |
| Clip slot fit status | Does the wick stand straight in the clip? | Upright during dry fit | Leans before wax is added |
| Vessel opening diameter | Can the holder span the usable rim opening? | Holder reaches and rests securely | Holder is too short or unstable |
| Centering tool span | Does the tool support the wick across the jar? | Stable across the opening | Slips, twists, or balances poorly |
| Holder grip status | Does it hold without pulling the wick sideways? | Firm but not forceful | Too loose or too tight |
| Tilt timing | When does the wick start leaning? | No lean before wax sets | Lean before pour, during pour, or after cooling |
| Base wobble | Does the clip rock or shift? | Base stays flat | Base moves or tips |
| Holder slip | Does the holder move during pour or cooling? | Holder stays in place | Holder slides or lifts |
| Checker output | What it means | Next action |
| Compatible setup status: pass | Parts work together physically before the wax sets | Pour while keeping the holder in place |
| Likely issue: clip or tab | Lean starts before pouring | Replace clip, use a matched pre-tabbed wick, or review finished tab fit |
| Likely issue: holder span or grip | Wick moves when the holder is added | Choose a wider, steadier, or better-fitting holder |
| Likely issue: vessel opening | Holder cannot span or grip the rim | Use the candle vessel sizing guide for jar-fit decisions |
| Likely issue: cooling support | Wick shifts after pour or top-off | Keep holder on through early cooling and recheck alignment |
| Bridge recommendation: wax defect | Tilt appears with sinkholes, adhesion issues, cracking, or frosting | Use the candle wax troubleshooting guide |
| Bridge recommendation: product bundle | Separate parts create repeated mismatch | compare compatible wood wick kits that disclose clip, tab, holder span, and vessel fit |
| Bridge recommendation: parent wick decisions | The setup question becomes broader than wood wick clip and holder fit | Use broader wick types and sizing decisions to place the problem correctly |
Product bundles are useful only when they disclose the parts that matter: clip fit, tab size, holder span, and vessel compatibility. A kit that hides those details may still leave the same wobble, span, or grip problem unresolved.
A checklist can prevent many tilted wood wicks, but it cannot replace burn testing or diagnose wax chemistry. Failed checks should lead to the right next action, not a bigger candle-making detour.
Diagnose the Tilt Cause Before Replacing the Clip or Holder
Before replacing a wood wick clip or centering holder, identify when the wick starts tilting and which part of the setup is moving.
Tilt cause separation means sorting the lean by timing and movement source. A wood wick can lean because the tab wobbles in the clip, the holder slips on the rim, the vessel opening is too wide for the tool, the wax moves during cooling, or the wick behaves differently during burning.
Common troubleshooting phrasing: “My wood wick keeps leaning even though it’s centered. How do I tell if the clip is loose, the holder is slipping, or the wick itself is the problem?”
Use timing first:
| When the wick tilts | Most likely cause | First check | Fix | Bridge if not fixed |
| Before pouring | Loose tab fit or base wobble | Does the wick move inside the clip when tapped dry? | Replace the clip or use a matched pre-tabbed wick | Return to the compatibility checklist |
| When the holder is added | Holder pressure or poor vertical alignment | Does the holder pull the flat wick sideways? | Reposition the holder or choose one with better wick support | Return to the compatibility checklist |
| During pouring | Pour stream or weak holder grip moved the wick | Did the holder stay level while wax entered the vessel? | Pour more gently and keep the holder in place | Return to the compatibility checklist |
| After cooling | Support was removed too early or wax movement shifted the wick | Was the wick still upright during early cooling? | Leave the holder on longer and recheck before wax sets | Use the candle wax troubleshooting guide if wax defects appear |
| During burning | Burn-stage behavior, not clip choice | Is the wick curling, mushrooming, crackling differently, or changing after ignition? | Stop diagnosing clip size as the main cause | Use the wood wick troubleshooting guide |
| In a wide vessel | Holder span may be too short or unstable | Does the tool reach and grip the rim? | Choose a holder that fits the vessel opening | Use the candle vessel sizing guide |
| With multiple wood wicks | Spacing and burn design may be the real issue | Are you deciding wick count, spacing, or flame interaction? | Keep clip fit stable, then route the layout question | Use multi-wick candle layout |
| When burn size is unclear | Wick width selection may be the real issue | Are you asking which wick burns correctly? | Separate burn size from clip and holder fit | Use the wood wick sizing guide |
Keep the problem inside broader wick types and sizing decisions only when you need the parent view of wick setup. For this section, the decision is narrower: replace the clip for base movement, replace or adjust the holder for top-support movement, and route away when burn behavior, wax defects, vessel choice, or multi-wick planning is the real cause.
After diagnosis, return to the clip-and-tool compatibility checklist and retest the failed condition before pouring the next candle.