
Candle additives are ingredients mixed into wax to change how a candle performs or looks, and they are useful only when testing shows a clear benefit without unacceptable tradeoffs.
On this page, a candle additive is a modifier added to the base wax system; fragrance oil, standard candle dye, and decorative inclusions are treated as separate components. Safe use means following supplier documentation, controlling the dose, and testing the finished candle; it does not mean universal toxicology or legal approval. The best additive suits the target result, wax, and candle format; too much means the dose creates unacceptable tradeoffs, while cost-effective and stable describe only measured value and the conditions tested. This page explains whether an additive is needed, which family suits the formula, the first documented dose to test, and the main tradeoffs to watch.
Which additive category fits the result you want?
A candle additive changes wax performance or appearance, and the right category depends on the goal, wax, candle format, and whether the formula needs another ingredient.
Here, best means the best match for that formula and target, not the best choice for every candle. A pre-blended wax already contains ingredients selected by the manufacturer, so another additive may make it perform worse rather than better. Choose waxes and additives according to their suitability for the candle type instead of applying one ranking to every formula.
Which common candle additive families match each performance goal?
Common additive families provide options to assess, not ready-made recipes; the supplier’s intended use, grade, dosage, wax fit, and candle format determine whether a material belongs in a test.
| Desired result | Formula clue | Category to assess | Example additive family to verify | Main tradeoff to test |
|---|---|---|---|---|
| Harder candle | Soft pillar wax | Hardness modifier | Stearic acid or a supplier-listed high-melt hardener | Brittleness or changed burn |
| Better mold release | Wax stays flexible | Structure modifier | Stearic acid or a supplier-listed pillar structure modifier | Shrinkage or extra pours |
| More fragrance retention | Oil separates from wax | Retention additive | Polymer retention additive or a suitable Vybar grade | Fragrance may become trapped |
| Less color fading | Dyed candle in bright light | UV stabilizer | Supplier-listed ultraviolet inhibitor | Fading may slow, not stop |
| Smoother surface | Rough or uneven top | Crystal-control additive | Microcrystalline wax or a wax-specific crystal modifier | Cooling may be the real cause |
| Less frosting | Vegetable-wax formula | Appearance modifier | Wax-specific soy or vegetable-wax modifier | Opacity or texture may change |
| More opacity | Translucent candle | Opacifying additive | Stearic acid or a supplier-listed opacifier | Color and burn may shift |
| Better container adhesion | Wax pulls from glass | Flexibility modifier | Microcrystalline wax or a supplier-listed flexibility modifier | Candle may become too soft |
| Changed burn behavior | Confirmed formula problem | Burn modifier | Only a supplier-specified burn modifier for the chosen wax | Wick may need retesting |
| No missing result | Formula already passes | No additive | None | No added tradeoff |
Method note: This chooser sorts additives by the result they are meant to change. Each row gives you an option to test, not a finished recipe. A control batch uses the same formula without the new additive, making it possible to judge one changed variable at a time.
Do not select an additive just because you recognize its name or have seen another maker use it. Name the missing result, check that the category suits the wax and candle format, and read the supplier’s stated use before running a test.
Start with the result you need, then check the formula fit before adding another ingredient to the candle.
When no additive is the better choice
No additive is the better choice when the wax already meets the goal, the problem has not been diagnosed correctly, or a pre-blended wax still needs a clean baseline test.
Better means reaching the target with fewer tradeoffs, lower cost, and test results that are easier to interpret. Another ingredient does not make a formula more advanced, and many pre-blended waxes are designed to work without added modifiers.
| Scenario | Decision | Reason | Next test |
|---|---|---|---|
| Base wax meets the target | Skip additive | No clear gain is needed | Repeat the base batch |
| Pre-blended wax is untested | Test first | It may contain modifiers | Test it as supplied |
| Problem followed a wick change | Test first | Wick may be the cause | Restore the prior wick |
| Problem followed added fragrance | Test first | Fragrance may be the cause | Restore the prior load |
| Pillar wax is clearly too soft | Assess additive | Goal matches a structure change | Change one variable |
| Surface flaw varies by batch | Test first | Cooling may be involved | Hold process conditions fixed |
| Supplier gives no use guidance | Skip additive | Fit and limits are unclear | Choose documented material |
| Additive has no named purpose | Skip additive | There is no testable goal | Define the target |
| One additive trial failed | Reset first | Category or dose may be wrong | Return to the baseline |
| Several additives were stacked | Remove extras | Effects cannot be isolated | Rebuild one change at a time |
Method note: This decision checks the wax status, the current problem, and whether the formula has a clean baseline. “Use” requires a matching outcome, “test first” marks an unresolved cause, and “skip” means another ingredient would create more uncertainty than useful evidence.
Keep the formula unchanged when it already works, and return to a no-additive control when the cause of a problem is unclear.
How do you screen a candle additive for safe use?
Screen a candle additive for safe use by checking its intended candle use, supplier documents, controlled dosage, and finished-candle test results.
Here, safe means the additive has a stated candle-formulation use, supporting supplier documents, a controlled dose, and acceptable burn-test results. It does not mean the material is universally safe, legally accepted everywhere, safe for general household use, or low risk simply because it is natural.
Formulation additives are ingredients intended to change wax performance. Dried flowers, leaves, herbs, and wood placed near the flame are decorative inclusions, not formulation additives. The National Candle Association has reported that botanical material near the burn path can create a fire hazard.
| Additive case | Main screening failure | Decision |
|---|---|---|
| Dried botanicals enter the melt pool | Flammable decoration reaches the burn path | Do not use |
| Loose craft glitter has no candle-use specification | Decorative material is treated as an additive | Do not use |
| A natural powder has no supplier documents | Origin does not establish formula fit | Do not use |
| The product has an SDS but no candle-use statement | Handling data does not confirm intended use | Test first or reject |
| Candle use is stated, but dosage guidance is missing | A safe test amount cannot be selected | Ask the supplier first |
| Use and dose are documented, but wax fit is unknown | Compatibility remains uncertain | Test first |
| Several new ingredients are added together | The additive’s effect cannot be isolated | Reset the test |
| The additive passes a controlled test | The target improves without a new failure | Use at the tested dose |
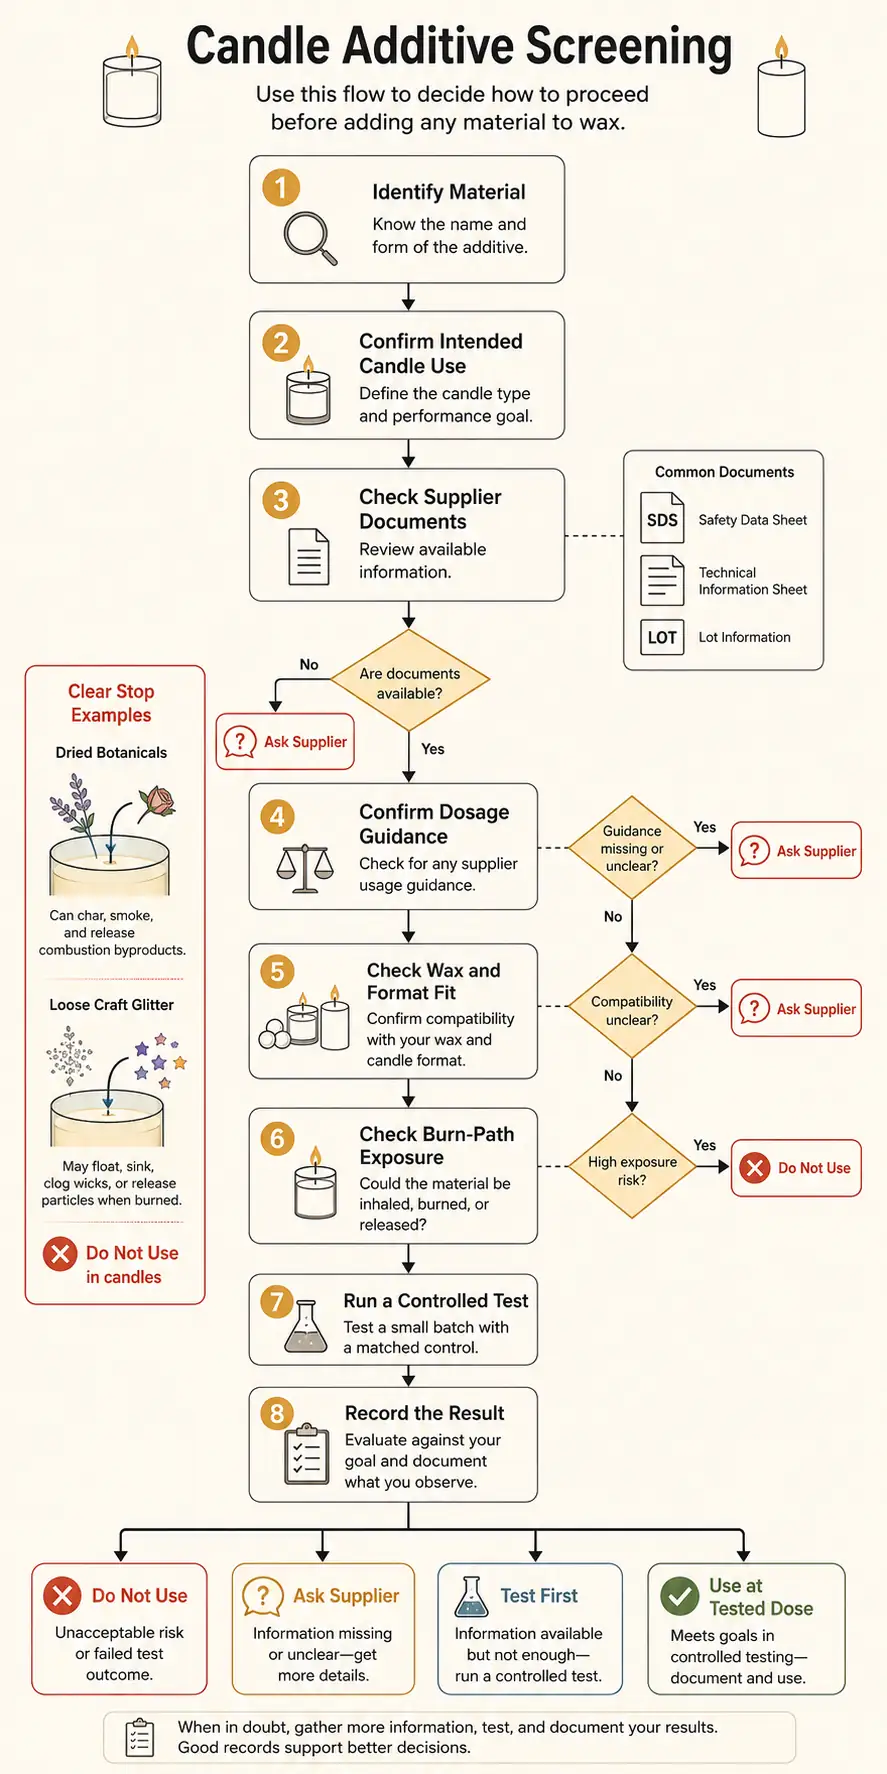
A Safety Data Sheet (SDS) identifies a material and describes hazards, handling, storage, exposure controls, and related safety information. It does not prove that the additive will improve a candle or burn correctly in a chosen formula.
Method: This screening model checks intended candle use, supplier documents, burn-path exposure, and a controlled test. Reject the material when you cannot confirm its identity or intended use.
First identify the material, read its documents, confirm its intended use, choose a controlled dose, and compare the finished candle with an unchanged batch. Questions about regional law need a separate review for the relevant jurisdiction.
Supplier files serve different purposes: an SDS covers identity, hazards, handling, and storage; a technical sheet covers intended uses, properties, limits, or processing; and a Certificate of Analysis may provide lot-specific conformity or results. None of these documents shows that an additive will improve every wax, wick, fragrance, or candle format, so the formula still needs a controlled comparison.
A testable claim identifies the candle outcome, comparison condition, observation method, and pass rule. You can compare claims such as reduced frosting or increased hardness with an unchanged control, while claims such as “professional grade,” “makes candles better,” or “works in all waxes” have little value without a measurable result.
How much additive should you use before it becomes too much?
Measure a candle additive against the wax weight, begin with the supplier’s lowest stated rate, and stop increasing the dose when new tradeoffs appear.
An additive dose is the additive weight divided by the wax weight, usually shown as a percentage. “Too much” means the dose causes appearance, burn, scent, stability, or cost problems; it is a formula-performance threshold rather than one percentage or legal limit for every additive. Treat the supplier’s maximum as an upper boundary, not the normal starting rate.
Use this calculation when the supplier gives the dosage as a percentage:
Additive dose (%) = additive weight ÷ wax weight × 100
| Dose stage | Basis | What to check | Decision |
|---|---|---|---|
| Control | No new additive | Current appearance, burn, scent, and stability | Keep as the comparison |
| Starting rate | Lowest suitable supplier-stated rate | Does the target result improve? | Keep, retest, or step up |
| Next test rate | Next documented dose step | Is the gain larger without a new defect? | Retest under equal conditions |
| Warning band | Any rate that introduces a new tradeoff | Surface, burn, scent, mixing, or cost change | Stop increasing the dose |
| Upper boundary | Supplier-stated maximum | Has the lower dose already passed? | Do not use as the automatic target |
| Reject point | Outside intended use or stated range | Product fit and limits cannot be supported | Reject the test plan |
More additive does not automatically produce a better result. The useful effect may appear below the supplier maximum, while a higher dose may bring only a small gain, a new defect, or extra expense.
Signs of overuse can include unexpected softness or brittleness, oil migration, altered opacity, poor dispersion, unstable appearance, changed burn behavior, or weaker scent performance. A symptom that begins after a dose increase is a warning sign, but it does not prove the additive is the only cause.
Method: The table uses decision bands instead of one dosage range for every additive. Take the starting rate and upper limit from the supplier’s technical specification. Compare matched candles under equal conditions, then judge the finished candle rather than the ingredient dose by itself.
Keep the lowest documented dose that meets the target, and stop increasing it when the next step creates a defect or adds little useful improvement.
How do you find the smallest dose that still works?
The minimum effective dose is the lowest tested additive level that reaches the target without creating unacceptable tradeoffs.
Here, optimal dose means the lowest dose worth keeping, not the highest amount the supplier allows. The starting rate is only the first comparison point. Keep the final rate only when the result repeats, the added cost is acceptable, and no new formula problem outweighs the benefit.
| Ladder step | Test result | Action |
|---|---|---|
| Control | Target already met | Keep the formula without the additive |
| Lowest stated rate | Target met with no new defect | Keep this dose |
| Lowest stated rate | Partial gain with no new defect | Retest or move one documented step |
| Next documented rate | Clear added gain with acceptable tradeoffs | Compare with the lower passing dose |
| Higher rate | Small gain but higher cost or new weakness | Keep the lower dose |
| Any rate | New burn, appearance, scent, or stability failure | Stop and reset |
| Repeated rates | No useful improvement | Reject the additive for this formula |
Use the same unchanged formula throughout the ladder. Keep the wax, fragrance, dye, wick, vessel, mixing method, cooling conditions, and evaluation timing fixed so the dose is the only planned change.
Compare every step with a written pass rule. For example, a dose may pass only when it produces the required appearance or handling result without adding a burn, scent, stability, or cost problem.
Method: This ladder uses only supplier-listed rates and equal comparison conditions. It does not set one additive range for every product. Record the dose, batch conditions, target result, new defects, and final keep-or-stop decision for each test.
Choose the first dose that passes every required check; replace it with a higher dose only when the added benefit is clear and repeatable.
Which additives fit your wax and candle format?
Base pillar wax may suit a structure modifier, container wax needs care with added firmness, pre-blended wax should be tested unchanged, and undocumented materials should be rejected.
Compatibility means an additive reasonably suits the stated wax system without causing problems that outweigh its benefit. “Works” means the material is suitable for controlled testing, not that it will give the same result in every formula.
| Wax or blend status | Candle format | Additive category considered | Screening decision | Reason |
|---|---|---|---|---|
| Base paraffin wax | Pillar | Structure or hardness modifier | Fit when supplier-supported | The goal may match the format’s firmness needs |
| Base paraffin wax | Container | Structure or hardness modifier | Test first | Extra firmness may not help the container formula |
| Base soy wax | Container | Crystal or appearance modifier | Test first | Surface changes depend on the full formula |
| Base soy wax | Pillar | Structure modifier | Test first | The wax must meet freestanding shape needs |
| Coconut-rich blend | Container | Hardness modifier | Test first | A softer blend may change more than one result |
| Beeswax formula | Freestanding | Added hardener | Avoid without stated support | The extra ingredient may be unnecessary |
| Pre-blended container wax | Container | Any extra enhancer | Test as-is first | The blend may already contain performance choices |
| Pre-blended pillar wax | Pillar | Structure modifier | Test as-is first | Added firmness may duplicate the blend’s design |
| Any documented wax | Either | UV or appearance stabilizer | Test first | Light and appearance gains remain formula-dependent |
| Any wax | Either | Undocumented material | Avoid | Intended use, dose, and compatibility cannot be checked |
The table is a modeled screening dataset rather than a product recipe. “Fit” means the wax, candle format, and intended use match closely enough to support a controlled batch. “Test first” marks an unresolved formula condition, while “avoid” marks missing support or a poor match between the ingredient and its purpose.
Pre-blended wax warning
A pre-blended wax is sold with built-in formulation choices that may already change hardness, appearance, or burn behavior.
| Check | Action |
|---|---|
| The label says ready-to-use, enhanced, or pre-formulated | Test the wax as supplied |
| Supplier notes describe built-in performance features | Record those features before adding anything |
| The supplier discourages extra additives | Do not stack another enhancer |
| Blend contents or intended use are unclear | Request technical information before testing |
| The as-is batch already meets the goal | Keep the formula unchanged |
| The as-is batch misses one named goal | Assess one matching additive category |
A maker may want to customize a wax even when the formula does not need an additive. Adding another modifier before testing an unchanged baseline can hide the real cause of a problem and raise the cost without showing a measurable gain.
Method: Compare the wax family, supplier-stated use, blend status, candle format, and additive purpose. Keep the fragrance, dye, wick, and process conditions fixed when the additive is the variable being tested.
Compatibility helps narrow the test plan, but it cannot replace a finished-candle test.
Why container and pillar candles need different additive logic
Container and pillar candles need different additive decisions because their structural support, release requirements, and burn conditions differ.
Format constraints are the physical requirements that change how you judge an additive. Copying the same additive plan means using the same category, dose logic, and expected result across formats, even when those choices do not suit both candles.
| Decision point | Container candle | Pillar or freestanding candle | Additive implication |
|---|---|---|---|
| Physical support | The vessel supports the wax | The candle must hold its own shape | Firmness may carry more weight for pillars |
| Hardness | Judged with adhesion, surface, and burn behavior | Judged with shape retention and handling | The same hardness target may not fit both |
| Release | The candle usually remains in its vessel | The candle must leave the mold cleanly | Release effects matter more for molded candles |
| Surface goal | Top finish and glass appearance may matter | Sidewalls, edges, and shape may matter | Visual pass rules should differ |
| Burn condition | The vessel contains the melt pool | The candle burns without container support | Each format needs its own finished test |
| Dose transfer | A passing jar dose applies only to that jar formula | A passing pillar dose applies only to that pillar formula | Do not copy the dose automatically |
A hardness modifier may help a soft pillar hold its shape but provide no useful gain in a container candle. A formula that works well in a jar may still be too soft or release poorly when used for a freestanding candle.
You can test the same additive category in both formats, but each format needs its own dose, success rule, and acceptable tradeoffs.
How do you test additives with a control batch?
An additive test batch changes only the additive while the wax, fragrance, dye, wick, vessel, process, cure time, and test conditions stay fixed.
A control batch uses the same formula without the new additive. “Tested” means both batches were prepared, cured, burned, observed, and recorded under matching conditions. Burning one candle without a control or written notes does not provide a valid additive comparison.
- Write the exact result the additive should change.
- Prepare the control and additive batches from the same wax lot where possible.
- Keep wax, fragrance, dye, wick, vessel, and process fixed except for the additive.
- Label both batches and use the same cooling and cure time.
- Burn and observe matched candles under the same conditions.
- Record the target result and new defects, then repeat the comparison before deciding.
Add the material at the stage and under the conditions stated for that additive and wax system, then keep that stage fixed during dose comparisons. Test a different incorporation time separately so timing and dose do not change in the same batch.
What counts as pass, retest, or reject?
A test passes when the additive reaches the target without an unacceptable tradeoff, needs retesting when the result is unclear, and fails when a new problem outweighs the gain.
“Pass” does not mean the candle is perfect. It means the candle reaches the written target and remains acceptable for every required appearance, scent, stability, and burn check.
| Outcome | Evidence | Decision |
|---|---|---|
| Target improves and no serious defect appears | Matched observations agree | Pass |
| Target improves, but results differ between matched candles | Repeatability is unclear | Retest |
| Control and test conditions differed or several variables changed | The comparison is invalid | Reset and retest |
| A serious burn or stability problem appears | The new failure outweighs the intended gain | Reject |
| A lower dose passes as well as a higher dose | Extra material adds no useful result | Keep the lower dose |
Write the pass rule before examining the result. This stops an attractive surface change from distracting you from worse burn performance or higher cost.
Is the additive worth the cost per batch?
An additive is worth its cost only when its repeatable benefit or reduction in waste is greater than the added expense and formula tradeoffs.
A working dose is the dose kept after testing confirms the intended benefit. Cost-effective means that dose produces a measurable gain or reduces failures or waste; it does not mean the package has the lowest purchase price.
Use the same weight units throughout the calculation. Convert kilograms to grams before multiplying when the package cost is listed per gram.
Additive weight used = wax batch weight × dose rate ÷ 100
Cost per batch = package price ÷ package weight × additive weight used
Cost per candle = cost per batch ÷ usable candles produced
The package price can be misleading because an expensive additive used at a low dose may cost less per batch than a cheaper additive used at a high dose.
| Test outcome | Cost meaning | Decision |
|---|---|---|
| Repeatable gain with no larger defect | Added cost buys a useful result | Keep |
| Same gain at a lower passing dose | The higher dose adds unnecessary cost | Keep the lower dose |
| No difference from the control | The added cost has no shown return | Reject |
| The benefit is inconsistent or creates a larger defect | Value is not repeatable or the loss exceeds the gain | Retest or reject |
Method: Calculate the cost from the supplier-stated package amount and the dose that passed testing. Compare that cost with the recorded performance change, usable output, and reduction in waste. Do not treat an unmeasured promise as a financial benefit.
Keep an additive when its repeatable benefit or reduction in waste is greater than the cost and tradeoffs it adds.
What problems can additives cause and how do you isolate them?
Treat a candle problem as additive-linked only after checking the control batch, wax, wick, fragrance, dye, timing, and process variables.
An additive-caused failure is a defect that appears after the additive is used and remains a plausible link after those checks. “Caused by the additive” can mean the additive is the main cause or one contributing cause; it does not automatically mean it is the only cause.
Additive Failure Check
| Symptom group | Possible additive link | Alternative cause to check | First isolation step |
|---|---|---|---|
| Sweating or oil migration | Dose exceeds formula compatibility or incorporation was incomplete | Fragrance load, heat exposure, or wax-fragrance fit | Return to the control formula and retest one lower dose |
| Weaker scent performance | The additive changes scent release or the dose is too high | Wick response, fragrance fit, process order, or cure time | Compare control and additive candles with the same fragrance and wick |
| Tunneling, soot, high flame, or mushrooming | The formula change affects fuel delivery or melt behavior | Wick size or fragrance load | Stop the test and compare matched control and additive candles |
| Frosting, discoloration, or unstable appearance | The additive affects crystal formation, color, or dispersion | Wax behavior, dye, cooling, heat, or light | Compare aged samples made under matching conditions |
| Cracking, softness, brittleness, or poor mold release | The additive changes hardness, shrinkage, or flexibility | Cooling rate, mold condition, wax choice, or pouring process | Repeat the same process without the additive |
| Grit, clumps, or settling | The additive did not disperse correctly | Incorrect addition stage or mixing conditions | Repeat the stated incorporation process at the same dose |
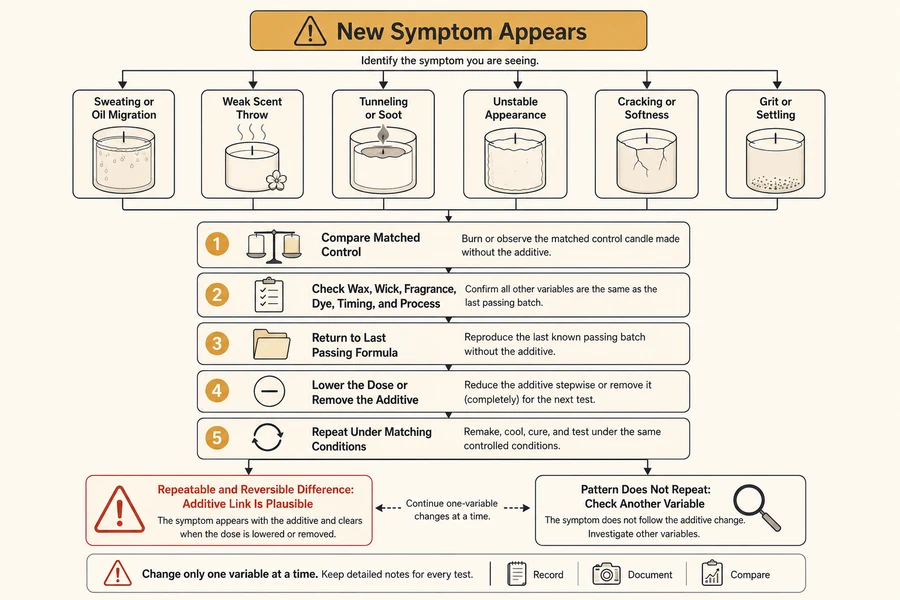
Do not diagnose the cause from timing alone. A problem that begins after you introduce the additive creates a question to test, not proof. The strongest sign is a repeatable difference between matched control and additive batches, followed by reversal when you remove the additive or lower its dose.
Method: This failure log groups symptoms that may be linked to additives and applies one-variable testing rules. It does not assign one cause to every case. A cause remains unconfirmed until a matched control and repeat test show the same pattern.
This section covers only whether a problem can be linked to an additive; it does not replace full wick, fragrance, storage, or general candle troubleshooting.
Return to the last passing formula, change one variable, and require a repeatable result before blaming the additive.
Changes to the fragrance, dye, wick, wax, temperature, vessel, cure time, or process can confuse an additive test, so record every changed variable and return to the last usable control. Keep the additive dose fixed while checking one nearby variable, or remove the additive to see whether the base formula already produced the symptom.
Stop adding modifiers when repeated patches hide the baseline, fix one symptom while causing a larger failure, or make cause-and-effect testing impossible. Change the underlying wax, fragrance load, wick, or candle format when removing the latest additive does not restore performance or the clean base formula repeatedly misses its main requirement.
Which appearance changes are worth the tradeoff?
Judge candle appearance changes by their effect on the whole formula, not by a smoother surface, less frosting, or a color shift alone.
Appearance stability describes how the surface, opacity, color, and finish hold after the additive is introduced and the candle cures and burns. “Improves the look” means the tested visual result gets better without a worse burn, stability, or cost result; it does not mean every candle becomes more attractive.
Controlled photo comparison: Photograph the control and additive samples from the same angle and distance, with the same lighting, cure stage, and burn stage. Label each image with its formula and dose so differences between unmatched samples are not treated as evidence.
| Appearance result | Tradeoff to check | Decision |
|---|---|---|
| Smoother top with unchanged burn and stability | Added cost and repeatability | Keep the lowest passing dose |
| Smoother top but weaker burn performance | Visual gain hides a larger loss | Reject or retest |
| Less frosting in the test sample | Whether the control shows the same change over time | Retest before assigning the result |
| Frosting appears in both samples | The wax or cooling conditions may be involved | Do not blame the additive |
| Slower color fading under matched exposure | Burn and formula stability remain acceptable | Keep when the result repeats |
| Color shift appears after additive use | The new shade may be an unwanted formula effect | Retest at a lower dose |
| Greater opacity suits the stated goal | Scent and burn results remain acceptable | Keep when repeatable |
| Greater opacity hides the intended color | The additive conflicts with the visual target | Reject |
| Cleaner finish appears in one sample only | The result may come from cooling or handling variation | Repeat the comparison |
| Better appearance requires a high dose | Cost or performance loss may outweigh the gain | Compare with the lowest useful dose |
Link a visual change to the additive only when matched samples show the same difference in repeated tests. Reject or retest an appearance gain that creates a larger burn, stability, scent, or cost loss, and stop raising the dose when the next step adds little visible benefit.
Keep the appearance change only when it repeats under matched conditions and the smallest effective dose passes every other required candle check.