
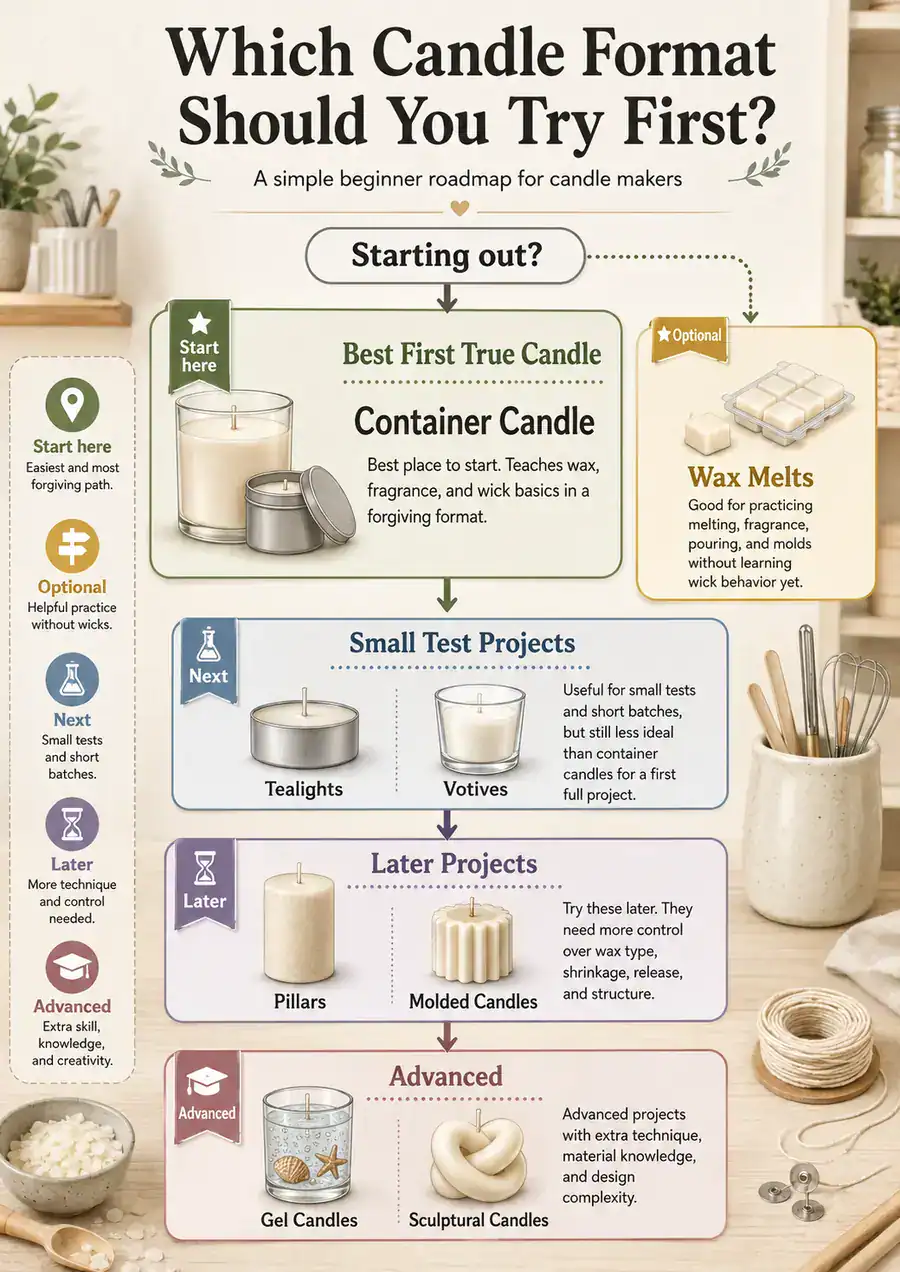
Most beginners in candle making should start with a simple container candle as their first true candle, while wax melts work as optional wick-free practice before using a flame.
A candle type means the finished format you attempt first, such as a container candle, tealight, votive, pillar, taper, molded candle, gel candle, novelty candle, sculptural candle, or wax melt practice project. It does not mean wax type alone.
This is a candle-making format decision guide, not a wax-type guide, full tutorial, wick-sizing guide, selling checklist, or candlestick-chart article.
For this guide, beginner means low setup complexity, fewer variables, forgiving testing, manageable safety friction, and lower failure cost. The easiest candle type to make is not always the easiest to test or safe to sell, so the best starting point is the format that teaches the most with the fewest early failure points.
How to Choose Your First Candle Type Without Guessing
A candle type is the finished candle format you make first, not the wax material alone. Choose your first candle type by comparing each format against difficulty, testing ease, safety friction, supply burden, failure cost, and forgiveness after beginner mistakes.
For this guide, a beginner is a first-time or early-stage maker who needs fewer variables, a simple setup, clear test results, and a low-cost way to repeat mistakes. That does not mean the cheapest candle, the prettiest candle, the most profitable candle, or the best candle to sell. Wax choice and wick testing still matter, but they are supporting decisions after the first format is chosen.
| Candle type | Difficulty | Testing ease | Setup burden | Safety friction | Failure cost | Beginner recommendation |
|---|---|---|---|---|---|---|
| Wax melts | 1/5 | 4/5 | Low | Low, no flame | Low | Best wick-free practice |
| Simple container candle | 2/5 | 4/5 | Low to medium | Medium | Low to medium | Best first true candle |
| Tealight | 2/5 | 3/5 | Low | Medium | Low | Useful for small tests |
| Votive | 3/5 | 3/5 | Medium | Medium | Low to medium | Useful after basic testing |
| Pillar candle | 4/5 | 2/5 | Medium to high | Medium | Medium | Better later |
| Taper candle | 4/5 | 2/5 | Medium to high | Medium | Medium | Better later |
| Molded candle | 4/5 | 2/5 | Medium to high | Medium | Medium | Better later |
| Gel, embedded, novelty, or sculptural candle | 5/5 | 1/5 | High | High | High | Save for advanced projects |
Methods note: These 1–5 scores are decision scores, not lab results. They rate each candle format by variable count, setup burden, material waste, observation simplicity, and repeatability for a first-time maker.
A simple container candle wins for most beginners because it teaches real wick and burn behavior without asking the wax to stand on its own. Wax melts can come before that when the maker wants to practice melting, measuring, pouring, cooling, and fragrance handling without a wick. Tealights and votives reduce waste, but their small size can make wick behavior more sensitive.
Use a beginner candle making guide for the full first-project path, then use a beginner candle wax choice guide when you are ready to match wax behavior to the format. Use wick testing for beginner candles after choosing a wicked format, because the format decides how demanding that wick test will be.
Start With a Simple Container Candle as Your First True Candle
A container candle is a wicked candle poured into a heat-safe vessel, so the container supports the wax while you learn the basic candle-making variables. Most beginners should start with a simple container candle because it teaches pouring, cooling, wick position, scent handling, and burn observation without adding freestanding shape problems.
“Safest” here means more contained and forgiving when the vessel is heat-safe and the wick is suitable. It does not mean risk-free, safe in any jar, or free from burn testing. A container candle still needs a stable container, a centered wick, careful heating, measured fragrance, and basic burn observation before you treat the result as successful.
| Format | Why beginners consider it | Main beginner drawback | Better first choice? |
|---|---|---|---|
| Simple container candle | Real candle behavior with container support | Still needs heat-safe vessel and wick testing | Yes, for most beginners |
| Wax melt | No wick or flame variable | Not a true wicked candle | Yes, as practice only |
| Tealight | Low wax waste per test | Small size can make wick behavior sensitive | Sometimes |
| Votive | Small and testable | Needs holder fit and careful wick behavior | Usually after containers |
| Pillar, taper, or molded candle | Attractive finished shape | Must hold structure without a container | Usually later |
| Gel, embedded, novelty, or sculptural candle | Strong visual appeal | Extra material and safety constraints | Later project |
The container gives the wax pool physical support, which removes one major beginner problem: the candle does not have to stand, release from a mold, hold a thin shape, or manage decorative structure. That lets the maker focus on fewer learning variables at once. The first goal is not to make every candle type; it is to make one simple format, observe what happened, and repeat the test with a clear next change.
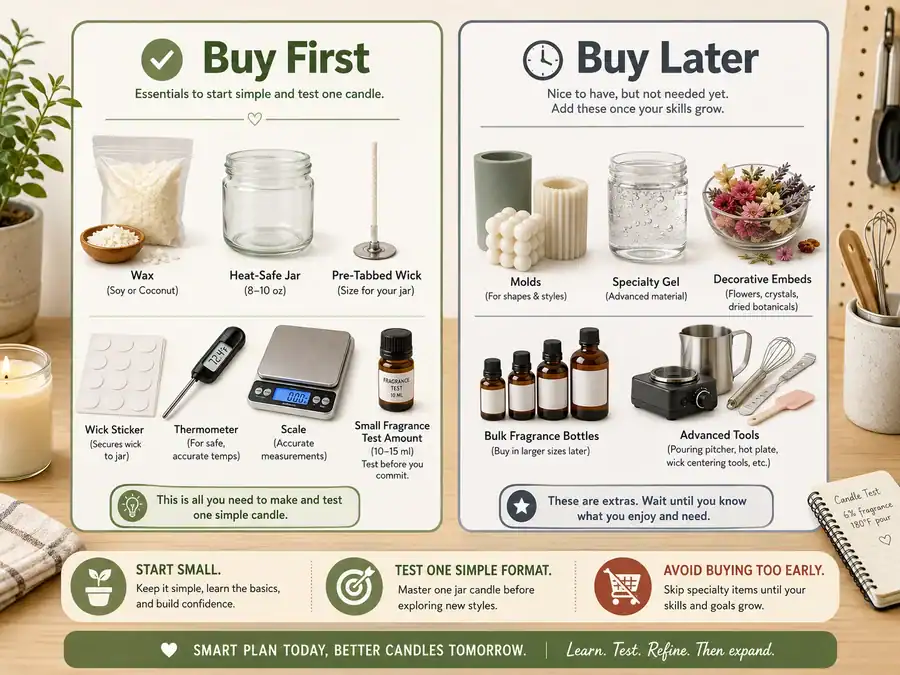
This is why starter supplies should match the format you choose. For a first container candle, the relevant supplies are heat-safe jars, pre-tabbed wicks, wick stickers, a thermometer, a scale, and small test amounts of wax and fragrance. Do not buy molds, specialty gel, decorative embeds, or bulk fragrance sets before the first container tests show that you understand the basic learning loop.
For the safety side, use heat-safe container candle safety before choosing jars. For the burn side, use wick sizing for container candles before judging the finished candle. For the making steps, use a simple container candle tutorial rather than turning this decision guide into a full tutorial.
What Makes a Candle Type Easy to Test?
Testing ease is how easily a candle type lets a beginner isolate variables, observe results, repeat the test, and decide what to change next. The easiest first candle is not only the easiest one to pour; it is the format that gives the clearest learning loop.
A beginner-friendly test has fewer moving parts. If the wax, wick, vessel, fragrance amount, shape, and burn pattern all change at once, the maker cannot tell which variable caused the result. A simple container candle is easier to learn from because the container supports the wax, the melt pool is visible, and the maker can repeat the same setup with one small change.
| Testing factor | What it means | Easier beginner result |
|---|---|---|
| Variable count | How many things can change the result | Fewer variables per test |
| Wick sensitivity | How strongly wick choice changes the burn | Less extreme wick behavior |
| Material waste | Wax, fragrance, containers, or molds lost per failed test | Lower waste per attempt |
| Observation simplicity | How easy it is to see flame, melt pool, surface, and container behavior | Clearer visual feedback |
| Repeatability | How easily the same test can be made again | Same format, same vessel, same batch size |
| Transferability | How well the lesson helps with later projects | Lessons carry into the next candle type |

Wax melts are easy practice because they remove wick and flame behavior, but they do not replace burn observation for a true candle. Tealights and votives can reduce wax waste, yet their small diameter can make wick behavior harder to judge. Pillars, tapers, molded candles, gel candles, and embedded designs add structure, shape, material, or safety variables before the beginner has mastered the basic test loop.
| Candle type | Variable count | Waste risk | Observation clarity | Repeatability | Testing-ease score |
|---|---|---|---|---|---|
| Wax melts | Low | Low | Medium | High | 4/5 |
| Simple container candle | Medium | Low to medium | High | High | 4/5 |
| Tealight | Medium | Low | Medium | Medium | 3/5 |
| Votive | Medium | Low to medium | Medium | Medium | 3/5 |
| Pillar candle | High | Medium | Medium | Low to medium | 2/5 |
| Taper candle | High | Medium | Low to medium | Low | 2/5 |
| Molded candle | High | Medium | Medium | Low | 2/5 |
| Gel, embedded, novelty, or sculptural candle | Very high | High | Low to medium | Low | 1/5 |
Methods note: These scores are modeled decision scores for beginner learning, not lab results. They rate each candle format by variable count, setup burden, material waste, observation simplicity, and repeatability.
For the next step, keep testing small and repeatable. A basic candle burn test checklist can guide what to watch during a wicked candle test, while wick testing for beginner candles can help once you know which finished format you are making. A candle testing log template is useful because it prevents one failed batch from becoming guesswork.
Use Tealights or Votives for Small Tests, Not Always for Easier Burns
Tealights and votives can reduce wax waste and make small experiments cheaper, but their small size does not automatically make them easier to burn correctly. Small-batch testing means quicker repeats and lower waste, not guaranteed better burn behavior.
A tealight is a small candle usually burned in a small cup. A votive is a small candle usually burned in a fitted holder. Both formats can help a beginner test fragrance handling, color, cooling behavior, and small wax batches without committing a full jar’s worth of material. The tradeoff is that small candles can be more sensitive to wick size, heat concentration, and holder fit.
| Format | Material waste | Testing reliability | Main benefit | Main limitation |
|---|---|---|---|---|
| Tealight | Very low | Medium | Fast, cheap repeats | Small diameter can make wick behavior touchy |
| Votive | Low | Medium | Better candle feel than a tealight | Holder fit affects burn behavior |
| Small container candle | Low to medium | High | Closer to a real first candle | Uses more material than a tealight |
| Standard container candle | Medium | High | Best learning transfer | Higher waste if the batch fails |
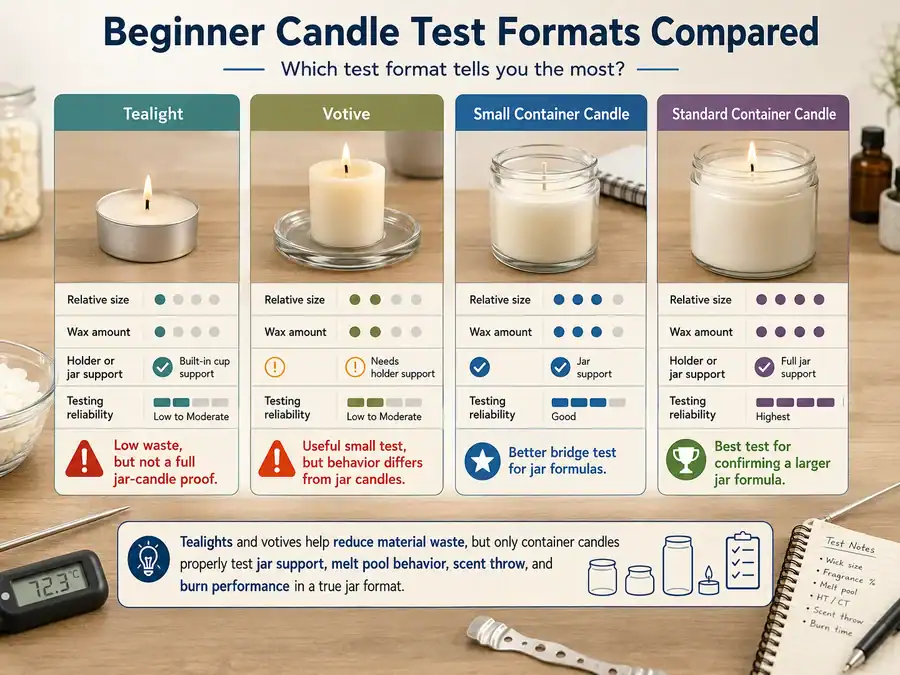
A tealight test does not fully validate a larger jar candle formula. A small cup has a different diameter, heat pattern, melt pool, and burn behavior than a larger container. That means a tealight can help you screen a fragrance idea or practice small-batch pouring, but it should not be treated as proof that a larger container candle is finished.
Use tealights or votives when material waste is the main concern, not when you want the most reliable first burn lesson. A basic candle burn test checklist is better for judging finished wicked candles, and wick testing for tealights and votives belongs in a more detailed test page. If fragrance is the main variable, fragrance testing in small candle batches can help without turning this first-choice guide into a full testing protocol.
Beginner Candle-Type Path: What to Try First, Second, and Later
A beginner candle-type path is a learning order based on the variables each candle format adds. Most beginners should move from fewer variables to more variables: optional wax melts, simple container candles, small-format tests, then freestanding or advanced formats later.
This path is not a course plan, selling roadmap, or rule that every maker must follow. It is a way to avoid changing wax, wick, vessel, shape, fragrance, and testing conditions all at once. The goal is to learn one candle-making variable at a time, then move to a format that adds the next manageable challenge.
| Stage | Candle format | Best for | New variable added | When to move on |
|---|---|---|---|---|
| Stage 0 | Wax melts | Wick-free wax practice | Fragrance handling, pouring, cooling | When you are ready to work with a wick and flame |
| Stage 1 | Simple container candle | First true candle | Wick position, melt pool, burn observation | After one repeatable small container test |
| Stage 2 | Tealights or votives | Low-waste experiments | Smaller diameter and more sensitive wick behavior | After you understand small-format limits |
| Stage 3 | Pillars, tapers, or molded candles | Freestanding shape practice | Wax structure, mold behavior, shape stability | After container candle testing feels predictable |
| Stage 4 | Gel, embedded, novelty, or sculptural candles | Advanced visual formats | Specialty materials, object placement, unusual shapes | After safety and testing basics are stronger |
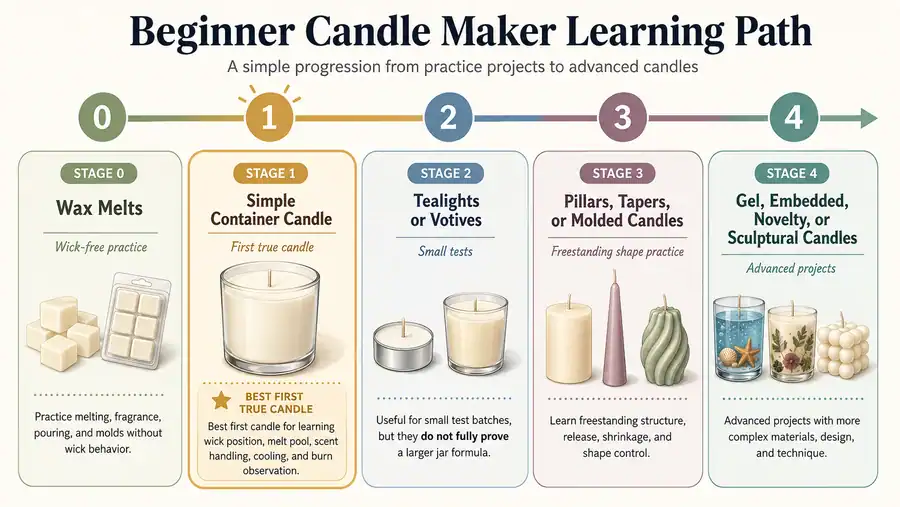
If you are nervous about flame, begin with wick-free wax melt practice. If you are ready for a real candle, begin with a first true container candle. If your testing budget is tight, use tealights or votives carefully, but do not assume a small candle proves that a larger jar will work. If decorative shapes are the reason you want to start, wait until a basic candle burn test checklist makes sense to you.
The path matters because each stage should answer a different learning question. Wax melts answer, “Can I melt, measure, scent, pour, and cool wax neatly?” Container candles answer, “Can I make a real wicked candle and observe the burn?” Tealights and votives answer, “Can I run smaller tests without misreading the results?” Pillars and molded candles answer, “Can I manage structure without container support?” Advanced formats answer, “Can I control extra safety and material constraints?”
Use pillar candles after container tests only when you are ready for more structural control. Use gel candle safety before advanced projects if you are drawn to clear gel, embeds, or decorative objects. The right first candle type is the one that teaches the next useful skill without adding five new failure points at the same time.
Use Wax Melts First Only If You Want Wick-Free Practice
Wax melts are scented wax pieces warmed without a wick or flame, so they are a practice project, not a true candle. They can be the easiest first wax project because they remove wick choice, flame behavior, and burn testing from the first attempt.
This distinction matters because “start with” can mean two different things. Some beginners mean their first wax project, while others mean their first true candle. If you want the lowest-friction wax craft, wax melts make sense. If you want to learn candle behavior, they are only a stepping stone before a container candle.
Use wax melts first if:
| Choose wax melts first when… | Why it helps | What it does not teach |
|---|---|---|
| You are nervous about flame | Removes the first flame variable | Flame size or burn behavior |
| You want to practice pouring | Lets you work with small wax portions | Wick centering |
| You want low-waste scent practice | Uses small fragrance tests | Full candle scent performance |
| You want to observe cooling | Shows surface behavior and shrinkage | Melt-pool development |
| You are not ready for burn testing | Keeps the first project calmer | Whether a wick works |
Wax melts can teach measuring, melting, fragrance handling, pouring into cavities, cooling, and mold release. They do not teach wick centering, flame behavior, melt-pool growth, container heat, or burn observation. That is why they work as a beginner wax project path, not as the final answer for a first candle type.
For the next step, use wax melts for beginners if you want the full practice route. Use fragrance handling for beginner wax projects when scent is the part you are unsure about. Then move to a first true container candle when you are ready to learn how wax, wick, vessel, and flame behave together.
Compare Supply Burden and Failure Cost Before Buying Supplies
Supply burden is the amount of equipment, reusable tools, consumable materials, and test waste a candle type requires before a beginner can make and evaluate it. The right first candle type should let you test, learn, and repeat without wasting too much wax, fragrance, containers, or molds.
Cost here means relative first-test burden and failure waste. It does not mean live prices, wholesale sourcing, profit margin, or which supplier is cheapest today. A beginner candle format with a lower burden usually needs fewer specialty items, smaller test batches, and fewer expensive mistakes before the maker understands what changed.
| Candle format | Minimum viable supplies | Setup burden | Failure-cost risk | Good first buy? |
|---|---|---|---|---|
| Wax melts | Wax, fragrance, mold or clamshell, thermometer, scale | Low | Low | Yes, for wick-free practice |
| Simple container candle | Wax, heat-safe jar, wick, wick sticker, thermometer, scale, fragrance | Low to medium | Low to medium | Yes, for first true candle |
| Tealight | Wax, small cups, small wicks, thermometer, scale | Low | Low | Yes, for limited tests |
| Votive | Wax, votive mold or holder, wick, thermometer, scale | Medium | Low to medium | Better after simple tests |
| Pillar candle | Pillar wax, mold, wick, sealant or mold tools, thermometer, scale | Medium to high | Medium | Better later |
| Taper candle | Suitable wax, dipping or mold setup, wick, deeper melting vessel | High | Medium | Better later |
| Molded candle | Mold, suitable wax, wick system, release planning, thermometer, scale | High | Medium to high | Better later |
| Gel, embedded, novelty, or sculptural candle | Specialty materials, safety checks, compatible fragrance or objects, test setup | High | High | Save for later |
Methods note: Low, medium, and high ratings compare first-test burden, not market price. They reflect the number of required supplies, how much material a failed attempt can waste, and how many format-specific items a beginner may buy too early.
The common failure pattern is overbuying before the first format is proven. A beginner may buy several molds, many fragrance oils, bulk wax, specialty jars, or decorative supplies before they know how one simple candle behaves. That makes each failed batch feel bigger than it needs to be. A smaller supply path keeps the first tests easier to repeat.
Use first candle supply planning before buying format-specific tools. A beginner candle making supplies guide can help separate must-have tools from later upgrades, while a candle making budget for beginners page can handle deeper cost planning. If wax choice is the unclear part, use a beginner candle wax choice guide after the candle format is chosen.
Save Pillars, Tapers, and Molded Candles Until After Container Tests
Pillars, tapers, and molded candles are freestanding or shaped candle formats, so they must hold their structure without a container. They are usually better after a beginner has completed container candle tests because they add wax-hardness, mold, shape, release, and burn-stability variables.
Harder does not mean impossible or unsafe by default. It means the candle gives the beginner less room for error. A simple container candle can still teach wick behavior while the jar supports the wax. A pillar, taper, or molded candle asks the maker to control structure and burn behavior at the same time.
| Format | Extra variable added | Why it is harder as a first candle | Better time to try it |
|---|---|---|---|
| Pillar candle | Freestanding wax structure | Wax must hold shape and burn without container support | After repeatable container tests |
| Taper candle | Thin shape and drip control | Shape makes burn behavior less forgiving | After wick observation feels familiar |
| Molded candle | Mold release and shaped body | Shape, mold, and wax behavior can fail together | After simple candle testing feels predictable |
A beginner can try a pillar first, but it is a less forgiving choice. The maker must accept more testing, more material control, and more uncertainty about whether a failure came from wax type, wick choice, mold shape, cooling, or burn behavior. That makes the learning loop harder to read.
The main failure pattern is choosing an attractive shape before understanding structural wax choice, wick stability, and burn behavior. A candle can look successful after release from the mold but still burn poorly. That is why pillars, tapers, and molded candles work better as later projects, after the maker can judge a simpler candle with fewer variables.
Use a beginner candle format progression path before moving into freestanding projects. A pillar candle guide, taper candle making guide, or molded candle troubleshooting page can carry the full method, because this guide only needs to explain why those formats come later.
Treat Gel, Embedded, Novelty, and Sculptural Candles as Later Projects
Gel, embedded, novelty, and sculptural candles should usually be later projects because their materials, objects, shapes, or visual goals add safety and testing constraints beyond a first candle. Advanced means higher consequence of error and more variables, not impossible or permanently off-limits.
These candle types often attract beginners because they look more creative than a plain container candle. The problem is that visual appeal can hide extra testing work. A simple candle asks whether the wax, wick, vessel, and fragrance behave together. An advanced visual candle may add specialty gel, decorative objects, unusual shapes, narrow burn areas, or fragile structure before the maker has learned the basic burn pattern.
| Candle type | Why beginners notice it | Added beginner risk | Better route |
|---|---|---|---|
| Gel candle | Clear, decorative look | Specialty gel and compatibility limits | Study gel candle safety constraints first |
| Embedded candle | Objects inside or near wax | Decorative items can affect burn safety | Study embedded candle safety risks first |
| Novelty candle | Theme, shape, or gift appeal | Design may matter more than burn behavior | Try after basic burn tests |
| Sculptural candle | Unusual freestanding form | Shape can change melt, drip, and stability | Try after molded candle basics |
A common failure pattern is choosing the visual idea before checking the material limits. A beginner may pair specialty gel with an unsuitable fragrance, place a decorative object where heat will reach it, or test a sculptural shape as if it were a simple jar candle. That makes the result harder to judge and can raise safety concerns.
Save these formats until you can explain what happened in a simple container test. If the flame, melt pool, wick position, container heat, and fragrance behavior still feel hard to read, advanced visual formats will add too much noise. Use advanced candle types to try later as a planning path, but route gel and embedded ideas through safety-specific pages before making them.
Decision Recap: Which Candle Type Should You Start With?
For most beginners, the first true candle should be a simple container candle. Use wax melts only if you want wick-free practice first, use tealights or votives for careful small tests, and save pillars, tapers, molded, gel, embedded, novelty, and sculptural candles for later.
| Beginner condition | Best first choice | Why |
|---|---|---|
| You want the best first true candle | Simple container candle | It teaches real wick and burn behavior with fewer structure problems |
| You are nervous about flame | Wax melts first, then a container candle | You can practice wax handling before burn testing |
| You want low material waste | Tealight or votive tests with caution | They use less wax, but small burns can be sensitive |
| You want decorative shapes | Wait until after container testing | Shape adds structure, mold, and burn-stability variables |
| You want to sell candles | Route to business and safety content | Selling adds testing, labels, insurance, and compliance duties |
The safest learning path is not the flashiest one. Start with the format that gives you the clearest next action after each test. A simple container candle gives most beginners that balance because it is a real candle, but it does not add freestanding shape, specialty gel, embedded objects, or decorative structure too early.
The easiest candle type to make is not automatically ready to sell. Selling introduces safety, labeling, insurance, testing, and compliance requirements that belong in a separate candle business starter guide. Before buying more supplies, use beginner candle making supplies to keep the first setup focused, then use a candle burn test checklist before treating any wicked candle as a finished result.