

Proper mold wicking means identifying the wick path, choosing a wick pin or threaded setup, centering and tensioning the wick, sealing the wick hole, and checking the setup before pouring.
A candle mold wick setup is the pre-pour arrangement that establishes a straight wick path through a free-standing molded candle. In this guide, “properly” means the wick is physically centered, straight, secured, sealed, and checked before wax enters the mold. The setup can use a wick pin to create a post-pour wick channel or a threaded wick that passes through the mold hole before pouring. Wick sizing, wax compatibility, and finished burn testing are separate tasks because they decide burn performance after the physical setup is complete.
Identify the Wick Path Before You Set Up the Mold
The wick path is the straight line the wick or wick pin follows through the center of the molded candle before wax is poured.
This is a physical setup check, not a wick-size decision. In candle mold wick setup, the path starts at the wick entry point, runs through the mold body, and ends at the top support point or finished candle top. For mold shape and orientation differences, see Candle Molds & Shapes before changing the setup method.
Method note: Use the same mold position, mark the wick entry point and centerline, and judge pass/fail by whether the wick path stays centered from the base opening to the top support. This visual check does not select wick size.
Many candle molds are filled upside down, so the visible opening may not be the finished candle top. Before using a wick pin or threading a wick, turn the mold in your hands and identify which end becomes the top of the finished candle. Then trace the centerline from the wick hole or pin opening through the mold body.
Top centering alone is not enough. A wick can look centered at the opening while leaning inside the mold. Proper setup means the full wick path is identified, centered, and ready before pouring; it does not mean the wick size has already passed a burn test.
| Checkpoint | What to verify before continuing |
| Wick entry point | The wick hole, pin hole, or intended entry point is visible and usable. |
| Mold orientation | You know which end becomes the finished candle top. |
| Centerline | The path runs through the mold’s vertical center, not only the visible opening. |
| Top support point | The wick or pin can be held in line without pulling sideways. |
| Setup method | The mold is ready for either wick pin setup or threaded wick setup. |
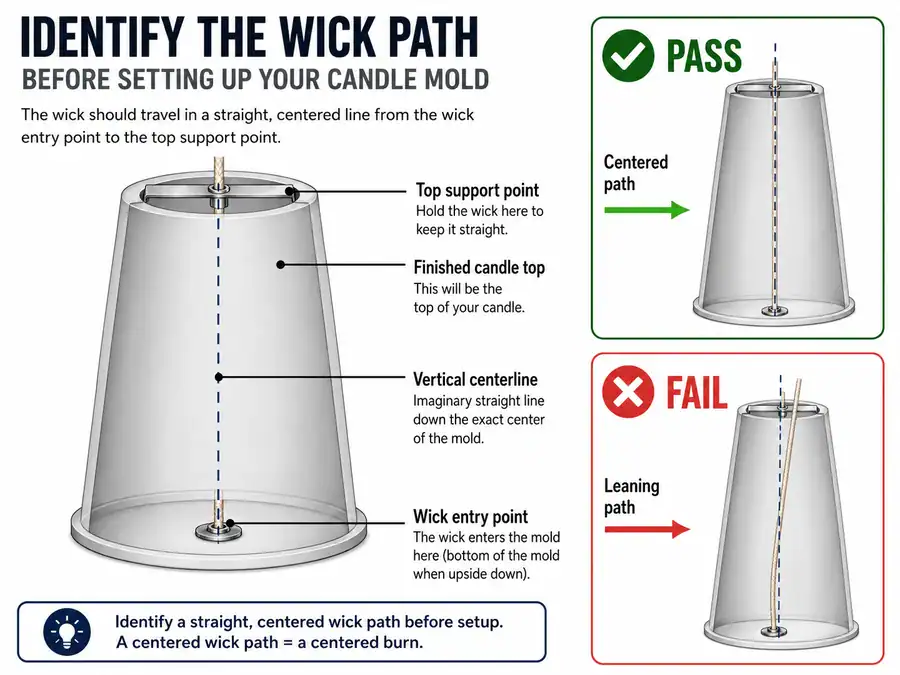
If you are choosing the wick size for your mold diameter, handle that separately before using this setup sequence. Wick path identification only tells you where the wick or wick pin should physically run through the molded candle.
Choose Wick Pin or Threaded Wick Setup Based on the Mold Access Point
Wick pin setup and threaded wick setup are physical mold-wicking methods chosen from the mold’s access point, not from wick size.
After the wick path is known, choose the setup method from the hole, pin system, or supported entry point the mold actually provides. A wick pin creates a channel first; a threaded wick places the actual wick in the mold before wax is poured.
| Mold condition | Use this setup | Why this belongs here |
| Mold has a wick pin system, pin hole, plug, or base opening | Wick pin setup | The pin creates a post-pour channel before the wick is inserted. |
| Mold has a designed wick hole for the actual wick | Threaded wick setup | The wick is installed before pouring and must be sealed at the hole. |
| Silicone mold has a clear center point and the mold design allows puncturing | Threaded wick with a needle | The wick can be pulled through the centerline and supported at the top. |
| Mold has no safe, centered, or intended access path | Do not force a universal setup | An off-center puncture can damage the mold or create a crooked wick path. |
| Wax leaks outside the wick hole or plug area | Route to mold leak troubleshooting | The problem is broader than pre-pour wick-hole setup. |
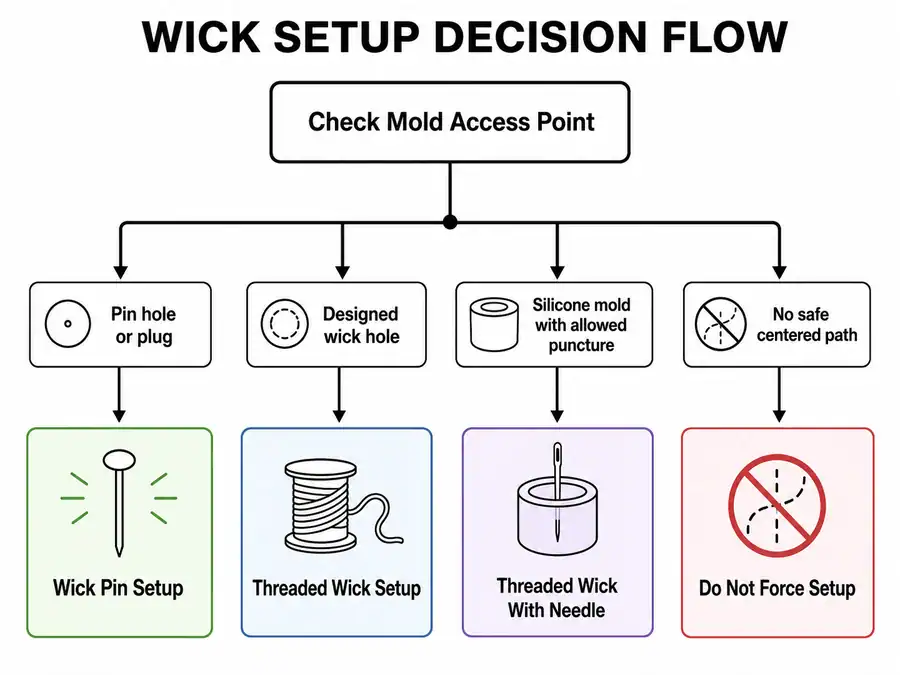
Use this table as a setup choice only. It does not decide wick diameter, wax compatibility, fragrance load, or finished burn behavior.
Use a Wick Pin When the Mold Needs a Post-Pour Wick Channel
A wick pin is a temporary metal or rigid pin that sits in the candle mold during the pour and leaves a centered channel for the wick after the wax sets.
Use a wick pin when the mold is designed for a post-pour wick channel, often in pillar molds or molds with a pin hole, plug, or base opening. The pin is not the wick. It only creates the channel that lets you insert the wick after unmolding or after the candle has set enough for the channel to remain open.
A wick pin creates the wick channel; it does not choose the wick size. If the question is which wick series or diameter fits the candle, use a wick sizing guide before treating the pin setup as finished.
Set up a wick pin in this order:
- Inspect the mold hole, plug, or base opening.
- Insert the wick pin through the intended channel point.
- Seat the plug, sealer, or base support so the pin does not wobble.
- Check that the pin stands vertically through the mold body.
- Confirm that the pin tip lines up with the mold’s centerline.
- Recheck the pin after moving the mold into pouring position.
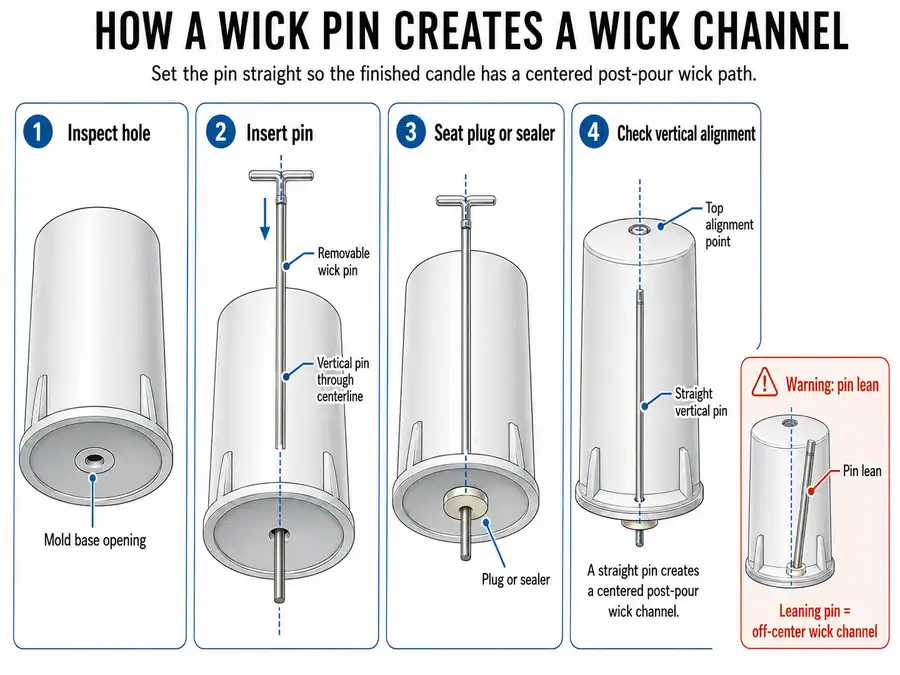
Wick pin setup and threaded wick setup solve different setup problems:
| Setup method | What goes into the mold before pouring | Best use | Main risk to check |
| Wick pin | A removable pin | Molds meant to create a wick channel first | Pin leans and leaves an off-center channel |
| Threaded wick | The actual wick | Molds where the wick is installed before the pour | Wick shifts, loosens, or pulls the seal open |
| Either method | A centered path | Molds with clear access through the centerline | Assuming the top opening proves the whole path is centered |
Method note: These are setup failure categories, not product defect claims. The table checks pin lean, plug gaps, and channel alignment without ranking wick pins.
| Failure | What it means | Fix before pouring |
| Pin leans to one side | The channel will not follow the candle’s centerline. | Reseat the pin and check the entry point, centerline, and top position. |
| Plug gap around the pin | Wax may escape at the base opening. | Press the plug or sealer firmly around the pin, then recheck after the pin is vertical. |
| Pin is hard to remove later | The channel may be tight, angled, or poorly seated. | Check that the pin is straight, smooth, and placed according to the mold’s intended access path. |
| Pin is mistaken for the wick | The candle may be left without an installed wick after setting. | Treat the pin as a channel-making tool only, then insert the correct wick after removal. |
Move to threaded wick setup instead when the mold is designed for the wick itself to pass through the hole before pouring. That method needs sealing and support around the actual wick rather than around a temporary pin.
Thread the Wick Through the Mold Hole and Secure It Before Pouring
Threaded wick setup means the actual wick passes through the mold hole before wax is poured, then gets sealed at the base and supported at the top.
Use this method when the mold is built with a wick hole and the wick needs to be in place during the pour. The wick should move through the hole cleanly, sit on the mold’s centerline, and stay under light tension without bending the mold or opening the seal.
Thread the wick in this order:
- Cut a wick length longer than the mold height.
- Feed the wick through the wick hole from the base side.
- Pull enough wick through so it reaches past the top opening.
- Press mold sealer around the wick hole.
- Set the mold upright in its pouring position.
- Pull the wick upward until it is straight, not tight.
- Attach the top wick to a bar, holder, skewer, or pencil.
- Recheck the base seal after the wick is supported.
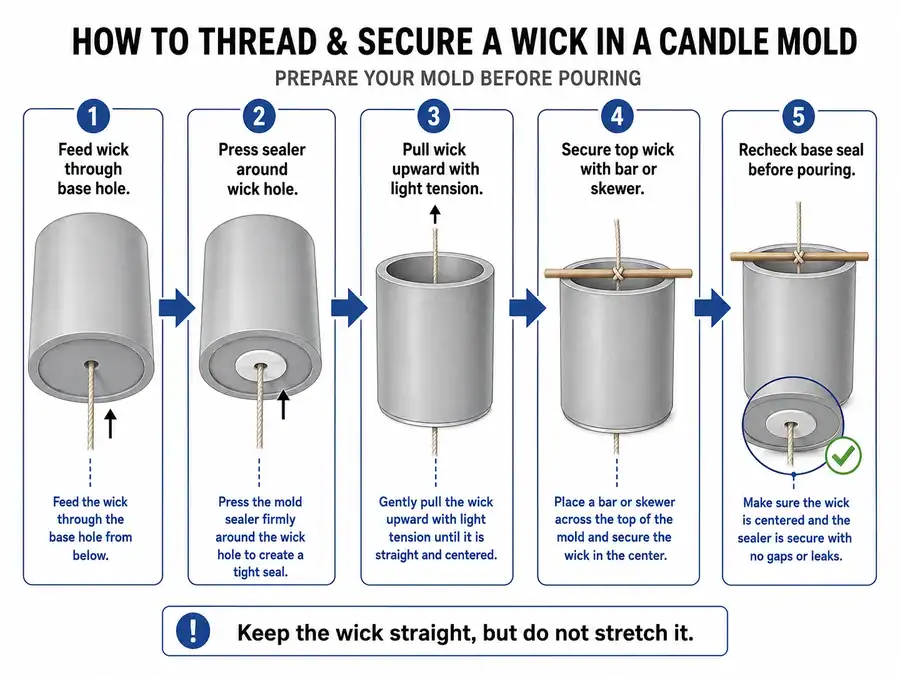
The goal is a straight wick path, not maximum tension. A wick that is pulled too hard can shift the base seal, stretch the braid, or drag the wick off the centerline. A wick that is too loose can bow inside the mold and dry off-center after the wax sets.
Method note: This sequence assumes a mold with a designed wick hole. Check the entry point, threading path, top support, and seal stage without treating unsupported mold puncturing as a universal method.
| Setup point | Correct result | Fix before pouring |
| Wick hole | Wick passes through without tearing or scraping. | Re-thread slowly and clear loose sealer from the hole. |
| Base seal | Sealer surrounds the wick with no visible gap. | Press fresh sealer around the wick and mold base. |
| Wick line | Wick rises through the center of the mold. | Adjust from the top support before wax is added. |
| Top support | Wick is held upright without sideways pull. | Reposition the bar or holder across the mold opening. |
| Tension | Wick is straight but not stretched. | Loosen and reset if the wick pulls the seal or leans. |
Do not treat this step as proof that the wick will burn correctly. Threaded setup only confirms that the wick is physically placed, secured, sealed, and ready for wax. Wick diameter, wax type, and finished burn behavior belong to wick sizing and burn testing, not pre-pour mold setup.
Center and Tension the Wick Without Pulling It Off-Line
Wick centering means keeping the wick on the mold’s centerline from the base hole to the top support while holding only light upward tension.
The wick should look straight from more than one angle. Check it from the front, side, and directly above the mold opening. If the wick only looks centered from one view, it may be leaning inside the mold.
Good wick tension holds the wick upright. It does not pull the wick hard enough to stretch, bow the mold wall, lift the base seal, or tilt the support across the opening. The comparison is simple: a centered wick gives the molded candle a straight internal burn path, while an off-line wick can place the flame closer to one side of the finished candle.
Method note: Judge centering by top position, bottom position, visible bow, and whether the wick drifts after the support is attached. This setup check does not prove burn performance.
| Check | What to look for | What to change |
| Front view | Wick appears vertical. | Move the top support left or right. |
| Side view | Wick does not lean forward or backward. | Rotate or reset the holder across the opening. |
| Top view | Wick exits near the center of the opening. | Reposition the wick before tightening the support. |
| Base view | Seal stays closed while the wick is held. | Reduce tension and press the seal again. |
| Touch check | Wick feels held, not stretched. | Loosen the top tie and reset with lighter pull. |
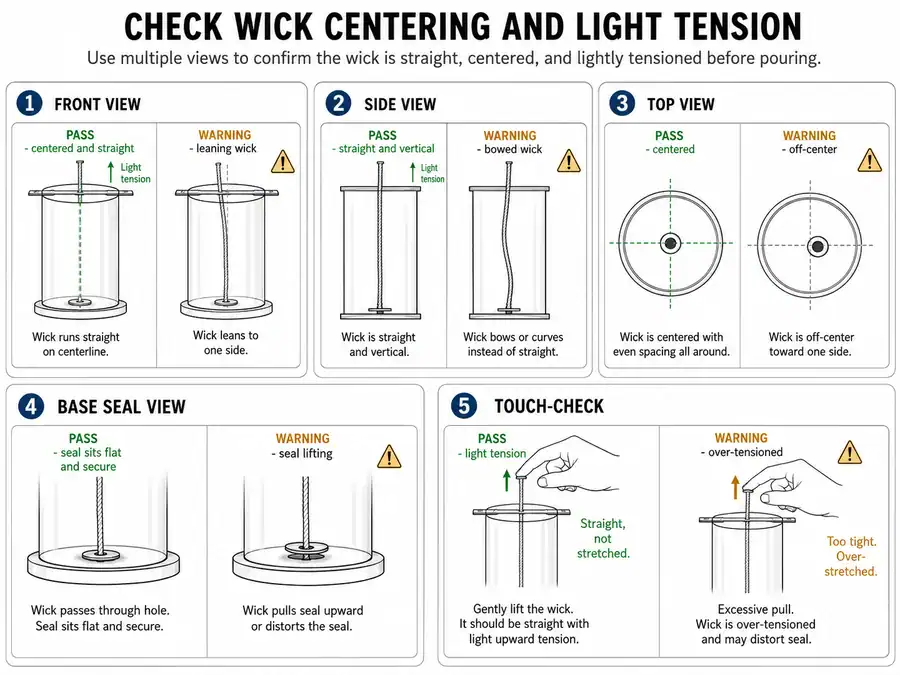
A wick bar, holder, skewer, or pencil can all work when they keep the wick stable across the mold opening. The support choice matters less than the result: the wick stays centered, the seal stays closed, and the mold can be moved into pouring position without the wick shifting.
Choose a Wick Bar, Holder, Skewer, or Pencil That Keeps the Wick Stable
A wick support is the top brace that holds the wick in place while the wax is poured and cooled.
A purpose-made wick bar gives the most controlled hold because the slot or hole can keep the wick near the center. A skewer or pencil can work for simple molds when the wick is wrapped, taped, or clipped without creating sideways pull. The wrong support is one that looks neat but pulls the wick away from the mold’s centerline.
Method note: Compare supports by drift risk, over-tension risk, and how well they hold the wick steady over the mold opening. Do not treat this as a product ranking.
| Support | Best use | Risk to avoid |
| Wick bar | Straight-sided molds and repeat setup | Slot is not aligned with the mold center. |
| Wick holder | Small molds with a centered opening | Holder shifts when the mold is moved. |
| Skewer | Simple beginner setup | Wick wraps unevenly and leans. |
| Pencil | Emergency support for light wick tension | Round surface lets the wick roll sideways. |
| Clip plus bar | Extra hold for a loose wick | Clip weight pulls the wick off-line. |
Pick the support after the wick path is known. A support cannot correct a bad wick hole, a tilted pin channel, or a leaking base seal; it only holds the top of a setup that is already aligned.
Seal the Wick Hole So Wax Cannot Escape During the Pour
Mold hole sealing means closing the gap around the wick or wick pin at the mold base before melted wax enters the mold.
The seal has one job: stop liquid wax from leaking while the wick path stays centered. It does not fix a crooked wick, choose a wick size, or repair a damaged mold. For broader mold damage or repeat leaking that continues after setup, route that problem to candle mold leak troubleshooting instead of treating this pre-pour step as the whole repair.
Seal the wick hole after the wick or pin is already in place. If you seal first and then pull hard on the wick, the seal can open, shift, or leave a thin channel where wax escapes.
Use this order:
- Thread the wick or seat the wick pin.
- Hold the wick or pin straight through the centerline.
- Press mold sealer around the wick hole from the outside.
- Push the sealer firmly against the mold base.
- Check for a full ring of contact around the wick or pin.
- Set the mold upright.
- Recheck the seal after the top support is attached.
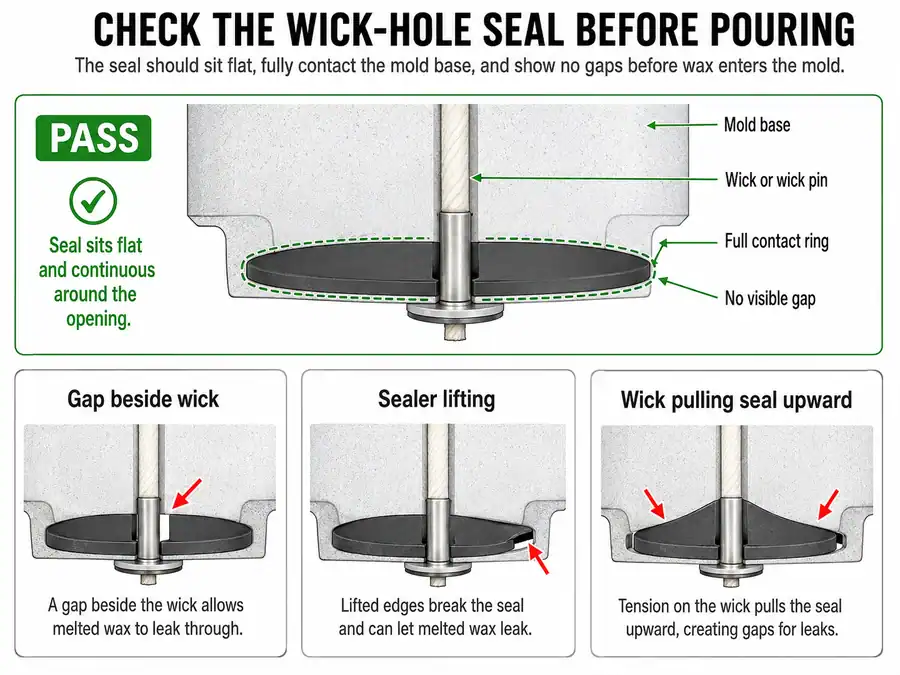
A good seal is tight, even, and still closed after the wick is tensioned. A weak seal looks finished at first but opens when the wick is pulled upward or when the mold is moved.
Method note: This table covers wick-hole leak sources only. Seam leaks, cracks, warped molds, and damaged plugs belong in broader mold leak troubleshooting.
| Leak risk | What it usually means | Fix before pouring |
| Gap beside the wick | Sealer is not touching the wick on all sides. | Add sealer and press it tighter around the wick. |
| Sealer lifts from the mold | The surface was not pressed firmly enough. | Flatten the sealer against the mold base again. |
| Wick pulls the seal upward | Tension is too strong. | Loosen the wick, reseal the hole, then retension lightly. |
| Pin wobbles inside the seal | The channel-maker is not seated. | Reseat the pin and rebuild the seal around it. |
| Wax leaks during a small test pour | The seal failed under heat and liquid pressure. | Stop, empty safely if possible, cool, clean, and reseal before a full pour. |
Do not pour a full mold when the base seal already looks loose. A centered wick with a weak seal can still leak, and a leak during the pour can disturb the wick path you just set.
Run a Final Wick and Seal Check Before Pouring Wax
The final pre-pour check confirms that the wick path, top support, wick tension, and mold-hole seal still match after the mold is in pouring position.
This check is the last setup gate before wax goes in. It compares the finished setup against the goal of the page: a wick or wick channel that is centered, straight, secured, sealed, and ready for pouring. It does not replace burn testing after the candle cures.
Method note: The checklist uses pass/fail setup criteria. A failed row should be fixed before pouring, but this checklist is not a full production record or burn-test log.
| Final check | Pass condition | Fix before pouring |
| Mold orientation | The mold is standing in its real pouring position. | Turn or reset the mold before judging the wick line. |
| Wick path | Wick or pin follows the centerline through the mold. | Recenter from the top support or reseat the pin. |
| Top support | Bar, holder, skewer, or pencil does not slide. | Tape, clip, or reset the support so it cannot roll. |
| Wick tension | Wick is upright without being stretched. | Loosen and retie with lighter pull. |
| Base seal | No visible gap around the wick or pin. | Add or press sealer before wax enters the mold. |
| Mold movement | Setup stays aligned when the mold is touched lightly. | Stabilize the mold and support before pouring. |
| Scope check | Setup is ready, but wick size is not being judged here. | Move wick-size questions to a wick sizing guide. |
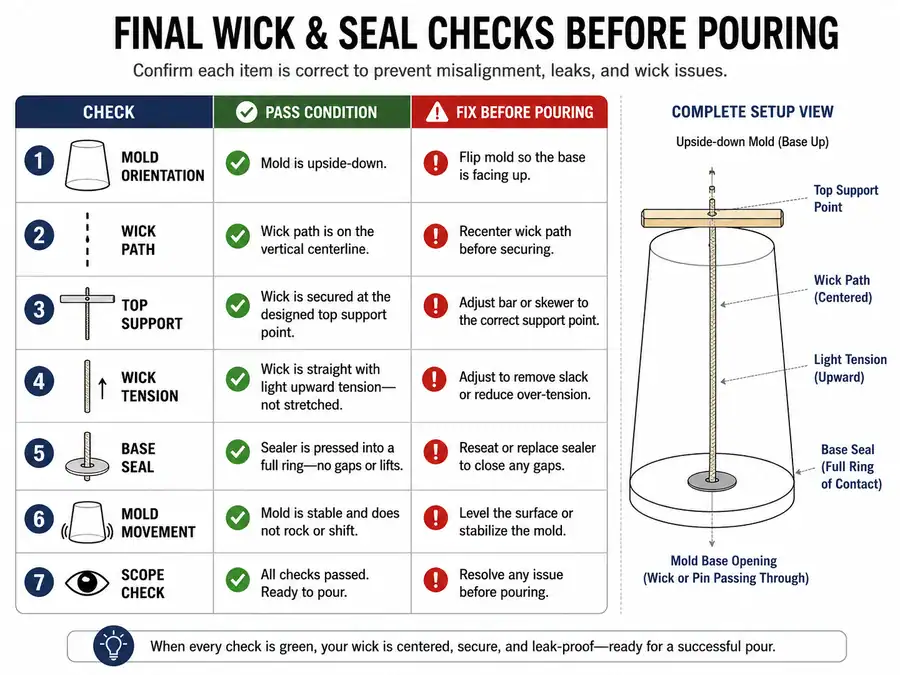
Do not pour yet if the wick leans, the support rolls, the pin wobbles, the mold bends, or the seal opens during this check.
A final check catches setup drift. Wick path identification, threading, centering, and sealing can all look correct in isolation, but the setup can change after the mold is moved, the support is tightened, or the base seal is pressed.
The best outcome is boring: nothing shifts, the wick stays centered, and the seal remains closed. If something moves during this check, fix it before pouring instead of hoping the wax will hold the wick in place.
Adapt the Setup for Pillar, Taper, and Novelty Molds
Pillar, taper, and novelty molds share the same wick setup goal, but the access point, support method, and drift risk can change by mold shape.
Use the same setup standard for every mold: the wick path must be straight, centered, secured, sealed, and checked before pouring. Mold type matters here only when it changes wick access, centering, support, or sealing. This section adapts the setup sequence; it does not help you choose a mold to buy.
Pillar molds usually have a clearer vertical wick path. Depending on the mold design, they may use a wick pin or a threaded wick through a base hole. Check the orientation first because many pillar molds are poured upside down, so the visible base during setup may become the top of the finished candle.
Taper molds need more attention to narrow-body alignment. A small lean near the top can move the wick closer to one side of the finished taper. Use a stable top support and check the wick from more than one angle before pouring.
Silicone novelty molds need the most judgment because the shape may be irregular, flexible, or decorative. Support the mold so it does not bend while you tension the wick. Puncture silicone only when the mold design allows it and the puncture can follow the intended centerline.
Mold-maker instructions should control unusual wick holes, pin systems, silicone puncture points, or mold-specific support methods.
| Mold type | Likely wick entry point | Recommended setup method | Centering support | Main setup risk | Route if the question leaves setup scope |
| Pillar mold | Base hole, plug, or pin opening | Wick pin or threaded wick | Wick bar or holder across the opening | Misreading the finished top and bottom | Use Candle Molds & Shapes for mold orientation or mold type basics. |
| Taper mold | Narrow base or designed wick path | Threaded wick when the mold supports it | Light top support with minimal sideways pull | Wick leans inside the narrow body | Use wick sizing separately if the question becomes flame or burn behavior. |
| Silicone novelty mold | Mold-specific wick point or designed access path | Threaded wick only when the path can stay centered | External mold support plus top holder | Flexible mold bends and shifts the wick | Use mold-maker instructions if the shape needs a specific access method. |
| Pre-drilled mold | Existing wick hole | Use the existing hole instead of creating a new one | Holder aligned over the existing path | Adding a second off-center path | Use mold leak troubleshooting if the drilled area leaks beyond the wick hole. |
| No-hole mold | No intended entry point | Do not force a universal method | Not applicable until a valid path exists | Off-center puncture or damaged mold | Compare candle mold types separately before modifying the mold. |
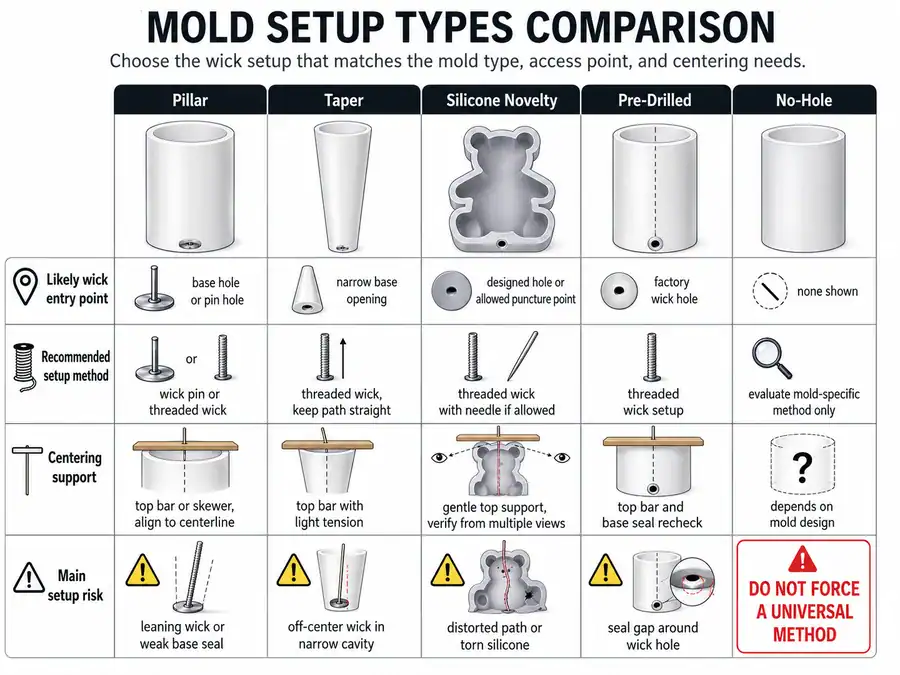
Do not assume one wicking method works for every mold. Keep the same setup goal, then adapt the entry point and support method to the mold’s access path.
Do not use mold type to choose wick size inside this section. This section only adapts the wick setup to the mold’s shape and access path. If you are choosing a mold, compare candle mold types separately; if you are choosing wick size, use a wick-sizing guide; if the mold leaks outside the wick hole, use candle mold leak troubleshooting.