Clean and store candle molds by identifying the material, removing wax gently, washing with mild material-matched cleaners, drying every surface, storing with proper support, and checking the mold before reuse so shape and release quality last.
Candle molds are reusable shaping tools for wax candles, and their material, surface condition, dryness, and support affect release quality and shape accuracy. Silicone, metal, and plastic molds need different cleaning and storage habits because each material reacts differently to moisture, pressure, heat, scratches, and residue. In this guide, damage means scratches, residue film, rust, sticky surfaces, corrosion, odor transfer, and reduced release quality; distortion means warping, flattening, compression marks, bent rims, leaning walls, ovaling, and lost cavity detail. This routine covers prevention through cleaning, drying, storing, and inspection, not mold buying, mold making, severe repairs, stuck-candle troubleshooting, wax formulas, wick selection, or broad beginner instruction.
Identify the Mold Material Before You Clean It
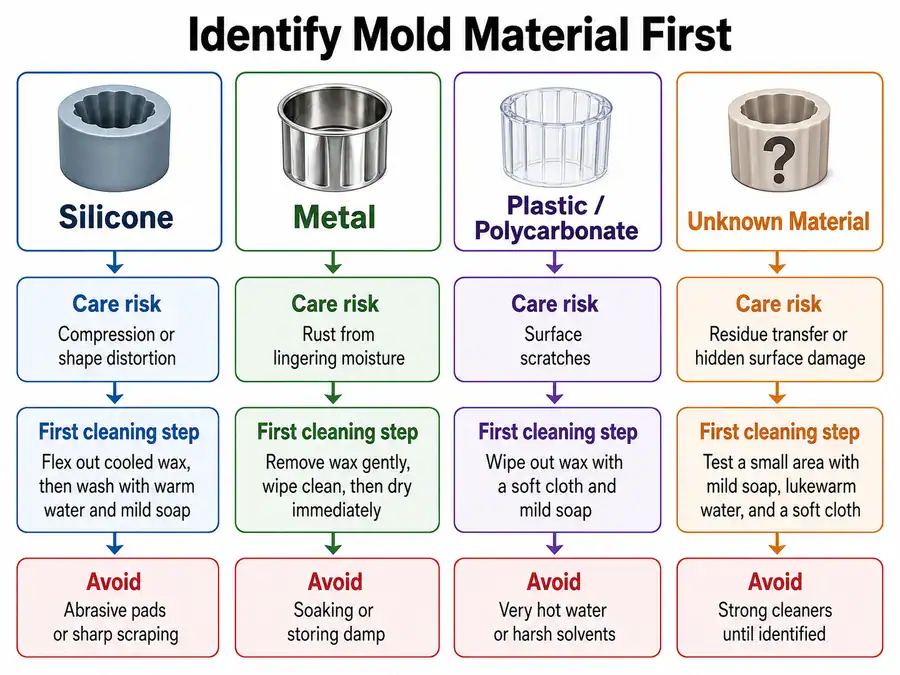
Before cleaning candle molds, identify the mold material because silicone, metal, and plastic molds can be damaged in different ways. The mold type tells you how much pressure, warmth, water, and scrubbing the surface can handle. Candle molds are reusable shaping tools for wax candles, so surface condition and shape support matter as much as cleanliness.
Mold material
Common care risk
Mold-safe first cleaning step
Avoid action
Storage caution
Silicone
Compression, stretching, odor, detail loss
Let wax cool, then wipe with a soft cloth
Pulling thin walls or folding detailed cavities
Store flat or lightly supported, not crushed
Metal
Rust, scratches, dents
Wipe residue, then wash and dry fast
Soaking, steel tools, damp storage
Store fully dry with airflow
Plastic or polycarbonate
Scratching, clouding, cracking, heat warping
Use warm water and a soft cloth
Hot water, hard scraping, solvent use unless approved
Keep away from heat and pressure
Unknown material
Wrong cleaner or heat damage
Treat as delicate and check supplier instructions
Assuming one method fits every mold
Store dry, flat, and uncompressed
Silicone molds are flexible, but that flexibility does not mean they should be twisted, folded, or packed under weight. They can hold fine surface detail, but thin areas can stretch or tear when wax is pulled out too hard. If the silicone mold has deep cavities, raised textures, or narrow rims, handle those areas as detail zones rather than as thick, flexible walls.
Metal molds feel rigid and durable, but their main risk is moisture. A metal candle mold can lose release quality when rust, pitting, or scratches interrupt the smooth inner wall. Metal molds should be cleaned without sharp tools, dried fully, and stored where damp surfaces cannot sit against the mold.
Plastic and polycarbonate molds can look hard enough for stronger cleaning, but they are often scratch-sensitive and heat-sensitive. Scratches can hold wax film and dye residue, while heat or pressure can make the mold cloud, crack, or lose its intended geometry.
If you are still choosing molds rather than cleaning ones you already own, use the candle mold material comparison guide instead. If the mold is already silicone and the care question goes beyond cleaning and storage, use the how to use silicone candle molds guide for deeper handling instructions.
Remove Wax Residue Without Scratching or Stretching the Mold
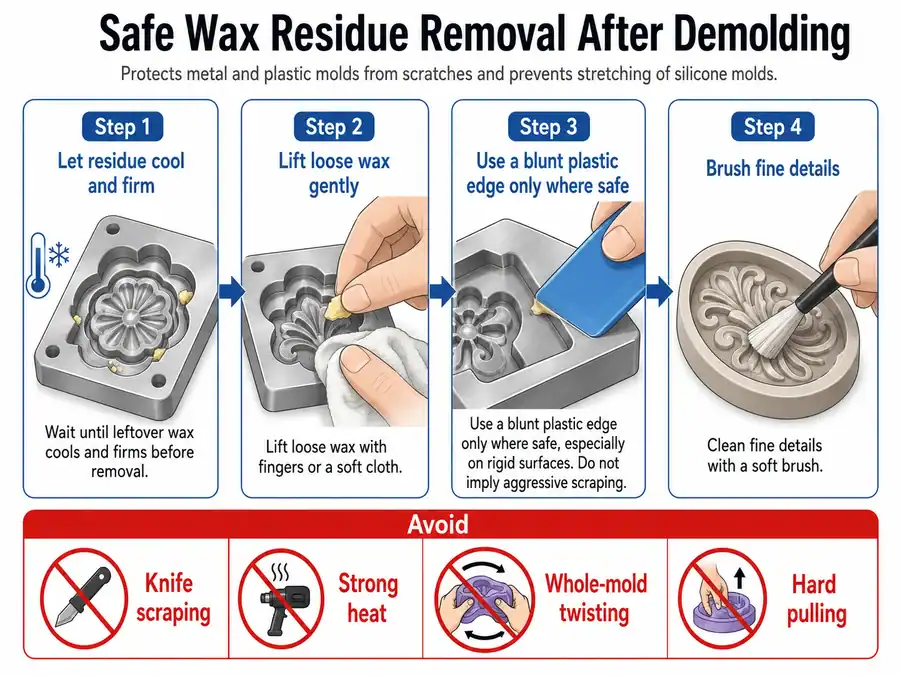
Remove wax residue from candle molds gently after demolding so leftover wax does not scratch, stretch, or coat the mold surface. Loose wax residue is wax left after the candle has come out; it is not the same problem as a candle trapped inside the mold.
Let the mold and leftover wax cool until the residue is firm. Then lift loose pieces with your fingers, a soft cloth, or a blunt plastic edge only where the mold surface can tolerate it. On silicone, flex only the parts meant to move, and stop before the wall turns white, creases, or stretches. On metal and plastic molds, keep the mold steady and avoid digging into corners.
If the candle will not release from the mold at all, use the stuck-candle troubleshooting guide before trying residue cleanup. This section only covers wax left behind after demolding.
Use this residue failure log before washing the mold:
Mistake
Damage risk
Safer action
When to bridge elsewhere
Scraping with a knife
Gouges, scratches, torn detail edges
Use fingers, a soft cloth, or a blunt plastic edge
Use damaged-mold repair guidance if the surface is cut
Pulling wax from a thin silicone cavity
Stretched cavity or torn rim
Cool the wax, then loosen it in small pieces
Use stuck-candle troubleshooting if the candle is still trapped
Twisting the whole silicone mold
Distorted walls or compression marks
Flex only the release area designed to move
Use silicone mold handling guidance for complex shapes
Using strong heat to melt residue
Warping, softening, or residue spread
Use mild warmth only if the material allows it
Check manufacturer instructions before heat use
Leaving wax film in detailed grooves
Residue transfer and lower release quality
Wipe details with a soft cloth or soft brush
Use fragrance residue guidance if odor or tackiness remains
Scrubbing before removing loose wax
Surface dulling and smeared wax film
Remove loose residue first, then wash
Move to material-safe washing after residue is lifted
Detailed cavities need slower cleaning because residue can sit in fine lines, raised textures, lettering, or narrow corners. A soft brush can help loosen residue from details, but the brush should bend before the mold surface does. For plastic or polycarbonate molds, use extra care near seams and rims because small scratches can become repeat residue points.
After loose wax is removed, check whether the remaining surface is wax film, fragrance residue, or dye residue. Wax film usually feels slick. Fragrance residue may feel oily or smell strong. Dye residue may leave color in the surface texture. Those are washing problems, not scraping problems, so the next step is a material-safe cleaner rather than more force.
Wash Candle Molds With Material-Safe Cleaners
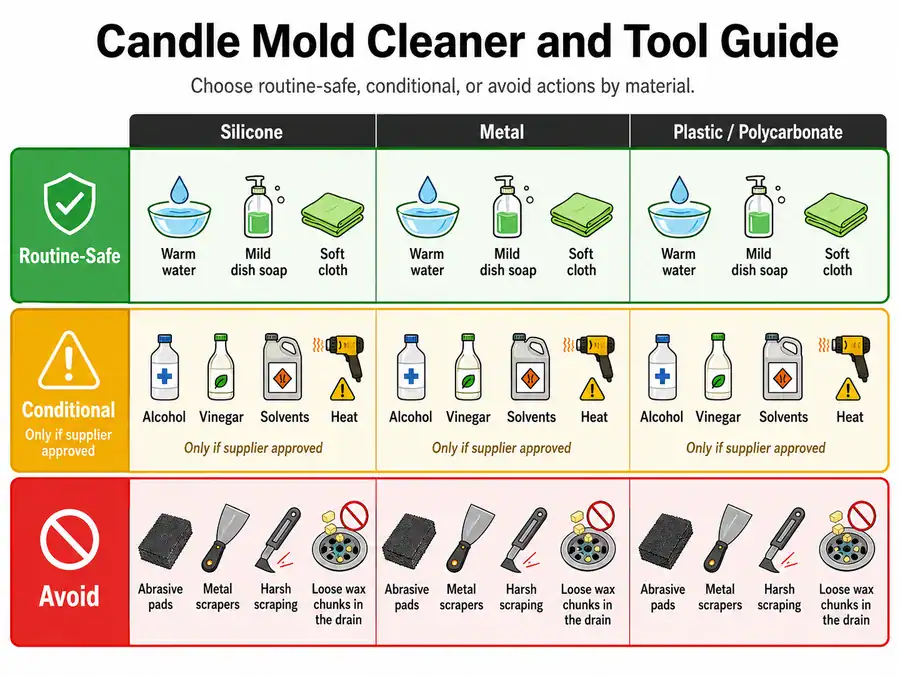
Wash candle molds with mild, non-abrasive cleaners matched to the mold material so the surface stays smooth, clean, and ready for the next pour. Routine washing usually starts with warm water, mild dish soap, and a soft cloth unless the mold manufacturer gives a stricter care limit.
“Safe” means mold-surface safe: non-abrasive, non-corrosive, non-deforming, and unlikely to leave residue for the next candle pour. It does not mean food-safe, child-safe, disinfectant-grade, or chemically safe in every use case.
Use alcohol, vinegar, solvents, heat, or freezing only when the mold supplier approves that method for the mold material. Do not rinse loose wax chunks into a drain; remove loose wax before washing.
Cleaner or tool
Silicone
Metal
Plastic/polycarbonate
Safe / conditional / avoid
Reason
Warm water
Usually safe
Safe if dried fully
Safe if not hot enough to warp
Safe
Lifts light residue without scraping the surface
Mild dish soap
Usually safe
Safe if rinsed and dried
Usually safe
Safe
Removes light wax film, dye traces, and fragrance residue
Soft cloth or microfiber
Safe
Safe
Safe
Safe
Cleans without dulling, gouging, or clouding the surface
Soft brush for details
Safe if gentle
Safe if non-metal
Safe if very soft
Conditional
Helps clean grooves without cutting detail edges
Alcohol
Conditional
Conditional
Conditional
Conditional
May affect surface finish or residues unless approved by the mold supplier
Vinegar
Conditional
Conditional
Conditional
Conditional
May be unsuitable for some surfaces or metal finishes
Solvents
Conditional to avoid
Conditional to avoid
Conditional to avoid
Conditional / avoid
Can degrade, cloud, or leave chemical residue if not approved
Abrasive pads
Avoid
Avoid
Avoid
Avoid
Can scratch, dull, or roughen the mold surface
Metal scrapers
Avoid
Avoid
Avoid
Avoid
Can gouge smooth release surfaces and damage fine details
Wash silicone molds gently because residue and odor can cling to flexible surfaces. A soft cloth handles most smooth cavities, while a soft brush can reach lettering, grooves, and raised detail without stretching thin walls. If a silicone mold still feels sticky after washing, the likely issue is leftover wax film, fragrance oil, dye, or soap residue rather than a need for harder scrubbing.
Wash metal molds quickly and dry them fully after rinsing. Soap residue can affect the next pour, but standing water is the larger risk because it can lead to rust or surface marks. Avoid steel wool, knife edges, and long soaking because scratches and moisture both reduce release quality.
Wash plastic or polycarbonate molds with extra care around clear surfaces, seams, and rims. These molds can scratch or cloud when scrubbed with rough pads, and they can deform if washed with heat beyond the maker’s care limit. For any cleaner not listed by the mold manufacturer, follow the supplier’s care instructions before using it on candle molds.
Rinse until the mold no longer feels slick from soap or cleaner. If fragrance odor or tackiness remains after routine washing, use fragrance oil residue troubleshooting instead of turning this washing step into a solvent test. After washing and rinsing, the mold is not storage-ready until all visible and hidden moisture is gone.
Dry Molds Completely Before Storage
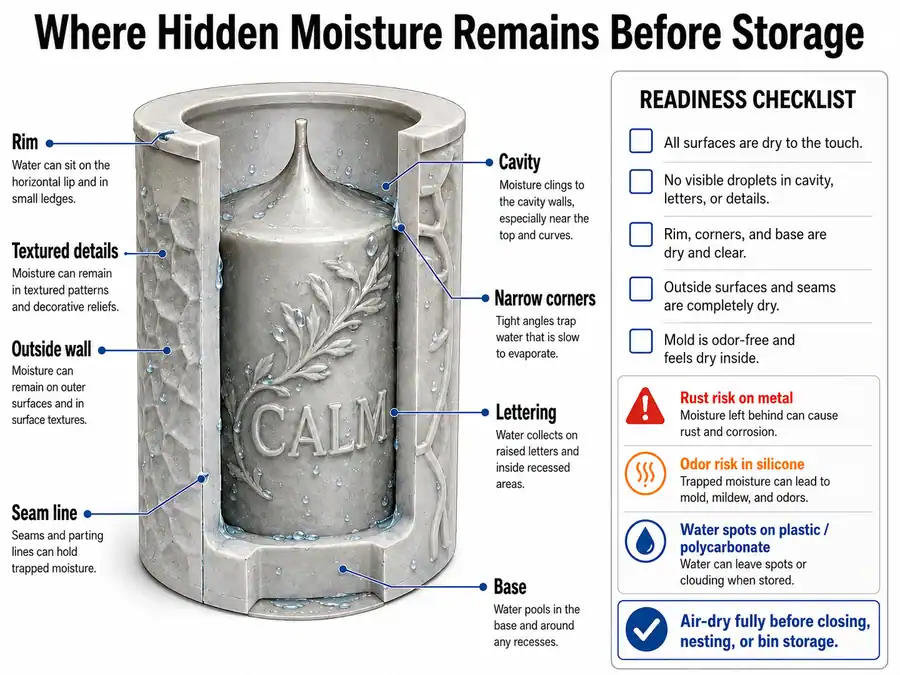
Dry candle molds completely before storage because hidden moisture can cause rust, spotting, odor, or residue transfer. Drying comes after washing and rinsing, but before stacking, closing containers, or putting molds away between candle projects.
Start by rinsing away cleaner residue. Then wipe visible surfaces with a lint-free cloth, including the cavity, rim, base, outside wall, and any seam line. Check detailed cavities by sight and touch because water can sit in lettering, narrow corners, textured surfaces, and release seams.
Air-dry the mold fully before closing a lid, nesting it with another mold, or placing it in a bin. Closed storage can trap moisture against the mold surface, and that trapped moisture can turn a clean mold into a rust, odor, or residue-transfer problem.
Use this storage-readiness checklist before putting candle molds away:
Storage-ready check
What it prevents
Extra note by material
No visible water
Water spotting and trapped moisture
Check rims and bases, not just the main cavity
No damp seams
Hidden moisture
Important for metal seams and detailed plastic molds
No soap film
Residue transfer
Re-rinse if the surface feels slick
No musty odor
Odor transfer
More common when silicone is closed too soon
No residue film
Sticky next pour
Look for shine, oiliness, or tacky spots
No rust spots
Metal surface damage
Do not reuse a rusty metal mold without checking the affected area
No wet detail cavities
Detail loss and residue pockets
Use air-drying time for grooves and raised textures
Metal molds need the strictest drying habit because even small damp areas can become rust points. Pay attention to rolled rims, seams, bases, clips, and any area where water can sit out of sight. If rust has already formed, move to metal mold rust prevention or repair guidance before reusing the mold.
Silicone molds are less likely to rust, but they can trap odor or residue when stored damp or sealed too soon. Let them air-dry open and uncompressed so moisture leaves both the inner cavity and any textured outer areas.
Plastic and polycarbonate molds can develop water spots or closed-container moisture. Drying them fully helps preserve a clear, smooth surface and avoids residue transfer into the next candle pour.
Once the mold is clean and fully dry, store it in a position that supports its walls, rim, cavity shape, and surface detail.
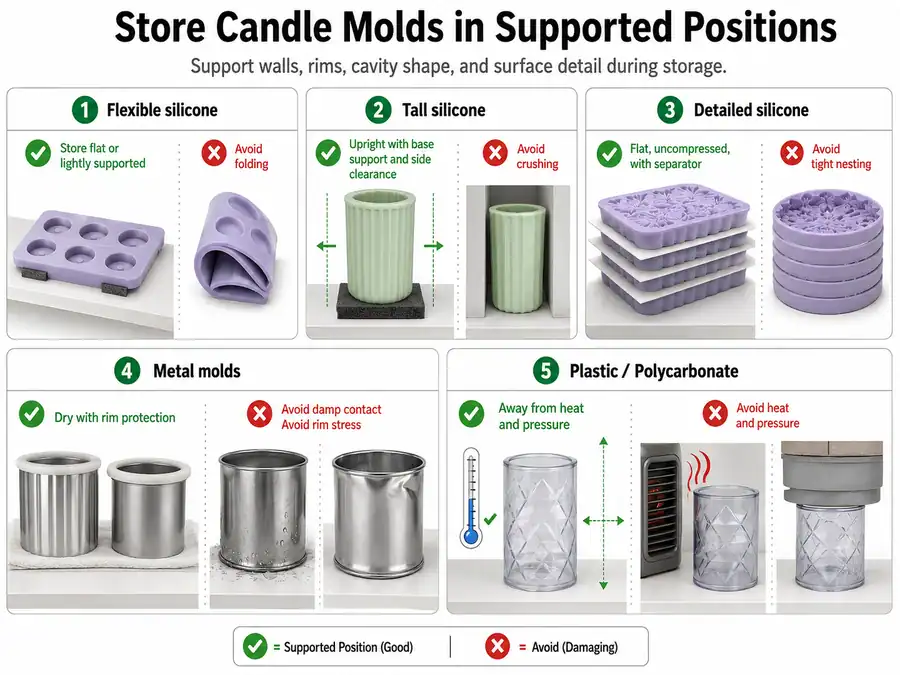
Store Candle Molds in a Position That Supports Their Shape
Store candle molds in a clean, dry, supported position so the mold keeps its walls, rim, cavity shape, and surface detail. Storage position means how the mold rests between uses, and the safest position depends on material, height, wall thickness, and surface detail.
Mold type
Best position
Support needed
Avoid
Damage prevented
Flexible silicone molds
Flat or lightly supported
Tray, shelf, or open space around details
Folding, bending, crushing, tight bins
Compression marks, flattened walls, lost cavity detail
Tall silicone molds
Upright only if stable
Base support and side clearance
Leaning against heavier tools
Leaning walls, ovaling, bent rims
Detailed silicone molds
Flat and uncompressed
Separator, tray, or protected shelf
Pressure on raised detail or fine cavities
Lost texture, torn edges, pressure marks
Metal molds
Upright or flat if stable
Dry surface and rim protection
Damp contact, dents, heavy rim pressure
Rust points, dents, scratched release surface
Plastic/polycarbonate molds
Flat or upright with no stress
Smooth shelf, no heat, no tight nesting
Hot storage, hard rubbing, rim stress
Warping, scratches, clouding, cracks
Thin-walled or fragile molds
Flat and isolated
Full base support
Stacking under heavier molds
Bent walls, collapsed shape, detail loss
The best position for a candle mold is the one that supports the whole shape without bending, twisting, or pressing on fine details. For silicone molds, flat storage is usually safer than upright storage when the mold is soft, thin, tall, or detailed. Upright storage can work when the base is broad, the rim is stable, and nothing presses against the mold wall.
For full workspace organization, use the candle-making supply organization guide. This section only covers mold position and support, not bins, shelves, furniture, or full craft-room layout.
If the mold is already warped, use a damaged-mold repair or replacement guide instead of this prevention routine. Prevention storage cannot reliably correct a mold that has deep cracks, torn silicone, severe rim bending, or structural deformation.
Correct storage should protect the mold from three forces: poor support, environmental stress, and pressure from stacking or nesting. The next two checks cover those storage risks before the final inspection routine.
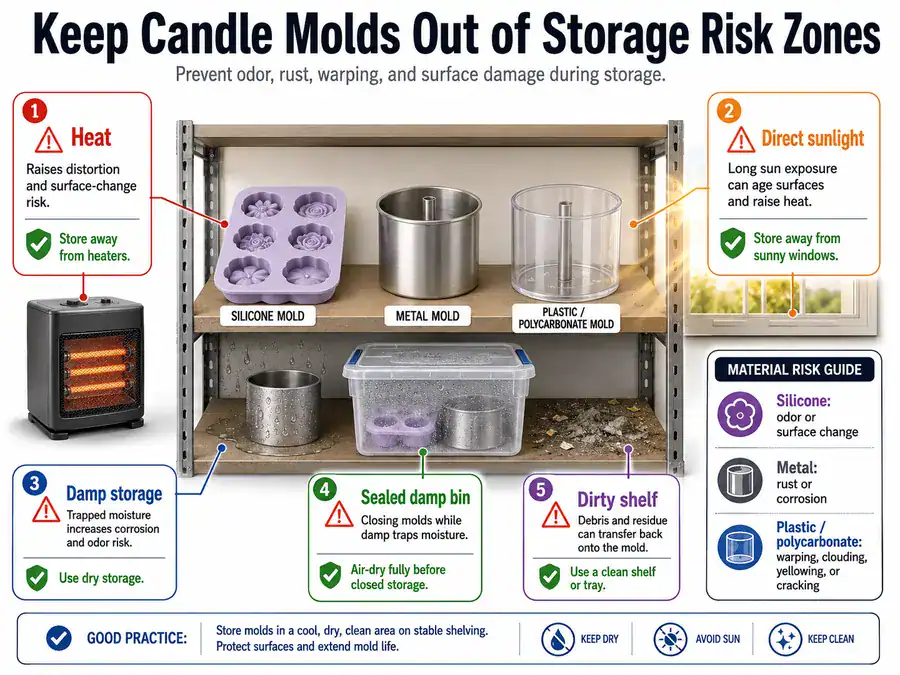
Keep Molds Away From Heat, Sunlight, and Damp Storage
Keep candle molds away from heat, direct sunlight, and damp storage because environmental exposure can warp, corrode, degrade, or contaminate mold surfaces. This storage rule applies after the mold is clean, dry, and placed in a supported position.
Exposure type
Silicone risk
Metal risk
Plastic/polycarbonate risk
Prevention action
Heat
Softening, odor retention, surface change
Hot metal surfaces may mark nearby items
Warping, clouding, shape change
Keep away from heaters, radiators, and hot garages
Direct sunlight
Surface change, brittleness, odor issues
Heat buildup and finish stress
Brittleness, yellowing, warping
Store away from sunny windows
Damp storage
Odor, tackiness, trapped residue
Rust, corrosion, discoloration
Water spots, closed-bin moisture
Dry fully before storage and avoid damp basements
Sealed damp bins
Trapped odor and moisture
Rust risk if any water remains
Musty surfaces and residue transfer
Close containers only after hidden areas are dry
Dirty storage areas
Dust and residue on flexible surfaces
Dust in seams and rims
Scratches from grit
Store clean molds on a clean shelf or tray
Heat can damage candle molds in storage even when the mold was cleaned correctly. Warm conditions can make flexible molds more vulnerable to compression and can make plastic molds more likely to lose shape. Direct sunlight can add heat and surface stress, especially near windows.
Damp storage is most serious for metal molds because moisture can start rust at seams, rims, bases, and small scratches. Silicone and plastic molds do not rust, but closed damp storage can still trap odor, tackiness, dust, or residue.
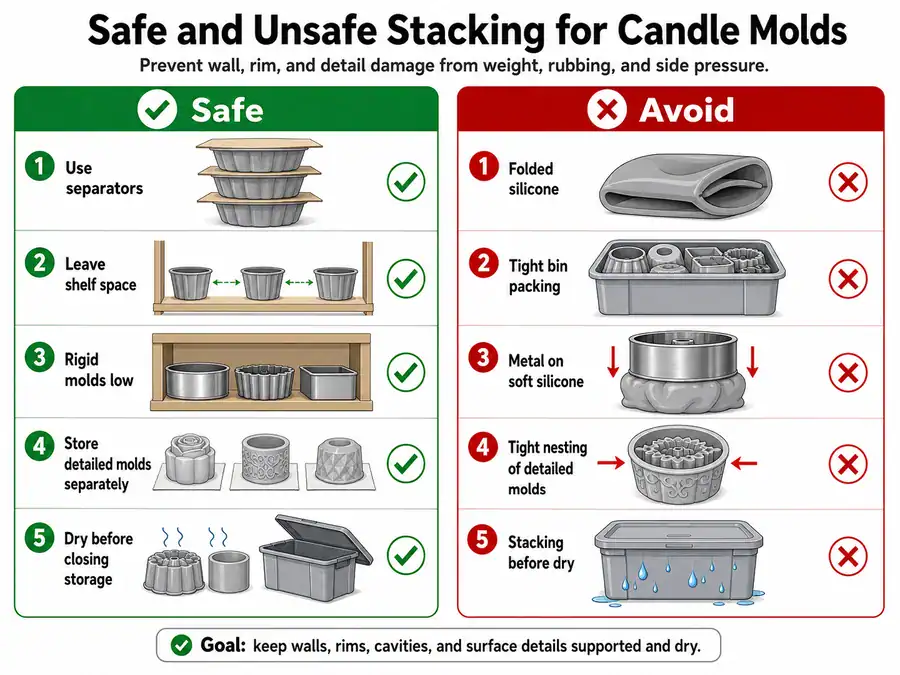
Stack or Nest Molds Only When Pressure Will Not Distort Them
Stack or nest candle molds only when the mold walls, rims, and details will not be compressed by weight or side pressure. Stacking means placing molds on top of one another; nesting means placing one mold inside another.
Mold type
Can stack?
Can nest?
Separator needed?
Main distortion risk
Soft silicone molds
Usually no under weight
Only if loose and shape-safe
Often yes
Flattening, compression marks, lost detail
Thick silicone molds
Sometimes, lightly
Sometimes, if not tight
Useful for detailed surfaces
Bent rims, pressure marks
Detailed silicone molds
Avoid heavy stacking
Avoid tight nesting
Yes
Crushed texture, torn fine edges
Metal molds
Yes if dry and stable
Sometimes if rims do not rub
Useful between hard surfaces
Dents, scratches, rim stress
Plastic/polycarbonate molds
Light stacking only
Only if loose and cool
Yes if surfaces touch
Scratches, clouding, cracks, warping
Tall or thin molds
Avoid stacking
Avoid tight nesting
Yes if stored near other molds
Leaning walls, ovaling, bent rims
Pressure-safe storage means the mold keeps its intended shape without weight, rubbing, or side force changing the walls, rim, or cavity. Pressure marks in silicone can become permanent when the mold does not spring back after being stored under weight or side pressure.
Do not stack heavy rigid molds on top of flexible silicone molds. Do not tightly nest detailed molds with fragile cavities, raised lettering, narrow rims, or thin walls.
Use separators, trays, or open shelf space when surfaces might rub together. Keep heavier rigid molds at the bottom only when the lower mold is stable and will not dent, scratch, or trap moisture. Store detailed or thin-walled molds flat and uncompressed whenever shape accuracy matters.
If compression damage is already severe, use replacement guidance rather than storage advice.
Avoid these pressure mistakes:
Pressure mistake
What can happen
Safer choice
Folding silicone molds to save space
Creases, flattened walls, detail loss
Store flat or lightly supported
Packing molds tightly in a bin
Side pressure and rim distortion
Leave clearance around flexible molds
Nesting detailed molds tightly
Raised details may press into nearby surfaces
Use separators or store separately
Placing metal molds on soft silicone
Silicone compression and shape marks
Put rigid molds below or on a separate shelf
Stacking before molds are dry
Trapped moisture and residue transfer
Dry fully before stacking or closing storage
Inspect Molds Before Storage and Before the Next Pour
Inspect candle molds before storage and before the next pour so residue, moisture, rust, odor, or distortion does not carry into the next candle. This inspection is the final readiness check after cleaning, drying, and storage support.
Before storage, confirm that the mold is clean, dry, residue-free, and supported. Before the next pour, confirm that storage did not add dust, odor, rust, tackiness, pressure marks, or shape change.
Store uncompressed; replace if shape is compromised
Scratches or clouding
Rough plastic surface or dull clear mold
Use gently; replace if release quality is poor
Cracks, tears, deep warping
Structural damage or distorted cavity shape
Replace or repair before reuse
Uneven sitting
Mold rocks, leans, or no longer holds shape
Do not pour until stability is corrected
A candle mold is safe to reuse when it is clean, dry, stable, odor-controlled, and still shaped as intended. Metal molds need a corrosion check before reuse. Silicone molds need checks for compression, odor, tackiness, and misshapen walls. Plastic and polycarbonate molds need checks for scratches, clouding, cracks, and heat distortion.
Warning sign
Likely cause
Next action
Bridge route if needed
Small wax film
Incomplete residue removal
Clean again
Residue cleanup section
Soap slickness
Poor rinsing
Rinse and dry again
Material-safe washing section
Water in seams
Stored too soon after washing
Dry again before storage
Metal rust prevention if corrosion appears
Rust spot on metal
Moisture contact or damp storage
Do not pour until checked
Metal mold rust guidance
Strong fragrance odor
Trapped fragrance residue
Clean, air out, and check residue
Fragrance residue guidance
Sticky silicone
Oil, dye, soap, or wax film
Rewash with material-safe cleaner
Silicone mold care guidance if tackiness repeats
Flattened silicone wall
Compression during storage
Store flat and uncompressed; replace if shape does not recover
Damaged-mold repair or replacement guidance
Cracked plastic
Pressure, age, or heat stress
Replace rather than pour into the damaged mold
Mold replacement guidance
Deep warping
Heat or long-term pressure
Use repair or replacement guidance
Damaged-mold repair or replacement guidance
Clean mold but candles still stick
Release issue not caused by storage
Check release variables outside storage
Candle release troubleshooting
Short-term storage usually needs a quick clean, dry, and support check. Long-term storage needs a closer inspection for hidden moisture, dust, odor, rust, deformation, and pressure marks. Detailed molds need extra attention because small features can hold residue or become compressed without obvious damage to the outer wall.
If cracked, badly warped, torn, or deeply rusted molds appear during inspection, move to repair or replacement guidance instead of storing them for another pour. If the mold looks clean but candles still stick, use candle release troubleshooting. If the finished candle defect clearly comes from wax behavior rather than mold condition, route that problem to wax formulation guidance instead of mold storage.
Clean the mold, dry every hidden area, support the shape, protect it from heat, dampness, and pressure, then inspect it before storage and before reuse.
FAQ
Can I clean all candle molds the same way?
No. Candle molds should be cleaned by material because silicone, metal, and plastic molds carry different damage risks. Silicone can stretch or compress, metal can rust, and plastic or polycarbonate can scratch, cloud, crack, or warp.
Use the material-first cleaning method before choosing water temperature, tools, pressure, or storage position. When the mold material is unknown, treat it as delicate and check the supplier’s care instructions before using heat, solvents, scraping tools, or tight storage.
What is the safest way to remove wax from a candle mold?
The safest way to remove wax from a candle mold is to let the wax cool, lift loose residue gently, and avoid sharp scraping. Use fingers, a soft cloth, a soft brush, or a blunt plastic edge only when the mold surface can handle it.
Do not use knives, metal scrapers, heavy pulling, or strong heat to force wax out. If the whole candle is stuck in the mold, that is a release problem rather than normal residue cleanup, so use stuck-candle troubleshooting before cleaning leftover wax.
Why does my candle mold still feel sticky after washing?
A candle mold may feel sticky after washing because wax film, fragrance oil, dye, or soap residue is still on the surface. Rewash with a mild, non-abrasive cleaner matched to the mold material, rinse well, and dry the mold fully before storage.
Do not treat stickiness as a reason to use harsh solvents unless the mold manufacturer approves them. Strong cleaners can dull, cloud, corrode, or degrade the surface that helps candles release cleanly.
How do I prevent silicone candle molds from losing shape?
Prevent silicone candle molds from losing shape by storing them flat or lightly supported, with no folding, tight nesting, side pressure, or heavy items on top. Silicone can look flexible, but long pressure can leave compression marks, flattened walls, or lost cavity detail.
Tall silicone molds need base support and enough side clearance to stop leaning or ovaling. Detailed silicone molds need extra space around raised textures, lettering, thin rims, and deep cavities.
How do I stop metal candle molds from rusting in storage?
Stop metal candle molds from rusting in storage by washing them gently, rinsing fully, drying every seam and rim, and storing them in a dry place with no trapped moisture. Metal molds should not be soaked, closed while damp, or stacked against wet surfaces.
Check rolled rims, bases, seams, clips, and scratched areas before storage and before reuse. If rust is already present, use metal mold rust guidance before pouring another candle.
Can I stack candle molds to save space?
You can stack candle molds only when weight, rubbing, and side pressure will not distort the mold. Rigid molds may tolerate light stacking when dry and stable, but soft silicone, thin-walled molds, detailed molds, and plastic molds often need separators or separate shelf space.
Avoid placing metal molds on soft silicone molds, nesting detailed molds tightly, or closing damp molds together. Space-saving storage is not worth it if the mold comes out scratched, compressed, warped, or odor-trapped.
When should I replace a damaged candle mold?
Replace a candle mold when cracks, torn silicone, deep warping, severe rust, bent rims, or permanent cavity distortion affect candle shape or release quality. Cleaning and storage can prevent damage, but they cannot reliably fix structural failure.
If the mold is clean and dry but candles still stick, check candle release troubleshooting. If the candle defect comes from wax behavior rather than mold condition, route that issue to wax formulation guidance instead of mold storage.
Candle dye can contribute to weak hot scent throw, soot, or unstable burning when its dose, dispersion, compatibility, or effect on the wick is wrong, but poor performance does not prove dye is the...
Color candles naturally with the wax’s inherent color, a strained botanical infusion, or a documented wax-compatible concentrate, then compare cured and burned results with an uncolored...