Burning and maintaining candles means using finished candles with safe placement, controlled burn sessions, wick care, gentle extinguishing, post-burn reset, and storage habits that support safety, even melting, scent throw, and candle life.
A finished candle is a candle that has already been made and is ready to use. Candle burning is the act of lighting, watching, and stopping that candle under safe conditions. Candle maintenance is the routine care before, during, and after each burn, including trimming, placement, reset, storage, and basic symptom checks. This guide is for home users caring for finished candles, not makers doing wax formulation, wick sizing, professional burn testing, regulatory compliance, or product reviews. <!– Meta description: Learn how to burn and maintain finished candles with safe placement, wick trimming, burn-time control, gentle extinguishing, reset, storage, and basic troubleshooting. –>
When the label does not give stricter guidance, use common consumer defaults: keep the wick near 1/4 inch (6 mm), keep burning candles about 12 inches from flammable items, avoid sessions longer than about 4 hours, and stop container candles before the wax is extremely low.
How to Burn a Candle the Right Way the First Time
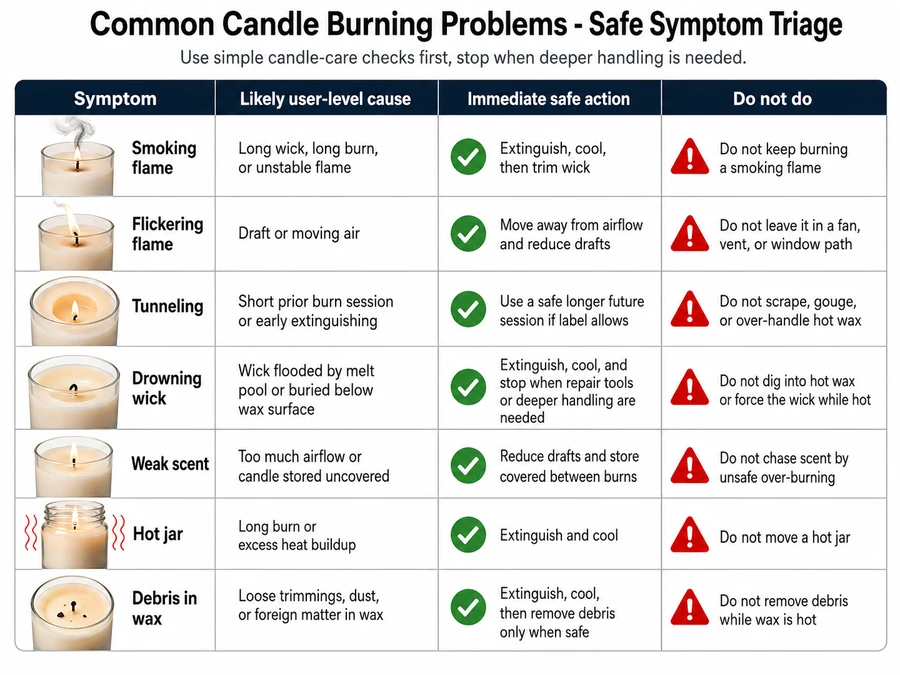
Burn a candle the first time long enough for the wax surface to melt evenly across the top, but never longer than the label allows.
A melt pool is the liquid wax that forms around the flame while the candle burns. For many candles, the first session should be long enough for melted wax to reach close to the container edge or candle edge. Manufacturer instructions and warning labels should override generic burn-time advice.
[IMAGE-PLACEHOLDER: Photo series showing an unlit candle, partial melt pool, full surface melt, and overlong burn warning signs.]
- Place the candle on a stable, heat-safe surface.
- Trim the wick if the wick is long, curled, or mushroomed.
- Light the candle only when you can stay nearby.
- Let the top wax surface melt evenly.
- Stop before the jar gets too hot, the flame becomes unstable, or the label’s burn limit is reached.
- Extinguish the flame gently and let the wax cool before moving the candle.
| First-burn result | What it looks like | What it means | What to do next |
|---|---|---|---|
| Even first burn | Melted wax reaches close to the edge | The candle has a better chance of burning evenly later | Extinguish within the safe burn limit |
| Short first burn | Melted wax stays near the wick | Side wax may remain unused in later burns | Burn longer next time, within label limits |
| Overlong first burn | Large flame, hot jar, soot, or mushroomed wick | Heat and soot risk are rising | Extinguish, cool, trim before relighting |
| Unsafe first burn | Flame flickers wildly or jar feels too hot | The candle is no longer burning safely | Extinguish and do not relight until the cause is clear |
Understand Candle Memory and Tunneling Risk
Candle memory is the melt pattern a candle tends to repeat after earlier burns, especially when the first burn melts only a small center ring.
Candle memory is not literal memory. It is a user-facing way to describe repeated wax behavior. When a candle is extinguished too early, the melted area may stay narrow. Later burns can follow that narrow path, leaving unused wax around the sides.
Short first burns raise tunneling risk. Overlong first burns raise heat, soot, and wick problems. The safer target is an even melt pool reached through a monitored burn session.
Prevent Candle Tunneling Before It Starts
Prevent tunneling by helping the candle form an even melt pool early, then repeating safe burn habits during later sessions.
Tunneling means the candle burns down through the middle while unmelted wax remains around the sides. Prevention belongs in daily candle care. Established tunneling repair is a separate task because foil methods, heat tools, wax correction, and wick replacement can change the safety conditions of the candle.
| Prevention habit | Why it helps | Do not turn it into |
|---|---|---|
| Give the first burn enough time | Helps the surface melt more evenly | Burning past label limits |
| Keep the wick trimmed | Helps control flame size and heat | Wick sizing or wick replacement |
| Avoid drafts | Reduces uneven flame movement | Sealed-room burning |
| Stop at safe limits | Reduces overheating and soot | Burning until the jar is empty |
| Watch the melt pool | Shows whether wax is melting evenly | Heat-gun, foil, or remelting repair |
Trim the Wick Before Each Burn
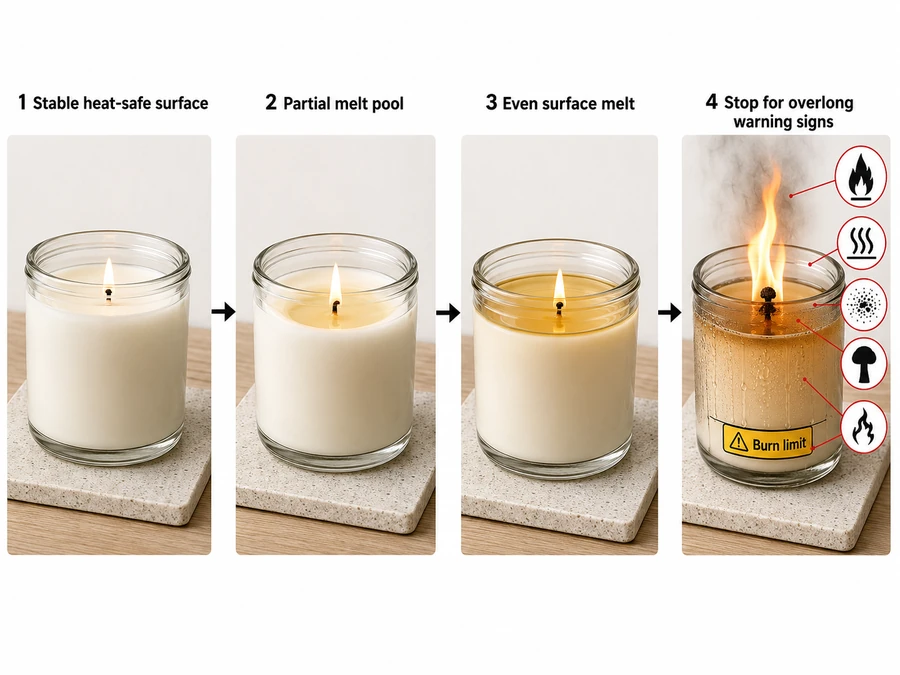
Trim a candle wick before each burn so the flame stays controlled, produces less soot, and burns the wax more evenly.
Wick trimming means shortening the cooled, charred wick before lighting or relighting the candle. A cooled wick is a wick that is no longer hot from a previous burn. A charred wick is the blackened burned end left after use. When the label does not give a different length, trim the cooled wick to about 1/4 inch (6 mm) before lighting.
[IMAGE-PLACEHOLDER: Close-up comparison of an untrimmed wick, a properly trimmed wick, and an over-trimmed wick.]
- Let the candle cool fully after the last burn.
- Remove the lid, if there is one.
- Check the wick for a long, curled, or mushroomed top.
- Trim the blackened end cleanly.
- Remove wick trimmings from the wax.
- Check that the wick is centered enough for safe relighting.
- Relight only when the candle sits on a safe surface and can be watched.
| Wick condition | Flame result | Maintenance action |
|---|---|---|
| Long wick | Tall flame, more soot, faster wax use | Trim before lighting |
| Mushroomed wick | Smoking, flaring, unstable flame | Cool, trim, remove debris |
| Properly trimmed wick | Steadier flame and cleaner burn | Light and monitor |
| Over-trimmed wick | Weak flame or drowning risk | Do not dig wax or replace wick here; use troubleshooting guidance |
A wick trimmer is useful for deep jars because it reaches lower than scissors and can catch the cut piece. Scissors can work on shallow candles if they cut cleanly and do not push debris into the wax. The tool matters less than trimming only when the candle is cool and unlit.
Check the Candle Before Relighting
A candle is ready to relight when the wick, wax surface, jar, placement, and room conditions are safe for another monitored burn.
| Check | Safe condition | Wait or fix first when |
|---|---|---|
| Wick | Trimmed, centered, not mushroomed | Wick is long, curled, buried, or smoking from the last burn |
| Wax surface | Firm or safely cooled, with no loose debris | Wax is still liquid or contains matches, wick pieces, or dust |
| Jar or holder | Cool enough to handle and not cracked | Glass is hot, cracked, or unstable |
| Placement | Stable, heat-safe, away from drafts and hazards | Candle is near fabric, paper, pets, children, or moving air |
| Monitoring | Someone can stay nearby | You are leaving the room or going to sleep |
Wax debris means foreign material such as match fragments, wick trimmings, dust, or loose charred wick pieces. Remove debris only when the candle is unlit and safe to handle. Do not touch hot liquid wax.
Place Candles Safely Before Lighting
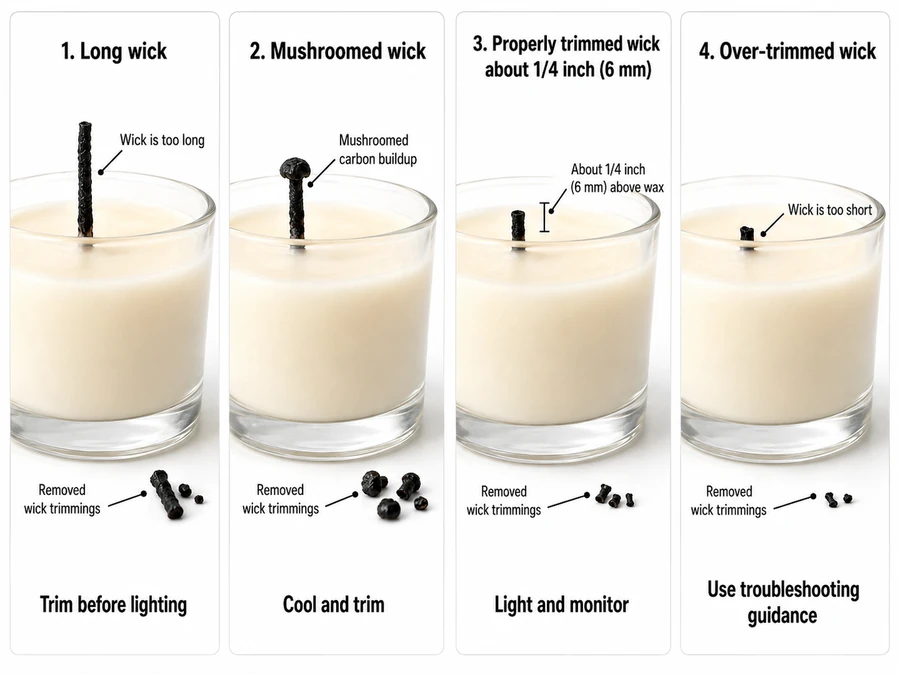
Place candles on a stable, heat-safe surface away from drafts, flammable items, children, pets, and unstable edges.
A heat-safe surface is a level surface that can handle candle heat without tipping, melting, scorching, or transferring heat to nearby objects. Safe placement means the candle sits where heat stays controlled, wax can melt evenly, and the flame cannot touch nearby hazards.
[IMAGE-PLACEHOLDER: Safe vs unsafe placement diagram showing a stable heat-safe tray, clear space, no fabric nearby, and no open window or fan path.]
| Placement check | Safe condition | Move the candle when |
|---|---|---|
| Surface | Level, stable, and heat-safe | The candle wobbles, leans, or sits on fabric, paper, or plastic |
| Distance | Away from anything that can catch fire | Curtains, books, plants, décor, or clothing are nearby |
| Reach | Out of reach of children and pets | A child, cat, dog, or moving object could touch it |
| Airflow | Away from direct moving air | The flame leans, flickers, or smokes before settling |
| Visibility | Easy to watch during the burn | You cannot see it from where you will be |
| Holder or tray | Correct size and nonflammable | A taper, pillar, or votive is loose or unsupported |
The placement goal is not home styling or fire-code advice. It is a practical candle-care check before flame use.
Keep Candles Away From Drafts
Drafts can bend the flame, increase soot, create uneven melting, and raise candle safety risk.
A draft is moving air around the flame from an open window, fan, vent, doorway, or high-traffic area. “Draft-free” means away from direct moving air. It does not mean burning a candle in a sealed or unventilated room.
| Flame symptom | Likely draft source | Candle-care action |
|---|---|---|
| Flame leans to one side | Open window, vent, or fan | Move the candle away from the air path |
| Flame flickers repeatedly | Foot traffic or a nearby doorway | Place the candle in a calmer spot |
| Jar darkens near one side | Flame is burning unevenly | Extinguish, cool, trim, and relight in a steadier location |
| Wax melts more on one side | Draft or tilted surface | Check both airflow and surface level |
| Flame grows or smokes | Wick, draft, or burn-time issue | Extinguish if unstable, then reset before relighting |
Draft control is part of candle maintenance because airflow affects flame behavior before it becomes a soot, melt-pool, or overheating problem.
Burn Candles Long Enough, but Not Too Long
A candle burn session should melt wax evenly for that candle type, then stop before label limits or overheating signs appear.
A burn session is one continuous period when a finished candle stays lit and watched. Safe burn time means the candle burns long enough to support even melting without exceeding the candle label, overheating the container, creating an unstable flame, or reaching unsafe low-wax conditions.
Methods note: Use numeric burn-time rules as general consumer guidance, not as candle testing data. Candle size, wax type, vessel shape, wick behavior, and the manufacturer label can change the safe session length.
When the label does not give a stricter maximum, treat about 4 hours as the upper limit for a watched burn session before cooling and resetting the candle.
| Burn-session goal | What to watch | Good result | Stop condition |
|---|---|---|---|
| First burn | Wax surface and label limit | Surface melts evenly without overheating | Label limit, hot jar, unstable flame, or heavy soot |
| Later jar-candle burn | Melt pool, wick, jar heat | Even wax use and steady flame | Jar too hot, wax too low, smoke, or label limit |
| Pillar burn | Edge shape and drip control | Outer wall remains stable | Excess dripping, leaning flame, or holder heat |
| Votive or tealight burn | Holder fit and full melt behavior | Flame stays centered in a safe holder | Holder overheats, flame flares, or wax is nearly gone |
| Taper burn | Holder grip and flame height | Candle stays upright with steady flame | Candle nears holder, leans, drips heavily, or smokes |
Stop burning when:
| Stop when | Why it matters |
|---|---|
| The label’s maximum burn time is reached | The maker’s safety instructions override generic timing |
| The jar becomes too hot to handle | Heat may be rising beyond normal use conditions |
| The flame grows, smokes, or flickers wildly | Wick, draft, or wax conditions may no longer be controlled |
| Wax is very low | Low wax can increase container heat risk |
| You cannot stay nearby | Candle care depends on attended use |
Too short and too long create different problems. A short session can leave unmelted side wax and encourage uneven future burns. An overlong session can increase heat, soot, wick mushrooming, low-wax risk, and container stress.
Manage the Melt Pool for an Even Burn
A healthy melt pool melts enough wax to support an even burn without overheating the candle or exceeding safe burn guidance.
A melt pool is the liquid wax around the wick during a burn session. An even burn means the wax surface melts in a controlled pattern for that candle type. It does not mean forcing the candle hotter, burning past the label, or trying to repair a tunnel with foil, heat tools, or remelting.
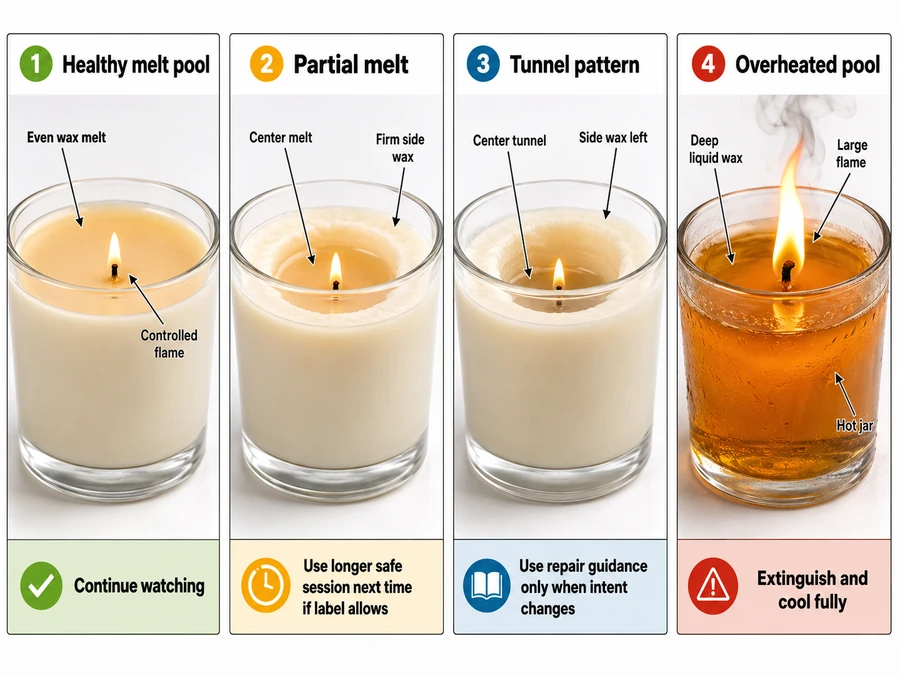
[IMAGE-PLACEHOLDER: Labeled melt-pool comparison showing healthy melt pool, partial melt, tunnel pattern, and overheated melt pool.]
| Melt-pool state | What it looks like | What it means | Candle-care action |
|---|---|---|---|
| Healthy melt pool | Wax melts evenly without a roaring flame | Burn time, wick, and placement are working together | Continue watching until a safe stop point |
| Partial melt | Center melts while side wax stays firm | Session may be too short, candle may be large, or flame may be weak | Use a longer safe session next time if label allows |
| Tunnel pattern | Candle burns down the center with side wax left | Earlier sessions may have set a narrow melt path | Keep prevention here; use repair guidance only when intent changes |
| Overheated pool | Deep liquid wax, hot jar, large flame, or smoke | Burn session may be too long or wick/flame may be unstable | Extinguish, cool fully, and inspect before relighting |
Melt-pool care supports scent release and wax use, but it is not wax chemistry. Finished-candle users should judge visible burn behavior, flame stability, jar heat, and the candle label rather than trying to change the candle’s formula.
Watch for Hot Jars and Overheating
Stop or cool the candle when the jar becomes unsafe to handle, wax is too low, flame behavior is unsafe, or the label limit has been reached.
Jar temperature management means knowing when a container candle is normally warm, too hot to handle, or unsafe to keep burning. A warm jar is not automatically unsafe. The concern rises when heat combines with a long burn session, low wax, unstable flame, soot, cracking, or a heat-sensitive surface.
| Jar condition | What it means | What to do |
|---|---|---|
| Warm jar | Normal heat may be present during use | Keep watching and follow the label |
| Hot to touch | Handling or moving is unsafe | Do not move it; extinguish if heat keeps rising |
| Very hot with low wax | End-of-candle heat risk is higher | Stop burning and let it cool |
| Hot with smoke or large flame | Wick, draft, or burn time may be uncontrolled | Extinguish, cool, trim, and reassess |
| Cracked or damaged jar | Container safety is compromised | Stop using the candle |
Container heat is why “use all the wax” is not the goal of candle maintenance. A safer candle-care routine stops before the candle burns to empty, especially when the label gives a low-wax stopping point.
Maintain Scent Throw Without Unsafe Burning
Support scent throw with safe burn habits, draft control, clean wax, correct room fit, and proper storage.
Scent throw is the fragrance a candle gives off. Hot throw is fragrance released while the candle is burning. Weak scent does not mean the candle should burn longer than the label allows.
| Weak scent cause | Safe user action | Do not do this |
|---|---|---|
| Candle is too small for the room | Use it in a smaller room or closer seating area | Burn past safe limits to force stronger scent |
| Drafty placement | Move the candle away from moving air | Burn in a sealed room |
| Short session | Let the candle form a safe melt pool if label allows | Leave it burning unattended |
| Dirty wax surface | Remove debris only when unlit and safe | Touch hot liquid wax |
| Poor storage | Keep cooled candles covered and away from heat, dust, and sun | Add fragrance oil to a finished candle |
| Formulation issue | Treat it as a product or candle-design limit | Try to reformulate the candle during use |
Scent maintenance belongs inside safe candle use. When the flame is steady, the wax surface is clean, the room fit is reasonable, and the candle is stored well between burns, the scent has the best chance to perform without unsafe user changes.
Put Out Candles Without Smoke, Soot, or Wick Damage
The best way to put out a candle is to extinguish the flame gently so you reduce smoke, avoid wax splatter, and keep the wick ready for the next burn.
Extinguishing means safely ending the candle flame. Safe extinguishing means doing that with less smoke, less splatter, less wick movement, and fewer relighting problems.
| Extinguishing method | Best use | Main benefit | Watch out for |
|---|---|---|---|
| Candle snuffer | Ending the flame without blowing air at the wax | Reduces smoke and wax splatter | Bell must not touch hot wax or push the wick |
| Wick dipper | Dipping and lifting the wick when used carefully | Can reduce smoke and help reposition the wick | Do not leave the wick buried in wax |
| Careful blowing | When no tool is available | Simple and fast | May cause more smoke, splatter, or wick movement |
| Lid use | Only when the maker says the lid is safe for extinguishing | Can limit oxygen in some candle designs | Do not assume every lid is heat-safe for this job |
Use this safe extinguishing sequence after a normal burn:
- Stop the flame with a snuffer, wick dipper, or careful method.
- Keep the candle stable while the wax is still liquid.
- Avoid touching hot wax, the wick, or a hot jar.
- Let the candle cool before moving, covering, or storing it.
- Check the wick and wax before the next burn.
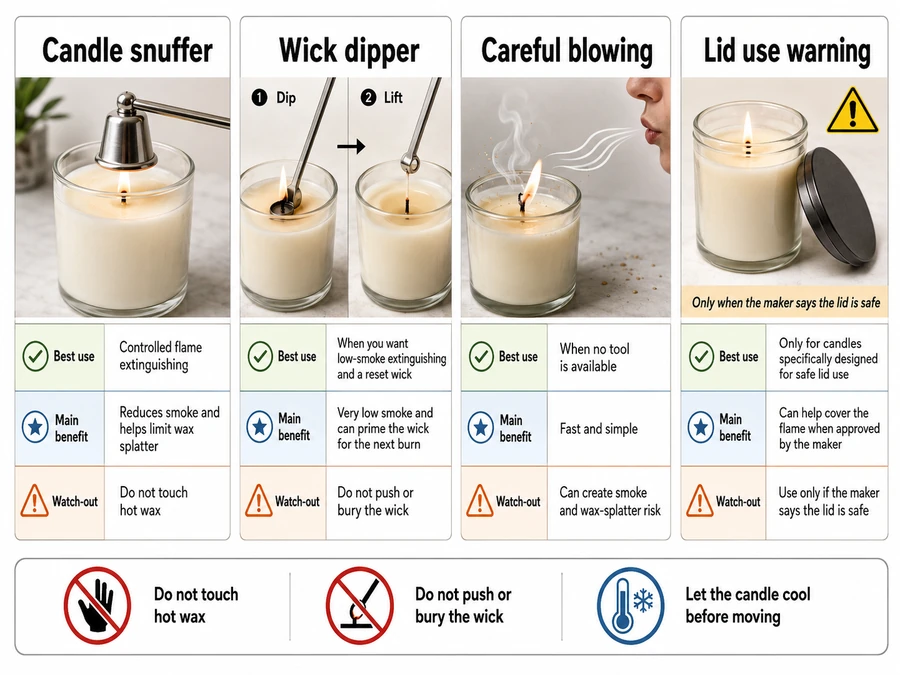
[IMAGE-PLACEHOLDER: Tool comparison photo showing a snuffer over flame, wick dipper in use, careful blowing risk, and lid-use warning.]
Blowing out a candle is not always wrong, but it can create more smoke or push liquid wax. A snuffer often gives a cleaner shutdown because it ends the flame without a burst of air. A wick dipper can help when the user knows how to lift the wick back out of the wax.
Reset the Candle After Every Burn
After every burn, let the candle cool, inspect the wick and wax, remove safe-to-remove debris, cover or store the candle, and leave it ready for the next burn.
A post-burn reset routine is the after-extinguishing care that leaves a candle cool, clean, covered, and ready for its next safe burn. To maintain a candle here means repeating after-burn care, not repairing, remaking, replacing the wick, or chemically modifying the candle.

[IMAGE-PLACEHOLDER: Reset photo sequence showing extinguish, cool, inspect, clear debris, cover, and store.]
| Reset step | What to do | Why it matters |
|---|---|---|
| Extinguish | End the flame gently | Reduces smoke, splatter, and wick movement |
| Cool | Let wax and container temperature settle | Prevents unsafe handling and lid problems |
| Inspect | Check wick length, wick position, wax surface, and jar condition | Catches relighting issues early |
| Clear debris | Remove loose debris only when wax is cool and safe | Keeps the next flame cleaner and more controlled |
| Cover | Use a lid or dust cover when appropriate | Protects wax from dust and scent loss |
| Store | Put the candle away from heat, dust, sunlight, and moisture | Keeps it ready for the next burn |
The reset routine happens after extinguishing. The relighting routine happens before the next flame. That distinction matters because a candle may look ready right after the flame is out, but hot wax, a hot jar, or loose debris can still make handling unsafe.
This section does not cover jar cleaning after the candle is finished, wax reuse, wick replacement, or candle repair.
Store Candles Between Burns
Store candles between burns in a cool, dry, covered place away from direct sunlight, dust, moisture, and excess heat.
Candle storage is the between-burn care that protects wax, wick, fragrance, and surface cleanliness when a candle is not lit. Proper storage means cool, dry, covered, and away from sun or dust after the candle has cooled.
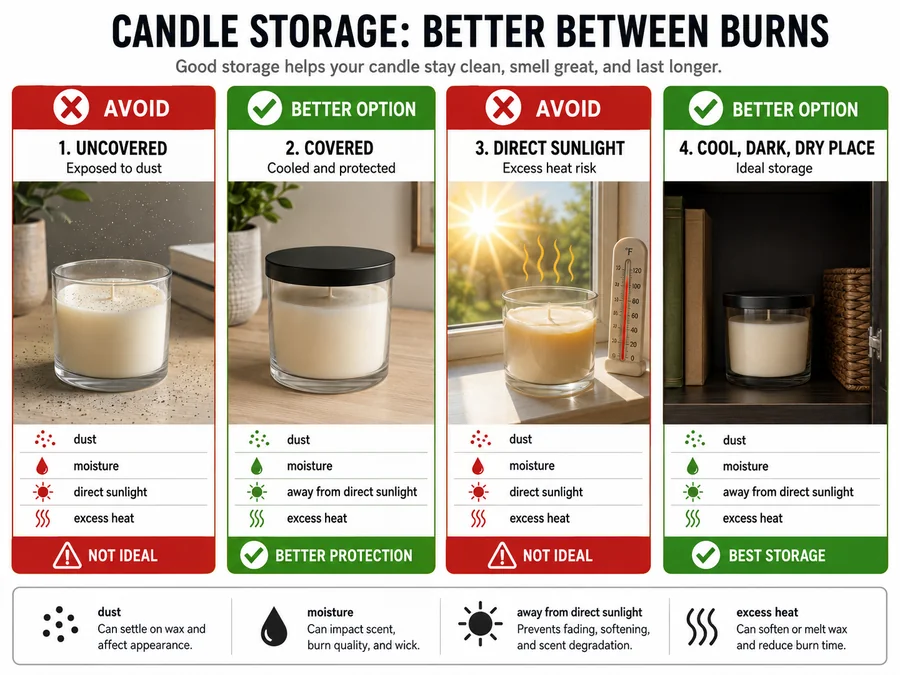
[IMAGE-PLACEHOLDER: Storage comparison photo showing an uncovered candle, covered candle, candle in sunlight, and candle in cool dark storage.]
| Storage choice | Better option | Avoid | Why it matters |
|---|---|---|---|
| Covering | Cover cooled candles with a lid or dust cover | Covering while wax or jar is still hot | Protects wax without trapping heat too early |
| Light exposure | Keep candles in a shaded or dark place | Direct sunlight | Helps protect color, shape, and perceived fragrance |
| Temperature | Use a stable, cool room area | Heat sources, hot windowsills, or cars | Reduces softening, sweating, or shape changes |
| Cleanliness | Keep wax surface free from dust | Open storage near lint, ash, or pet hair | Makes the next relight cleaner |
| Moisture | Store in a dry place | Damp rooms or wet surfaces | Helps protect wick condition and container finish |
Use this storage routine after the candle has cooled:
- Check that the flame is out and the wax has hardened.
- Remove loose debris only if it is safe to touch.
- Cover the candle when the lid or cover is meant for storage.
- Keep it away from sunlight, heat, dust, and moisture.
- Recheck the wick and wax before lighting again.
Storage supports scent throw, relighting readiness, and cleaner wax, but it does not fix a poorly made candle or change the fragrance formula. Between-burn care only protects the finished candle you already have.
Know When to Stop Burning a Candle
Stop burning a candle when the label’s burn limit is reached, the jar is too hot, the flame becomes unstable, or the wax is low.
End-of-candle care means knowing when a finished candle is no longer safe to burn. It does not mean burning every last bit of wax, scraping hot wax, or forcing the candle to last longer than its safe-use condition allows.
When the label does not give a lower stopping point, stop container candles when about 1/2 inch (13 mm) of wax remains so the container does not overheat near the bottom.
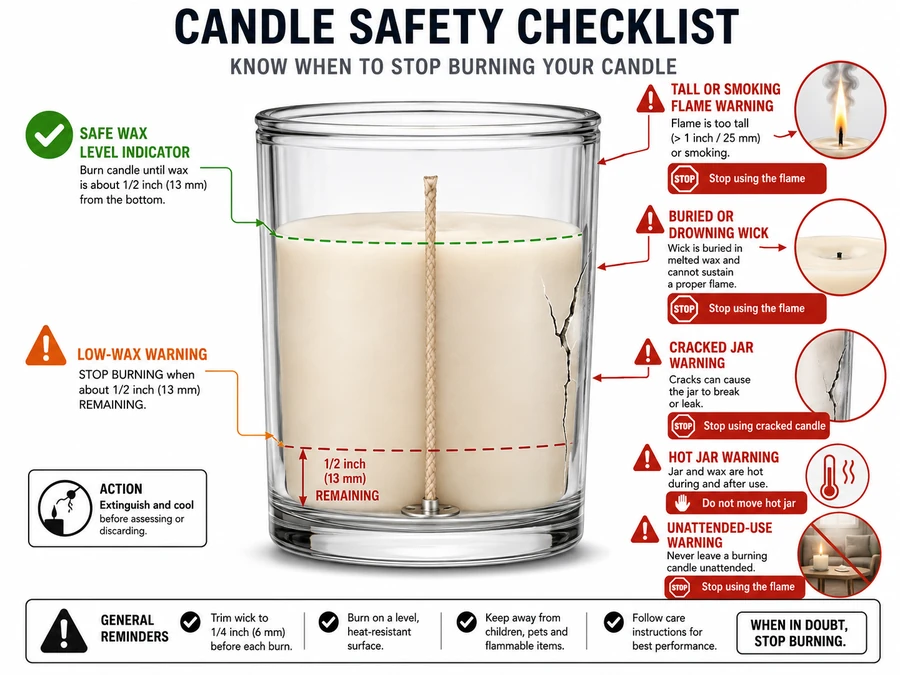
[IMAGE-PLACEHOLDER: Stop-burning diagram showing safe wax level, low-wax warning, hot jar warning, and cracked jar warning.]
| Stop-burning sign | What it means | What to do |
|---|---|---|
| Label limit reached | The candle has burned as long as the maker allows for one session | Extinguish and let it cool |
| Wax is very low | Container heat risk can rise near the bottom | Stop using the flame |
| Jar is too hot | Heat is no longer comfortable or safe to handle | Do not move it; extinguish if needed |
| Flame is tall or smoking | Wick, draft, or burn time may be uncontrolled | Extinguish, cool, trim, and reassess |
| Wick is buried or drowning | Wax is interfering with the flame | Stop and use troubleshooting guidance |
| Jar is cracked | The container may fail under heat | Stop using the candle |
| You cannot watch it | An unattended candle is unsafe | Extinguish before leaving |
The safest end point is before the candle burns to an empty jar. Remaining wax is normal. A candle that has reached its safe stopping point has finished its flame-use life, even if wax is still visible.
If the candle has leftover wax, let it cool fully before deciding what to do next. Jar cleaning, wax reuse, or repurposing belongs after burning has ended, not during a live or hot candle-care session.
Prevent Soot, Smoke, and Flickering Flames
Prevent soot, smoke, and flickering by trimming the wick, avoiding drafts, limiting burn time, keeping wax clean, and extinguishing the candle gently.
Soot is dark residue from incomplete combustion. In candle care, a “clean burn” means reduced visible soot and smoke, not zero emissions or an indoor air-quality guarantee.
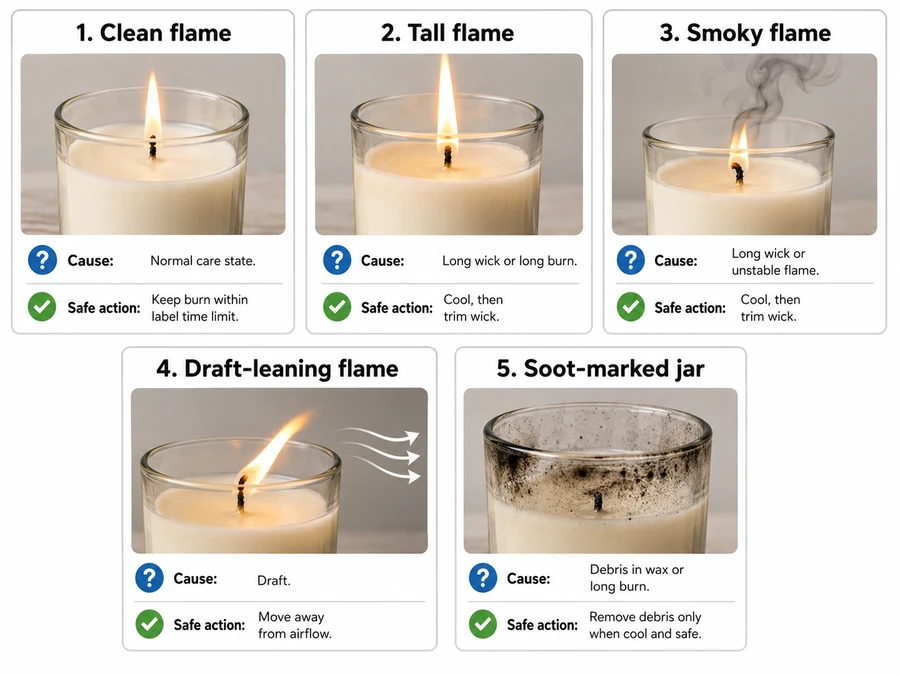
[IMAGE-PLACEHOLDER: Symptom matrix image showing clean flame, tall flame, smoky flame, draft-leaning flame, and soot-marked jar.]
| Symptom | Common user-level cause | Safe maintenance action |
|---|---|---|
| Black soot on jar | Wick too long, draft, long burn, or unstable flame | Cool, trim wick, clean jar only when safe, and relight away from drafts |
| Smoking flame | Wick mushrooming, poor extinguishing, or airflow | Extinguish, cool, trim, and reset |
| Flickering flame | Draft, uneven surface, or wick issue | Move the candle, check placement, and trim before relighting |
| Tall flame | Wick is too long or burn session has gone too long | Extinguish and trim after cooling |
| Jar darkens on one side | Flame is leaning or burning unevenly | Move away from airflow and check surface level |
| Popping or debris in wax | Loose material in the melt pool | Extinguish and remove debris only when cool and safe |
Use this prevention routine:
- Trim the wick before lighting.
- Remove matches, wick trimmings, and loose debris before relighting.
- Place the candle away from drafts.
- Keep each burn within the label’s time limit.
- Extinguish gently instead of splashing wax or disturbing the wick.
- Let the candle cool before moving, covering, or trimming again.
Soot prevention is not only about candle quality. User behavior also changes flame stability. A good candle can still smoke if the wick is too long, the candle sits in moving air, or the burn session runs too long.
This section covers normal use-phase prevention. It does not cover toxicology, ventilation science, fragrance chemistry, or professional burn testing.
Adjust Care for Different Candle Types
Jar candles, pillars, votives, tealights, and tapers all need the same basic care principles, but the exact burn, holder, trimming, and storage steps change by candle type.
Different candle types means finished candle forms that affect user-care actions. It does not mean candle recipes, molds, wax formulas, wick sizing, or manufacturing categories.
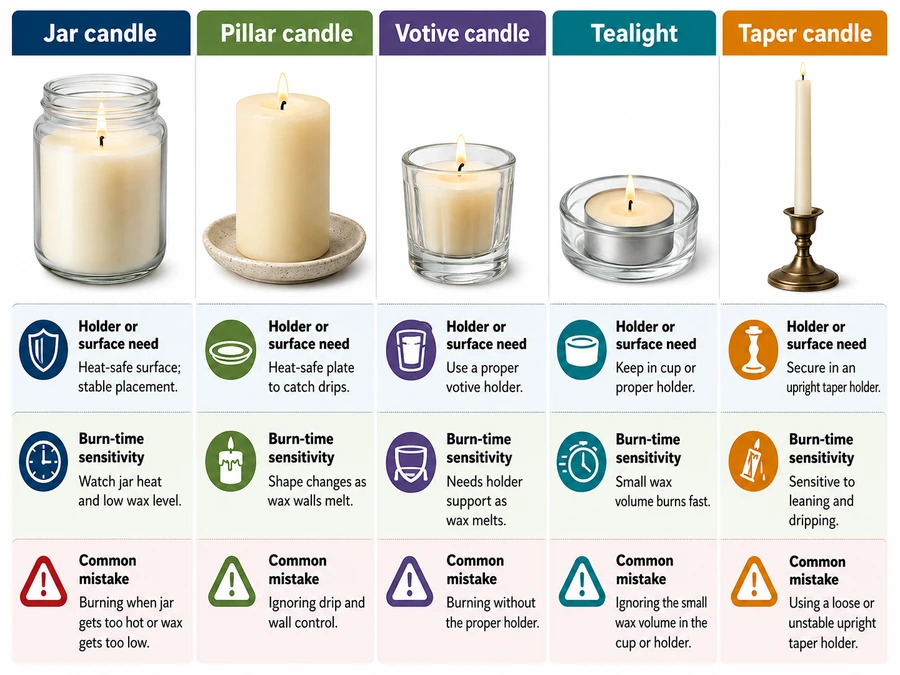
[IMAGE-PLACEHOLDER: Type comparison table image showing jar, pillar, votive, tealight, and taper with one care warning each.]
| Candle type | Holder or surface need | Wick trimming relevance | Burn-time sensitivity | Storage issue | Common mistake |
|---|---|---|---|---|---|
| Jar candle | Stable, heat-safe surface under the jar | Important before relighting | High when the jar gets hot or wax is low | Dust on wax surface and lid timing | Burning too long near the bottom |
| Pillar candle | Heat-safe plate or holder wide enough for wax | Important if the wick grows or mushrooms | High because the outer wall can weaken | Warping from heat or sunlight | Letting it drip onto unsafe surfaces |
| Votive candle | Proper votive holder | Usually useful before reuse | High because it liquefies in its holder | Dust and holder residue | Burning it without the right holder |
| Tealight | Flat, heat-safe placement in its cup or holder | Limited, but flame should still be watched | High because wax volume is small | Crushed cup or exposed wick | Treating it as low-risk because it is small |
| Taper candle | Firm, upright taper holder | Trim if the wick is long or smoking | High because leaning and dripping matter | Bending or warping | Using a loose holder |
Jar candles need more attention to container heat. Pillars need drip and wall control. Votives and tealights need the correct holder because the wax can liquefy. Tapers need upright support because leaning changes the flame and drip path.
Candle type changes how the care routine is applied, not the purpose of the routine.
Use Candle Care Tools Only When They Fit the Task
Candle care tools are optional accessories that make specific tasks easier, such as trimming a cooled wick, extinguishing the flame gently, protecting surfaces, or covering a candle between burns.
Candle care tools are task-support accessories, not requirements for every candle. The best tool is the one that matches the care job; it is not automatically the most expensive, decorative, or brand-ranked option.
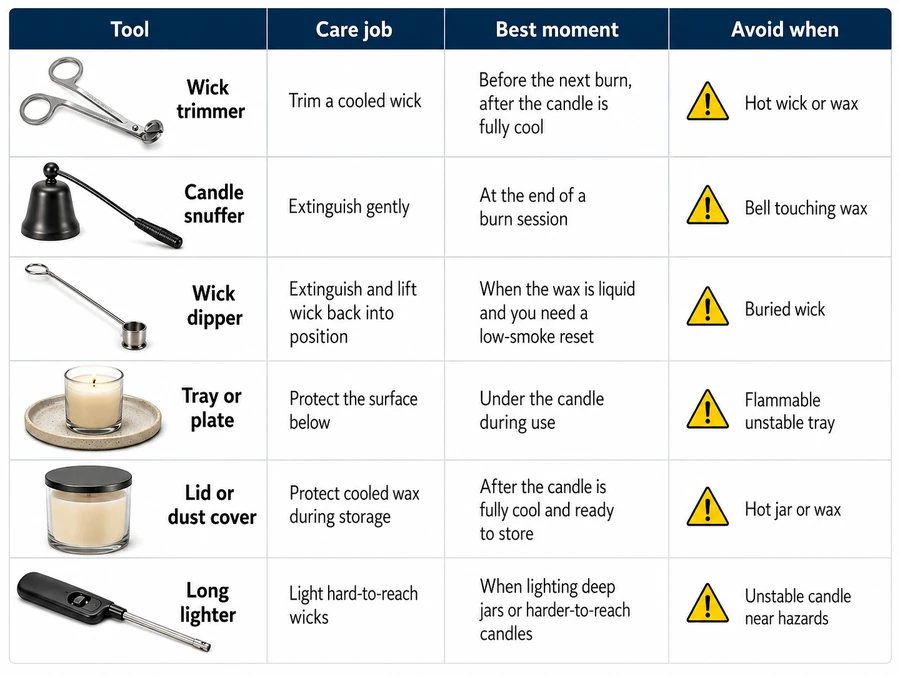
[IMAGE-PLACEHOLDER: Tool-fit matrix showing wick trimmer, snuffer, dipper, tray, lid, and long lighter matched to care tasks.]
| Tool | Care job | Optional or useful | Best moment | Avoid when |
|---|---|---|---|---|
| Wick trimmer | Trim a cooled wick | Useful for deep jars | Before lighting or relighting | The wick or wax is hot |
| Candle snuffer | Extinguish gently | Useful for reducing splatter and smoke | At the end of a burn | The bell would touch wax or bend the wick |
| Wick dipper | Extinguish and lift wick back into position | Useful with careful handling | At extinguishing, before reset | You might bury the wick in wax |
| Tray or plate | Protect the surface below | Useful for jars, pillars, votives, and tapers | Before lighting | It is flammable, unstable, or too small |
| Lid or dust cover | Protect cooled wax during storage | Useful between burns | After the candle cools | The jar or wax is still hot |
| Long lighter | Light hard-to-reach wicks | Useful for tall jars | Before the burn starts | The candle is unstable or too close to hazards |
A tool should reduce friction in the routine. A wick trimmer helps when scissors cannot reach cleanly. A snuffer helps when blowing creates smoke or splatter. A tray helps when the surface needs heat protection. A lid helps after cooling, not during a hot reset.
This section is a task-fit guide, not a product review, brand comparison, retailer list, or luxury décor guide.
Troubleshoot Common Candle Burning Problems
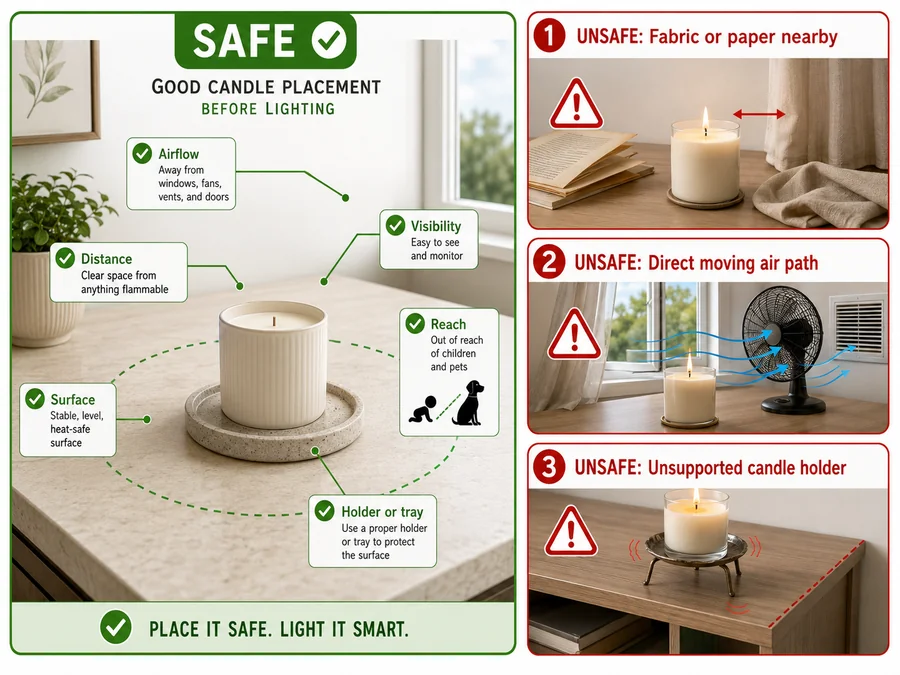
If a candle smokes, flickers, tunnels, drowns the wick, smells weak, or overheats, identify the symptom first and take the safest basic action.
Troubleshooting during use means visible symptom triage during or around a burn session. A fix here means a safe user-level adjustment, not rebuilding the candle, replacing the wick, using foil repair, using a heat gun, changing the formula, or handling an uncontrolled fire.
[IMAGE-PLACEHOLDER: Symptom-to-action triage table showing smoking, flickering, tunneling, drowning wick, weak scent, hot jar, and debris.]
| Symptom | Likely user-level cause | Immediate safe action | Do not do | When the problem needs deeper handling |
|---|---|---|---|---|
| Smoking flame | Wick is long, mushroomed, draft-hit, or overburned | Extinguish, cool, trim, and relight away from drafts | Keep burning through heavy smoke | Smoke keeps returning after basic care |
| Flickering flame | Draft, unstable surface, or wick issue | Move away from airflow and check the surface | Put the candle near fabric to block air | Flicker continues in a calm location |
| Tunneling | Repeated short burns or narrow melt pattern | Use safe, longer future sessions if label allows | Use foil or heat tools inside this general guide | A deep tunnel has already formed |
| Drowning wick | Wax pool overwhelms a short or weak wick | Extinguish and let wax cool before reassessing | Dig into hot wax or replace the wick | The wick stays buried after cooling |
| Weak scent | Short burn, large room, draft, poor storage, or candle limit | Use a safer room fit, reduce drafts, and store covered | Add fragrance oil or overburn the candle | Scent stays weak despite safe use |
| Hot jar | Long session, low wax, or unsafe surface condition | Extinguish if heat is rising and let it cool fully | Move a hot jar by hand | Heat returns quickly or glass looks damaged |
| Debris in wax | Match piece, wick trimming, dust, or loose char | Extinguish and remove debris only when safe | Touch hot liquid wax | Debris keeps falling from the wick |
Use this fast triage routine:
- Name the visible symptom.
- Extinguish first if the flame, jar, wax, or placement looks unsafe.
- Let the candle cool before trimming, removing debris, or moving it.
- Apply only the safe basic action tied to the symptom.
- Stop if the issue returns, looks structural, or requires repair tools.
This triage layer keeps candle maintenance safe because it separates quick user adjustments from repair-heavy problems.