Trim the wick, remove drafts, shorten the burn session, check wick size, and stop if the flame or container heat looks unsafe.
A fast-burning candle uses wax too quickly because the flame receives too much fuel, too much heat feedback, or unstable airflow. Common causes include an oversized wick, long wick, hot jar, draft, high fragrance or dye load, long session, or multi-wick overheating.
Start with the lowest-risk fixes first: trim, remove airflow, shorten the burn, and stop if the flame, soot, or container heat looks unsafe. For a finished candle, the usable fixes are trimming, draft control, shorter burns, debris removal, and stopping unsafe sessions; wick size, wick series, wax blend, fragrance load, dye load, container shape, and wick count are future-batch fixes unless you are remaking or testing candles. This page does not replace a full wick chart, wax-formulation guide, fragrance-load guide, container guide, or formal burn-test protocol.
Steps to Slow a Candle That’s Burning Too Fast
Trim to 3–5 mm, remove drafts, shorten the session, check wick size, and stop if flame or container heat looks unsafe.
For this page, “too fast” means the candle is losing wax quickly because heat, fuel delivery, or airflow is too high. Use the quick corrections before changing the candle design.
| Step | What to do | What it changes |
|---|---|---|
| 1 | Snuff the candle if the flame is tall, flickering hard, smoking, or heating the jar wall sharply. | Reduces immediate heat risk. |
| 2 | Let the wax and container cool before touching the wick or jar. | Prevents burns and avoids disturbing hot wax. |
| 3 | Trim the wick to 3–5 mm before relighting. | Lowers fuel draw and flame size. |
| 4 | Remove wick trimmings, match heads, soot pieces, or dried wax debris from the melt pool. | Stops loose material from feeding the flame. |
| 5 | Move the candle away from fans, vents, open windows, and busy walkways. | Keeps the flame steadier. |
| 6 | Shorten the next burn session and let the candle fully cool between burns. | Prevents heat from building across sessions. |
| 7 | If the flame still races after trimming and draft removal, treat the wick as too hot for the jar or wax. | Points to wick size, wick series, or multi-wick heat. |
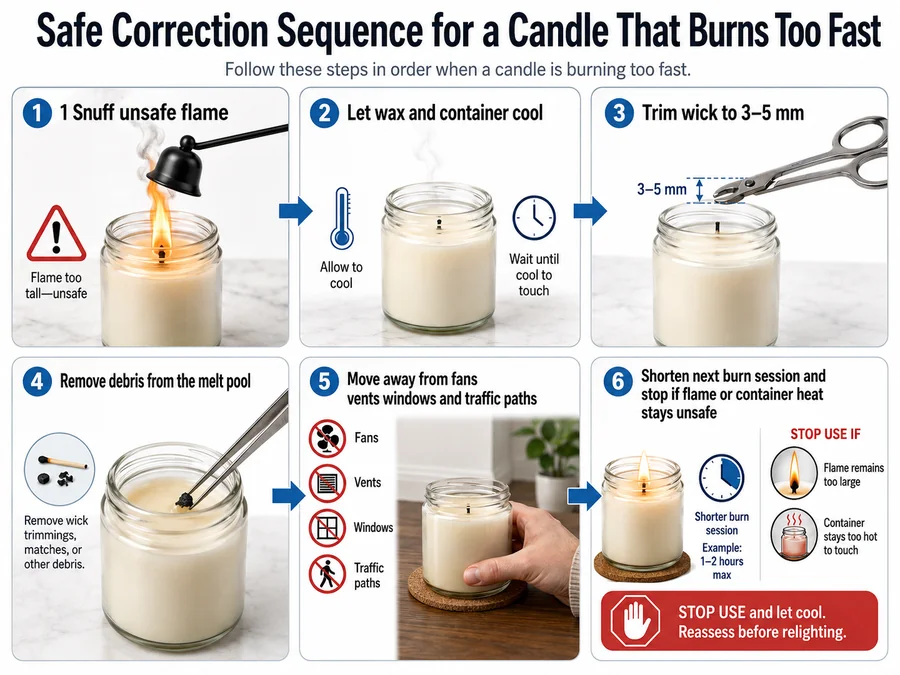
For a finished candle, this sequence is the safe repair range: trim, clear debris, remove airflow, shorten the burn, and stop unsafe behavior. A candle that still burns too fast after those fixes usually needs a cooler wick, different container behavior, lower additive load, or a new test batch.
The National Candle Association advises trimming wicks before lighting and removing debris from the wax pool because debris can add fuel and long or crooked wicks can cause flaring, dripping, and sooting. For this fast-burn fix, keep the wick closer to 3–5 mm when the candle has already shown a tall flame or rapid melt pool.
A candle that improves after trimming was usually drawing too much fuel through excess wick length. A candle that still burns too fast after trimming needs diagnosis by wick size, container heat, airflow, wax blend, fragrance load, dye load, or burn schedule.
What Causes a Candle to Burn Too Fast?
Fast burn usually comes from too much heat, too much fuel delivery, or unstable airflow.
In candle burning and usage, the same symptom can come from the user’s burn setup or the maker’s candle design. The goal is to match the visible sign to the nearest cause instead of guessing.
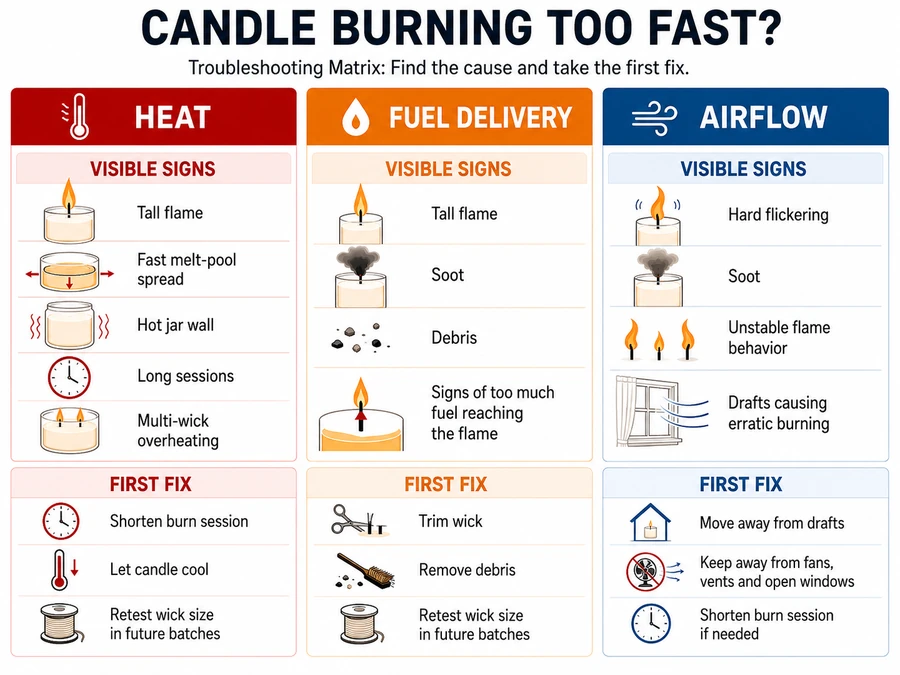
| Cause | Common sign | First fix |
|---|---|---|
| Wick too large | Tall flame, fast melt-pool spread, hot jar wall | Wick down or switch to a cooler wick series. |
| Wick not trimmed | Mushrooming, soot, flaring, black smoke | Trim before lighting and remove carbon buildup after cooling. |
| Wick material too hot for the wax or jar | Flame stays strong even after trimming | Compare cotton, wood, paper-core, or series behavior without changing everything at once. |
| Drafts or airflow | Flame leans, pulses, or flickers hard | Move the candle away from vents, fans, windows, and traffic paths. |
| Thin, narrow, reflective, or metal container | Jar heats quickly; wax liquefies fast near the wall | Use shorter sessions and check container heat more often. |
| High fragrance or dye load | Flame seems unstable, sooty, or unusually active | Reduce load in future batches or compare against supplier limits. |
| Long burn sessions | Flame grows later in the burn; melt pool deepens | End the session sooner and let the candle cool fully. |
| Too many wicks | Whole surface liquefies quickly; container feels too hot | Test fewer wicks, wider spacing, or cooler wick choices in future candles. |
| Debris in melt pool | Sudden flare, floating black bits, uneven flame | Remove debris only after the wax is cool enough to handle safely. |
The fastest safe diagnosis is to separate maintenance causes from design causes. If trimming, debris removal, draft control, and shorter sessions fix the problem, the candle likely needed better use habits. If those steps do not help, the burn is probably driven by wick size, wick type, jar heat, wax blend, or additive load.
How to Tell If Your Wick Is Too Large
A wick is likely too large when flame height, melt-pool growth, soot, or jar heat stay excessive after trimming.
In candle burning and usage, an oversized wick means the wick is feeding more fuel vapor than the candle body can burn cleanly. For a fast-burning candle, treat a flame that stays above about 4 cm as a hot-burn warning, especially if the jar wall feels too hot, soot appears, or the melt pool deepens quickly. <!– IMAGE-PLACEHOLDER –>
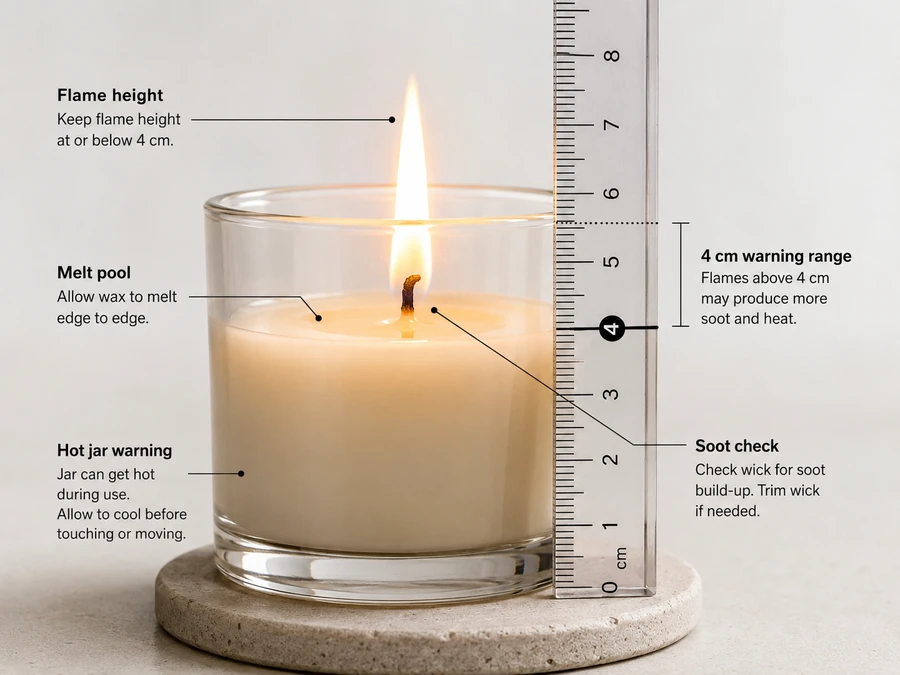
ALT TEXT: Candle wick too large with flame height checked against a ruler
FILENAME: candle_wick_too_large_ruler.png
VISUAL TYPE: photo
PURPOSE: Show how to compare flame height against the fast-burn warning range <!– /IMAGE-PLACEHOLDER –>
| Check | Correctly wicked candle | Likely over-wicked candle |
|---|---|---|
| Flame | Steady and controlled after trimming | Tall, forceful, or still growing after trimming |
| Melt pool | Expands steadily without racing down the jar | Spreads fast and becomes deep early |
| Soot | Little to none during normal use | Black smoke, dark rim, or carbon buildup |
| Container heat | Warm but not alarming during a normal session | Jar or tin heats quickly, especially near the wall |
| Wick response | Trimming calms the flame | Trimming helps briefly, then the flame races again |
An oversized wick burns faster because it increases fuel delivery and heat feedback at the same time. A correctly sized wick gives enough heat to melt the wax pool without turning the whole container into a heat amplifier.
Use the ruler check as a diagnostic, not a full wick chart. The National Candle Association describes using a ruler beside the flame for wick-size and flame-height experiments, and it recommends controlling variables so the result points to the wick rather than wax, dye, fragrance, or airflow.
If trimming, draft removal, and shorter sessions do not calm the flame, the practical fix is to retest with a smaller or cooler wick choice.
How to Trim and Maintain the Wick Correctly
Trim most candle wicks to 3–5 mm before lighting and remove mushrooming or debris after cooling.
For fast candle burn diagnosis, wick trimming is the first maintenance fix because excess wick length feeds a larger flame and hotter melt pool. The National Candle Association’s general safety baseline is to trim wicks to ¼ inch before each use to prevent high flames and soot; for a candle already burning too fast, a 3–5 mm trim target is the tighter correction range. <!– IMAGE-PLACEHOLDER –>
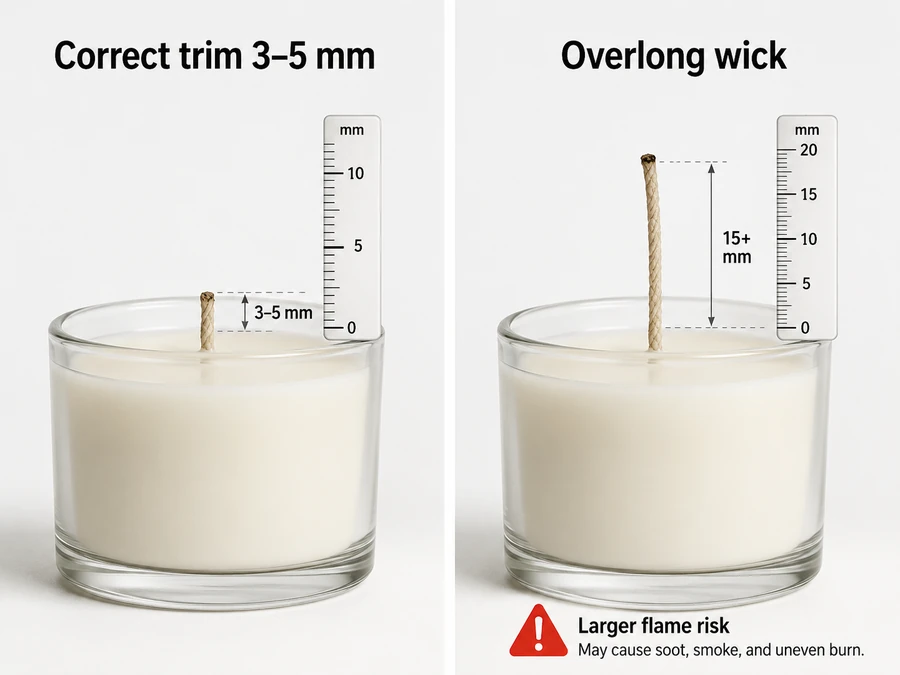
ALT TEXT: Trimmed candle wick at 3 to 5 mm beside an untrimmed wick
FILENAME: trimmed_vs_untrimmed_candle_wick.png
VISUAL TYPE: photo
PURPOSE: Compare a fast-burn correction trim against an overlong wick <!– /IMAGE-PLACEHOLDER –>
Wick maintenance checklist
- Snuff the candle instead of trimming while the flame is active.
- Let the wax and container cool before touching the wick.
- Cut the wick back to about 3–5 mm.
- Remove mushroomed carbon from the wick tip.
- Clear wick trimmings, match heads, and soot pieces from the wax pool.
- Relight only when the candle is stable, cool enough to handle, and away from drafts.
- Recheck the flame after several minutes; the flame should settle rather than climb.
Mushrooming is the carbon buildup that forms a bulb or cap on the wick tip. It increases flame instability, soot, and fuel delivery, so removing it after cooling helps slow the next burn without changing the candle’s formula.
Trimming solves excess wick length, but it does not solve every fast burn. If the candle keeps racing after proper trimming, the next likely variable is wick size, wick material, jar heat, airflow, or additive load.
How Drafts, Airflow, and Burn Sessions Change Burn Speed
Drafts, heat-trapping toppers, and long burn sessions can push a candle from controlled burning into fast wax consumption.
Airflow changes the flame path, while session length changes how much heat builds in the container and melt pool. A stable, shorter burn keeps the flame more predictable; a drafty, trapped, or extended burn can speed wax use, soot, or container heat. <!– IMAGE-PLACEHOLDER –>
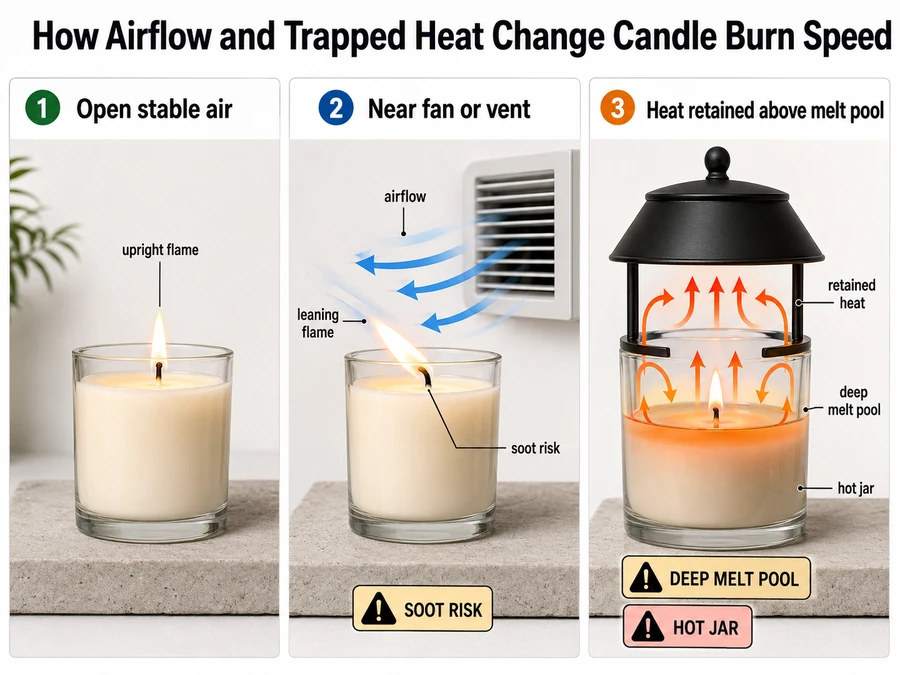
ALT TEXT: Candle draft path and topper heat retention diagram
FILENAME: candle_draft_topper_heat_retention.png
VISUAL TYPE: diagram
PURPOSE: Show how moving air and trapped heat can change candle burn speed <!– /IMAGE-PLACEHOLDER –>
| Setup | What happens | Fast-burn risk | Better correction |
|---|---|---|---|
| No draft, open air | Flame stays upright and controlled | Lower | Keep the candle away from traffic paths. |
| Fan or vent nearby | Flame leans, pulses, or grows unevenly | Higher | Move the candle away from direct airflow. |
| Open window draft | Flame flickers and may heat one side faster | Higher | Close the window or move the candle. |
| Topper on a cool, drafty candle | Draft may reduce, but heat may rise | Mixed | Watch flame and container heat closely. |
| Topper on an already-hot jar | Heat can stay around the melt pool | Higher | Remove the topper and shorten the session. |
| Topper on multi-wick candle | Several flames plus trapped heat can compound | Higher | Avoid heat-retaining toppers when the jar already runs hot. |
A topper is not automatically a slow-burn tool. It can calm light airflow, but it can hold heat over the melt pool and make a fast-burning candle worse.
Do not enclose the candle, restrict ventilation heavily, or use a topper to force a hot candle to behave. For a fast burn, the safer test is simple: remove the topper, remove drafts, shorten the session, and compare the next burn.
<!– IMAGE-PLACEHOLDER –>
ALT TEXT: Candle first burn timing checklist showing light monitor snuff cool and relight
FILENAME: first_burn_timing.png
VISUAL TYPE: flow
PURPOSE: Show how controlled burn sessions prevent heat runaway <!– /IMAGE-PLACEHOLDER –>
Burn-session timing checklist
- Start with a trimmed wick and a clean wax pool.
- Place the candle away from fans, vents, open windows, and hot surfaces.
- Watch the melt pool as it forms; it should expand without becoming deep and aggressive.
- Watch the flame later in the session, not only in the first few minutes.
- Snuff the candle if the flame climbs, the container heats sharply, or soot increases.
- Let the candle cool fully before relighting.
- Shorten the next session if the same candle races near the end of each burn.
The first burn should condition the top wax layer without turning the full container into a heat reservoir. A long first burn may look like a clean melt pool at first, then become a fast-burn problem as jar heat and melt-pool depth rise together.
Use “candle memory” as a practical burn-pattern idea, not as a reason to over-burn. If the candle is racing, cooling and trimming matter more than forcing the wax surface to stay liquid longer.
Maker Variables That Can Make a Candle Burn Too Fast
Persistent fast burn after trimming, draft control, and shorter sessions usually points to candle design variables rather than candle-care habits.
This section is only a boundary summary for candle makers. It explains which design variables can keep heat or fuel delivery too high without turning this page into a full wick chart, wax comparison, fragrance-load guide, container guide, or burn-test protocol.
| Maker variable | Fast-burn clue | Future-batch correction |
|---|---|---|
| Wick material or series | The flame stays tall or forceful after a clean trim. | Retest with one smaller or cooler wick choice while keeping wax, jar, and session length unchanged. |
| Wax or blend | The melt pool deepens quickly even when the wick and airflow are controlled. | Check wick size and container heat before changing wax type. |
| Fragrance oil load | The scented version burns hotter, soots, or surges compared with a similar unscented test. | Lower the load within supplier guidance and retest the same wick. |
| Dye or pigment load | The wick clogs, residue appears, or the flame becomes unstable. | Reduce colorant and avoid unsupported pigments in container candles. |
| Jar shape or material | A narrow, thin, reflective, or metal container heats quickly near the wall. | Use shorter sessions for finished candles and retest future batches in a cooler container setup. |
| Multi-wick layout | The whole surface liquefies early or several flame zones combine into sharp container heat. | Retest wick count, spacing, and wick size before changing wax or fragrance. |
| Measured burn rate | The candle seems fast, but flame size alone does not prove the rate. | Use burn-rate testing only as a maker-level confirmation, not as the main repair path for a finished candle. |
If a finished candle stays unsafe after trimming, draft removal, debris removal, and shorter sessions, stop using it instead of forcing another long burn. Design variables require a new test batch or controlled maker test.
Safety Checks: Flame Height, Hot Container, Soot, and When to Stop Burning
Stop burning if the flame is persistently too tall, the container overheats, soot increases, or the candle behaves unpredictably.
For this fast-burn diagnosis, treat a flame consistently above about 4 cm as a hot-burn warning, not as a full legal pass/fail standard. Use ruler and IR thermometer checks as practical home or workshop observations, not as a substitute for formal testing. <!– IMAGE-PLACEHOLDER –>
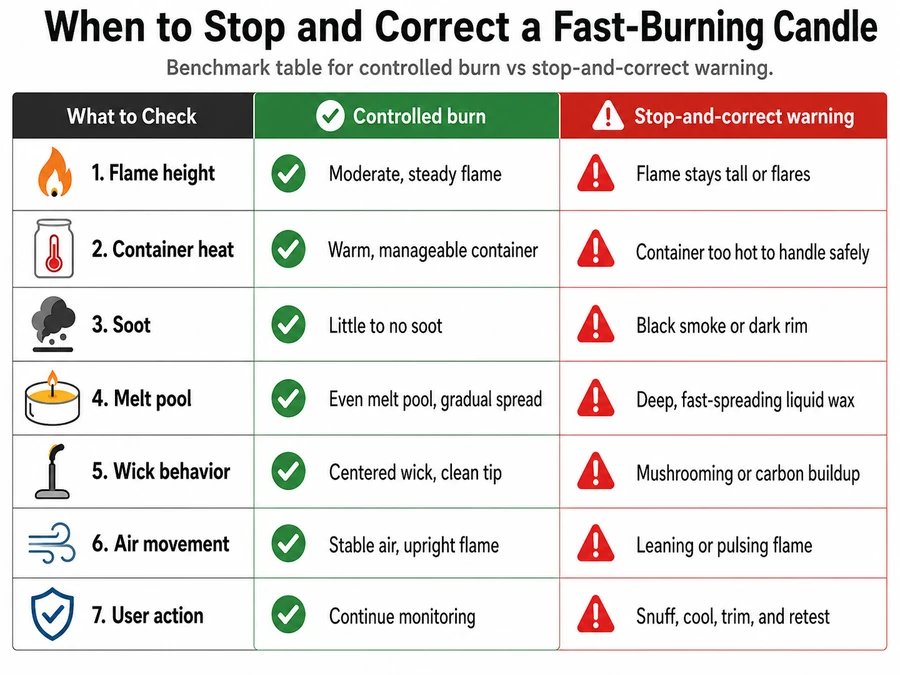
ALT TEXT: Candle safety benchmark table showing flame height container heat soot and stop-burning signs
FILENAME: candle_fast_burn_safety_thresholds.png
VISUAL TYPE: benchmark table
PURPOSE: Show when a fast-burning candle should be stopped and corrected <!– /IMAGE-PLACEHOLDER –>
| Safety sign | Controlled burn | Stop-and-correct warning |
|---|---|---|
| Flame height | Steady, moderate flame after trimming | Flame stays tall, grows, or repeatedly flares |
| Container heat | Warm during use | Too hot to handle safely or heating sharply |
| Soot | Little to no visible smoke | Black smoke, dark rim, or rapid soot buildup |
| Melt pool | Expands without deep flooding | Deep, fast-spreading liquid wax |
| Wick behavior | Trimmed wick stays stable | Mushrooming, leaning, splitting, or carbon buildup |
| Air movement | Flame stays upright | Flame leans, pulses, or flickers repeatedly |
| User action | Monitor, then snuff normally | Snuff, cool, trim, check drafts, and retest |
Methods box
Use a ruler beside the flame for a quick height check and an IR thermometer for repeatable container-surface readings. Measure from the same position each time and record the result beside burn time, wick trim, room conditions, and visible soot.
Do not touch or move a burning candle or a container with liquid wax. National Candle Association guidance says to trim wicks to ¼ inch before each use, place candles on stable heat-resistant surfaces, and avoid drafts near open windows, fans, or vents.
A fast-burning candle is not worth “saving” mid-session if safety signs are rising. Snuff it, let it cool, remove debris, trim the wick, move it away from airflow, and only relight if the next burn starts under control.
Quick Troubleshooting Checklist
Fix a fast-burning candle by checking wick length, airflow, container heat, burn time, additives, and wick sizing in that order.
For candle burning and usage, this list keeps the diagnosis inside the fast-burn problem. It separates simple use fixes from maker-level design fixes so you do not blame the wax before checking the flame conditions.
| Check | What to look for | Fix |
|---|---|---|
| Wick length | Flame grows, smokes, or mushrooms | Cool the candle, then trim to 3–5 mm. |
| Debris | Carbon bits, match pieces, or wick trimmings in wax | Remove debris after the wax cools. |
| Drafts | Flame leans, pulses, or flickers hard | Move the candle away from fans, vents, windows, and traffic paths. |
| Container heat | Jar or tin heats sharply during the session | Snuff it, cool it, and shorten the next burn. |
| Burn time | Candle starts normally, then races later | Use shorter sessions with full cool-downs. |
| Wick size | Flame stays too strong after trimming | Retest with a smaller or cooler wick in future batches. |
| Wick material | Wood, cotton, paper-core, or series choice runs too hot | Change one wick variable at a time. |
| Wax blend | Melt pool deepens faster than expected | Check wick and container before changing wax. |
| Fragrance oil | Scented version burns hotter than unscented test | Lower the load within supplier guidance. |
| Dye or pigment | Wick clogs, residue appears, or flame becomes unstable | Reduce colorant and avoid unsupported pigments. |
| Multi-wick layout | Whole top liquefies quickly | Test fewer, smaller, cooler, or better-spaced wicks. |
| Safety signs | Tall flame, soot, sharp heat, or unstable behavior | Stop burning and correct before relighting. |
Use the checklist as a sequence, not a menu. Trim and remove drafts first because those fixes are low-risk and quick. If the candle still burns too fast, move into design variables: wick size, wick material, jar heat, wax blend, fragrance load, dye load, and wick count.
A candle that slows after trimming or draft removal had a use-condition problem. A candle that still races after those fixes needs a cooler burn system, better measurement, or a new test batch rather than another long burn session.