
Make molded pillar candles by using a simple mold, leaving room for normal shrinkage, correcting any hidden sinkhole with one controlled second pour, then unmolding and finishing the free-standing candle. This page covers free-standing pillar candles made in a mold, not container candles.
This guide focuses on molded pillar candles that need a clean second pour and a clean release. The goal is to keep the process simple enough for straight walls, flat bases, and less repair later. It stays on mold choice, setup, shrinkage control, unmolding, and finish work. Topics like wick sizing, wax-capacity math, and mold-specific troubleshooting belong on their own pages.
This workflow assumes a pillar wax suited to molds, a centered wick path, and a small reserve of wax kept back in case the top needs one controlled repour.
Good pillar candles come from a steady mold setup and a controlled shrinkage plan, not from rushing the first pour. A simple round mold is usually easier to release, easier to wick, and easier to finish than a detailed shape. Most defects start early, with a poor seal, an off-center wick, trapped air, or a second pour made at the wrong time. When each stage is handled in order, the candle comes out straighter, cleaner, and easier to level.
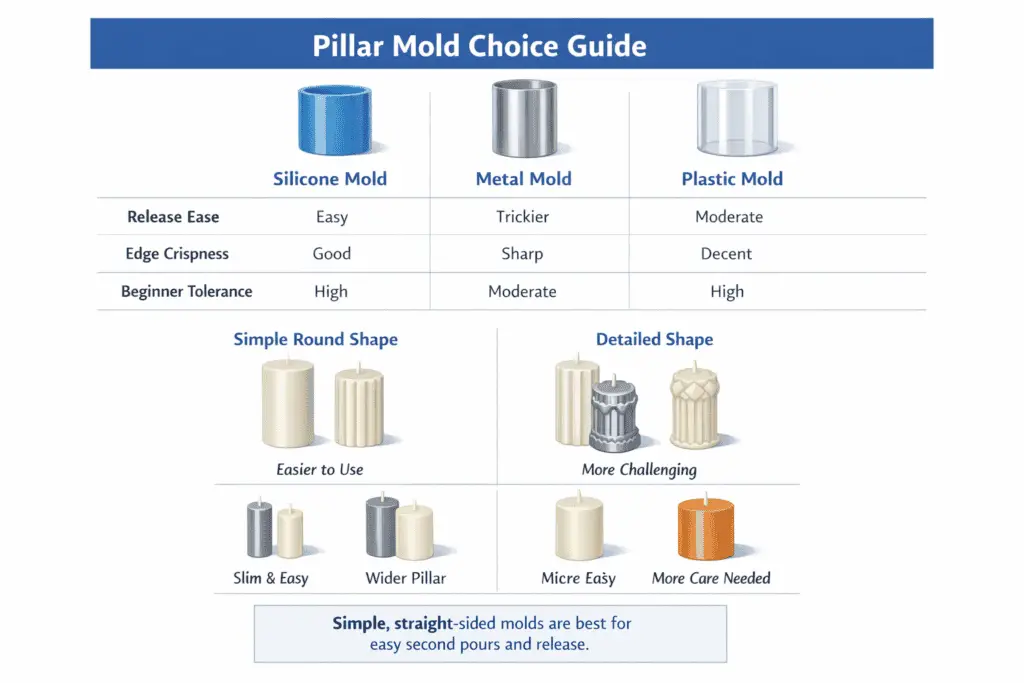
Choose the right pillar mold for size, material, and shape
A beginner pillar mold works best when its material, diameter, and shape favor easy release and stable free-standing form.
Start choosing candle molds for pillar candles by putting shape ahead of looks. A plain round or straight-sided mold is usually easier to fill, easier to wick, and easier to release than deep ribs, sharp corners, or heavy surface detail.
Among candle molds, simple walls give you more room for small mistakes in wick choice, shrinkage, and cleanup. If you need a broader material and shape comparison, start with types of candle molds silicone metal plastic and more, then come back here for the molded pillar workflow.
For broader mold context, see Candle Molds & Shapes. For the main workflow around this craft, see Candle Making.
| Mold choice | Release ease | Edge crispness | Beginner tolerance | Best use |
|---|---|---|---|---|
| Silicone, plain round | Easy | Soft to medium | High | Early practice and easier release |
| Metal, plain round | Medium | High | Medium | Straighter walls and cleaner edges |
| Plastic, plain round | Medium | Medium | Medium | Simple shapes with light detail |
| Deeply detailed molds | Harder | Varies by wax | Low | Later testing, not first tries |
For silicone vs metal candle molds pros and cons, keep the choice narrow on this page: silicone usually releases with less force, while metal usually keeps straighter walls and sharper corners. Diameter matters too. A wider pillar asks more from the wick and gives shrinkage more room to show up near the center.
A useful way to judge a mold on this page is to keep the question narrow: will it release cleanly, hold a straight free-standing shape, and stay manageable for a first molded pillar.
Match pillar wax to the mold
Match the mold to a firm pillar wax that can hold its shape, shrink in a manageable way, and come free without torn edges.
If a pillar warps, smears, or loses detail, simplify the mold or switch to a firmer pillar blend before changing several variables at once. Once the mold and wax suit each other, the next job is keeping that setup sealed and centered before any hot wax goes in.
Prep the mold: seal the base, center the wick, and ready the release
Prep a pillar mold by sealing the wick hole, centering the wick path, and checking release readiness before any wax is poured.
Use pillar mold setup basics in a fixed order so the mold does not leak and the wick stays where you put it. Clean and dry the mold first. Set the wick pin or wick path next. Seal the bottom opening well. Tighten the wick so it stands straight without pulling the base out of line.
Then decide whether the mold needs release help at all. When people search how to prevent mold sticking in candle making, the first fix is often better prep and a better wax-to-mold match, not more force at unmolding time.
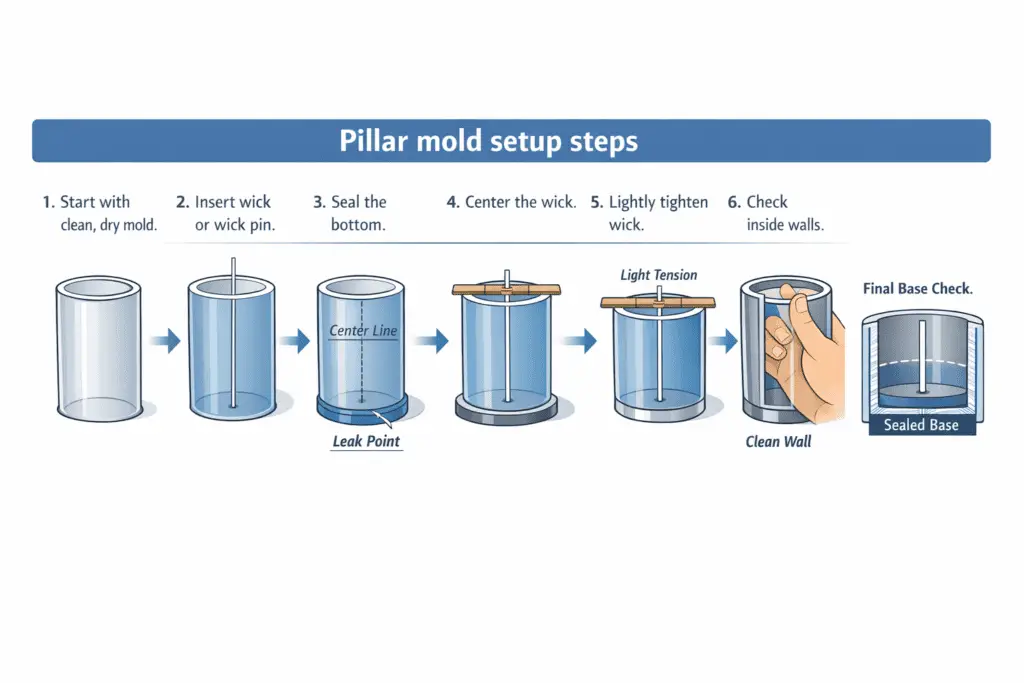
- Clean and dry the mold so the seal can grip and the surface does not hold dust or oil.
- Set the wick path with a pin or other support so the wick exits the base in the middle.
- Seal the bottom opening firmly enough to stop leaks, but not so loosely that hot wax can creep out.
- Center the top of the wick and keep light tension on it so the path stays straight.
- Check the inside wall and decide whether release help is needed for that mold material and shape.
- Recheck the base before pouring. If the wick has drifted or the seal looks weak, fix it now.
A ready mold looks simple: the base is sealed, the wick path is centered, and the inside wall is clean. If you are weighing best molds for beginners, pay attention to how easy the base is to seal and how easy the wick path is to hold straight. With some candle molds, release aid is helpful for stubborn detail. With many plain molds, clean prep and the right wax are enough.
Common prep failures are easy to spot early.
- Wax leak at the base: weak seal, crooked pin, or disturbed mold
- Wick off center at the top: poor tension or unstable support
- Drag marks at release: dirty wall, too much detail, or wrong wax fit
For wick sizing, use a separate test page: how to size your candle wick correctly.
When the base stays sealed and the wick holds straight, the first pour becomes much easier to manage.
Make the first pour with the right fill level and cooldown
Pour pillar wax steadily within supplier guidance, stop at a shrinkage-ready fill level, and let the mold cool evenly before disturbing the top.
Use first-pour steps for pillar candles as a calm sequence, not a race from pitcher to mold. Pour in a steady stream, aim for the same entry path, and leave enough headroom for the top to settle before the repair stage.
Keep setup questions separate here: use how to size your candle wick correctly for exact wick selection. Different candle molds shapes change how wax moves against the wall, and the habits from preventing air bubbles in candle molds matter most in narrow molds, sharp corners, and tall pillars.
If you need the exact fill amount for a different mold, check how much wax your candle mold will hold and keep a small reserve for the repour.
| First-pour choice | What to do | What you should see | What usually went wrong if it fails |
|---|---|---|---|
| Pour path | Keep one steady path, usually near the side rather than splashing into the center | Fewer trapped bubbles and a calmer top | Air pockets from splashing or a broken stream |
| Fill level | Stop with room for shrinkage and a later repour | A slight top dip instead of overflow | No room left for sinkhole repair |
| Pour speed | Keep it even, not jerky | Smooth walls and less foam | Rippled top or trapped air |
| Cooldown | Let the mold sit at room conditions without moving it | Gradual top contraction and even pullaway | Early pullaway, voids, or a tilted top |
A useful first-pour routine looks like this:
- Check that the mold is sealed, centered, and sitting flat.
- Bring the wax into the maker’s stated pour range for that wax.
- Pour in one calm stream instead of short stops and restarts.
- Fill to a level that leaves space for the top to contract.
- Leave the mold alone while the surface dulls and the center begins to sink.
- Watch the top before touching it. A shallow dip is normal. Hidden voids near the wick often are not.
The sequence works best when you change one variable at a time. Hold the same wax, mold, room conditions, and pour path steady across test batches so you can tell whether the problem came from fill level, trapped air, or cooldown.
Before moving on, check for three signs: a visible top dip, no fresh leaking at the base, and enough reserved wax for repair. Those clues set up the timing for sinkhole work and the second pour.
Fix sinkholes with relief holes and a timed second pour
Fix sinkholes by venting hidden cavities near the wick and making a controlled second pour after the first pour has visibly contracted.
Start fixing sinkholes in pillar candles only when the top has dropped enough to show where shrinkage is pulling the wax inward. The goal is not to keep topping off every shallow dip. The goal is to open a path into hidden voids, refill once with control, and stop before a visible line forms across the top. Wax choice from best wax for pillar candles vs container candles affects how deep the cavity forms, while the habits behind how to prevent mold sticking in candle making and how to fix common mold release issues both start with steady shrink control long before the candle comes out of the mold.
When can you skip the second pour?
You can skip the second pour when the top shows only a shallow dip, no hidden cavity opens near the wick, and the candle will still finish cleanly without extra fill. Use the repour only when relief holes or a deeper sink show missing volume that needs one controlled correction.
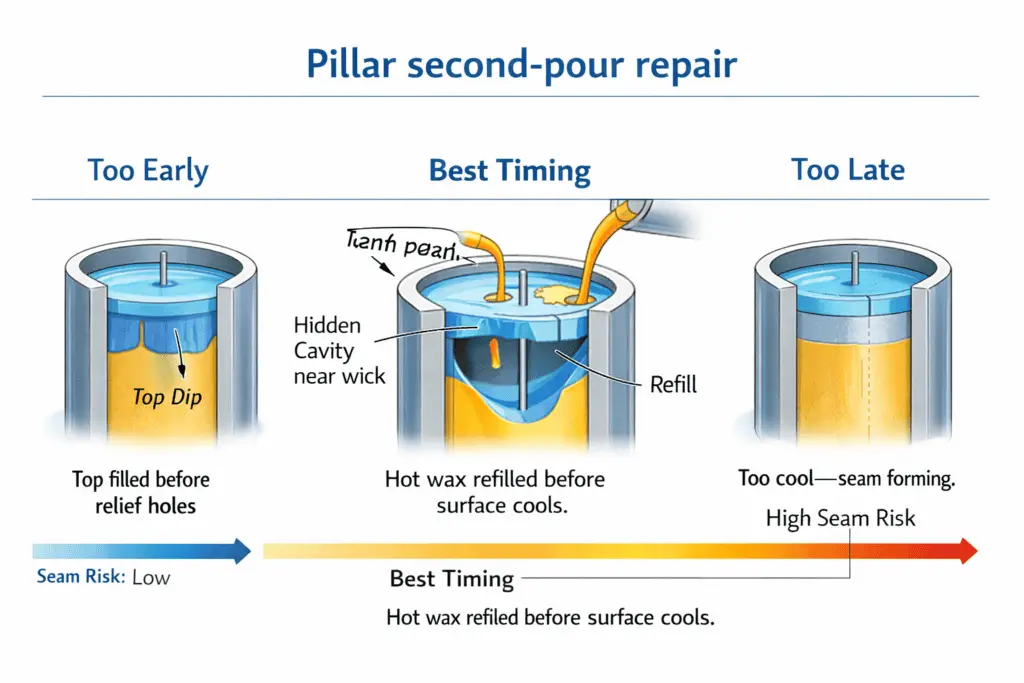
| Top condition after first pour | Relief-hole timing | Second-pour move | Likely result | Seam risk |
|---|---|---|---|---|
| Small dip, no deep cavity | Wait and observe a little longer | Light refill only if the cavity opens | Cleaner top with less waste | Low |
| Clear dip around the wick | Poke near the wick once the top firms but is not fully cold | Controlled repour to refill the hidden space | Best chance of filling the void | Medium |
| Deep sinkhole returns after first refill | Recheck cavity path before acting again | One more small correction, not many top-ups | Better fill if the cavity was missed the first time | Medium to high |
| Top already cold and hard | Relief hole may mark the surface more easily | Warm, careful repour only if the defect is worth fixing | Repair is possible but the line may show | High |
A clean repair sequence usually looks like this:
- Wait until the first pour has contracted enough to reveal the true top shape.
- Poke relief holes close to the wick path so trapped cavities can vent.
- Rewarm the reserved wax to a pourable state within supplier guidance for that wax.
- Refill only enough to replace the lost volume and level the top.
- Let the candle cool again without moving the mold.
- Stop after a good repair instead of stacking many small pours on top of each other.
The timing matters as much as the refill. Act too early and the cavity can keep pulling wax down after the repour. Act too late and the second pour can leave a ring or split line that needs extra finish work later.
A second pour is not automatic; use it when the top has skinned over enough to reveal a real cavity or relief holes show missing volume, not while the wax is still very fluid or after the top has gone fully cold and hard.
If the sinkhole comes back, the hidden cavity was usually not opened well enough or the first cooldown was still active under the surface. That is why one careful vent-and-refill pass works better than repeated shallow top-offs.
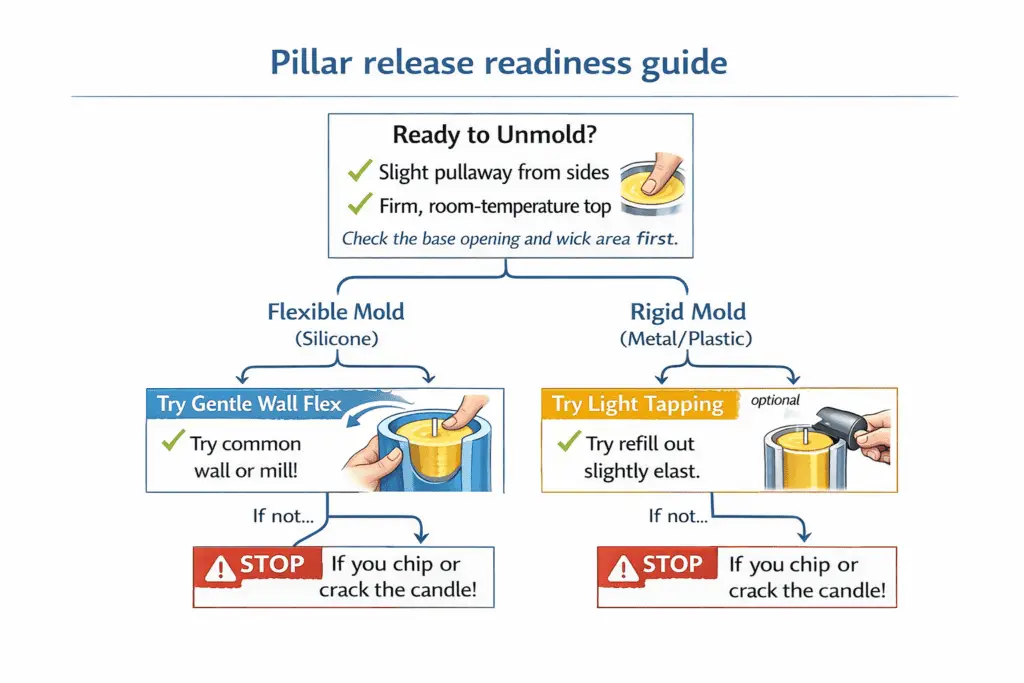
Unmold the pillar without cracking or chipping the edges
Unmold a pillar only after enough shrink and cooldown, using the least-force release method that matches the mold material.
Start unmolding molded pillar candles only when the candle has firmed enough to hold its shape and pulled away at least a little from the mold wall. If you force the release too early, small chips at the rim and hairline cracks become much more likely.
Many problems people blame on how to prevent mold sticking in candle making actually begin with a poor wax fit, a rushed second pour, or sharp candle molds shapes that ask too much from a still-soft pillar.
| What you see | Most likely cause | First response |
|---|---|---|
| Candle will not move at all | Not enough shrink yet | Let it cool longer and try again later |
| Top loosens but base stays stuck | Grip at the wick opening or bottom | Check the base opening and loosen that area first |
| Small chip at the rim | Too much force or early release | Stop, cool longer, then finish the edge later |
| Hairline crack | Brittle wax or forced push from a rigid mold | Return the candle to room conditions and reassess before trying again |
Use the lightest release order first. For a flexible mold, gentle wall flex is usually safer than pushing hard from one end. For a rigid mold, light tapping and patient cooldown usually beat force. When readers end up in common mold release issues, the same pattern shows up again and again: if the pillar has not pulled away at least slightly and the top still feels firm, the safest fix is usually more readiness, less force, and a release method that suits the mold instead of a single trick used on every candle.
- Check for slight pullaway from the wall and a firm top.
- Inspect the base opening and wick area for any grip point.
- Try the mildest release move that fits the mold material.
- Support the candle as it starts to move so the rim does not catch.
- Stop after the first chip or crack instead of pushing harder.
- Hand the candle off to finish work once it comes free intact.
The safest release order comes from manufacturer mold-care notes, supplier molded-candle instructions, and repeated maker reports that show sticking and cracking change with mold material, wax firmness, and cooldown state. That is why a single clock-based rule is weaker than visible readiness checks.
Finish the base, seam, and surface so the candle sits cleanly
Finish a pillar candle by leveling the base, reducing visible seam marks, and refining the surface without damaging edge detail.
Start finishing molded pillar candles by fixing function before looks. A pillar that rocks needs a flatter base before it needs a smoother seam. A candle that sits flat but shows a faint line often needs only light cleanup, not heavy scraping or heat.
Readers who arrive here from how to prevent mold sticking in candle making often try to erase release damage with too much rubbing or heat, which can make the surface worse instead of better.
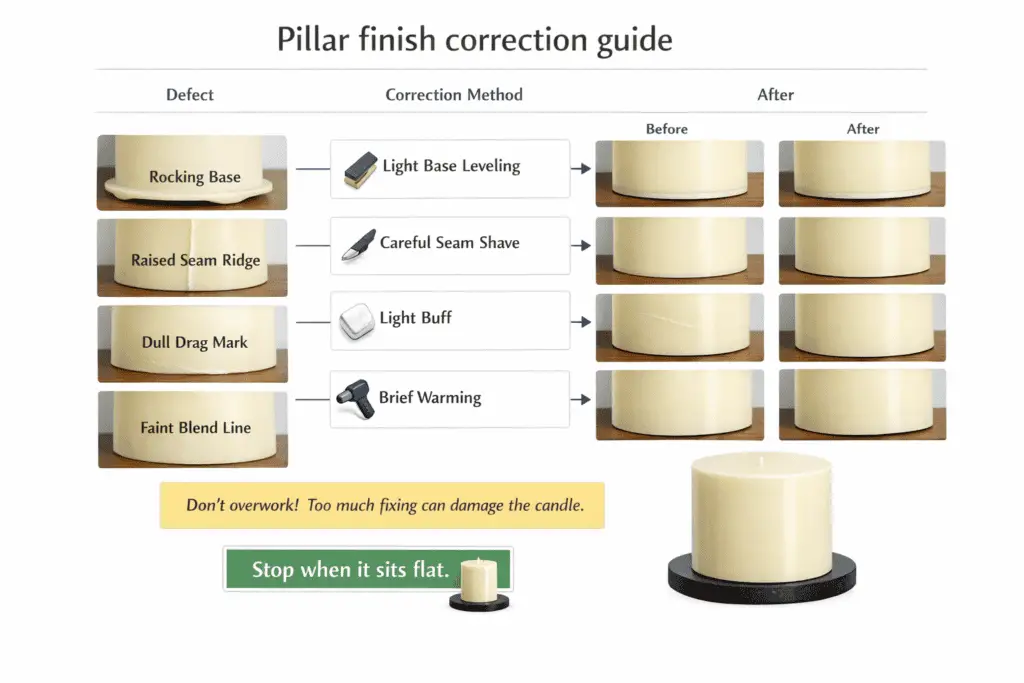
| Area | Acceptable result | Overworked result |
|---|---|---|
| Base | Sits flat without rocking | Hollowed, sloped, or smeared bottom |
| Seam | Light line with nearby detail still visible | Wide dull stripe or flattened detail |
| Surface | Even look with minor handmade variation | Gloss patches, drag marks, or gouges |
Match the method to the defect. A lightly raised seam may need a careful shave. A dull drag mark may respond better to a very light buff. A rocking base often needs brief leveling against a warm flat surface rather than more seam cleanup. On textured pillars, surface finish glossy vs matte candles techniques matters because extra heat can erase texture faster than it hides the flaw. Detailed candle molds shapes usually need less cleanup than people think.
| Method | Best use | Main risk |
|---|---|---|
| Light base leveling | Rocking candle | Melting one side too far |
| Careful seam shave | Raised seam ridge | Gouging the wax |
| Light buff | Minor dull spots | Blurring a matte look |
| Brief warming | Small drag marks or faint blend line | Gloss patches or softened edges |
A simple finish sequence works well for most pillars.
- Set the candle on a flat surface and check for rocking.
- Level the base first until the candle stands steady.
- Reduce the seam only where it rises above the surface.
- Blend small marks with the least heat or friction needed.
- Inspect the candle from arm’s length, not nose-to-wax distance.
- Stop when the pillar sits flat and looks intentional in normal light.
The point of finish work is not to erase every handmade sign. It is to leave a pillar that stands straight, reads cleanly, and keeps the edge detail you worked to preserve during the pour and release stages.