Wood wick crackle is the audible ticking, snapping, or fireplace-like sound a wooden candle wick makes as it burns inside a wax-and-container system.
In this guide, “maximize” means increasing that sound only while the flame stays steady, the jar stays clean, and no sparks, heavy soot, or overheating appear. “Control” means changing one variable at a time so crackle becomes more repeatable without turning the candle into a sizing, troubleshooting, or compliance problem. This page explains crackle behavior and routes deeper wick, wax, safety, and troubleshooting decisions to their own pages.
Wood wicks can sound anything from a soft fireplace tick to sharp pops that feel risky. That range usually comes down to wick types and sizing, wax blend, and how the candle is burned and maintained. Once you can spot the normal crackle spectrum, you can tune for more sound without chasing soot, sparks, or overheating. Start by learning what “normal” looks and sounds like so every tweak has a safe baseline.
Wood Wick Crackle Basics: What’s Normal & What’s Not
A normal wood wick crackle is a gentle, intermittent fireplace sound with a steady flame, minimal soot, and no sparks leaving the container. Wood crackle varies because the wick is a natural material and it burns with tiny shifts in fuel flow, airflow, and heat. The most useful baseline is what you can observe: sound rhythm, flame stability, and soot.
Wood wicks crackle because the flame burns across a rigid wooden surface while wax vapor, char, and airflow shift in tiny pulses.
A “healthy” crackle feels intermittent, not constant. The flame looks steady and centered, and it does not surge high and then collapse. Light soot at the wick tip can happen, but black streaks on the jar and smoke you can smell are warning signs. If you want a deeper foundation on wick behavior beyond sound, Wick Types and Sizing and a broad Candle Wick Guide help you interpret what you see without guessing.
Here’s a quick calibration table you can use while the candle is burning:
| Crackle level | What you hear | What you see | What it usually means |
| No crackle | Nearly silent | Flame may be small or lazy | Often under-fueled or muted by formula/environment |
| Soft, periodic crackle | Occasional ticks | Stable flame, clean jar | Normal for many builds |
| Steady cozy crackle | Consistent “fireplace” texture | Full flame, even melt pool | Tuned setup, still needs clean burn |
| Harsh popping / sparking | Sharp snaps, rapid pops | Soot, smoke, sparks or flaring | Unsafe behavior; stop and troubleshoot |
Wood also behaves differently than cotton, so comparing your candle to a cotton-wick burn can mislead you. If you want that contrast in plain language, Wood vs Cotton Candle Wicks is the mental model: wood can sound active even when the flame looks stable, while cotton can look strong and still be quiet.
Some problems look like “sound” issues but start as wick maintenance issues. A curled, mushroomed, or debris-loaded wick tip can change crackle and soot in minutes, which is why Fixing Wick Issues: Mushrooming, Drowning & More matters even when the candle “mostly works.” When your baseline feels clear, the main levers are wick type/size, wax system, and burn routine, which map directly to How to Choose the Right Wood Wick Type & Size for Crackle, How Wax Type, Blend & Fill Level Change Your Wood Wick Crackle, and Burn Technique & Wick Maintenance for Consistent Crackle.
If the candle sits at the silent end of the table, jump to Fixing Weak or No Wood Wick Crackle; if it jumps to harsh popping, smoke, or heavy soot, use Fixing Loud, Popping or Sooty Wood Wick Crackle first. A simple way to stay disciplined is to log one change at a time in Wood Wick Crackle Tuning Checklist & Test Planner so “better crackle” does not accidentally become “dirtier burn.”
How to Choose the Right Wood Wick Type & Size for Crackle
The right wood wick type and size gives you an audible crackle with a stable flame and a clean jar. On this page, “right” means correctly matched for crackle control, not the final sizing answer for every jar. Wood wick choice sets how much fuel reaches the flame and how evenly the wick burns.
Major suppliers such as Makesy and CandleScience warn that oversizing can push flame height and container heat, so sound tuning always sits inside safe burn behavior. Use a supplier table as your primary reference, whether that is a published chart or a downloadable Wood Wick Sizing Chart. Then align the wick to the container itself; practical sizing is about inside diameter, wax system, and how much heat the vessel can shed, which is the same logic you would use when Choosing Wicks for Different Candle Vessels.
Start by understanding what you are selecting. A single-ply wood wick is one strip and it tends to sound lighter at the same burn strength. A multi-ply wick stacks layers and it usually feeds more wax, which can increase both flame and sound. A booster wick adds a second strip to increase capillary action, and it often produces a more “active” crackle in larger containers.
Here is a generic starting-point table that helps you plan crackle tests without replacing supplier sizing:
| Jar inside diameter | Starting wick approach | Expected crackle direction | Notes |
| 2.5–2.9 in (6.4–7.4 cm) | Narrow single-ply or small series | Subtle → moderate | Prioritize clean burn; crackle may be intermittent |
| 3.0–3.4 in (7.6–8.6 cm) | Medium single-ply or medium series | Moderate | Most common “fireplace” target range |
| 3.5–4.0 in (8.9–10.2 cm) | Booster or stepped-up series | Moderate → strong | Watch soot and container temperature |
| 4.1 in+ (10.4 cm+) | Booster or multi-wick design | Strong but harder to keep clean | Consider whether one wick is appropriate for the diameter |
The fastest way to dial in crackle without wasting weeks is a controlled test set. Pour three identical candles and change only the wick: one “as recommended,” one size down, and one size up. Run two burns per candle under similar conditions and record four observations: sound level, flame stability, soot on the jar, and melt pool behavior. A wick that sounds great but leaves soot or surges in flame is not a winner, even if it “crackles more.”
Keep full sizing decisions on the dedicated wood-wick sizing page. If your “best” crackle wick still lands at silence or harsh popping, route your next move to Fixing Weak or No Wood Wick Crackle or Fixing Loud, Popping or Sooty Wood Wick Crackle instead of forcing a bigger wick.
Wax formula decides how easily your chosen wick can pull fuel and keep a stable melt pool, so the next decision is matching wick choice to the wax system you actually pour.
How Wax Type, Blend & Fill Level Change Your Wood Wick Crackle
Wax softness, blend ratio, and fill level change melt-pool behavior, which can shift wood wick crackle from quiet to bold.
In the same jar, blends like 100% soy versus a 70/30 soy–coconut mix can sound noticeably different, so compare wax options first and keep fill height within about 1/8 in (3 mm) across test pours. Supplier guidance from large wax retailers (like CandleScience) is the safest baseline when you’re deciding which waxes to test and how far to push a blend.
Think of wax choice as “fuel delivery,” not just “ingredient preference.” Softer systems tend to melt and flow more readily, which can feed a steadier flame and a more consistent crackle. Harder or more viscous systems can struggle to keep a stable melt pool early in the burn, which often reads as muted sound or a wavering flame. If you want a bigger map of options beyond crackle alone, Candle Wax Types & Blends is where to compare melt behavior, adhesion, and throw side by side.
Here’s a practical matrix you can use to predict sound before you pour a dozen tests:
| Wax type / blend (common examples) | Typical crackle tendency | Clean-burn tendency | What makers often notice | Usual wick-size direction (starting point) |
| 100% soy (container-style) | Low → medium | Medium | Can be cozy but sometimes “quiet” unless the wick is perfectly matched | Often needs careful sizing; sometimes +1 step |
| Soy–coconut blend (e.g., ~70/30) | Medium → higher | Medium → higher | Fuller melt pool and steadier sound for many containers | Often same size or -1 step vs pure soy |
| Coconut-heavy blend | Medium → higher | Medium | Strong melt behavior, but can run hot if over-wicked | Often -1 step to avoid soot/overheat |
| Paraffin blend (container) | Medium | Medium | Easy melt pool; crackle may be strong but needs clean-burning balance | Often same size or -1 step |
| Beeswax or harder natural blends | Variable (often lower) | Variable | Can burn “stiffer” and feel quiet unless the setup is dialed in | Often +1 step, then watch heat/soot |
If you sell (or gift) candles, “best wax” is the wrong question. The better question is: what trade-off do you prefer—more crackle, easier clean burn, or a specific scent profile? A setup that sounds amazing but smokes is not a win. That broader wax decision belongs in Soy vs Coconut vs Paraffin: Pros & Cons for Makers.
Fill level matters because it changes heat behavior across the life of the candle. Two jars can share the same wax and wick, but a higher fill creates more thermal mass and can take longer to reach a stable melt pool early on. A lower fill can heat faster, and it may sound more “active” sooner, but it can also get hotter toward the end of the candle if the wick is aggressive. For a simple baseline, keep fill level consistent across your tests, then adjust only one factor at a time.
A quick way to test wax and fill without chasing your tail:
- Pick one vessel and one wood wick series/size you already know is “safe enough” (steady flame, low soot).
- Pour 2–3 jars: one 100% soy, one soy–coconut blend (like 70/30), and one other option you’re considering.
- Keep fragrance load, dye, and pouring process consistent so wax is the only meaningful difference.
- Keep fill height matched (aim for that ~1/8 in / 3 mm consistency) so you’re not accidentally testing headspace/thermal mass instead of wax.
- Compare sound, flame stability, and glass cleanliness under the same room conditions.
If a wax change clearly improves crackle but introduces sooting or popping, the next lever is usually formula details like fragrance and additives. And once the formula is stable, the day-to-day routine becomes the difference between “it crackled once” and “it crackles every time,” which leads directly into burn technique and maintenance.
How Fragrance Load, Dyes & Additives Affect Crackle and Safety
Fragrance and additives can either steady a wood wick burn or push it into smoking, popping, or muted sound, because they change how easily fuel moves through the melt pool and up the wick.
Fragrance load is the most common place crackle and cleanliness start fighting each other. More fragrance can sometimes make a candle feel “richer,” but it can also change viscosity and combustion, which may show up as a louder, dirtier flame or the opposite: a wick that struggles, sputters, and goes quiet. The safest approach is to stay inside your wax supplier’s recommended fragrance range, then test in small steps so you can see whether a change improves crackle without adding soot.
Dyes can be “small but real” variables. A tiny color change might do nothing, while a heavier dye load can alter how the melt pool behaves and may contribute to residue that changes wick performance over time. If you’re troubleshooting, remove dye first and re-test so you know whether color is part of the problem.
Additives and decorations are where safety can change fast. Botanicals, glitter, mica, and any “stuff” in the melt pool can become extra fuel, create hotspots, or increase sooting—even if the candle looks fine for the first burn or two. If your goal is a clean, repeatable crackle, keep the melt pool simple during testing: wax, fragrance (within the wax’s range), and a properly sized wick. Once the candle is stable, reintroduce any extras one at a time and treat any increase in smoke, soot, or sparks as a stop signal.
A practical, maker-friendly way to test the formula lever is to keep everything else identical and pour a three-candle set: baseline fragrance level, a small step down, and a small step up—then burn with the same trim routine and room conditions. If the crackle improves but soot rises, the “answer” is not more tweaking in the dark; it’s to return to the last clean version and adjust wick style/size rather than pushing fragrance higher.
Choosing Wax for Container Candles is the right place to check that your wax choice matches your vessel style and your performance goal before you tweak anything else.
Burn Technique & Wick Maintenance for Consistent Crackle
Consistent wood wick crackle comes from a repeatable routine: trim, burn long enough to stabilize, and stop before the wick overheats.
As a practical baseline, trim the wick to about 1/8 in (3 mm) before lighting and keep burns in the 2–4 hour range, checking the flame after 15–20 minutes for steadiness. Wood-wick makers commonly recommend keeping wooden wicks shorter than cotton—often in the 1/8–3/16 in range—and the National Candle Association’s general candle-care guidance emphasizes consistent trimming, removing debris, and avoiding overlong burn sessions (in general: don’t burn longer than four hours, and let candles cool before relighting).
Here’s the key idea: the same candle can sound completely different depending on how you light it, where you place it, and what condition the wick tip is in. Wood wicks are especially sensitive to char buildup. Too much char can create a big, noisy flame with smoke. Too little wick above the wax can make it hard to light and can mute sound. If you want a broader baseline beyond wood wicks, Candle Care & Safety is the foundation for the habits below.
A simple care routine that keeps crackle steady:
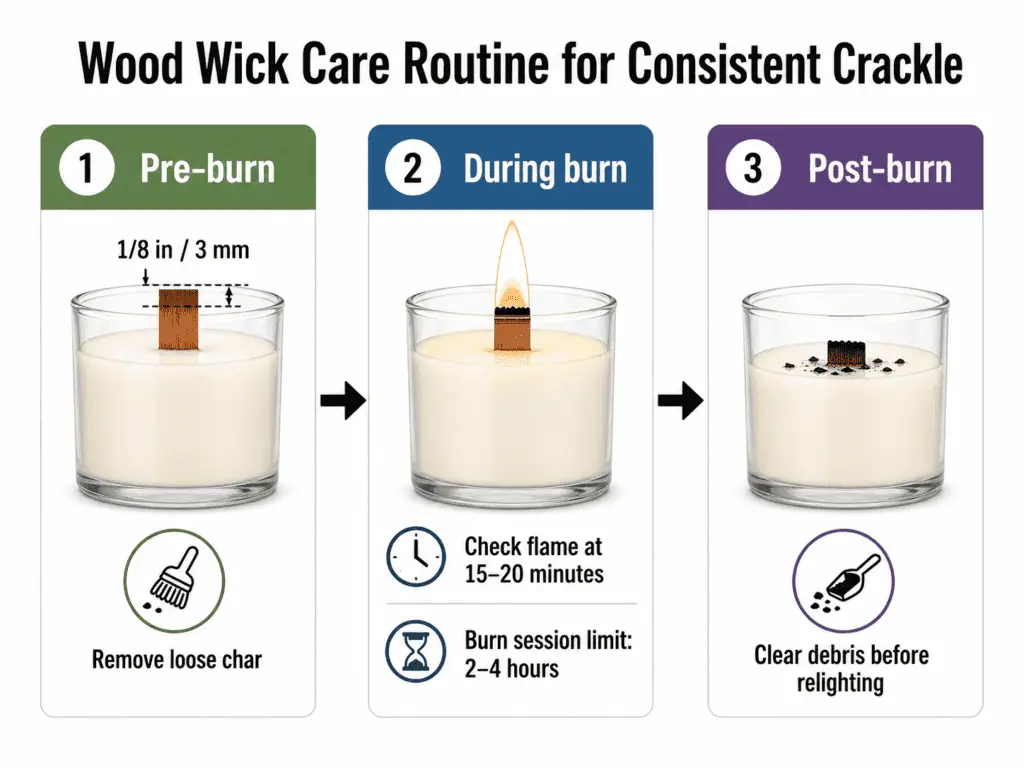
Pre-burn (before every light)
- Trim to a clean, flat edge (aim for ~1/8 in / 3 mm above the wax).
- Remove loose, flaky char so it can’t fall into the melt pool.
- Keep the candle on a level, heat-safe surface, away from vents or drafts.
During burn (first 30 minutes)
- At ~15–20 minutes, check for a steady flame and listen for a “cozy” crackle rather than sharp popping.
- Let a melt pool form before judging the sound; early minutes can be deceptive.
- If the flame surges, smokes, or throws soot, extinguish and correct the wick condition before relighting.
Post-burn (after extinguishing)
- Let the wax fully cool before moving the candle.
- Before the next burn, clear any debris around the wick so the next light is predictable.
Common symptoms and the simplest maintenance fixes:
| What you notice | What it usually means | Maintenance fix to try next burn |
| Hard to light, weak flame, little crackle | Wick trimmed too short or buried in wax | Gently clear wax around the wick top; avoid trimming shorter next time |
| Loud crackle + tall flame + smoke | Char buildup or wick left too long | Trim flatter/shorter; remove loose char before lighting |
| Crackle disappears mid-burn | Drafts or uneven melt pool | Move to a draft-free spot; keep the candle on a level surface |
| Soot on jar | Overactive flame or dirty wick tip | Shorten burn time; trim and clear char before relighting |
| Tunneling starts | Burn too short or unstable flame | Extend burn within safe limits; correct wick condition before the next session |
Wood vs cotton expectations help here. Cotton can tolerate a bit of “set it and forget it,” while wood rewards consistent trimming and debris control because the wick surface itself is part of the burn behavior. If you want a detailed trimming standard in plain language, How to Trim Candle Wicks Correctly is the skill to dial in first.
Two final habits make a big difference in repeatability:
- Don’t relight immediately after a messy burn; let it cool, trim, and clear debris first.
- Treat tunneling as a routine problem, not a mystery—most of the time it’s burn duration, placement, or wick condition, which is why Why Your Candle Tunnels and How to Fix It pairs so closely with crackle control.
Once your burn routine is consistent, your results become testable, and that’s when a simple logging and comparison system starts paying off.
Wood Wick Crackle Tuning Checklist & Test Planner
Treat wood wick crackle like a controlled experiment: change one variable at a time, log what you hear and see, and keep only the tweaks that improve sound without creating soot, sparks, or overheated jars.

If you’ve been bouncing between wick swaps, wax tweaks, and different burn habits, you’re not alone—crackle is the result of several levers working together. The goal here is to turn those levers into a repeatable system, so you can recreate a “cozy crackle” on purpose (or calm a candle down) instead of chasing guesses. If you’re organizing this across multiple lines or recipes, it helps to keep your notes consistent with how you’d structure Wick Types and Sizing and a simple Candle Testing & QA routine.
Crackle tuning checklist (use this before every test)
A crackle tuning checklist isolates one variable at a time so sound changes can be compared against flame stability, soot, melt pool behavior, and jar heat.
- Define your target: subtle, steady, or louder crackle—plus the “must stay true” rules (clean glass, stable flame, no sparks leaving the container).
- Establish a baseline burn: same room, same surface, minimal drafts, same lighting method, same observation window.
- Choose one variable to change:
- Wick (type/size/boosters)
- Wax system (type/blend/fill depth)
- Formula (fragrance %, dyes/additives)
- Technique (trim, first burn, relight habits)
- Wick (type/size/boosters)
- Decide your test set size: 2–3 small variations that isolate the change (not a full rework).
- Run the burn consistently (if you need a refresher on structure, see How to Run Candle Burn Tests).
- Record outcomes the same way every time: sound, flame behavior, melt pool, soot, and container heat signals.
- Make a decision immediately after each test cycle: keep, adjust, or stop-and-fix for safety.
Test planner table (copy/paste and reuse)
The test planner table records the candle variables and burn results that explain whether a crackle change made the candle cleaner, louder, steadier, or less safe.
Keep one reusable test log per container style so jar diameter, wick code, wax blend, sound notes, soot, and safety signals stay comparable across batches.
Reusable burn-test log
Example wood wick crackle test
Use one log per container style so jar diameter, wick code, wax blend, sound notes, soot, and safety signals stay comparable across batches.
1. Test setup
| Batch ID | Goal | Container | Wick |
|---|---|---|---|
| 1A | Louder but clean | 3" glass | Single / size X |
| 1B | Louder but clean | 3" glass | Single / size X+1 |
2. Wax and formula
| Batch ID | Wax | Fill level | Fragrance | Dye/additives |
|---|---|---|---|---|
| 1A | Soy-coco blend | Standard | Same FO% as baseline | None |
| 1B | Soy-coco blend | Standard | Same FO% as baseline | None |
3. Burn results and next step
| Batch ID | Burn setup | Session notes | Safety notes | Next step |
|---|---|---|---|---|
| 1A | Same room/time | Crackle: soft to steady; flame stable; glass clean. | No sparks; jar felt normal. | Test +1 wick size. |
| 1B | Same room/time | Crackle: louder; flame taller; faint soot at rim. | Stop if soot grows. | Try booster or revert. |
Two example test plans (simple, controlled, useful)
These two test plans keep crackle changes small enough to show whether the next move should be a wick adjustment or a technique correction.
Plan A: “I want more crackle” (without creating soot)
- Keep container + wax + fragrance the same.
- Test three adjacent wick options (one smaller, baseline, one larger), one per candle.
- Burn with identical trimming and environment rules.
- Choose the winner based on: (a) audible crackle you can repeat, (b) stable flame, (c) clean glass, (d) no worrying spark/soot signals.
Plan B: “My candle crackles, but it’s inconsistent”
- Keep recipe fixed and test technique first: trim routine, char removal, and relight habits.
- If consistency improves, you’ve saved yourself a repour.
- If not, move to the smallest ingredient-level adjustment (wax blend or fragrance load) before resizing wicks.
A practical note on numbers: whenever you’re tempted to “push” burn times, fragrance load, or wick size for sound, cross-check your supplier guidance and mainstream candle-care standards. The National Candle Association’s guidance, for example, warns against overlong burns and emphasizes trimming and debris control; the planner helps you prove a change is safer and louder—not just louder.
If your next test still comes out disappointingly quiet, the troubleshooting flow below will help you pick the right lever instead of randomly changing everything.
Fixing Weak or No Wood Wick Crackle
When a wood wick candle burns but barely crackles, diagnose maintenance and environment first, then melt pool, wick sizing, and formula.
Use this section as a routing check, not the full troubleshooting page. Start by labeling your situation using Wood Wick Crackle Basics: What’s Normal & What’s Not: “weak” is crackle you only notice in a silent room, while “no crackle” is a steady-looking burn with essentially zero sound.
Quick decision flow (what to check next)
The weak-crackle flow checks the lowest-risk causes first: wick condition, room conditions, melt pool behavior, wick sizing, then formula.
- If the flame is small, struggles, or keeps going out
- Maintenance first: remove loose char, confirm the wick isn’t trimmed too short, and relight with a steady technique from Burn Technique & Wick Maintenance for Consistent Crackle.
- Environment next: move to a quieter, draft-free spot; ambient noise can make “weak” crackle feel like “none.”
- If it still struggles, suspect wick under-sizing and jump to How to Choose the Right Wood Wick Type & Size for Crackle for a size-up test.
- Maintenance first: remove loose char, confirm the wick isn’t trimmed too short, and relight with a steady technique from Burn Technique & Wick Maintenance for Consistent Crackle.
- If the flame looks normal, but the candle is still quiet
- Check melt pool behavior: shallow or uneven melt pools often mute crackle, which points you toward How Wax Type, Blend & Fill Level Change Your Wood Wick Crackle.
- If you’re heavily scented or using additives, audit the formula next—some oils, dyes, and particulates can change burn character and sound; use How Fragrance Load, Dyes & Additives Affect Crackle and Safety as your checklist for what to simplify first.
- Check melt pool behavior: shallow or uneven melt pools often mute crackle, which points you toward How Wax Type, Blend & Fill Level Change Your Wood Wick Crackle.
- If the candle crackled on the first burn, then went quiet later
- This is often maintenance and relight behavior: char buildup, debris in the melt pool, or inconsistent burn sessions can dampen sound. Re-center on Burn Technique & Wick Maintenance for Consistent Crackle and retest before changing materials.
- This is often maintenance and relight behavior: char buildup, debris in the melt pool, or inconsistent burn sessions can dampen sound. Re-center on Burn Technique & Wick Maintenance for Consistent Crackle and retest before changing materials.
- If everything looks clean and safe, but the crackle is just subtle
- Some setups are built for a softer profile. Decide whether the candle is “quiet but correct” before you chase louder sound at the expense of stability—then plan a controlled test instead of a big recipe overhaul.
- Some setups are built for a softer profile. Decide whether the candle is “quiet but correct” before you chase louder sound at the expense of stability—then plan a controlled test instead of a big recipe overhaul.
Prioritized fixes (small changes, clear signals)
The first fixes for weak crackle should change low-risk burn variables before you repour, resize, or alter the formula.
- Standardize your burn conditions: same room, same surface, minimal drafts, and a consistent observation window so you’re not judging sound through background noise.
- Fix maintenance variables: trim consistently, remove loose char, and avoid poking the wick mid-burn (it changes airflow and can temporarily kill crackle).
- Run a wick-only test set: three adjacent wick options in the same container and wax, then pick the winner based on repeatable sound and clean burning.
- Adjust wax system only after wick tests: harder waxes and certain blends can need a different starting size; change one wax variable at a time and re-burn.
- Simplify formula if needed: remove “extras,” then retest; reintroduce fragrance/dye/additives one at a time so you can spot what quieted the candle.
- Log every result in Wood Wick Crackle Tuning Checklist & Test Planner so you can compare batches without relying on memory.
For full weak/no-crackle troubleshooting, keep the deeper diagnosis on the dedicated crackle-fix page and use this section only to choose the next route.
If your troubleshooting reveals the opposite problem—loud popping, soot, or anything that feels unsafe—move to the next section before you keep experimenting.
Fixing Loud, Popping or Sooty Wood Wick Crackle
Loud popping, sparks, or heavy soot from a wood wick candle is a safety problem, not a “better crackle,” so extinguish, inspect, and then route the issue to wick, formula, or airflow troubleshooting.
Many care instructions from the National Candle Association and major candle brands treat visible smoking, sparks leaving the jar, or a flame that becomes unstable or out of proportion to the container as a “stop and reassess” signal. In formal fire-safety testing, standards like ASTM F2417 include flame-height criteria for candles under controlled conditions; at home, the practical rule is simpler: if it looks wrong, stop and troubleshoot. If you’re unsure what “normal” lives on the spectrum, revisit Wood Wick Crackle Basics: What’s Normal & What’s Not and compare sound plus flame behavior.
A lot of forum advice says “trim it and keep burning,” but popping + soot usually means something in the system is out of balance, and continuing the burn can overheat the vessel or stain the jar fast.
Here is a safety-first checklist to run before you try any “fix” (do it once the candle is fully out and cooled):
- You see sparks leaving the container.
- You see steady smoke, heavy soot streaks, or a black film building on the glass.
- The flame looks erratic or out of proportion to the jar opening.
- The melt pool is turbulent or “spitting,” not just gently moving.
- The container feels uncomfortably hot to touch on the sides.
Once it cools, keep the repair sequence short. Trim and clear char first, move the candle away from drafts, then check whether fragrance load, additives, or wick size are making the flame too aggressive. Use How Fragrance Load, Dyes & Additives Affect Crackle and Safety and Wood Wick Crackle Tuning Checklist & Test Planner to isolate one variable instead of changing the whole recipe.
If you keep feeling tempted to push for “louder no matter what,” treat that as the cue to step back and read Safety Limits When You’re Pushing Wood Wick Crackle before you keep experimenting.
Safety Limits When You’re Pushing Wood Wick Crackle
You can chase stronger crackle only up to the point where flame, soot, heat, and spark behavior stay boringly safe, and anything beyond that belongs in testing—not in your living room.
This is practical fire-safety guidance for crackle control, not toxicology advice, regulatory approval, or proof that a candle is ready to sell. Start from the conservative basics that show up across many manufacturer care cards and National Candle Association safety advice: burn within sight, keep clear space around the candle, and cap burn sessions. In general, it is recommended that candles do not burn for longer than about four hours and cool before relighting, unless the manufacturer’s instructions say otherwise.
Think of Candle Safety & Compliance as the ceiling that every crackle tweak must respect. If “more crackle” also brings a bigger flame, darker soot, hotter glass, or more sparks, the sound is not worth the trade.
Use this safe-crackle checklist during test burns:
- The flame stays modest and steady instead of tall and whipping around.
- The jar stays at a temperature you can touch comfortably, not “too hot to handle.”
- Soot does not streak up the glass or collect as a black film near the rim.
- Sparks do not leave the container.
- Burn time stays inside conservative session limits, with cool-down between sessions.
When you sell (or plan to sell), the bar rises from “safe at home” to “safe, repeatable, and documented.” CPSC candle business guidance lists ASTM F2058 and ASTM F2417 among candle industry consensus standards; confirm current standard text and qualified compliance support before treating a crackle test as sale-ready evidence.
It also helps to adopt a repeatable test habit like How We Test Our Candles Before Selling Them, because it forces you to prove safety across multiple burns, not just one “good night.”
If you are actively dealing with smoke, sparks, or panic-level popping, circle back to Fixing Loud, Popping or Sooty Wood Wick Crackle and treat those symptoms as stop signs, not “character.” If the candle is merely noisy but stays clean and stable, your record-keeping still matters—Wood Wick Crackle Tuning Checklist & Test Planner is the simplest way to spot when a “louder” version quietly drifts into hotter, dirtier behavior over time.