
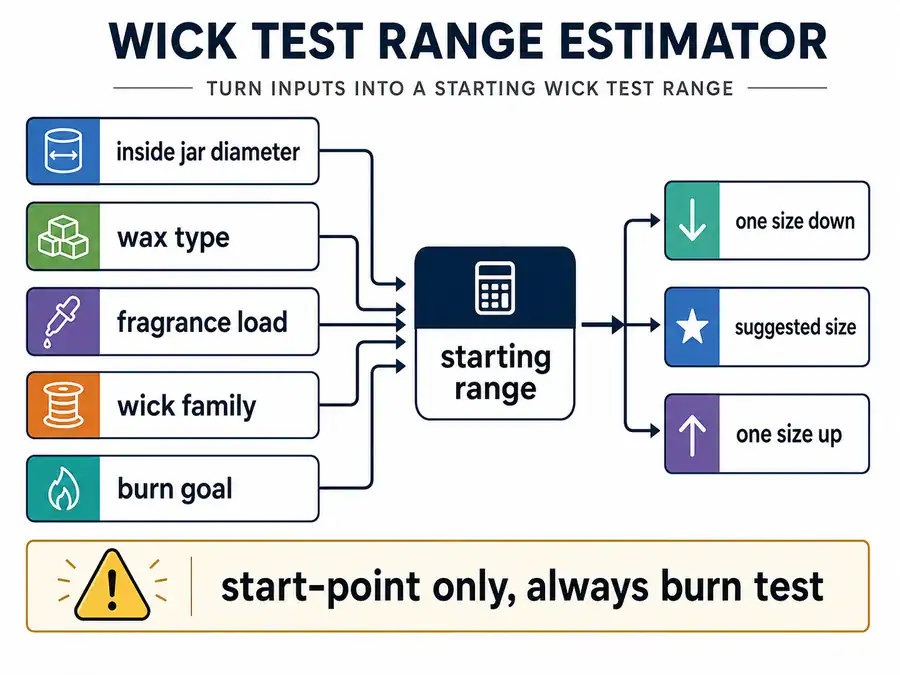
A wick size estimator gives container-candle makers a starting wick range from inside jar diameter, wax type, fragrance load, wick family, and burn goal. Measure the jar at the wax fill line, read the range as a test plan, then test one down, suggested, and one up.
A wick size estimator gives container-candle makers a first testing range for wick types and sizing, not a guaranteed final match. It starts with the inside jar diameter at the wax fill line, then adjusts for jar shape, wax type, fragrance load, wick family, and burn goal. Start-point means conservative enough for testing, not a safety certification or replacement for supplier charts. Confirm the range with adjacent test burns and stop any candle that smokes heavily, flares, develops an unstable tall flame, or overheats the container.
Wick Size Estimator (Start-Point)
Use the estimator to get a starting range, then test one size down, the suggested size, and one size up.
| Estimator signal | Output direction | What to do |
|---|---|---|
| Diameter fits one nearby range, cotton baseline, medium fragrance | Start middle | Use the suggested size as the first test candle |
| Measurement falls between two nearby ranges | Keep both nearby options | Test lower, suggested, and higher instead of rounding to a final answer |
| Slow melt progress with calm flame after controlled testing | Test one up | Change only one wick step after trim and room conditions are checked |
| Heavy fragrance, soot, mushrooming, or tall flame | Start lower or step down | Use a more conservative test direction before adding heat |
| Wide, oval, or edge-gapped vessel | Route to multi-wick | Do not make one wick solve a coverage problem it cannot handle |
| Wood wick selected | Use wood-wick path | Do not translate cotton wick numbers into wood-wick sizes |
A start-point wick size estimator is a planning tool for wick types and sizing, not a promise that one wick will work in every jar. For candle wick types and sizing basics, the useful result is a small test range based on inside diameter, jar shape, wax type, fragrance load, wick family, and burn goal.
Use these inputs before reading the output:
| Estimator field | What to enter | Why it matters |
|---|---|---|
| Inside diameter | The inside width at the wax fill line | Sets the first wick range |
| Shape | Round, square, oval, or wide container | Changes heat coverage and edge behavior |
| Wax type | Soy, paraffin, beeswax, coconut, rapeseed, or closest blend | Changes melt speed and fuel flow |
| Fragrance load | Light, medium, heavy, or your percentage if known | Can shift soot, flame, and melt behavior |
| Wick family | Cotton baseline or wood path | Cotton and wood do not size the same way |
| Burn goal | Conservative, balanced, or faster melt pool | Sets the first test direction |
Read the output as a test plan:
| Output label | What it means | What to do |
|---|---|---|
| Starting range | A small wick range that fits your inputs | Do not treat it as the final answer |
| Start-here pick | The middle or most conservative first test option | Burn test it first if supplies are limited |
| Test sizes | One down, suggested, and one up | Compare all three when possible |
| Adjustment direction | Size up, size down, or hold | Change one step at a time |
| Multi-wick flag | A warning that one wick may not cover the vessel | Use a multi-wick spacing guide if coverage fails in a wide or oval jar |
Start-point only — always burn test. This wick size estimator gives a starting range, not a guaranteed match. Wax type, fragrance, dye or additives, jar shape, and room conditions can change results. Test at least three sizes when possible: one down, suggested, and one up. Stop any test that smokes heavily, flares, develops an unstable tall flame, or heats the container too much.
The estimator uses rule-of-thumb mapping: diameter sets the base range, then wax, fragrance load, shape, and burn goal add small adjustment offsets. It does not replace supplier charts, a CD vs ECO size chart, or dedicated wood wick sizing rules, because wick series and wood-wick sizing need their own comparison paths. After the tool gives a range, the next useful step is understanding each input so a wrong measurement or wrong wax choice does not distort the result.
Inputs explained
Enter inside jar diameter, shape, wax type, fragrance load, and wick family because each input changes the starting wick range.
These inputs explain how wick sizing works in a container candle: the wick must pull enough melted wax to support a stable flame, but not so much that it smokes, mushrooms heavily, or overheats the jar.
Measure inside diameter
Measure the inside diameter at the widest point at the wax fill line, not the outside glass.
Use inches or millimeters, but stay consistent. For tapered jars, measure where the wax surface will sit, not the top rim if the rim is wider.
- Place a ruler or calipers across the inside of the jar.
- Measure from inner wall to inner wall.
- Use the widest inside span for round jars.
- For tapered jars, measure at the planned fill line.
- If you are between sizes, test the lower, middle, and higher nearby options instead of rounding as a final rule.
Common mistakes:
| Do this | Don’t do this |
|---|---|
| Measure the inside opening | Measure the outside glass |
| Measure at the wax fill line | Measure the lid or outer rim |
| Note taper or thick glass | Assume the labeled jar size is enough |
| Keep units consistent | Mix inches and millimeters |
| Use the result as a test input | Treat the number as a final wick answer |
Use candle jar sizing measurement notes in your batch log so later wick tests match the same jar and fill height.
Non-round jars: effective diameter
For square or oval jars, use the widest inside span as a conservative input, then validate because corners and long sides change melt-pool behavior.
A round jar melts outward more evenly from one center point. A square jar can leave cooler corners, and an oval jar can melt along the short side before the long side catches up.
| Shape | Measure | Watch for |
|---|---|---|
| Round | Inside diameter across the center | Even melt pool progress |
| Square | Widest inside side-to-side span | Cooler corners |
| Oval | Inside length and width | Long-side undercoverage |
| Wide vessel | Widest inside span first | Possible need for more than one wick |
For example, an oval jar that measures 3.5 inches by 2.5 inches should not be treated like a simple 2.5-inch round jar. Start conservatively, test three adjacent sizes, and move to a multi-wick path only when one wick cannot give safe coverage.
Wax type: how it changes wick demand
Choose the closest wax family because wax behavior changes how the wick pulls fuel and how the melt pool forms.
Wax type affects melt speed, flame behavior, soot risk, and fragrance performance, so two candles with the same jar can still need different test sizes. Use candle wax types as a high-level input, not as a brand-specific wick prescription.
If your wax is a blend, choose the dominant wax family when you know it; if you do not, select the closest supplier description and record the exact wax name in your test notes.
| Wax family | What often changes | Testing approach |
|---|---|---|
| Soy | Slower melt behavior in many blends | Test the suggested range before sizing up |
| Paraffin | Often easier melt-pool formation | Watch soot and flame height |
| Beeswax | Denser fuel behavior | Test patiently and avoid big jumps |
| Coconut or rapeseed blends | Blend-dependent behavior | Pick the closest match and document results |
Does soy always need a larger wick? No. Soy may need a different starting range in many setups, but jar shape, fragrance, dye, room temperature, and wick series can reverse the result.
Fragrance load: adjust for FO strength
Choose light, medium, or heavy fragrance load because fragrance can change burn behavior and the next wick test.
A heavier fragrance load may slow melt progress, increase mushrooming, or change flame stability, depending on the oil and wax. Do not assume more fragrance means a bigger wick every time; use the bucket to choose a test range, then confirm by burn behavior.
| Fragrance bucket | What to observe | Next test |
|---|---|---|
| Light | Weak throw or slow melt may not be wick-related | Hold size unless tunneling persists |
| Medium | Balanced test condition | Start with the suggested size |
| Heavy | Watch soot, mushrooming, flare, or drowning | Test adjacent sizes and stop unsafe burns |
Follow the fragrance supplier’s usage limits for your wax, and stop any burn that becomes unstable. Record fragrance percentage, oil name, wax, and wick result in a candle batch record sheet template so future tests are comparable.
Choose a wick family (cotton vs wood)
Pick a wick family first: cotton for most jars; wood when you specifically want wood-wick traits.
A wick family means the wick’s material and construction, which changes capillary pull, flame shape, trimming needs, and failure patterns. The estimator output assumes a cotton-wick baseline unless a separate wood path is selected.
| Wick family | Best starting use | Watch for |
|---|---|---|
| Cotton | Most beginner container-candle tests | Soot, mushrooming, tunneling, drowning |
| Wood | Crackle, wide flame shape, visual style | Going out, uneven burn, different sizing logic |
Do not apply cotton size numbers directly to wood wicks. If you choose wood, use a dedicated wood-wick sizing path and still burn test adjacent options.
The next variable is burn goal, because a clean conservative candle and a faster full-pool candle may use different test directions.
Burn goals
Choose a burn goal before reading the wick range because a cleaner burn and a faster melt pool can point in different test directions.
Burn goals help wick types and sizing stay realistic: the estimator gives a start-point range, then your test burn decides whether that range is clean, safe, and useful. Use wicking for clean burn goals when you want a calmer flame, less soot, and slower progress instead of chasing the fastest full melt pool.
Clean burn here means lower soot, controlled mushrooming, stable flame behavior, and acceptable jar heat during home wick testing; it does not mean non-toxic, compliant, or ready for sale.
Melt pool goal: full by 2–3 hours vs slower
Pick a conservative or faster melt-pool goal, but let the burn test decide whether the range is safe and clean.
Treat timing as diameter-dependent. A larger jar normally needs a longer controlled test window than a small jar, so do not force a fixed 2–3 hour result if the flame, soot, or jar heat looks wrong.
A full melt pool by 2–3 hours is a target some makers use during testing, not a rule to force on every first burn. A slower, cleaner melt pool can be the better start when the candle has heavy fragrance, a tricky jar shape, or a flame that already looks strong.
| Goal | What it means | What to test |
|---|---|---|
| Conservative and cleaner | Slower melt-pool progress with a calmer flame | Start with the middle or lower size |
| Balanced | Melt pool develops without obvious soot, drowning, or tall flame | Start with the suggested size |
| Faster melt pool | Quicker edge-to-edge progress | Test one size up only if the flame stays calm |
| Too aggressive | Fast melt with smoke, mushrooming, or excess heat | Step down and check trim and drafts |
A progressing melt pool should widen in a controlled way over repeated burns. Do not assume the first burn must solve every edge of wax, especially in a larger or cooler jar. Room temperature and drafts can mimic under-wicking, so a candle that looks slow in one room may behave differently under calmer test conditions. Keep trim and burn windows consistent; a candle wick trimming guide helps separate wick-size problems from maintenance problems.
Use how long to burn a candle as a timing reference for consistent tests, then compare results across the same jar, wax, fragrance load, and wick family.
Constraints: low soot, low mushrooming, flame height
If a clean burn is the priority, use the range conservatively and fix trim or drafts before sizing up.
A clean-burn constraint means the candle should avoid heavy smoke, repeated mushrooming, and an unstable tall flame while still melting enough wax for a useful burn. These symptoms do not always mean the wick size is wrong; long trim, drafts, fragrance behavior, or jar heat retention can distort the test.
| Symptom | Likely cause | What to test next |
|---|---|---|
| Light soot at the end | Long wick, draft, or wick too large | Trim, remove drafts, then test one step down if repeated |
| Heavy smoke | Over-wicking, draft, or unstable burn | Stop the test and restart with safer conditions |
| Mushrooming | Wick too large, fragrance effect, or additive effect | Trim first, then compare one step down |
| Tall or erratic flame | Long wick, draft, or wick too large | Stop if unstable, then retest with better control |
| Weak melt pool with calm flame | Wick may be too small | Test one step up after confirming conditions |
| Drowning wick | Too much melt wax or weak wick pull | Test one step up or review fragrance and wax match |
Mushrooming is not always a failure if it is small and controlled, but repeated large carbon buildup points to a test change. Smoke that appears late in the burn often comes from rising jar heat, longer flame behavior, or a wick that became oversized as the melt pool deepened. Use candle soot causes and fix notes when smoke repeats after trimming and calm room conditions. After you set the burn goal, read the result range as a test set rather than a single answer.
Results: your recommended starting wick size range
Treat the recommended range as a test set, not a final wick answer.
The estimator output tells you where to start with wick types and sizing by combining jar diameter, shape, wax, fragrance load, wick family, and burn goal. A start-point range is conservative guidance for testing; it is not a universal chart, product claim, or safety certification.
Keep this result as a test range, not a final wick approval.
| Output label | What it means | What to do |
|---|---|---|
| Starting range | The likely nearby wick sizes for your inputs | Treat it as a testing bracket |
| Start-here pick | The most conservative middle choice from the range | Test it first if you only pour one sample |
| Recommended test sizes | One down, suggested, and one up | Pour comparable samples when possible |
| Adjustment direction | The likely next move after the burn result | Change one step at a time |
| Multi-wick flag | One wick may not cover the vessel well | Do not solve wide-vessel layout here; use separate multi-wick guidance |
The range works better than one exact answer because two candles with the same jar diameter can behave differently. A soy blend with heavy fragrance and a square jar may need a different test direction than a paraffin candle in a round jar. The output assumes your measurements were taken inside the jar at the wax fill line and that the burn goal matches what you actually want: cleaner and slower, balanced, or faster melt-pool progress.
Why doesn’t the estimator give one exact wick? Because wax, fragrance, container shape, room conditions, and wick family interact during the burn. Why do wick charts disagree? They often use different waxes, vessels, wick series, and test assumptions, so use a candle wick size chart as a comparison aid rather than a final verdict. What if the result looks off? Recheck the input, repeat the test under calmer conditions, then use what wick size do I need as a decision question tied to your observed burn, not just the jar label.
The estimator maps inside diameter to a base range, then adjusts for shape, wax type, fragrance load, wick family, and burn goal. It handles uncertainty by returning adjacent sizes instead of one “correct” size. Use wick size for jar diameter as the starting relationship, then let the burn test confirm or reject the recommendation.
Once the result gives you a range, the next decision is whether your first burn says to step up, step down, or hold the same wick.
Results: next step (step up/down after a test burn)
Change one wick size step at a time after a test burn, and verify trim, centering, timing, and drafts first.
For wick types and sizing, the next test should come from what the candle did, not from guessing. Use how to adjust wick size after testing as a one-variable rule: change only the wick size, then keep the same jar, wax, fragrance load, trim habit, and burn window.
Before changing the wick size, verify these five things:
- The wick was centered before and during the burn.
- The wick was trimmed the same way before each test.
- The candle burned in a calm room without strong drafts.
- The wax, fragrance load, dye, and container were the same across samples.
- The result repeated, rather than appearing once because of a test-condition mistake.
Use this decision matrix after the first controlled test:
| What you observed | Likely cause | Next wick test |
|---|---|---|
| Small melt pool or tunneling | Wick may be too small, or the room may be cool | Recheck conditions, then test one size up |
| Wick drowns or goes out | Wick may be too small, off-center, or overloaded by fragrance | Center and trim first, then test one size up |
| Heavy smoke or soot | Wick may be too large, too long, or in a draft | Trim and remove drafts, then test one size down |
| Tall or unstable flame | Wick may be too large or poorly controlled | Stop the test, then restart with one size down |
| Repeated large mushrooming | Wick may be too large or fragrance may be affecting burn | Trim first, then compare one size down |
| Clean flame but slow edge progress | Wick may be slightly small | Test one size up only if soot and jar heat stay controlled |
| Good melt progress with smoke late in the burn | Jar heat may be rising, or the wick may become too strong later | Test one size down and repeat under the same conditions |
A candle tunneling fix begins with confirming that the candle is truly under-wicked, not just early in its burn cycle or tested in a cold room. A candle mushrooming fix starts with trim and observation because small buildup can happen without meaning the wick is unusable. A candle soot causes and fix check should look at drafts, trim length, fragrance load, and jar heat before blaming wick size alone.
Reliable step-up and step-down testing changes one variable at a time. If you change wick size, fragrance load, jar, and trim habit together, you will not know which change fixed or caused the result.
What counts as tunneling? Tunneling means the candle repeatedly burns down the center while leaving a lasting wall of unmelted wax around the sides. Why did it burn fine at first, then soot later? Later soot can come from deeper melt pools, hotter jar conditions, longer wick growth, or a wick that becomes too strong as the candle warms. When do you stop a test? Stop when the flame becomes unstable, smoke becomes heavy, the container overheats, or the candle behaves in a way you would not want repeated in normal use.
After you choose the next test size, validate it with a repeatable burn protocol so the result is comparable.
Validation: burn test protocol (quick checklist)
Run controlled test burns with consistent trimming, timing, room conditions, and notes before committing to a wick size.
A burn test validates the estimator’s starting range for wick types and sizing by showing how the wick behaves across repeated burns in the same candle system. Use this wick testing guide to compare adjacent wick sizes without changing the jar, wax, fragrance load, or burn goal mid-test.
Keep each burn as validation of the range, not as final wick approval.
Follow this quick checklist:
- Label each test candle with jar, wax, fragrance load, dye or additive, wick family, and wick size.
- Center the wick and let all samples cure or rest under the same conditions before comparing them.
- Trim each wick the same way before every burn.
- Burn in a calm room away from drafts, open windows, fans, and vents.
- Start with the same burn window for each test candle.
- Record melt-pool progress, flame behavior, soot, mushrooming, scent performance, and jar heat.
- Let the candle cool fully before the next burn.
- Re-trim the wick consistently before the next test.
- Repeat before deciding that a wick is too small, too large, or acceptable.
- Stop any unsafe test instead of trying to force a full melt pool.
Use a simple log so your next wick decision comes from observations rather than memory:
| Test burn | Wick size | Melt-pool notes | Flame notes | Soot or mushrooming | Next action |
|---|---|---|---|---|---|
| Burn 1 | Hold, step up, or step down | ||||
| Burn 2 | Hold, step up, or step down | ||||
| Burn 3 | Finalize or retest |
A candle batch record sheet template keeps the test repeatable when you change one variable later, such as wax blend or fragrance load. A candle wick trimming guide helps keep trim habits from being mistaken for wick-size problems.
Controlled conditions, consistent burn windows, and consistent trim are required for comparable wick tests. Treat the burn protocol as a comparison method, not a home safety certification. Standards-based candle safety testing is a separate process, so do not use a passing home burn as proof that a candle is ready for sale.
Once the wick range passes controlled testing, use the quick answers below to clear common sizing doubts before repeating or scaling the batch.
FAQ (quick answers)
Use these quick answers to settle common wick sizing questions before you pour or retest.
For wick types and sizing, the most conservative testing answer is usually a starting range plus a controlled burn test, not one fixed wick number. Keep wick sizing questions tied to the same jar, wax, fragrance load, wick family, and burn goal so the answer does not drift.
What wick size fits my jar?
The right wick size starts with the jar’s inside diameter at the wax fill line. Use that measurement to choose a starting range, then test one size down, the suggested size, and one size up.
How do I measure jar diameter for wick size?
Measure from inner wall to inner wall at the planned wax fill line. Do not use the outside glass, lid size, product label size, or rim width as the estimator input.
Why do wick charts disagree?
Wick charts disagree because they are built around different waxes, jars, wick series, fragrance loads, and test rules. Use a chart as a comparison aid, not as proof that one size will work in your candle.
Why is my candle tunneling?
Tunneling usually means the candle is not getting enough heat coverage over repeated burns. Check trim, centering, room drafts, and burn time first, then test one wick size up if the issue repeats.
How do I get a full melt pool without soot?
Start with a balanced wick range and avoid chasing a fast full melt pool at all costs. If the candle smokes, mushrooms heavily, or gets too hot, step down instead of forcing faster wax melt.
Does soy always need a larger wick?
Soy does not always need a larger wick. Soy blends often change wick demand, but jar shape, fragrance load, dye, wick series, and room conditions can change the result.
Can too much fragrance cause flare-ups?
Too much or poorly matched fragrance can make burn behavior less stable. Follow the fragrance supplier’s limits for your wax, and stop any test that flares, smokes heavily, or develops an unstable tall flame.
Is mushrooming always bad?
Mushrooming is not always bad when it is small and controlled. Repeated large carbon buildup is a test signal, so trim first, then compare one wick size down if it keeps happening.
Why does it smoke only at the end of a burn?
End-of-burn smoke can happen when the jar is hotter, the melt pool is deeper, or the wick has grown too long. Retest with a consistent trim before deciding the wick is oversized.
When do I need two wicks?
You may need two wicks when one centered wick cannot give safe, even coverage in a wide, oval, or unusually shaped vessel. Keep the estimator on a single-wick start point, then route wide-container layout decisions to a multi-wick spacing guide.
For wick series questions, use a CD vs ECO size chart only after you know your jar diameter, wax type, and burn goal. For wood wicks, do not translate cotton wick numbers directly; use wood wick sizing rules because wood behaves as a separate path.