
To fix weak scent throw in candles, test weak hot throw while the candle is burning by isolating fragrance load, wax, wick, cure, temperatures, containers, and burn protocol, then keep the combination that fills the target room without creating burn problems.
Weak scent throw is frustrating, especially when a candle looks clean but barely fills the room once lit. Most weak hot throw problems come from a small group of controllable variables: fragrance load, wick, wax, cure time, temperatures, container geometry, and burn conditions. Treat the problem like an experiment so you can change one variable at a time and see what actually improves scent instead of guessing. The goal is to turn faint, inconsistent candles into reliable jars that suit the intended room size without smoking, tunneling, or drowning the wick.
On this page, “fixed” means repeatable hot throw in the target room without soot, overheating, tunneling, sweating, or a drowning wick, and “stronger throw” means stronger room projection while burning, not stronger cold throw before lighting.
Start here: the 6 fastest weak-throw checks
Start with the highest-probability causes before you change lower-impact variables like dye, additives, or headspace. Most weak hot throw problems come from wick size, fragrance load, cure time, add temperature, or room conditions, so those are the fastest checks to run first.
Role in this fix path: use this table to identify the highest-probability bottleneck before you change lower-impact variables.
For the broader context behind these fixes, see candle fragrance and scenting.
| What you observe | Most likely cause | First variable to test |
| Strong cold throw, weak hot throw, and a small melt pool after 2–3 hours | Wick too small or too cool for the wax and jar | Wick up one size in the same series |
| Strong first hour, then flat or burnt scent, deep melt pool, soot, or mushrooming | Wick too large or the candle is over-fueled | Wick down one size and retest |
| Weak scent in every burn, but the flame looks clean | Fragrance load too low or weak FO/wax compatibility | Run a 6% / 8% / 10% test ladder if your wax allows it |
| Fresh candle smells weak, then improves days later | Cure time too short | Retest at 7 and 14 days before reformulating |
| Candle works in a bathroom but disappears in a large room | Room-size mismatch or airflow is stripping the scent | Test in a smaller room or move away from vents and windows |
| Oily tops, sweating, lazy flame, or a drowning wick | Too much FO or poor add-temp / mix control | Lower FO and retest add temperature plus stir time |
Fast wins first: start with wick size, fragrance load, cure time, add temperature, and room placement. Only move to additives, dye, headspace, or lid variables after the core burn system is stable.
Behind those fast checks sit 20 specific variables you’ll actually test and record:
- Fragrance load percentage
- Wax family (soy, paraffin, coconut, blends, beeswax)
- Wick size
- Wick type/series (cotton, wood, CDN/HTP/CD, etc.)
- Cure time
- Cure conditions (temperature, light, lid on/off)
- Fragrance add/mix temperature
- Pour temperature
- Container diameter
- Container shape and wall thickness
- Room size
- Airflow/drafts (vents, windows, fans)
- Burn time per session
- Wick trimming habits
- Fragrance volatility profile
- Fragrance flash point vs process temperatures
- Additive type and dose (Vybar, stearic, UV, etc.)
- Dye type and load
- Headspace above the wax
- Lid type and storage conditions
Use this one-variable test protocol
Change one variable at a time so each weak-throw test gives you a usable answer. Lock the wax, jar, fragrance, room, and burn schedule, then move only one variable per test round using a simple scent-throw testing protocol.
Role in this fix path: this protocol keeps each test comparable so one change gives one usable answer.
Method box: Keep one wax, one jar, one fragrance, one room, and one burn schedule fixed, then score each candle the same way so one changed variable gives one clear result.
- Pick one formula and one room.
- Change one variable only: FO %, wick size, cure time, add temp, jar, or another item from the list.
- Burn each candle for the same interval, ideally 3–4 hours, after the same cure window.
- Log melt pool width, flame behavior, jar heat, and hot-throw score from 0–10. To reduce nose fatigue, step out of the room for 5–10 minutes before you come back in and score it. That step helps reduce olfactory fatigue, a temporary drop in scent sensitivity that can make a good candle seem weak.
- Keep the lowest-risk winner, then move to the next variable.
A simple log row is enough: wax / FO / FO% / wick / jar diameter / cure days / add temp / pour temp / room / hour 1 HT / hour 2 HT / notes.
Work in this order
Run your tests in this order so you solve the biggest performance problems before you spend time on smaller refinements.
- Lock fragrance load and wax.
Run your 6–8–10% FO ladder in one wax and pick the lowest clean winner. Decide whether you’re staying in soy/coconut–soy, paraffin, or a blend. - Dial in the wick for that combo.
Ladder-test 3 wick sizes in one series in your chosen jar until you get a full melt pool in 2–3 hours with a clean, steady flame. - Stabilize cure time and temperatures.
Set a standard cure window by wax, write it down, and fix your add/pour temps using a thermometer and a simple chart. - Choose containers, room size, and placement.
Confirm jar diameter and shape work for your wick and wax, then test in the actual room with reasonable airflow (no vents or strong drafts nearby). - Only then tweak extras.
Once the core system works, experiment with additives, dye load, headspace, and lids—one tweak at a time—so you keep your strong hot throw while polishing appearance and storage.
Prevention checklist for future batches
Use this short checklist to keep future batches consistent.
- Weigh wax, fragrance, dye, and additives every time.
- Change only one variable per test round.
- Burn-test in the same room and away from drafts.
- Record wick code, jar diameter, cure days, and temperatures on every batch.
- Retest whenever you change wax brand, fragrance, dye load, or container shape.
Fix weak scent throw: set the right fragrance load (%)
Test fragrance loads between 6–10% of your wax weight and keep the lowest level that gives strong, steady hot throw without stressing the wick. You’ll dial this in much faster if you understand broader candle fragrance basics, especially how oil dissolves into different waxes. Measure fragrance load by weight and keep it inside your wax supplier’s stated fragrance limit plus the fragrance supplier’s IFRA and SDS guidance where relevant. ASTM F2417 covers candle fire safety, but your usable fragrance percentage still has to be validated through burn testing in your exact wax, wick, and container system.
Role in this fix path: test load early because too little and too much oil can both weaken hot throw.
Method box: Run matched testers at 6%, 8%, and 10% if your wax allows it, keep wick, jar, cure time, and burn schedule unchanged, and reject any load that causes sweating, weak flame, or dirtier burns.
Think of fragrance load as one variable in a bigger system. A quick look at hot throw vs cold throw helps separate release problems from pre-burn sniff problems. Wax type, wick, jar, cure time, and burn protocol all change how a given percentage behaves. Before chasing higher numbers, run a simple ladder test at, say, 6%, 8%, and 10% with the same wax, jar, wick, cure time, and burn schedule. Give each test candle at least two full burns and score the hot throw on a 0–10 scale while watching the flame and melt pool. Often you’ll find that going from 6% to 8% brings a clear jump in scent, while 10% adds wick mushrooming, sweaty tops, or a smaller, lazier flame that actually throws less.
Poor-quality or incompatible fragrance oil can make a candle throw weakly even when the percentage looks right on paper. If one oil stays faint across multiple clean wick and cure tests while other oils perform normally in the same wax, treat FO quality or FO/wax compatibility as the likely bottleneck.
Use a tiny fragrance load calculator habit so you never have to mentally juggle the math and can really compare wax carriers for scent throw instead of comparing sloppy guesses. Take your planned wax weight in grams, multiply by your chosen fragrance percentage, then divide by 100:
- 200 g wax at 6% → 200 × 0.06 = 12 g oil
- 250 g wax at 8% → 250 × 0.08 = 20 g oil
- 300 g wax at 10% → 300 × 0.10 = 30 g oil
A scale that reads to 0.1 g makes this painless and keeps you within the limits on your supplier’s SDS and any IFRA category caps. As you repeat pours, that little method becomes your built-in FO calculator.
Once you’re comfortable with the numbers, learn how fragrance load is calculated in the context of your exact wax and fragrance combo, not just “soy can take X%.” Each wax family and individual fragrance has its own realistic ceiling where extra oil just sits in the melt pool, chokes the wick, or weeps out of the jar. Keep notes for each scent: wax type, FO %, cure time, wick code, and HT score, then circle the lowest percentage that hits your target hot throw with a clean, self-trimming flame. That becomes your “house load” for that fragrance, and it will beat blindly maxing out the label every single time.
Soy vs paraffin (and blends): when is wax actually the weak-throw problem?
Switch wax only after wick size, fragrance load, cure time, and room testing are stable, because wax is usually a second-pass fix rather than the fastest first fix. If you need a deeper comparison after troubleshooting, see best wax for strong scent throw rather than turning this page into a full wax guide.
Role in this fix path: treat wax as a second-pass variable after the core burn system is stable.
Wax is more likely to be the problem when your wick is correctly sized, the melt pool reaches the edge on time, cure time is long enough, and the candle still smells faint in the target room. In like-for-like tests, paraffin and parasoy often project scent farther than pure soy, coconut–soy blends often sit between soy and parasoy, and beeswax usually throws more softly unless it is blended.
Wax is probably not the main problem when the candle tunnels, mushrooms, sweats, or performs very differently after a longer cure. Keep the same fragrance oil, jar, and burn schedule when you test a new wax, then use the dedicated wax page for full comparison work.
Choose the right wick size & type for strong hot throw
To get strong hot throw, start with the smallest wick that still reaches a full melt pool in 2–3 hours and burns with a bright, stable flame. Before you choose core candle settings, pick one wax, one jar, and one fragrance so you’re not chasing too many variables at once. Then use your supplier’s wick series and sizing guide as a starting point instead of guessing blindly from photos online. That will usually give you two or three candidate wick sizes and families (cotton, paper-core, HTP, CDN, wooden) to test in the same container.
Role in this fix path: wick testing tells you whether the melt pool is hot enough to release fragrance cleanly.
Think of wick testing as a bracket tournament. For each candidate wick, pour one test candle with the same wax, fragrance, load, pour temperature, and cure time. Burn them side by side and watch flame height, melt-pool diameter, and HT after 2–3 hours. When you have the types of candle wicks explained in plain language—hotter vs cooler series, more rigid vs more flexible, self-trimming vs not—you can predict which wicks tend to run hotter for heavier fragrance loads or higher-melting wax blends. A wick that’s a size too small will tunnel and give weak scent; a wick that’s a size too big will mushroom, soot, and sometimes smell harsher.
A simple method is to pick three sizes in the same wick series (for example, one “likely” size plus one step down and one step up) and run them as a mini test set. Keep burn logs: date, burn time, flame behavior, melt pool width, and a 0–10 hot-throw score. Retire obvious losers and keep the cleanest, strongest wick as your new baseline. For stubborn fragrances, repeat the test with a different wick series that runs slightly hotter or cooler rather than jumping wildly between brands. When you’re stuck, a small wick sample kit or a wick selection tool from your supplier can be a cheap shortcut compared with wasting whole bags of wax.
Finally, remember that wick choice is tied to everything else in the system. If you change jar diameter, wax blend, fragrance load, or dye load, you may need to revisit your wick choice too. A wick that works in a 7 cm tumbler may be too weak in a 9 cm jar even with the same wax and FO. Treat your notes like a mini database so you can quickly skim previous tests and reuse what worked instead of starting from zero every time. Over time, you’ll build an intuitive map of which wick families carry strong scent for each wax and jar shape you use most.
Cure time & conditions: set 7–14 days (by wax) for stronger HT
Most container candles reach noticeably stronger hot throw when they cure undisturbed for several days. As a starting window, many makers test paraffin blends at about 3–7 days and soy or coconut–soy at about 7–14 days. A simple guide to how long to cure scented candles in your notebook can save you from testing too early and misjudging a perfectly good formula. During cure, fragrance molecules distribute more evenly through the wax and the crystal structure stabilizes, which helps the candle burn more consistently from the top of the jar to the last centimeter of wax. If you burn too soon, you often get a faint first impression and assume the fragrance load or wax is the problem.
Role in this fix path: cure tests confirm whether the formula is weak or just being judged too early.
Method box: Pour one matched batch, burn testers at 3, 7, and 14 days, and compare only the change in throw and burn behavior before you reformulate.
For example, your chart might look like this to start:
| Wax type | Typical cure window | Notes |
| Paraffin blends | 3–7 days | Often “ready” faster, still test. |
| Parasoy blends | 5–10 days | Middle ground; verify at 7 days. |
| Soy / coconut–soy | 7–14 days | Often improves noticeably after a week. |
To dial in soy candle cure, pour at a consistent temperature, cool the candles at room temperature away from drafts, and cover them once they’re fully set to protect from dust and scent loss. Mark your pour date and “ready” date right on the bottom label so you don’t have to rely on memory. Many soy makers find that a candle that smells like a 5/10 after one day quietly climbs to a 7–8/10 after a full week in the same room. Paraffin and parasoy often come into their own a bit faster, but they still benefit from at least a few days of rest before serious testing or gifting.
Room conditions matter just as much as time. Store curing candles in a cool, dry place out of direct sunlight so they don’t repeatedly soften and firm up. Extreme temperature swings—like curing in a cold garage during the day and a hot room at night—can lead to frosting, wet spots, or subtle scent changes. To improve hot throw with curing, keep batches together, avoid stacking candles while the wax is still even slightly warm, and don’t leave lids off for weeks, especially with lighter citrus and herbal scents that evaporate more readily.
A practical workflow is to pour weekly batches and always have several “matured” candles ready to test, instead of waiting impatiently on a single experiment. On your testing calendar, note which day you’ll do the first burn for each batch and stick to it. If you ever change wax brands or fragrance suppliers, run a small set of cure-time tests: burn one candle at 3 days, another at 7, another at 14, and compare the throw. That extra patience usually costs only a bit of shelf space but pays off in fewer reformulations and more predictable results.
Set mix & pour temps to protect top notes (by wax & FO)
Treat mix and pour temperature as a process variable to test after wick size, fragrance load, and cure time are stable, and use the wax and fragrance supplier’s recommended ranges as your working limits. Use add fragrance at the supplier’s recommended range as the baseline, because temperature control here is about repeatable scent performance in your wax system, not about using flash point as the mixing target.
Role in this fix path: temperature control helps you separate handling losses from formula problems.
Method box: Keep wax, fragrance, wick, jar, and cure fixed, then move one temperature variable at a time in small steps so you can see whether add temperature or pour temperature changed the result.
Most reputable suppliers give specific bands for their waxes and fragrance oils; those are your first stop, not random numbers from social media.
A simple starting chart might look like this:
| Wax type | FO add range (°C) | Pour range (°C) | Notes |
| Soy blends | 60–70 | 55–65 | Many citrus FOs prefer cooler end. |
| Paraffin-rich | 70–85 | 65–80 | Tolerates more heat, still avoid smoke. |
| Coconut–soy blends | 60–70 | 50–60 | Often fussy; cooler pour can help. |
A practical workflow is: fully melt the wax, let it cool into the correct FO range, stir gently but thoroughly for 2–3 minutes, then wait until it reaches your target pour temperature for strong scent before filling containers. For example, many soy blends like to have fragrance added around 60–70 °C (140–158 °F) and poured several degrees cooler, while paraffin-rich waxes often tolerate both melting and pouring hotter. Coconut-heavy blends can be fussier; they may need slightly cooler pour temps to reduce frosting and sink holes. The key is that each wax–fragrance combo has a sweet spot where the oil binds well without flashing off.
To really protect fragrance top notes, avoid overheating either the wax or the fragrance oil itself. If your wax needs to be taken very hot to dissolve additives, let it cool back down before you add FO. Never dump fragrance into aggressively boiling or smoking wax; that’s wasted scent and sometimes a safety hazard. Use a thermometer every time instead of relying on “it feels about right.” Stir slowly in different directions and scrape the bottom and sides of the jug so there are no cool pockets of wax that trap unmixed oil.
Finally, test in small, controlled variations. Pour a mini trio where everything is identical except the FO addition temp (for example 60, 65, and 70 °C) and keep pour temp the same. Burn-test them after your normal cure and rate HT and surface quality. Repeat with small adjustments to pour temp while holding the mix temp steady. Within a few cycles you’ll have reliable temperature “recipes” for each of your main waxes and fragrance families, which cuts guesswork and makes scaling up far less risky.
Pick containers that project scent: when is the jar actually the bottleneck?
The jar is the bottleneck when its diameter or shape prevents a full melt pool or exposes too little warm wax surface for the room you want to scent. Start by learning how to choose candle jar size for your wax and wick combo, because too narrow a jar can tunnel and too wide a jar can leave one wick struggling to keep up.
Role in this fix path: container tests show whether jar geometry is limiting warm wax surface and room coverage.
Method box: Pour the same formula into two or three correctly wicked jars with different diameters or shapes, then compare time to edge, wall heat, and room coverage in the same room.
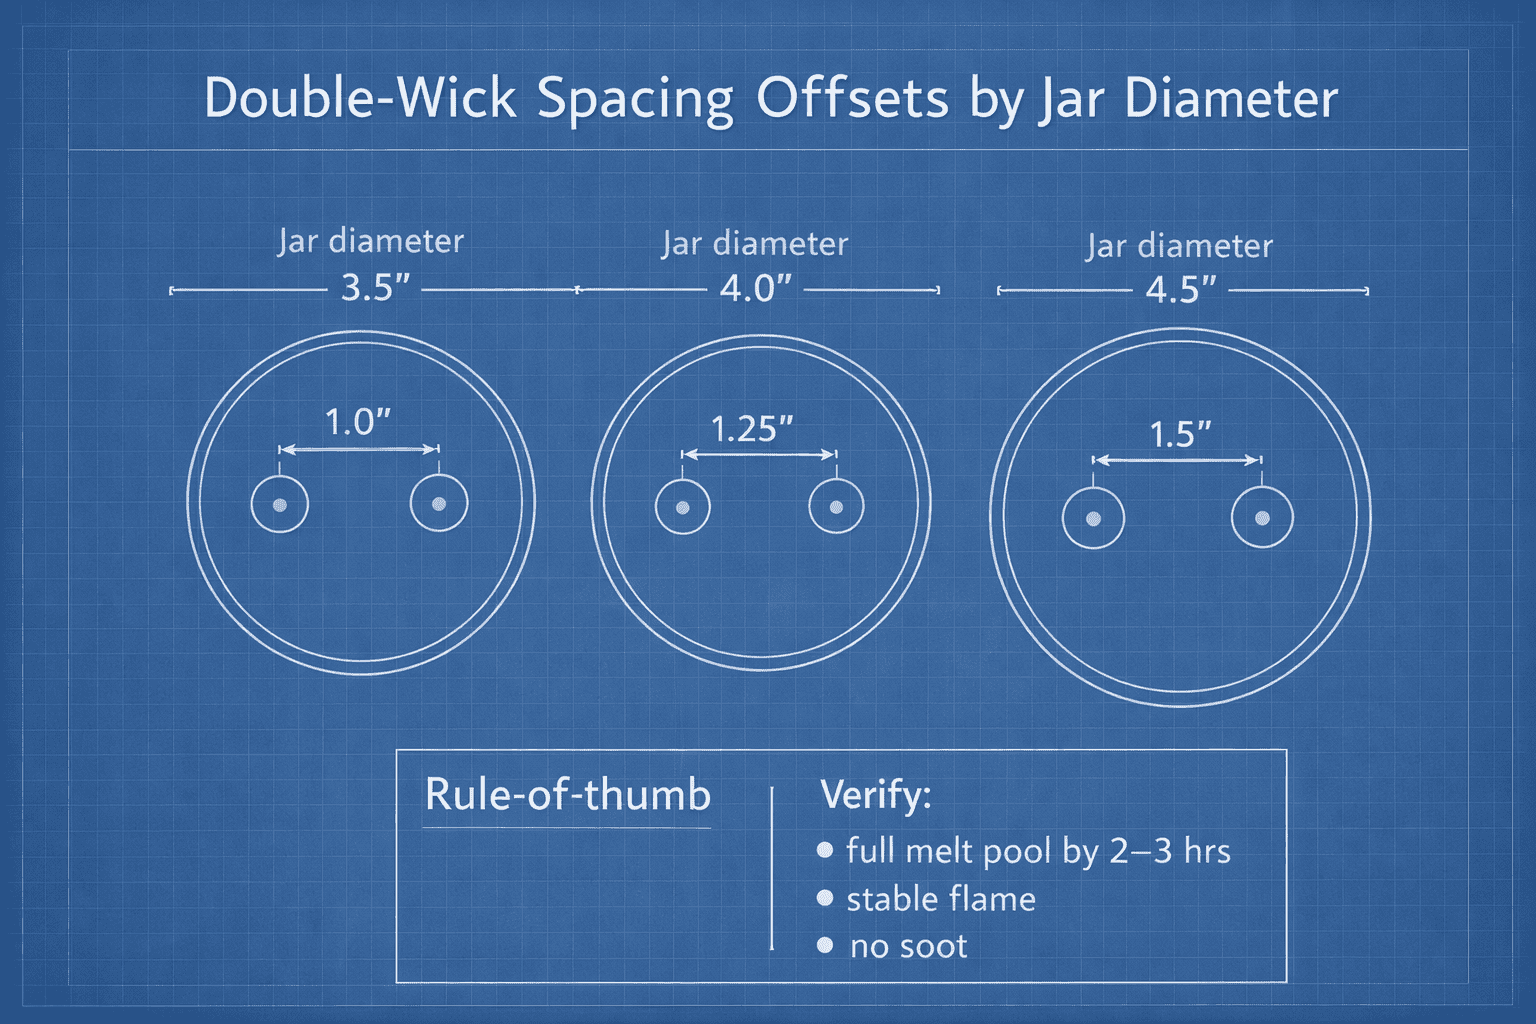
For most single-wick container candles, diameters between about 6–8 cm work well in bedrooms and small living rooms when paired with an appropriate wick and fragrance load. Once you move wider than that, weak throw can become a surface-area problem rather than a fragrance problem, and a multi-wick jar or a smaller container may fix more than another FO increase.
Very tall, narrow jars can push heat and scent straight upward instead of spreading them through the room, while squat tumblers and straight-sided jars usually give a more even pool and scent field. Heavy, opaque ceramics can delay a full melt pool and may need a hotter wick than glass. Avoid containers that narrow sharply at the top or have complex internal ridges, because those shapes can create hot and cool spots that hurt both throw and safety.
To check whether the container is the bottleneck, pour the same wax and fragrance into two or three jars with different diameters, wick them correctly, and burn them in the same room. Log time to edge, room coverage, and wall heat. That simple comparison tells you whether weak throw is coming from the formula or from the amount of warm wax surface the jar can expose.
Match candle to room size & avoid drafts for better scent
A candle that smells amazing in a tiny bathroom can feel almost unscented in an open-plan living room, so you need to think in terms of candle size for room coverage rather than “one jar fits all.” As a rough guide, small single-wick jars (6–7 cm diameter) shine in bathrooms, offices, and bedrooms, while medium tumblers suit typical living rooms. Very large or very open spaces often need either a bigger multi-wick candle or a few smaller jars burning together. The goal is to match the amount of wax and melt-pool surface area to the volume of air you’re trying to scent.
Role in this fix path: room tests tell you whether the candle is weak or simply undersized for the space.
Method box: Burn the same candle in the target room and in one smaller control room, then compare how far the scent travels after the same burn window and re-entry check.
Start by literally measuring: note the square meters of your room and write down which candle size and fragrance load you’re testing there. When you match candle to room size, burn the test candle for at least 2–3 hours, then step out for 5–10 minutes and come back in with “fresh” senses. If the scent only hugs the area immediately around the jar, you either need more surface area (wider jar, multi-wick, or multiple candles) or a stronger fragrance/wax combination. If the scent is overwhelming, downsize the jar or lower the fragrance load for that room type. Over time you’ll build your own simple matrix: small room / medium room / large room vs small / medium / large candle.
Even a perfectly sized candle can underperform if it sits in the wrong spot. Drafts, vents, windows, fans, and constantly opening doors all steal fragrance molecules and carry them away before they can build up in the room. To avoid drafts for better scent throw, place candles away from direct airflow and not right under air-conditioning vents or on window sills with constant breezes. A slightly central, stable surface—like a coffee table or console—often gives more even scent distribution than a far corner. You’ll also see fewer sooting issues and less uneven melting when the flame isn’t fighting moving air.
Finally, test placement just as deliberately as you test wax and wicks. Try the same candle formula in two spots in the same room: one calm, one drafty. Keep notes on how the throw feels after one, two, and three hours and whether the scent fills the space evenly or pools awkwardly in one area. You may discover that a simple move of 1–2 meters away from a vent does more for scent than changing your fragrance load. When you document room size, candle size, and placement together, you turn “weak throw” from a vague complaint into a variable you can actually control.
Standardize burn protocol: cycles & trims that improve HT
If every test candle is burned differently, your scent-throw results will be all over the place. A standard candle burn protocol means you always burn for similar lengths of time, in similar conditions, with a properly trimmed wick, so you can trust your comparisons.
Role in this fix path: consistent burn cycles keep your comparisons fair from batch to batch.
Method box: Use one trim length, one burn window, one cooling interval, and one room setup for every tester so poor testing habits do not masquerade as formula changes.
A simple rule of thumb is one hour of burn time per 2.5 cm (1 inch) of jar diameter on the first burn, so the melt pool has a fair chance to reach the edges without overheating the container. Write this rule on your testing sheet and follow it as closely as you can.
Do not score hot throw before the candle has had a fair test window and a realistic melt pool for that setup. If you judge a large jar too early, you can mistake an unfinished burn for a weak formula.
Before each burn, trim the wick to about 6 mm (¼ inch) and remove any old mushroom or debris from the melt pool. Consistent wick trim and burn cycles reduce soot, keep the flame from getting too tall, and prevent the wick from curling over and smothering itself. That cleaner, more stable flame often translates directly into stronger, more even hot throw because the melt pool stays at the right depth—usually around 0.5–1 cm. Trimming also helps keep fragrance from smelling “burnt” as the candle ages.
For testing, decide on a standard cycle like: trim, burn 3–4 hours, extinguish, cool completely, then repeat. Use the same cycle for all the candles in a test set, and log your observations: flame height, melt-pool width, jar temperature, and scent strength at each hour. Over time, you’ll see patterns—maybe a certain wick series gives great HT in the first cycle but fades on later burns, or a particular fragrance smells best after the second burn. When you improve hot throw with better burning habits, you’ll notice fewer surprises between your early tests and how customers actually burn at home.
It helps to write a short “burn care” blurb for yourself and for future buyers based on your test protocol: always trim, avoid burning longer than 4 hours, keep away from drafts and out of reach of children and pets. Following your own instructions during testing ensures the real-world experience matches what you designed. Once burn behavior and scent throw are predictable under a standardized protocol, you can confidently tweak one ingredient at a time instead of wondering whether a weak candle was really just burned badly.
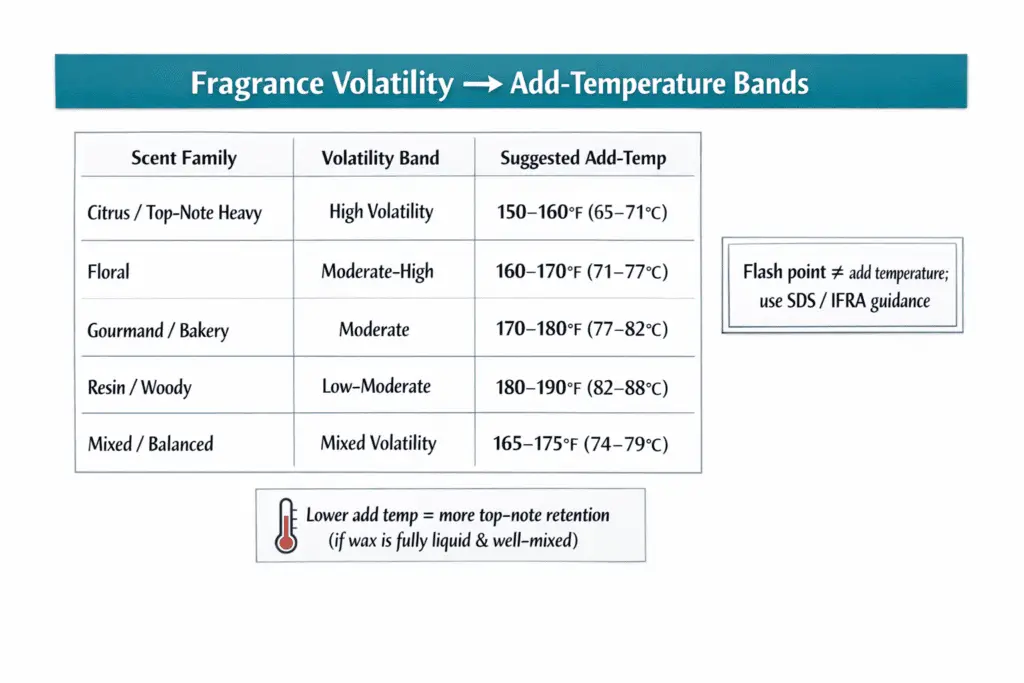
Match FO volatility & flash point to wax & temps
Use fragrance volatility and flash point only as a late-stage tuning check after wick size, fragrance load, cure time, and room testing are stable. Lighter top-note blends can lose impact in hot, fast systems, while heavier gourmand or wood blends may need more heat to open up fully.
Role in this fix path: use this second-pass check only after the core variables are behaving.
A short guide to what flash point means in candle making helps separate fire-risk language from scent-performance testing. Flash point is the lowest temperature at which an FO’s vapors can ignite in the presence of a flame or spark in a lab test; it does not set the correct FO addition temperature for your wax.
Keep a simple note page with wax melt temp, FO add temp, and pour temp for each combination you use. Regularly heating fragrance far above the supplier’s working range can still change the scent profile, so add FO after the wax cools into that range and keep low-flash-point oils away from open flame.
If this variable still looks like the bottleneck after the core tests are stable, route out to the dedicated flash-point page and keep this page focused on the exact FO, wax, and wick combination in front of you.
Secondary variables to test only after the core 5 are stable
Test secondary variables only after wick size, fragrance load, cure time, add or pour temperatures, and room conditions are stable. These levers can help with fine-tuning, appearance, or storage, but they rarely fix weak throw when the core burn system is still off.
Role in this fix path: keep these tests subordinate so extras do not distract from the core five.
Use additives without muting throw
Use additives only to solve a specific problem, and keep the dose as low as possible. A side-by-side review of best candle additives for scent throw can help you narrow the next test, but additives still belong after the core system is stable.
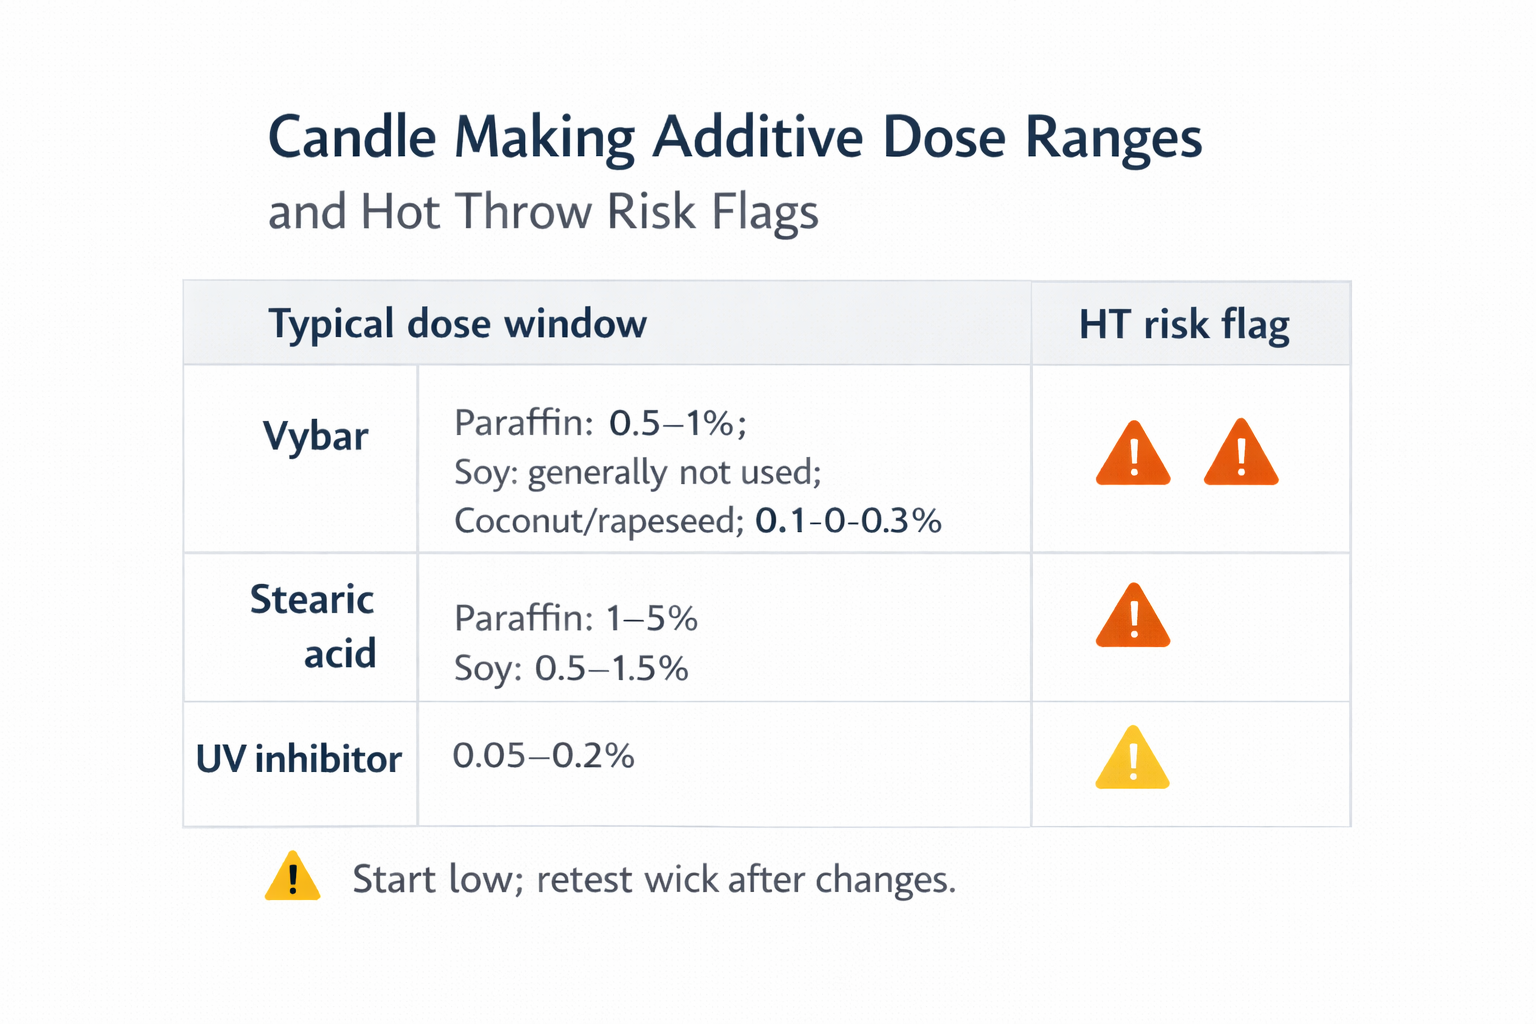
Common additives like Vybar, stearic acid, and UV inhibitors can change how wax holds and releases fragrance. Paraffin and parasoy makers often rely on Vybar and stearic for scent throw and structure, but excess can mute throw, cool the system, or force a new wick size. Start at the low end of the supplier’s recommended range, change one additive at a time, and rerun wick tests because a cosmetic fix is not worth a weaker burn.
Choose dye loads that don’t mute scent throw
Use the smallest dye load that gives you the color you want, then check whether the darker version throws or burns differently. Heavy color loads can change melt-pool behavior enough to reduce hot throw, especially in already borderline wick setups.
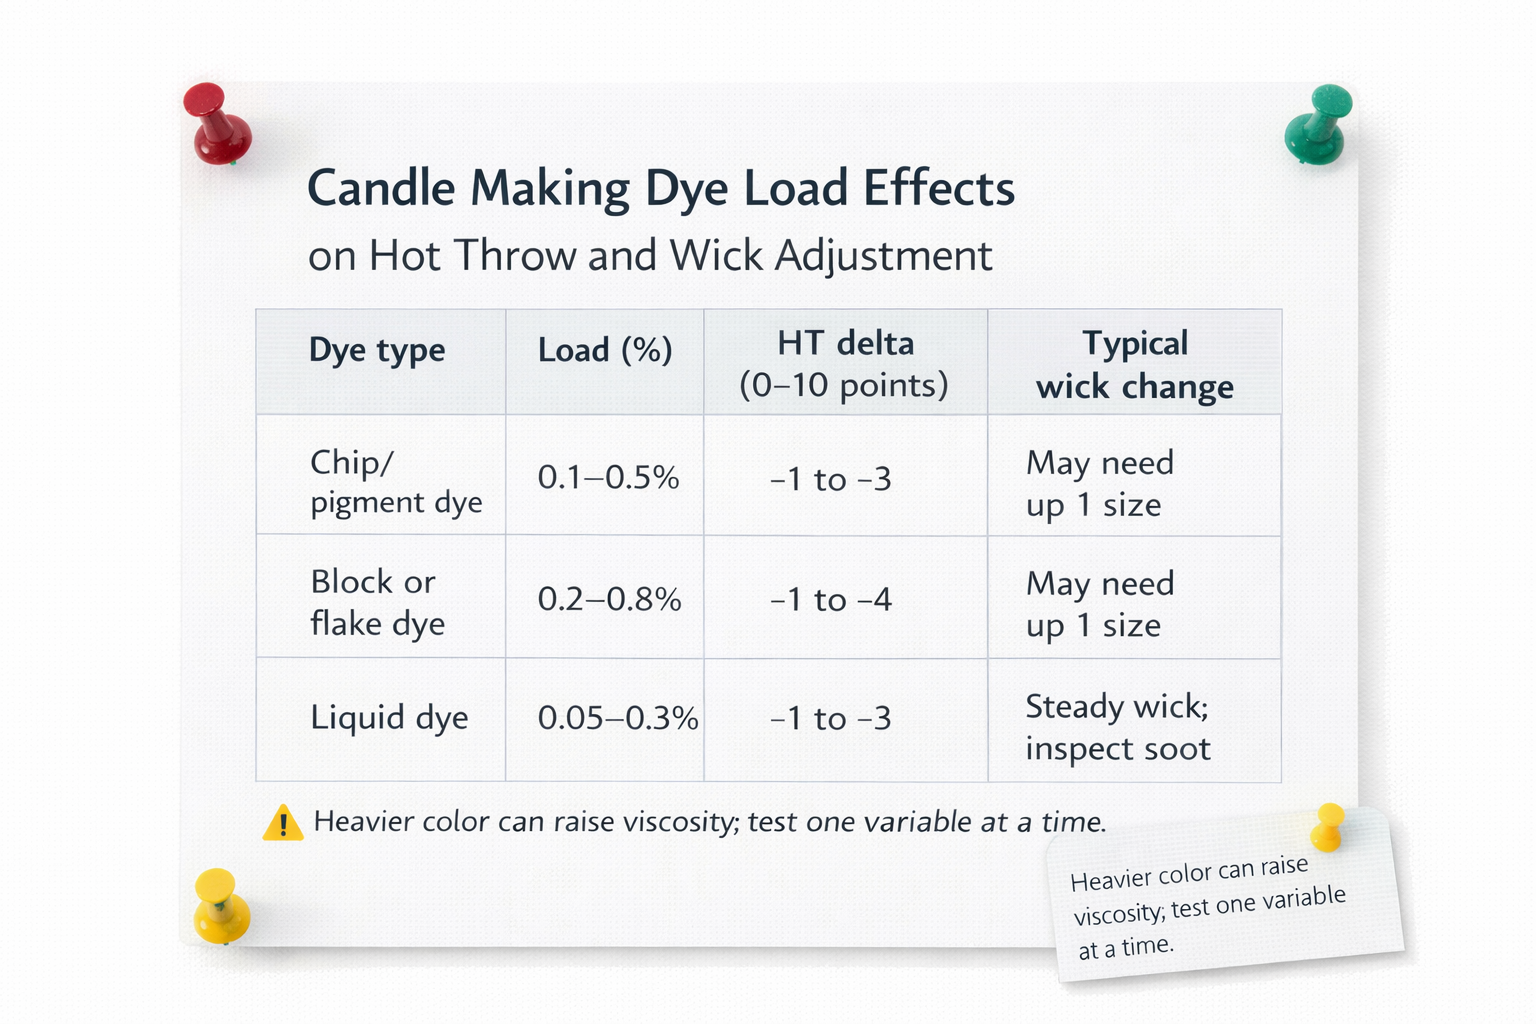
Always weigh dye when possible and treat it like a true percentage of wax weight. A safe candle dye percentage for most liquid dyes is often tiny, so pour matched testers at low, medium, and high color levels with the same wax, FO, wick, cure, room, and burn protocol. If scent strength drops as color load rises, treat dye as the likely variable instead of changing fragrance or wax at the same time.
Some pigments and micas are better suited to wax melts than container candles because they can clog wicks or create cloudy melt pools.
Headspace & lids: how pre-burn aroma and HT are affected
Headspace and lids affect storage and first impression more than they fix true weak hot throw. They matter once the candle already burns well, especially when you want stronger cold throw or less scent loss between uses.
Storage age and conditions can make a good candle seem weaker before you ever light it. Heat, direct sunlight, and long periods with poor lid fit can slowly reduce pre-burn aroma and flatten your first impression, so compare candles of similar age and storage history when you test.
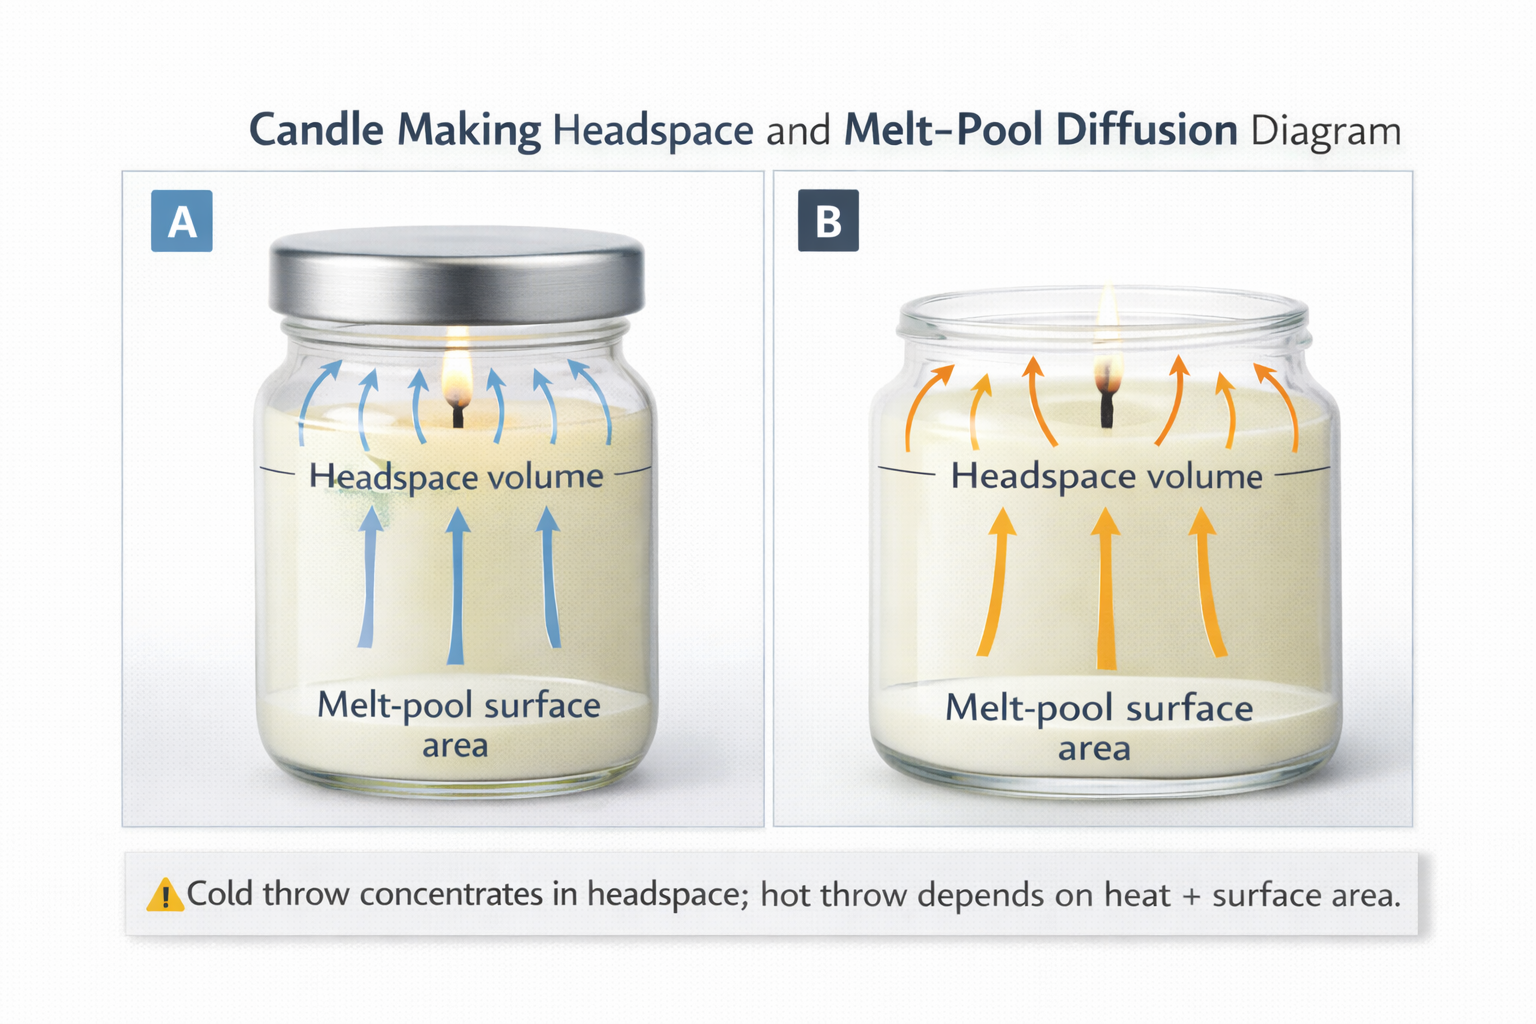
Headspace is the air gap between the wax surface and the lid or open top of the container. Lids can trap fragrance molecules in that small space, which can make the first sniff stronger and slow down scent loss during storage. Candles should always be burned with the lid off, so test storage conditions and fill height rather than lid-on burning.
Keep these checks secondary. If the candle still smells weak when burning, go back to wick, fragrance load, cure time, add or pour temperatures, and room placement before you spend more time on lids or headspace.
Weak scent throw FAQ
Weak scent throw usually comes down to the same small group of causes. Wick size, fragrance load, cure time, and room conditions explain most weak-burning candles before lower-probability variables come into play.
Role in this fix path: use these short answers to confirm the most common weak-throw diagnoses before you reformulate.
Why does my candle smell strong cold but weak when burning?
That usually means the melt pool is not releasing fragrance efficiently. The first things to test are wick size, fragrance load, cure time, and room conditions.
What is the difference between hot throw and cold throw?
Hot throw is the scent you get while the candle is burning, and cold throw is the scent you smell before lighting it. A candle can smell strong cold and still perform weakly hot if the melt pool, wick, or wax system does not release fragrance well.
For the full comparison, see hot throw vs cold throw.
Does adding more fragrance oil always improve hot throw?
No. Once you overload the wax, the wick can struggle, the top can sweat, and the candle can throw less instead of more.
How long should I cure candles before judging scent throw?
Paraffin-rich systems often tell you enough within a few days, while soy and many natural blends usually need about 7–14 days to show their real performance.
For the deeper cure workflow, see how long to cure scented candles.
Can room size make a good candle seem weak?
Yes. A candle that fills a bathroom may feel faint in a large, open room or in a spot with HVAC airflow, open windows, or fans nearby.