Prepare candle containers by cleaning and drying them, anchoring and centering the wick, warming the vessel gently, and pouring to a consistent fill line with enough headspace for the lid. This page covers that pre-pour container-preparation workflow only: inspection, cleaning, wick setup, optional warming, and fill-line control for the vessel you have already chosen. It does not cover container selection, wick sizing, post-burn cleaning, or full defect troubleshooting. The sections below follow that same sequence so you can prep one jar or a whole batch without re-contaminating finished containers.
- Inspect the vessel and reject chips, cracks, or stressed seams.
- Clean and fully dry the inside surface.
- Anchor and center the wick while the base is clean and dry.
- Warm the container only if your wax-and-vessel setup benefits from it.
- Set a repeatable fill line with enough headspace for the lid.
How to Clean and Dry Candle Containers Before Wicking
Clean candle containers by removing labels and adhesive, washing and fully drying the vessel, then wiping the interior with isopropyl alcohol and keeping dust and fingerprints out until you wick and pour. For the bigger picture on materials and vessel selection, see Choosing the Right Candle Containers.
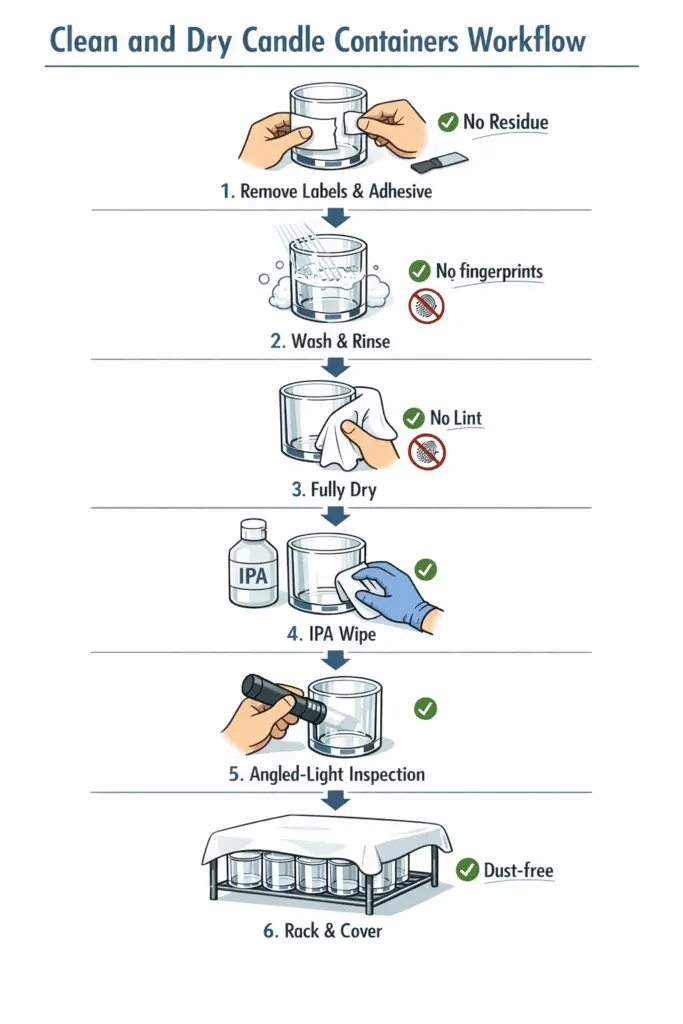
If you pour into jars, tins, or ceramics, container prep is the fastest way to stop wet spots, sootier burns, and labels that won’t stay put. You’ll know what to clean with, how to keep glass lint-free, and how to set a wick that stays centered while the wax cools. A warm, dry, residue-free container helps the wax wet the walls evenly and reduces bubbles, jump lines, and “mystery” adhesion failures. Start by making the inside surface truly clean, because any film you can’t see becomes the first defect you can.
Before you clean or warm any vessel, reject anything with chips, hairline cracks, or stressed seams. If you’re reusing glass, start with Using Recycled Jars for Candles: What You Need to Know; if a jar looks damaged, stop and review How to Fix or Avoid Cracked Candle Containers.
Why this matters (and what “clean” actually means)
“Looks clean” isn’t clean enough for wax adhesion. Fingerprints, fragrance oils, label-glue haze, and fine dust can create streaks, wet spots, or pull-away after cure. The goal is a dry, residue-free interior that stays that way until the pour.
A repeatable bench workflow (no streaks, no lint)
- De-label and de-goo (if needed). Remove labels and adhesive first, then wash, otherwise you can smear glue film into a wider area.
- Wash, rinse, and fully dry. Any leftover water beads can hide in seams or rolled rims; let containers air-dry until you see no fogging.
- IPA wipe (the “degrease” pass). Dampen, don’t soak, a lint-free wipe, then wipe the interior wall and base in one direction. Rotate the container as you wipe so you’re not dragging debris back over a cleaned area.
- Flash off and re-check. Let the alcohol evaporate completely, no visible wetness, no strong solvent smell right at the rim.
- Inspect under angled light. Tilt the jar under a strong light and look for rainbow haze, streaks, or lint fibers. If you see any, repeat the wipe with a fresh section of cloth.
- Rack and cover. Place cleaned containers upside down or covered so dust can’t settle back in while you prep wicks.
70% vs 91%/99% IPA: which one should you use?
- For everyday dust and fingerprints: 70% can work, but it often needs a bit more time to dry because of the water content.
- For oily film or stubborn haze: higher-percentage IPA usually cuts residue faster and flashes off cleaner.
Whatever you choose, treat it like a flammable solvent: keep airflow moving and avoid open flames while you clean.
Keep lint out (the small habits that prevent “mystery fibers”)
- Fold your wipe into a tight pad so loose edges don’t shed.
- Use a “one wipe per few jars” rule if you see residue transferring to the cloth.
- Handle jars by the outside only once they’ve passed inspection.
- If you’re setting wicks immediately after cleaning, review the Wick Size Chart by Jar Diameter & Wax Type first so you’re not swapping wick tabs and re-touching the interior.
Bridge: Once the inside is genuinely clean, the next failure point is the wick tab, how you anchor it determines whether it stays centered through the pour and cooldown.
How to Anchor the Wick So It Stays Put During the Pour
Anchor the wick to a clean, dry base with an adhesive that can stay stable through your pour, then leave it undisturbed until the bond is set. If you want a deeper tools-and-methods walkthrough, see Centering and Securing Wicks (Tools & Methods).

| Anchoring method | Best at | Weak spot | When it fails most | Practical takeaway |
|---|---|---|---|---|
| High-tack wick stickers | Speed + clean setup | Softens if wax/metal gets too warm | Hot pours or hot preheated bases | Great for most small/medium jars if temps stay moderate |
| Hot glue | “Right now” fixes | Heat sensitivity + thick glue lumps | Warm tins, high pour temps, heavy tabs | Use only if the base stays cool and the glue is applied thin |
| RTV silicone (room-temperature vulcanizing silicone) | Stronger hold after cure | Needs cure time | Pouring before it cures | Strong option when you can allow full cure before pouring |
What actually makes one option hold better than another
Anchors fail for two predictable reasons: the bond never fully formed, or it softened during the pour. Temperature matters because wax and the metal tab can warm the adhesive at the jar base, and some products lose grip well before you’d expect. A quick habit that prevents surprises is to check the SDS (Safety Data Sheet) or tech sheet for any adhesive that lists a softening point or service temperature.
How to apply each option so it doesn’t drift later
These steps work best when your container base is clean, dry, and room-temperature unless you have a specific reason to warm it.
- Wick stickers: Press the tab down firmly for 10 to 20 seconds, then tug gently straight up to confirm it’s seated.
- Hot glue: Use the smallest dot that fully wets the tab, press down immediately, and keep the tab motionless until the glue is hard.
- RTV silicone: Apply a thin “pancake,” press the tab in, then stop touching it, movement during cure is what turns a strong bond into a weak one.
Quick troubleshooting when tabs lift or slide
Most “mystery drift” has one of three causes: the base was oily, the adhesive was still soft, or the base got too warm during the pour. If a tab pops loose after pouring, let the wax cool completely, then remove the tab gently and re-clean the base before you try again. Start by checking cure time, then temperature, then surface cleanliness.
Bridge: Once the tab is anchored, centering is the next place small errors turn into uneven melt pools.
For this workflow, anchor and center the wick before any optional jar warming. That order keeps the base clean and dry for adhesion, then lets you warm the vessel only if your wax-and-container setup benefits from it.
How to Center and Secure Single & Double Wicks
Center the wick directly over the container’s axis and hold it there with a rigid centering tool until the adhesive cures and the wax sets. For a dedicated tools-and-methods walkthrough, see Centering and Securing Wicks (Tools & Methods).
Tool options that keep wicks straight (and when to use them)
These options all work; the best choice depends on jar width and whether you’re using one wick or two.
| Tool | Best for | Watch out for | Good tip |
|---|---|---|---|
| Centering bars (single/multi-hole) | Consistent batches | Wrong hole spacing for your jar | Mark your “go-to” bars for common diameters |
| Clips/pins | Small jars, quick setup | Can pull wick off-center if angled | Clip gently and check from above |
| DIY dowel/jig | Wide jars, odd rims | Flex or wobble | Tape the jig so it can’t rotate mid-cool |
A simple centering routine for single wicks
These steps keep the wick straight from the first pour splash to the final set.
- Press the anchored tab into position, then pull the wick taut, snug, not stretched.
- Place the centering tool on the rim and pinch the wick in the exact center point.
- Verify alignment by looking straight down from above, then rotate the jar 90° and check again.
- Don’t move the container once centered; relocate your pour pitcher instead.
How to place double wicks without guessing
Two-wick setups still need the same prep logic: place both wicks symmetrically and confirm the layout with test burns instead of treating any spacing as fixed for every jar. Keep this section at setup level only, then use Double Wicking Guide (When & How) and the Wick Size Chart by Jar Diameter & Wax Type for full spacing and sizing decisions.
Fast “did it drift?” checks during cooldown
- Re-check centering a few minutes after the pour, when the wax is still fluid enough that a wick can wander.
- If the wick leans while the top is setting, correct it once and then stop touching it, because repeated nudges can loosen the tab bond.
Bridge: With the wicks locked straight, the next lever for clean adhesion is controlling jar warmth right before the pour.
How to Preheat Jars to Reduce Wet Spots and Jump Lines
Preheat candle jars to reduce wet spots by warming the vessel evenly before pouring, without overheating the container. On this page, gentle, even warmth means a uniformly warmed vessel for cleaner adhesion, not a hot jar or a substitute for material safety testing. Not every container needs the same preheat step, so follow your wax supplier’s pour guidance and use only as much warming as your material and room conditions require; if you’re still comparing vessel types, review Types of Candle Containers: Glass, Tin, Ceramic & More first.
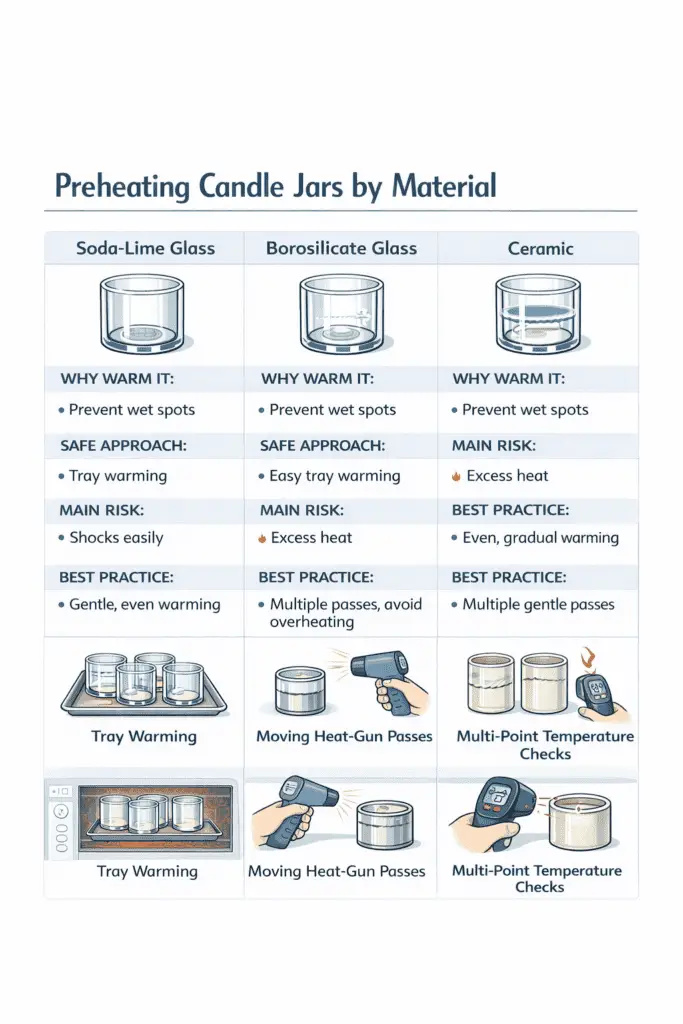
Quick comparison: what changes by material
| Material | Why warm it? | Typical “safe” approach | Main risk | Best practice |
|---|---|---|---|---|
| Glass (soda-lime) | Reduce wet spots / jump lines | Gentle, even warming | Thermal shock from rapid heat changes | Warm slowly; avoid hot-to-cold swings |
| Glass (borosilicate) | More forgiving adhesion | Still warm evenly | Overconfidence leads to uneven warming | Treat like glass: slow, uniform heat |
| Tin | Stabilize temperature, reduce pour lines | Usually minimal warming | Warping seams, over-heating base | Warm lightly; keep it uniform |
| Ceramic | Improve wetting, reduce bubbles | Longer, gentler warm-up | Uneven heating can crack or craze | Warm gradually; avoid hotspots |
If you want a narrower comparison between the two most common vessel types, see Glass vs Tin Containers for Candles: Pros and Cons.
Two dependable ways to warm containers
- Tray warming (most even): Warm a whole batch together so the glass, tin, or ceramic rises gradually. Even warmth is the point, not a “hot” vessel.
- Heat-gun pass (fast, easy to overdo): Keep the airflow moving and sweep the wall and base in circles. Avoid lingering at the seam, base edge, or one side of the jar.
How to measure warmth so it’s repeatable
Use an IR thermometer to spot-check the sidewall and the base before you pour. Take two or three readings around the jar and aim for “even,” not “highest.” For shiny tins, a small piece of matte tape on the outside can help you get consistent readings.
What you’re preventing (in plain terms)
Wet spots are areas where wax pulls away from the glass as it cools, so you see a lighter “halo.” Jump lines are visible bands or ridges from uneven cooling, often caused by hot wax hitting a cold wall and shrinking at different speeds.
When preheating backfires (and what to do instead)
If the vessel feels uncomfortably hot to hold, you’re more likely to see distortion, stress, or adhesive issues at the base. Let the containers equalize back to a gentle warmth, then pour.
If jars fog when you bring them into the room, let them acclimate before final wiping or wicking. Cool glass in humid air can collect moisture, which interferes with wax wetting and later adhesion.
If bands still show after cure, check uneven airflow, crowded trays, room temperature swings, and your pour temperature. For a deeper troubleshooting pass, see Wet Spots (Adhesion Issues): Causes and Fixes.
Next, headspace and fill height decide whether your lid stays clean and your wax surface sets without smears.
How to Measure Safe Headspace and Fill Height for Lidded Jars
Leave enough headspace so the lid clears the wax and the candle burns cleanly without smearing soot on the lid. On this page, safe headspace means practical lid clearance and a repeatable fill height for a lidded jar, not a separate fire-safety or compliance standard.
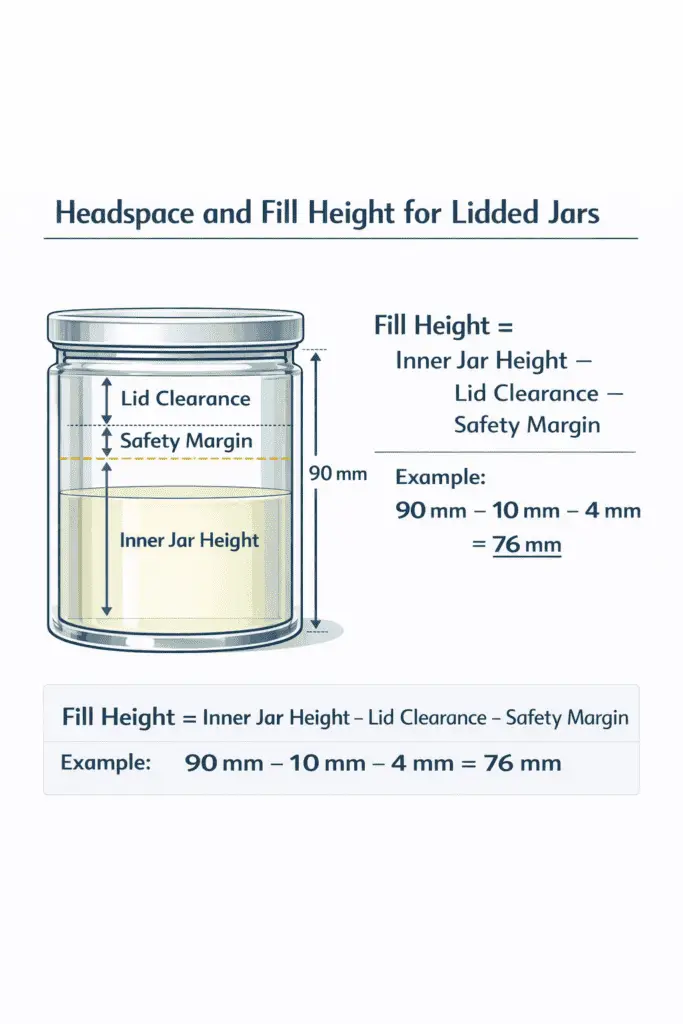
Method (quick measuring routine)
Measure inner height, confirm lid clearance, and mark one repeatable fill line before you pour.
Fill-height “formula card” you can reuse
- Fill height = inner jar height − lid clearance − safety margin
A simple measuring routine (single jar or full batch)
For matching jars, keep one repeatable fill line across the batch and stop at that setup step here.
Quick example (so the math feels real)
Use the same subtraction once per jar style, then reuse the marked line instead of recalculating during every pour.
Why headspace affects burn quality, not just looks
Too little clearance can smear the rim or underside of the lid. If burn behavior still looks uneven later, check Preventing Candle Tunneling to Avoid Burn Risks after you confirm the jar was not overfilled.
After pouring, let the wax surface set and the jar cool before you lid or label it. For label-specific steps, see How to Apply Labels to Candle Containers Without Bubbles; if labels still lift later, troubleshoot with Fixing Candle Label Issues: Smudging & Peeling.