To make votive candles, melt and pour the wax into a votive mold, let it cool and unmold, place the finished votive in a close-fitting holder, and test the first burn with a wick sized to that holder’s inner diameter.
A votive candle is a small candle made to liquefy as it burns inside a close-fitting holder, not as a freestanding candle and not as a tealight. Here, burn basics means the setup and first-burn checks that show whether the holder, wick, and wax are working together after the votive is made, not full troubleshooting, not safety ownership, and not a full burn-test methodology. The starting point is the holder’s actual inner diameter, because that is the burn space the wick must serve. From there, the goal is a steady flame, an even melt pattern, and quick recognition of early problems before you change anything else.
What do you need to make votive candles?
To make votive candles, you need a votive wax formula, a votive mold, a wick, a way to form or place the wick, a melting setup, and a close-fitting holder for the first burn test.
The holder still matters before the first burn because a votive is made to liquefy inside that holder after it is unmolded. If the holder is too loose, later wick decisions can look wrong even when the molded candle itself was made correctly.
- Wax for a votive formula
- A votive mold
- A wick for the holder you plan to test in
- A way to form or place the wick in the finished votive
- A melting setup for the wax
- A close-fitting votive holder for the first burn test
- Fragrance or dye only if they are part of the formula you are testing
How to make votive candles step by step
Make votive candles by preparing the mold and materials, melting and pouring the wax, letting the candle cool and unmold, then placing the finished votive in its real holder for the first burn test.
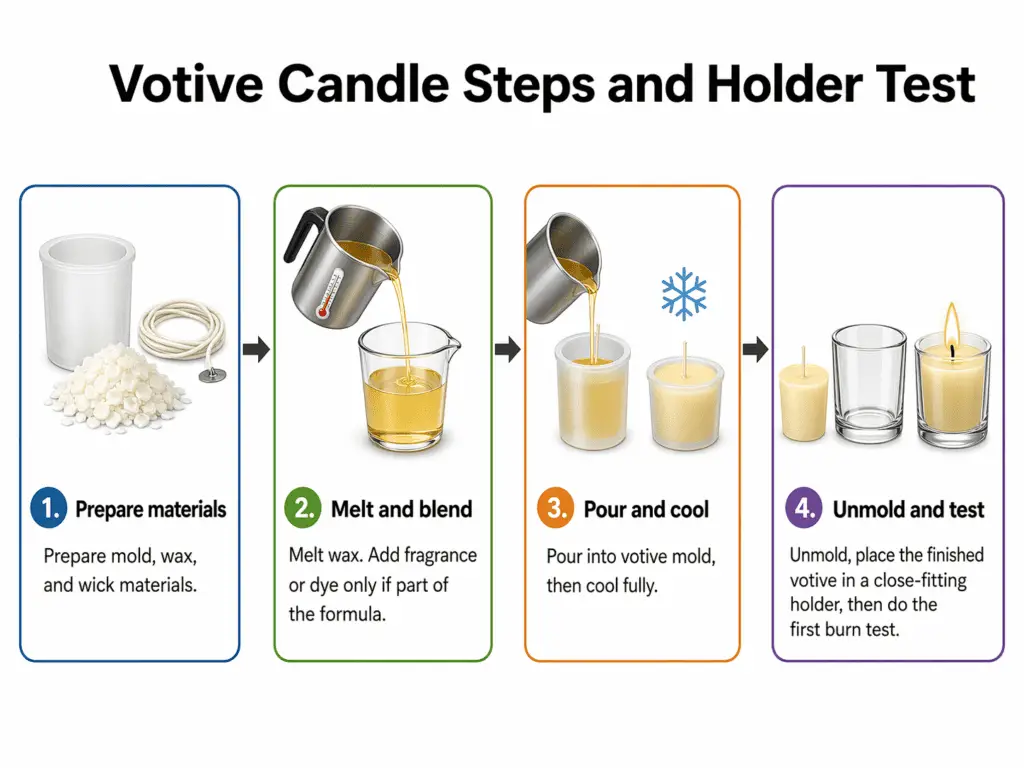
Prepare the mold, wax, and wick materials
Prepare the mold, wax, and wick materials before you melt anything so the pour, cool, and holder-test sequence stays readable.
- Set out the votive mold and the wax you plan to use.
- Set out the wick and the holder that the finished votive will burn in.
- Decide whether fragrance or dye is part of this test batch.
- Keep the mold, formula, and holder consistent so the first burn gives a readable result.
Pour, cool, and unmold the votive
Pour the melted wax into the votive mold, let it cool fully, and unmold the candle before you judge holder fit or wick behavior.
- Melt the wax for the formula you are testing.
- Add fragrance or dye only if they belong to that formula.
- Pour the wax into the votive mold.
- Let the candle cool fully before unmolding it.
- Unmold the finished votive and prepare it for wick placement or trimming.
Place the finished votive in the holder for testing
Place the finished votive in the close-fitting holder you plan to use before you judge wick fit, melt shape, or first-burn behavior.
This is the point where the page’s cups, wicks, and burn basics begin. A votive is not judged as a freestanding candle, and it should not be judged by tealight behavior.
What kind of cup or holder does a votive candle need?
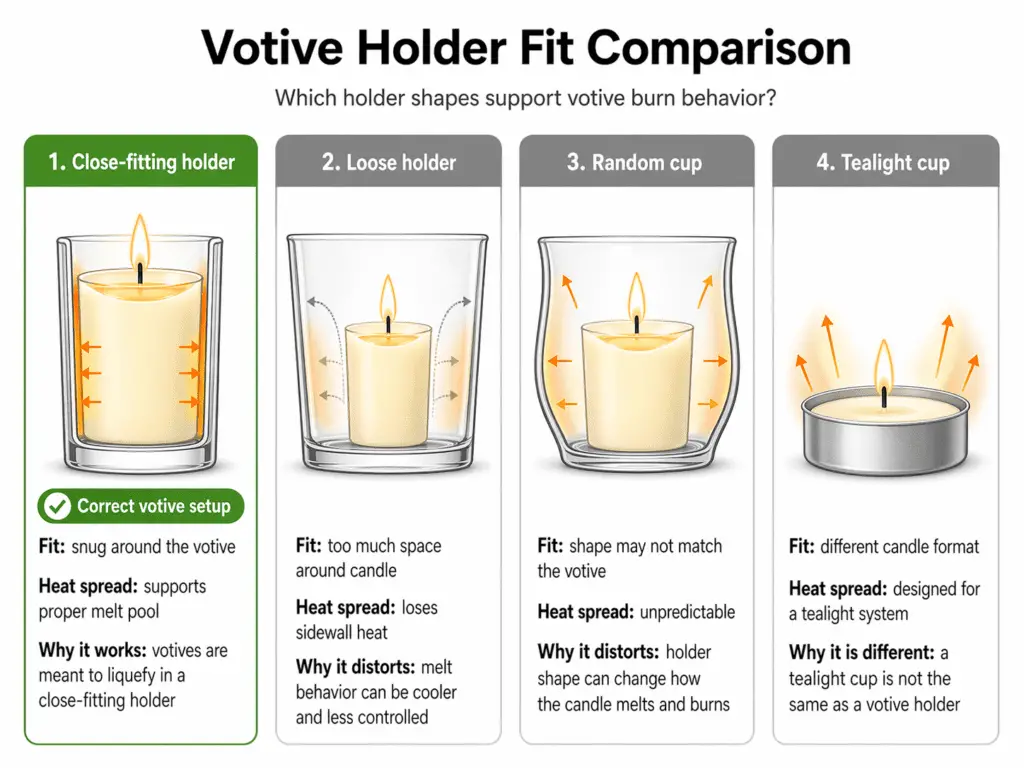
A votive candle needs a close-fitting holder because it liquefies as it burns, and a loose or oversized cup changes heat concentration and melt behavior.
A votive candle is a small candle meant to burn inside a close-fitting holder, not as a freestanding candle and not as a tealight. Here, cup or holder means a snug votive glass or similar holder that keeps the melt zone contained enough for the wick to form a steady flame and readable melt pattern.
Why votives need a close-fitting holder
What matters here is fit, because not every small decorative cup behaves like a votive holder. Extra width or a flared shape can spread heat too far from the wick and make later wick decisions look wrong.
Holder-fit terms:
- Close-fitting holder: the inside walls stay reasonably near the melt zone as the candle liquefies.
- Loose holder: the inside space is wider than the votive needs, so heat spreads and the melt pattern reads colder than it really is.
- Random cup: a jar, bowl, or decor cup that happens to be small but was not chosen for votive burn behavior.
- Tealight cup: part of the candle itself, which is why a tealight is not the same setup as a votive.
A simple test is to ask whether the candle is meant to liquefy into the holder as it burns. If the answer is yes, you are in votive-holder territory. For the full format split, Tealight vs Votive Candles belongs on its own page, and the next step here is choosing a starting wick from the holder’s inside diameter.
How to choose a starting wick size for a votive by inner diameter
Choose a starting votive wick from the holder’s actual inside diameter, then test it in that same holder, because the number is a starting fit, not a final answer.
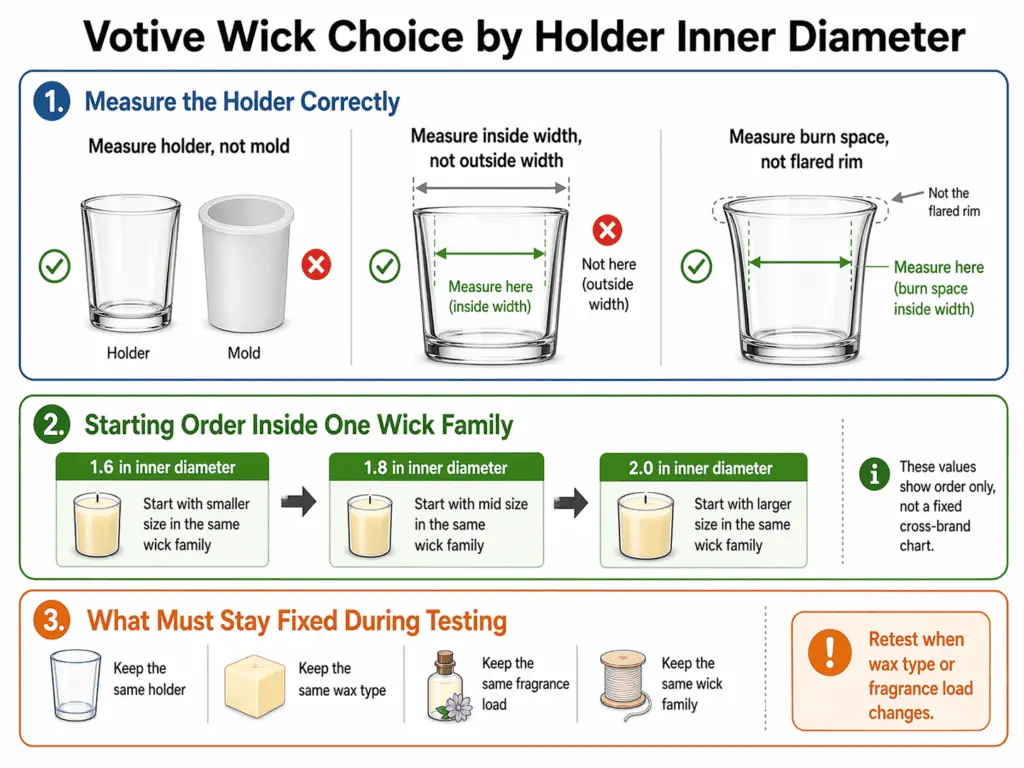
Inner diameter means the holder’s inside width from wall to wall where the wax will actually pool during the burn. Do not use outer width, rim flare, or mold width, because those numbers do not describe the real burn envelope of the finished votive.
How to pick a starting wick from holder inner diameter
Pick a starting wick by measuring the holder’s actual inner diameter and matching your first test to that same holder.
- Measure the holder, not the mold.
- Measure the inside width, not the outside width.
- Measure the burn space, not the flared rim.
- Pick a starting wick for that inside diameter.
- Test the wick in the same snug holder you plan to use.
For votives, wick choice begins with the holder the finished candle will actually burn in. In practical terms, a 1.6-inch inside diameter starts lower than a 1.8-inch inside diameter, and a 2.0-inch inside diameter starts one step higher within the same wick family and formula.
Those inch values only show order, not a fixed cross-brand chart. Keep the holder, wax, and fragrance load the same when you compare starting points, because wick size here means a first-fit guess that must be proven by a real burn. If repeated testing stops improving in a clear direction, use How to Size Your Candle Wick Correctly or How to Burn Test Candle Wicks rather than changing several variables at once.
How wax type and fragrance load change wick choice
A wick that starts correctly in one votive formula may need retesting when the wax type or fragrance load changes.
Diameter still sets the start. After that, wax type and fragrance load can change how the same holder-and-wick setup burns, so old results should not be trusted automatically when the formula changes.
A simple way to think about it is this:
- Same holder, same wick, lighter formula: keep the first test as your baseline.
- Same holder, same wick, heavier fragrance load: retest before trusting the old result.
- Same holder, different wax family: retest again, because the same wick may burn differently in soy, paraffin, or a blend.
A formula change does not automatically mean size up. When repeated tests stop moving in a clear direction, route outward to How to Size Your Candle Wick Correctly or How to Burn Test Candle Wicks instead of widening this page.
Trim, test, and reset: the simple votive retest loop
Reset means trim, cool, observe, change one variable, and retest the same votive setup.
Do not change wick size, holder, wax, and fragrance all at once. A clean retest keeps one variable moving at a time, so the next burn tells you what actually changed.
Use this loop:
- Trim the wick to your normal test length.
- Burn the votive in the same snug holder.
- Watch the flame and melt pattern.
- Let the candle cool fully.
- Change one variable only.
- Retest and compare the result to the last burn.
Go back to How to Size Your Candle Wick Correctly when the starting point itself looks wrong. Use How to Burn Test Candle Wicks when the flame or melt pattern gives a clear early signal. If careful retests still miss the mark in the same holder and formula, the next question is whether the wick family needs to change instead of only moving up or down in size.
When should you change wick series instead of only changing wick size?
Change wick series when repeated test burns show a family mismatch, not just a size mismatch.
Wick series means a wick family with a shared braid or construction style. Wick size is the specific starting fit you test in a votive holder, while wick series is the broader family behavior behind that fit.
If one-step size moves keep changing the burn in the expected direction, stay in the same family and keep testing. If sensible size moves stop improving the burn in a readable way, route outward to How to Size Your Candle Wick Correctly or How to Burn Test Candle Wicks instead of extending wick-family guidance here.
How to do the first holder burn after making votive candles
The first holder burn confirms whether the finished votive, the holder, and the starting wick are working together in the setup you will actually use.
A first burn only means something when the candle is tested in its real snug holder, because holder fit changes heat concentration and melt shape. Here, burn basics means first-burn expectations and early visible signals, not a full fault library and not a safety page.
Start with How to Size Your Candle Wick Correctly if the original setup was only a rough guess. Use How to Burn Test Candle Wicks when the flame or melt pattern already gives you a readable early signal, and keep Tealight vs Votive Candles as a format boundary rather than a reason to judge a votive by tealight behavior.
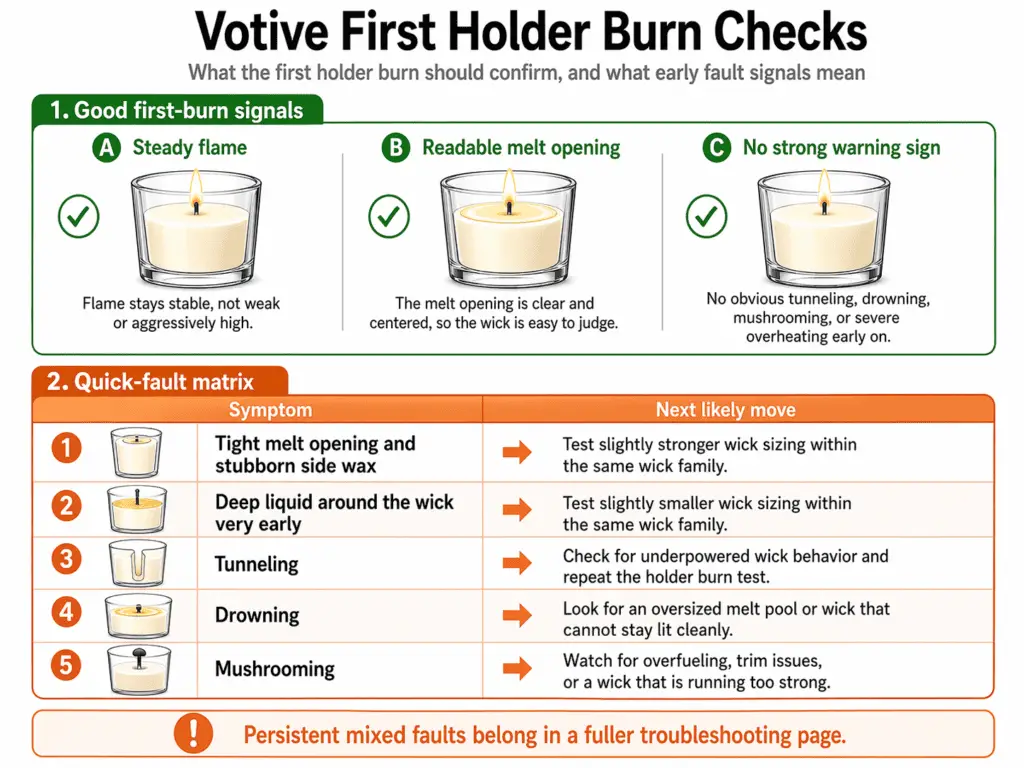
What the first burn is meant to confirm:
- The flame stays steady rather than struggling or racing.
- The melt pattern starts to look readable in the real holder.
- The candle does not immediately show an obvious early fault.
- The setup looks close enough to keep testing before bigger changes.
A short first-burn log makes the decision easier:
- Steady flame, readable melt opening, no strong warning sign: the setup is likely close.
- Tight melt opening and stubborn side wax early on: the setup may still be too cold for that holder.
- Deep liquid around the wick very early: the setup may already be running too hot or mismatched.
When one early symptom stands out, read it as a quick yes-or-no signal before you change anything else.
Quick burn-fault checks: tunneling, drowning, and mushrooming
Use these quick checks to pick the next likely move after the first holder burn, not to solve every burn fault.
This is a narrow decision filter for the actual votive holder, not a full troubleshooting system. Persistent or mixed faults belong in Fixing Wick Issues: Mushrooming, Drowning & More.
- Tunneling: the melt opening stays too narrow for the holder and leaves too much wax standing at the sides. Recheck the starting fit with How to Size Your Candle Wick Correctly before you change several variables at once.
- Drowning: the flame sinks into excess liquid around the wick and struggles to stay readable. Recheck the test path with How to Burn Test Candle Wicks before widening the diagnosis here.
- Mushrooming: a carbon cap forms early or returns fast during testing. Treat that as a sign to question the current wick family or test path, then route outward if it keeps happening.
When a symptom persists, combines with another one, or needs full remediation logic, stop the quick checks and move to Fixing Wick Issues: Mushrooming, Drowning & More.