
Candle molds shape molten wax into free-standing candles, and the best choice balances easy release, clean form, and manageable testing.
Most beginners do best with simple silicone pillar molds because they flex, release easily, and tolerate small process mistakes. Metal molds suit straight-sided pillars and repeat batches, while rigid clear molds help with visual alignment when your pour temperature stays controlled. This guide explains mold materials, shape families, sizing basics, heat limits, release routines, and upkeep so you can choose with fewer surprises. Use it as the overview page within a broader candle making workflow, then follow the linked child guides when you need deeper testing or troubleshooting.
Use this page to classify mold materials, shape families, and beginner starting points. When you need a narrower decision, comparison, or fix, use the linked pages below instead of treating this overview as the final destination for every mold-related question.
| If you need… | Go next |
|---|---|
| Broader candle making workflow | candle making |
| Deeper mold choice logic | how to choose the right candle mold |
| Broader mold type taxonomy | types of candle molds |
| A narrower material comparison | silicone vs metal candle molds |
| Best beginner mold picks | best candle molds for beginners |
| Using silicone molds properly | how to use silicone candle molds properly |
| Advanced multi-layer mold work | how to make multi-layered candles with molds |
| Wick sizing after mold selection | how to properly size your candle wick |
| Release or bubble troubleshooting | prevent mold sticking in candle making and prevent air bubbles when using candle molds |
| Novelty-shape depth | novelty candle molds |
How to choose the right candle mold
Start with a simple mold that releases cleanly, matches your wax, and fits the amount of testing you can realistically handle.
Choose by project first, not by the most decorative shape in the catalog. Here, the right mold means one that matches your wax, releases cleanly, holds the level of detail you need, and fits the amount of testing you can realistically manage. If you want a deeper decision tree after this overview, see how to choose the right candle mold or review broader types of candle molds as you narrow your options.
| If your goal is… | Best starting mold | Why it fits | Main tradeoff |
|---|---|---|---|
| First molded candle | Simple silicone pillar mold | Easy release, low breakage risk, forgiving for beginners | Can lose shape if stored poorly |
| Crisp straight-sided pillars | Metal or aluminum pillar mold | Durable, repeatable, sharp edges | Less forgiving if wax and pour temperature are off |
| Detailed sculptural candle | High-quality silicone mold | Captures fine detail and flexes for cleaner release | More testing, more care, higher scrap risk |
| Visual alignment or embeds | Rigid clear mold | You can see bubbles, wick lean, and placement | Lower heat tolerance and easier surface damage |
If you are unsure, choose the mold that reduces failure first. A clean release beats a fancy shape that tears, dents, or burns badly.
What candle mold materials are best (silicone, metal, polycarbonate)?
Pick silicone for easy release and complex shapes, metal for crisp straight-sided pillars, and polycarbonate for alignment-sensitive pours when you can control temperature closely.
When you compare the main mold materials, it helps to think in three buckets: flexible silicone, conductive metal, and rigid clear polycarbonate. Silicone is the most forgiving starting point because it flexes, peels away from the candle, and tolerates minor underfilling or small air bubbles better than rigid molds. That flexibility reduces sticking and denting, especially for intricate designs, but contamination from fragrance oil or dust can dull the surface over time. Metal molds, by contrast, are rigid shells that pull heat out of the wax quickly, which sharpens edges and helps repeatability for straight pillars when cooled well.
Silicone’s main strength is demolding. You can gently fold or peel the walls away, so beginners are less likely to damage a candle while learning timing. Many candle-grade silicone molds handle normal candle-pour temperatures for common candle projects, but you should still verify working limits and cleaning compatibility in the supplier’s product guidance or technical sheet. Metal molds usually tolerate repeated cycles well and keep their shape, which makes them strong workhorses for pillars and loaf-style pours. Because metal conducts heat so efficiently, it can also exaggerate sinkholes, shrink rings, or frosting if the wax and room temperature are poorly matched, so test pours still matter.
Polycarbonate sits between the two in practical use. It is rigid like metal, but clear enough that you can see trapped bubbles, wick lean, or incomplete fills before committing to a full batch. That transparency is genuinely useful when visual placement matters, yet polycarbonate is more sensitive to overheating and harsh cleaners than metal. A careless pour above the maker’s recommended limit, or repeated exposure to incompatible solvents, can lead to clouding, crazing, or stress cracks. That is why many makers reserve clear rigid molds for projects where alignment matters more than maximum durability.
Material choice also interacts with wick sizing and wax type. Metal molds cool the wax faster, which can slightly change how the candle sets and how the first burn behaves compared with the same diameter poured in silicone. Softer waxes and detailed designs often benefit from silicone’s gentler release, while straight paraffin pillars often look their sharpest in metal. If you want a tighter side-by-side comparison of these two common options, read silicone vs metal candle molds after this overview.
Maintenance and safety finish the comparison. Silicone is easy to clean with mild detergent and warm water, but its surface can hold fragrance residue if scrubbed with harsh tools or soaked in strong solvents. Metal tolerates more mechanical cleaning, though polished finishes can still be scratched and release differently afterward. Polycarbonate should be treated as the most delicate of the three, with soft cloths, mild cleaners, and careful storage away from heat and abrasion. Over the long run, a starter set built around one dependable silicone pillar mold and one or two metal molds covers most beginner projects, with clear rigid molds added later for specialized work.
Advanced note: 3D-printed or custom molds are best treated as prototype tools, not default beginner options. They often need extra smoothing, heat testing, and more frequent replacement. Surface finish also transfers directly to the candle, so reserve polished molds for glossy results and scratched or textured molds for rustic-looking pieces.
Candle mold shapes explained: pillar, taper, votive, and novelty
Start with simple pillar shapes, then move into smaller specialty forms and novelty designs once your wax, wick, and release routine are stable.
For this page, shape means the form of the molded candle itself. Containers matter for poured candles, but they are not the same thing as free-standing molds, so they need to be treated as a separate build path when you choose tools and test performance.
| Shape family | Best for | Difficulty | What to watch |
|---|---|---|---|
| Pillar | Learning, testing, repeatable batches | Low | Match wick to diameter and keep cooling even |
| Taper or slim forms | Decorative or formal candles | Medium | Wick centering and straight release matter more |
| Votive and small forms | Short test batches and gift sets | Low to medium | Small cavities show bubbles and overfill quickly |
| Novelty or sculptural | Decorative candles and custom designs | High | Corners, thin protrusions, and uneven melt zones raise scrap risk |
Pillar molds are the easiest training ground because the geometry is simple and the problems are easier to diagnose. You can see whether the melt pool reaches the edge, whether the wick mushrooms, and whether the candle develops sinkholes or side pull-away during cooling. When the shape is round or square and the walls are fairly even, you spend less time guessing which variable caused the flaw. That makes pillars the most efficient place to learn a new wax, wick family, or demolding routine.
Small forms like votives or short decorative pieces are also approachable, but they reveal mistakes quickly. Minor overfilling, trapped bubbles, or off-center wicks show up faster in smaller cavities because there is less wax to hide them. Tapers and other slim shapes demand better centering and cleaner release because a slight bend or dent becomes obvious immediately. These shapes are still workable for newer makers, but they punish sloppy setup more than basic pillars do.
Novelty molds, including hearts, stars, figurines, or multi-lobed forms, look attractive but demand more from your process. Sharp corners cool faster, thin protrusions break more easily, and irregular surfaces make both demolding and burn behavior less predictable. That does not make them bad choices, it just means they belong later in the learning curve. If novelty designs are your goal, keep them as small-batch projects at first and compare them against a proven baseline, or move to a dedicated guide on novelty candle molds once you are ready to go deeper.
From a product-planning standpoint, a narrow family of dependable shapes is usually smarter than a wide collection of random forms. Two or three reliable pillars, a few smaller specialty shapes, and only a limited number of novelty molds keep testing under control while still giving you enough variety to build a collection. Once you know how a wax and wick combination behaves in a stable core set, branching out becomes far less chaotic.
How mold size and volume affect wick selection
You match wick size to the mold’s effective diameter and wax type, then confirm with test burns, because larger molds and higher volume magnify tunneling, soot, and overheating when the wick is poorly matched.
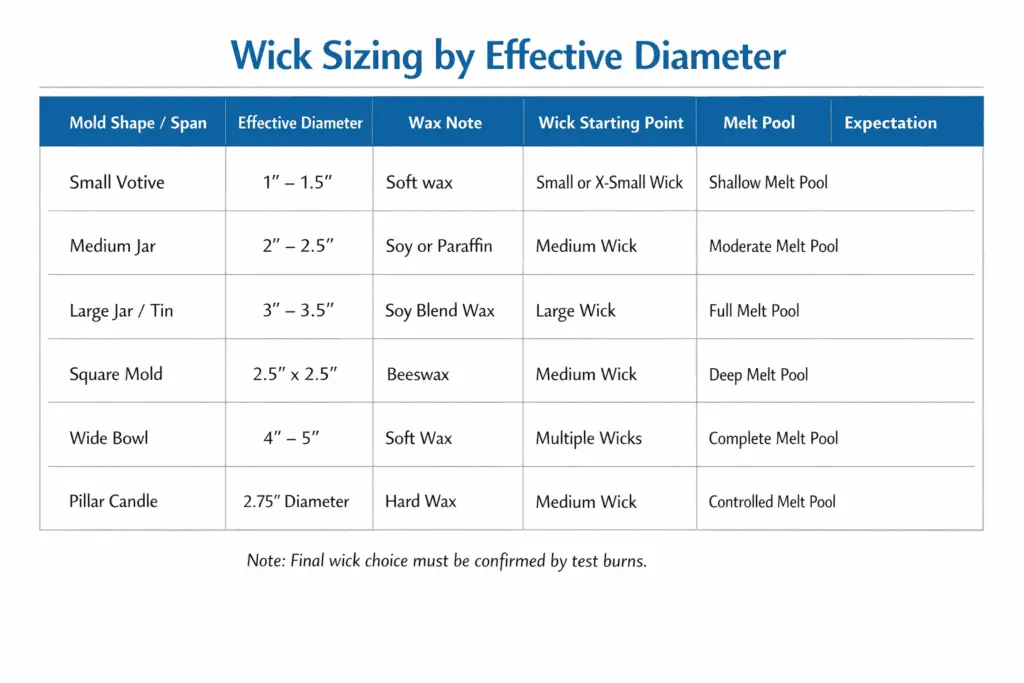
Wick charts and supplier calculators usually start with diameter because width determines how far the flame must reach to melt wax toward the edge. For round pillars and jars, that measurement is simple. For rectangles, ovals, or other non-round shapes, it helps to estimate an effective diameter rather than guessing from total wax weight alone.
Volume still matters, but mostly as a reminder that bigger candles expose wick mismatches faster. Wax type and additives can shift the starting point too, which is why the same diameter does not always behave the same across different formulas. This page only explains why mold dimensions change the wick starting point; exact fill formulas and the full wick-fitting process belong on the dedicated sizing page. For the full process, continue to how to properly size your candle wick.
Safe mold heat ratings and pour temperature windows
Keep your wax inside the supplier’s pour-temperature range and below the mold maker’s stated heat limits, then adjust in small steps to fix frosting, bubbles, or sinkholes without damaging the mold.

Here, safe means staying inside the wax supplier’s recommended pour range and below the mold maker’s stated compatibility limit, not broader fire-safety, consumer-safety, or labeling questions. Every mold material has a practical working range, even when the packaging makes it sound universal. Many silicone molds handle common candle-pour temperatures well, but repeated overheating can shorten their life or change how they release. Metal molds tolerate heat better and hold shape well, yet their conductivity can magnify the effect of small temperature changes on cooling speed and surface finish. Clear rigid molds are usually the least forgiving, so you should never assume that all transparent molds can take the same heat.
Your wax supplier’s technical sheet, product page, or direct usage guidance usually gives the most useful melt and pour range for that formula. Those ranges exist to balance viscosity, air release, shrinkage, and adhesion. Pouring too cool can trap bubbles or create rough surfaces, while pouring too hot can exaggerate sinkholes, frosting, or stress on the mold itself. The safest working habit is to treat both the wax instructions and the mold instructions as real limits, not as suggestions to push for convenience.
Ambient conditions create the third part of the equation. Cold molds, a chilly room, and very hot wax increase the risk of thermal shock, which can lead to pull-away, fine cracks, or distorted surfaces. Slightly warming a mold within its safe range can reduce that shock, especially with metal molds, while pouring in very hot rooms can soften details and slow a clean set. The goal is not the hottest possible pour, it is a stable and repeatable one.
Adjustments should stay deliberate. If you see minor frosting, bubbles, or shallow sinkholes, move the pour temperature in small steps inside the wax maker’s recommended range and change one variable at a time. Keep notes on mold type, room temperature, and wax behavior so you can spot patterns instead of relying on memory. Over a few batches, that record will tell you which combinations behave cleanly without forcing the mold outside its safe working window.
Sticking solved: release agents & surface prep
Prevent sticking by starting with clean molds, using light and compatible release agents only where needed, and matching wax temperature and fragrance load so the candle shrinks slightly instead of gripping the wall.
Most sticking starts with residue, rough handling, or a wax-and-temperature mismatch. Clean molds, use only a light compatible release when needed, and check seams, clamps, or small tears before the next pour so the candle can separate without turning this overview into a full diagnosis flow.
If sticking keeps repeating, treat it as a process signal rather than adding more spray, and continue to prevent mold sticking in candle making for the full troubleshooting sequence.
Steps to demold cleanly without dents
Demold only after the candle has fully set and cooled, then loosen the edges gently and support delicate shapes so the candle slides out without dents, flat spots, or snapped details.
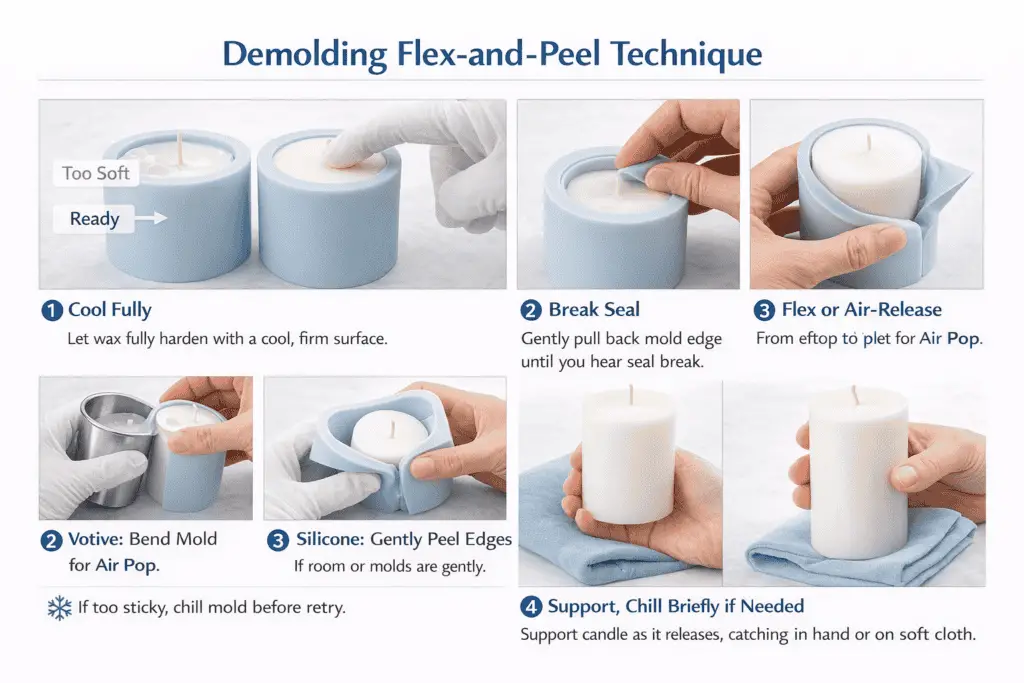
Wait until the mold and the candle core are fully cool, break the seal gently, and support thin or decorative areas so the candle can slide out without twisting or catching. If the surface smears, shines oddly, or resists, stop and wait longer instead of forcing the release.
When trapped air keeps creating catch points or dents, it also helps to review prevent air bubbles when using candle molds before the next batch.
How to clean and maintain candle molds
You clean candle molds safely by using mild products, soft tools, and gentle heat, then storing them dry and supported so they keep their shape and release candles consistently.
Good mold care starts with understanding what you are removing: leftover wax, fragrance oil film, and dust. For silicone, warm water with a small amount of mild dish soap is usually enough; soak briefly, then wipe with a soft cloth or sponge and rinse well. Avoid abrasive pads or sharp scrapers, which can scratch the surface and create tiny grab points that later cause sticking. Metal molds respond well to a careful wipe with a lint-free cloth while they are still slightly warm, lifting residual wax before it hardens into stubborn rings. Clear polycarbonate or other plastics need even gentler treatment so their surface stays smooth and glossy.
Drying and inspection matter just as much as washing. After cleaning, let molds air-dry completely rather than trapping moisture in box lids or bags, which can invite corrosion or odors over time. This is the moment to check seams, corners, and detailed areas for wax build-up and remove it gently before it becomes a permanent ridge. That inspection matters for finish too, because scratches, residue, and haze on the mold can show up on the candle surface. A soft wooden or plastic tool, used with patience, can chip away stubborn beads of wax without scarring the mold. Over time, forming a simple routine to clean candle molds safely after each production day will prevent the kind of residue that forces you to scrub aggressively later.
Long-term performance depends on long-term mold storage and care tailored to each material. Silicone molds should be stored flat or supported so they do not sag or twist; stuffing them into tight boxes can warp the shape and distort future pours. Metal molds appreciate a very light film of neutral oil or a specialized rust-inhibiting cloth in humid climates, especially around seams and edges, but they should never feel greasy when you pour. Polycarbonate molds belong away from direct sun and heat sources, which can discolor or warp them over time; keep them in padded containers or sleeves so sharp tools or other molds do not scratch them in storage.
The main enemy of mold longevity is harsh chemistry and rough handling. Strong solvents, undiluted degreasers, and abrasive pads can all degrade surfaces in ways that only become visible after a few cycles. When you need extra cleaning power, step up gradually from warm soapy water to specialty cleaners rated safe for your specific mold material, always testing on a less visible area first. Paying attention to how each cleaner smells, feels, and rinses off will help you notice early signs of damage, like tackiness or clouding, before they ruin an expensive mold.
Quick cleaning and maintenance checklist
- Let candles cool fully, then remove as much leftover wax as possible by hand or with a soft cloth while molds are just slightly warm.
- Wash silicone in warm water with mild dish soap and a soft sponge; wipe metal and polycarbonate gently with a lint-free cloth, avoiding abrasive pads and harsh solvents.
- Rinse thoroughly and allow every mold to air-dry completely before closing boxes or bags.
- Inspect seams, corners, and fine details and gently lift any remaining wax with a wooden or plastic tool so ridges do not build up.
- Store silicone flat or well supported, keep metal dry (with light protection in humid rooms), and pad polycarbonate molds away from heat and sharp objects so shapes and surfaces stay true.
How candle shape changes melt pool, airflow, and tunneling risk
Candle shape changes how heat and air move, so round forms usually burn more evenly while sharp corners, tall profiles, and wide surfaces raise tunneling and soot risk unless wick and layout are adjusted.
Round and evenly shaped candles are easier to test because heat spreads more predictably across the surface. Sharp corners, long spans, and deep recesses create cooler zones that usually need more wick testing than basic pillars, so use shape as a screening factor before deeper testing when the form becomes wide, irregular, or highly sculpted.
Why candles warp or shrink: wax-type behaviors and fixes
Candles warp or shrink because each wax contracts differently as it cools, so controlling room temperature, mold warmth, and pour temperature helps prevent side pull-away, dish tops, and base warps.
Warping and shrinkage are usually cooling signals, not separate mold categories. If the same side pull-away, sinkhole, or base warp repeats across batches, treat it as a process signal, log the wax, mold material, room conditions, and pour setup, and move the deeper troubleshooting into your test process rather than this overview page.