
The right candle mold matches your wax, candle type, heat tolerance, release needs, and production goals.
On this page, the right candle mold means the mold material, geometry, size, heat tolerance, and release behavior that fit the molded candle you plan to make with your wax and workflow. For a broader overview of candle molds and shapes, use the hub first; for full wick sizing, detailed mold-capacity calculations, defect-specific troubleshooting, and full compliance rules, use the dedicated guides instead of treating this page as the final answer for those topics.
| Mold material | Best for | Watch-outs | Heat / release profile |
|---|---|---|---|
| Silicone | Detailed shapes, sculptural candles, easier demolding | Soft walls can bow on tall or thin designs | Usually handles common candle wax pour ranges well; release is usually easiest |
| Metal | Straight pillars, votives, tapers, repeatable production | Dents and seams can mark candles; release usually needs more attention | Strong heat tolerance; fast cooling; release is less forgiving than silicone |
| Rigid plastic / polycarbonate | Simpler shapes, visible inspection, lower-cost trials | Can warp, craze, or cloud if heat is pushed too far | Use only within stated limits; release varies by shape and finish |
| Latex | Unusual organic shapes and niche small runs | Often needs a support shell and slower handling | More limited heat tolerance; release can be good but setup is slower |
Use the comparison in this order: choose the mold material first, then match it to the candle family, then confirm size and capacity, and finally check heat tolerance and release behavior against your wax and workflow.
Mold material — compare silicone vs metal vs polycarbonate vs latex
If you only buy one mold family to start, choose platinum-cure silicone and build out from there.
Material is the first filter because it determines heat tolerance, release behavior, durability, and the kind of candle you can make without constant workarounds. If you want a broader overview of different types of candle molds, start there. If you want a broader overview of different types of candle molds, start there, and if you need simpler starter picks, use best candle molds for beginners, then narrow the choice based on wax, shape, and production goals.
Silicone molds are the default for many small makers because they flex for easy release, hold detail well, and usually tolerate the pour ranges used for soy, paraffin, and blends. They shine for pillars, sculptural shapes, and textured designs where you want high detail fidelity without wrestling with aggressive release agents. The trade-off is that very soft silicone can bow slightly, so tall or very thin forms may need strapping or support.
Metal molds, usually aluminum or tin-plated steel, are workhorses for straight pillars, votives, and tapers. They handle higher heat than many flexible or rigid alternatives, shed heat quickly, and resist casual damage. You will, however, rely more heavily on release methods and careful wicking, and dents or seam damage can permanently mark your candles.
Polycarbonate and other rigid clear plastics are useful when visual inspection matters or when you want to watch the candle set inside the mold. They are common for simpler shapes and some specialty designs. Clear molds can also help with QA because they make trapped bubbles, embed placement, and wall contact easier to spot, but they last longest when you respect their upper heat rating and avoid rough handling or metal tools inside them.
Latex and other flexible paint-on or slip-style molds are niche tools for unusual textures and organic shapes. They are slower to make, usually need an outer support shell, and generally suit lower-temperature waxes and smaller runs. They earn their place when you need shapes no standard mold family can provide.
As your line grows, keep notes on which materials gave you the best balance of finish, speed, and rejection rate for each product. Over time, that record makes it easier to compare silicone and metal molds for new designs instead of defaulting blindly to one material.
Which candle mold should you choose?
Most makers should start with silicone for detailed work or metal for straight, repeatable forms.
- Choose silicone if you make sculptural candles, want easier release, or care most about fine detail.
- Choose metal if you make straight pillars or tapers, pour hotter wax, or need stronger long-run durability.
- Choose rigid plastic if you want a lower-cost option for simpler shapes and you can control heat carefully.
- Choose latex only when the shape itself rules out the more common mold families.
If you are still unsure, buy one good mold in the material that best matches your main product, then test it with your actual wax and wick setup before expanding your lineup. That approach usually saves more money than buying a pile of speculative molds at once.
Candle type fit — steps to map pillar, votive, taper, sculptural candles
Choose a mold by matching it to the molded candle family you actually plan to make.
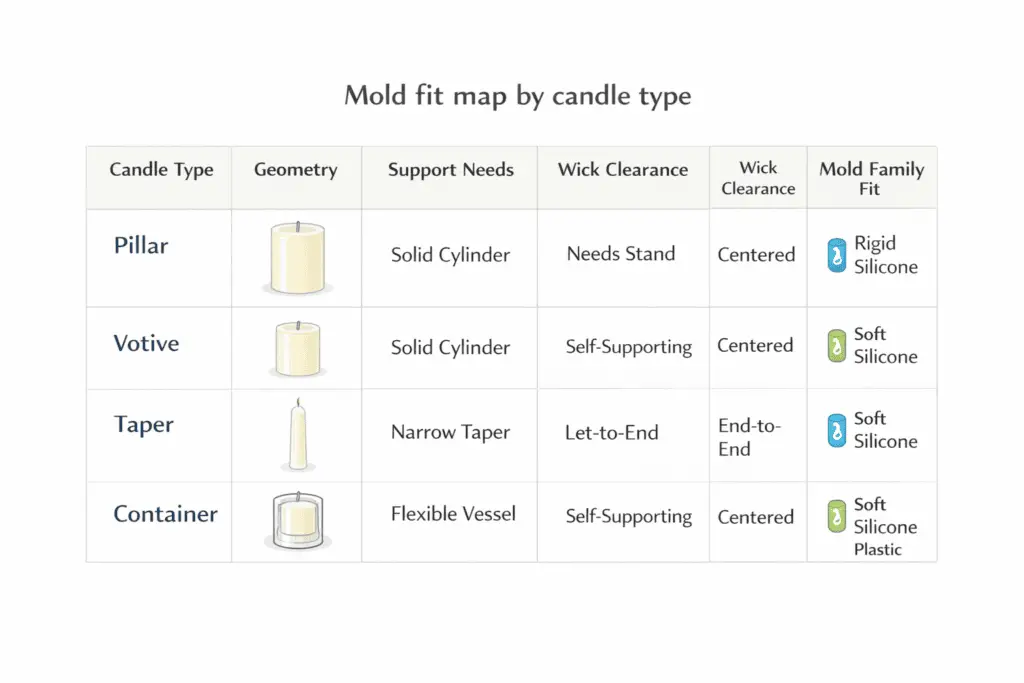
Begin by listing the molded candle families you actually want to sell: classic straight pillars, tapers, votives, wax melts, or sculptural pieces. Then compare mold families for each category instead of buying random shapes that look good in isolation.
For each candle type:
- Define the functional requirements
For pillars and tapers, safe freestanding stability matters. For votives and wax melts, cavity fit and clean release come first. - Match mold geometry and material
Votives and tealights often pair well with metal or rigid plastic cups; large pillars often prefer silicone or metal tubes; sculptural candles usually gravitate toward silicone. - Review practical fit using your notes or supplier images so you avoid buying beautiful but impractical shapes for your waxes and wick families.
Finally, match cleaning and maintenance to the candle type. High-soot tests, embedded botanicals, and loaded dyes all add wear to molds, and routines that work for unscented test pillars may fail for heavily fragranced molded lines. Over time, linking candle type, mold choice, and maintenance schedule will prevent surprise defects partway through a production season.
Wax temperature compatibility — how to set safe pour & pre-warm bands
Choose a mold whose safe heat tolerance matches your wax’s working pour range, then use pre-warming only when that wax-and-mold pair benefits from it.
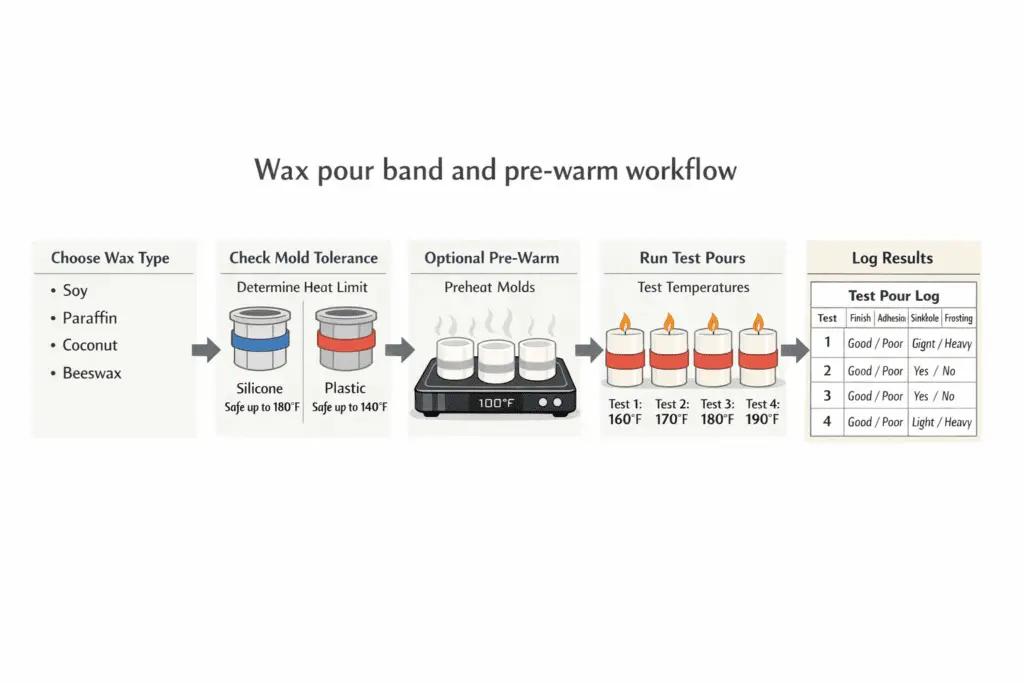
Start by checking supplier information for both wax and mold. Note the recommended melt and pour temperatures for the wax, and any stated maximum service temperature for the mold material. Then map your wax families, paraffin, soy, beeswax, and blends, against the mold materials that can sit safely inside those working bands with some margin.
Match those limits in practice as well as on paper. A hotter paraffin or beeswax pillar poured into thin plastic may move toward warping or clouding long before a metal or sturdier silicone mold has any issue. A cooler soy blend in a thick silicone mold may, by contrast, benefit from slight pre-warming to reduce jump lines and adhesion rings at the wall.
Before a serious production run, run a small test ladder with the same mold and the same candle at a few slightly different pour temperatures inside the safe band. Log surface finish, adhesion, sinkholes, and frosting. The best temperature is rarely the hottest one you can get away with; it is the band that gives clean walls and predictable cooling without creeping toward the mold’s stated limit.
It also helps to compare the upper and lower ends of your safe pour band. Hotter pours can improve detail fill and reduce some wall marks, but they narrow your margin for error in softer silicone or rigid plastics. Cooler pours widen the cushion but may increase bubbles, adhesion issues, or uneven fill in some shapes. Keep those working bands written near your melter, and treat any change of wax supplier or mold material as a reason to re-test rather than a plug-and-play swap.
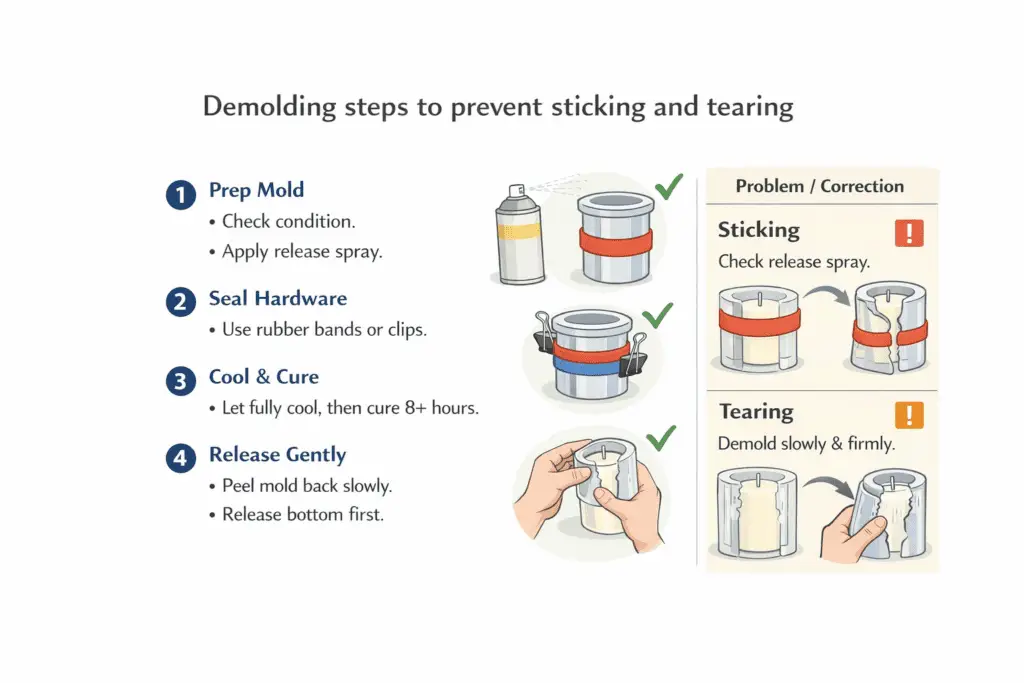
Release & demolding — steps to prevent sticking and tearing
Consistent, low-stress demolding comes from using the right prep and waiting long enough for the wax to set properly.
Start by deciding which mold families really need extra help and which can usually release cleanly with good timing and handling alone. Many platinum-cure silicone molds work best when you focus on using silicone candle molds correctly rather than loading them with heavy release agents, because too much spray can build residue and dull detail. Metal, latex, and some rigid plastics usually benefit from light, compatible release applied in a thin, even coat.
To keep release problems under control, break the setup into steps:
- Prep the mold
Check for leftover wax, dust, or old release residue. Clean and dry thoroughly. If you use a spray, apply a fine mist and let the carrier flash off completely. - Seal the hardware
For through-hole molds, make sure wick holes, seams, and plugs are fully sealed to prevent seepage. - Control cooling and cure time
Rushing demold is the fastest way to tear edges or lose surface detail. Thick pillars may need far longer than you expect. - Use a consistent demolding motion
For flexible molds, peel and roll the walls away from the candle rather than pulling the candle out. For rigid molds, gentle tapping, a short chill, or a quick warm water bath on the outside can help break the seal without brute force.
If a particular mold keeps fighting you, note wax type, pour temperature, room conditions, release product, and wait time before changing anything major. If sticking remains a pattern, move to a dedicated candle mold sticking guide before changing the mold family.
Dimensions & volume — calculating capacity and burn implications
Choose mold size by confirming usable capacity first, then checking whether that size supports the burn profile the candle needs.
For simple cylinders, estimate volume from base area and height. For irregular shapes, fill the mold with water, measure the volume, and record that number so you can compare wax usage, wick setup, and repeatability before you scale up.
At chooser depth, capacity is a fit check, not a full calculator. Use your dedicated mold-capacity guide for full volume workups, and treat any major change in size or shape as a reason to recheck wick testing before production.
Wicking constraints — how to center, seal, and space single/multi-wicks
A mold is a workable choice only when it lets you center, seal, and space the wick setup the candle requires.
At chooser depth, check three constraints before you buy: whether the mold can hold the wick centered, whether exits or seams can be sealed cleanly, and whether the cavity gives enough room for the planned wick count without crowding the wall.
Within the mold itself, focus on three constraints:
- Centering and anchoring – Use tabs, pins, or tensioning bars that keep wicks straight without distorting soft molds.
- Sealing – Prevent leaks at wick exits with appropriate plugs or sealants, especially in metal and rigid molds.
- Spacing for multi-wicks – Keep a consistent gap between wicks and between each wick and the mold wall to avoid overlapping melt pools.
If the mold makes centering, sealing, or spacing difficult, treat that as a selection problem first. Move to your dedicated wick guides for full wick-family choice and burn-test depth.
Detail fidelity & surface finish — how to keep edges sharp and surfaces glossy
Sharp detail and glossy surfaces depend mainly on temperature control, mold rigidity, and even cooling.
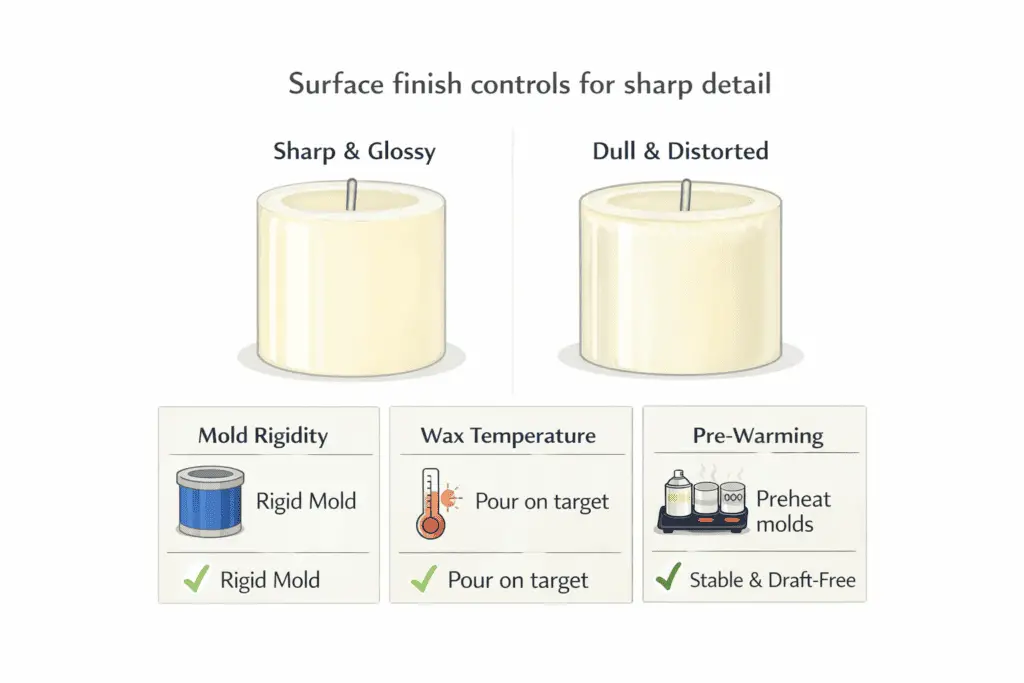
Start by pairing waxes and mold families that naturally support the finish you want. Rigid molds hold crisp edges well, while softer molds make release easier but can round corners if they flex too much under heat or handling. Keep notes on which molds preserve detail best for each wax and design rather than assuming one material always wins.
To keep surfaces glossy rather than hazy, pay attention to:
- Wax temperature – Pouring too cool can trap bubbles and cause ripples; pushing heat too far can increase frosting, micro-cracking, or mold stress in some setups.
- Pre-warming – Slightly warming rigid molds can reduce jump lines and adhesion rings, especially with soy blends.
- Cooling environment – Drafts, cold benches, and fans create uneven cooling that dulls or ripples the surface.
When a candle comes out dull, chalky, or distorted, do not guess. Run a short troubleshooting pass and note whether you changed wax batch, pour temperature, room temperature, or pre-warm habits. Often one stable change, such as slowing cooling or nudging the pour temperature inside the safe band, brings detail and finish back into line.
Production durability & cycle time — compare single vs multi-cavity and cooling methods
Durability and cycle time determine whether a mold belongs in hobby use, side production, or full production.
At chooser depth, compare only three signals: how quickly the mold shows wear, how long it takes to demold without distortion, and how often batches need rework. Use those signals to decide whether a mold stays in testing, small-batch use, or routine production.
Safety & compliance — what ratings and documents matter
For mold buying, use safety and compliance as a supplier-screening step: confirm what the material is, what heat range it is meant to handle, and what documents support that claim.
At minimum, ask for SDS (Safety Data Sheets) where relevant, material or temperature documentation for the exact mold or accessory, and hazard-label access such as CLP or equivalent labeling for related chemicals. If a supplier cannot produce basic records, treat that as a buying-risk signal rather than a detail to solve later.
Budget & total cost of ownership — calculating cost per good candle
Judge mold cost by cost per usable cycle, reject rate, and handling time rather than by purchase price alone.
At chooser depth, that is enough to separate a durable mold worth repeating from a cheap mold that creates rework. Leave full pricing and business modeling outside this page.
Specialty shapes & structural stability — how to support geometric/bubble/sculptural molds
Choose specialty shapes only when the finished look is the product and the mold can support that shape without distortion or breakage.
Keep this as a summary check at selection time: thin necks, deep undercuts, soft walls, and unsupported overhangs raise failure risk. Move detailed novelty and specialty-shape evaluation to a separate guide such as Are Novelty Candle Molds Safe and Practical to Use? instead of expanding it here.
Putting it all together — a simple mold-choice workflow
A short, repeatable workflow makes mold selection faster and less expensive.
To turn all of this into a practical decision path, use a short workflow whenever you consider a new mold:
- Clarify the candle’s job
Name the type, pillar, taper, container, sculptural, target burn profile, and any special aesthetic such as fine detail, embeds, or clear walls. - Pick a candidate mold family
Use your notes to choose between silicone, metal, rigid plastic, or specialty materials for that role. - Check heat and volume
Confirm compatibility between wax temperature bands and mold ratings, and calculate volume so you can plan wicking and pricing. - Plan release, climate, and cleaning
Decide how you will prep, demold, and maintain the mold in your actual workspace conditions. - Run a structured test batch
Pour a small ladder of test candles at slightly different pour temperatures or workflow settings, log outcomes, and check safety behavior. - Estimate cost per good candle
Use early defect rates and handling time to judge whether the mold belongs in hobby, small-batch, or full production. - Decide and document
Promote the mold to your core lineup, keep it as a niche art piece, or retire it, and update your notes so future decisions get easier instead of repeating the same mistakes.
Follow this consistently and your mold collection will slowly converge on a set that fits your waxes, climate, and brand instead of becoming a random pile of experiments.