Candle mold release spray helps only when a compatible candle mold grips wax after normal cooling, and it must be applied as a thin, wiped layer.
Candle mold release spray is a candle-mold surface aid that reduces wax grip so a finished candle can demold more cleanly. Release means easier wax separation, not a guaranteed perfect finish or a fix for every stuck candle. Spray means a light, compatible mist that is wiped or buffed until no wet film remains. The right decision depends on mold material, sticking pattern, residue risk, and whether the real problem is cooling, mold damage, or formula behavior.
Use spray only when three signs are present: the mold material is compatible, the candle sticks after normal cooling, and a thin wiped layer improves release without greasy residue. If any sign is missing, troubleshoot the mold, wax, cooling, or demolding method before adding more spray.
Compatible means the spray label, mold manufacturer, or supplier documentation supports that spray on the specific candle mold surface.
What Is Candle Mold Release Spray?
Candle mold release spray is a thin mold-surface aid used on compatible candle molds to reduce wax grip during demolding.
It works between the candle mold surface and cooled candle wax, so the finished candle separates with less sticking. In How to Fix Common Mold Release Issues, spray is only one possible aid; it does not replace correct cooling, mold condition, wax shrinkage, or careful demolding.
Release means reduced wax-to-mold adhesion. It does not mean every candle will come out flawless, and it does not mean more spray creates a better finish.
A candle maker does not need release spray for every pour. Clean silicone molds often release wax without spray, while some rigid molds may need help only after the mold material and product directions support it. Candle Molds & Shapes matters because the mold surface, flexibility, and detail level change how much the wax grips.
Candle mold release spray is not cooking spray, resin release, soap mold release, baking spray, or industrial mold-release advice. Candle wax, candle-safe mold materials, and candle finish quality are the limits here. Product label instructions, Supplier SDS, and Manufacturer compatibility guidance control exact surface approval, handling, ventilation, and cleanup.
A release spray is useful only when the mold surface is compatible and the sticking pattern points to surface grip rather than a deeper wax or timing problem.
When Should You Use Candle Mold Release Spray?
Use candle mold release spray only when a compatible mold repeatedly grips wax after normal cooling and basic demolding checks.
Spray is worth trying when a clean rigid mold still grabs cooled wax and the product label supports that mold surface. It should be a process aid after checks, not a routine coating for every candle.

Use it when the mold is clean, dry, compatible, and still repeats the same release problem. Metal molds, detailed molds, worn molds, and rigid plastic molds may justify a thin test layer, but plastic needs a label check and a small spot test first. If the sticking is caused by timing, shrinkage, mold damage, undercuts, overfill, or pulling, How to Fix Common Mold Release Issues is the better next step than adding more spray.
| Mold or situation | Spray decision | Why | Better path if not spray |
| Clean silicone mold releases normally | Avoid | Extra film can create residue without helping release | No added step needed |
| Metal mold repeatedly grips cooled wax | May use thin spray | Rigid walls can hold wax more firmly | Check broader causes if sticking persists |
| Detailed mold grabs in narrow textures | May test thin spray | Small details can create repeat grip points | Check mold shape and demolding technique |
| Rigid plastic mold with unclear material | Test first | Compatibility is uncertain | Use Candle Molds & Shapes or manufacturer directions |
| Spray leaves residue | Stop and clean | Overuse or mismatch may be causing film | Use residue cleanup and compatibility checks |
| Sticking continues after correct spray | Do not add more by default | A non-spray cause likely controls the problem | Use broader stuck-candle checks |
Use this table as a decision screen, not a product test. It separates mold situations by surface grip, material caution, and residue risk; it does not rank products or replace Product label instructions, Manufacturer mold guidance, or Supplier SDS.
Do not use release spray every time unless the same compatible mold needs it and the finish stays clean. A good use case has three signs: the mold material allows spray, the candle sticks after correct cooling, and a thin wiped layer improves release without greasy film. If one of those signs is missing, avoid spray until the real cause is clearer.
When Should You Avoid Mold Release Spray?
Avoid mold release spray when the mold releases cleanly, the product is incompatible, finish worsens, or sticking is not surface grip.
Avoiding spray is a compatibility and residue decision, not a claim that spray never works. If cooling, wax shrinkage, mold shape, overfill, or pulling is the real cause, How to Fix Common Mold Release Issues is the better route than adding more coating.
| Avoid when | Why | Try instead | Bridge if needed |
| A clean silicone mold already releases wax | Extra spray can leave film without improving release | Pour without spray and keep the mold clean | None |
| The label does not support the mold material | The spray may leave residue or affect the mold surface | Use only a product approved for that surface | Check Product label instructions before spraying |
| The candle feels greasy after demolding | The spray layer is too heavy or not wiped well | Stop spraying, clean the mold, and reduce the amount | Use Supplier SDS guidance for handling and cleanup |
| The candle looks dull after spraying | Spray film may transfer to the wax surface | Wipe thinner, test a small area, or change method | Use Manufacturer mold guidance for product mismatch |
| Sticking comes from undercuts, shrinkage, cooling, overfill, or pulling | Spray is not fixing the cause of the grip | Correct the release cause before adding a surface aid | Use Candle Molds & Shapes if mold shape is the issue |
| Wax behavior or hardness is the main cause | A surface spray cannot correct formula behavior | Adjust the wax approach outside this spray decision | Route formula questions to Best Candle Additives for Hardness, Opacity, and Mold Release |
| Ventilation or safety directions cannot be followed | Aerosol or solvent handling may become unsafe | Do not spray until the label conditions can be met | Follow label and safety sheet limits |
This table separates spray-related problems from non-spray causes. More spray can make candles worse when it creates greasy film, dullness, dust attraction, or buildup inside the mold.
Stopping spray does not mean giving up on release. It means the candle maker should remove the wrong variable first, then decide whether the mold needs a thin compatible layer later. The next decision is mold material, because silicone, metal, rigid plastic, and coated molds do not behave the same way.
Which Candle Mold Materials Work Best With Release Spray?
Candle mold release spray is most useful on compatible rigid molds that grip wax, usually unnecessary on clean silicone molds, and risky on hard plastic unless the label and spot test support it.
Compatible means safe and appropriate for the specific candle mold surface and finished wax appearance. It does not mean merely slippery, and it does not mean one spray rule applies to every mold material.
Material guidance controls whether spray belongs in the process. Candle Molds & Shapes helps when the real decision is mold selection, but this comparison stays focused on spray need, residue risk, and surface approval.
| Mold material | Spray need | Residue risk | Spot test needed | Practical note |
| Silicone | Usually low | Medium if unnecessary | Only for exception cases | Troubleshoot if repeat sticking continues |
| Metal | Medium when wax grips rigid walls | Medium if overapplied | Useful | Move to thin application and residue checks |
| Hard plastic or rigid molds | Uncertain | Medium to high | Yes | Use manufacturer and mold guidance first |
| Coated mold | Product specific | Product specific | Yes | Follow the coating and spray directions |
This matrix uses product label instructions, mold manufacturer instructions, and supplier safety information as the decision basis. It is not a product ranking, and it should not be used to approve resin, baking, food-container, or industrial release sprays for candles.
Do Silicone Candle Molds Need Release Spray?
Most clean, flexible silicone candle molds do not need release spray.
Silicone guidance differs from metal guidance because a flexible silicone mold can often release wax by flexing away from the candle surface. Silicone mold manufacturer guidance matters when the mold is worn, heavily detailed, unusually sticky, or paired with a product the maker has not used before.
Unnecessary spray on silicone can create film buildup, dull finish, dust attraction, or greasy residue. If a silicone mold repeatedly grabs after correct cooling, use How to Fix Common Mold Release Issues rather than assuming the solution is a heavier spray layer. Product label instructions and Supplier SDS still control whether a specific spray belongs on that silicone surface.
When Does Release Spray Help Metal Candle Molds?
Release spray may help metal candle molds when cooled wax repeatedly grips the rigid metal wall.
Metal does not flex like silicone, so pillar-style candles can hold against the wall after cooling. A thin layer means a light mist that is wiped or buffed until there is no visible film, pooling, or wet patch.
Use spray on metal only when the mold is clean, the spray is compatible, and the candle still shows repeat surface grip. Metal mold manufacturer instructions should control mold-specific limits, while Product label instructions and Supplier SDS control application, handling, and cleanup. Clean sprayed metal molds when film, odor, or buildup carries into the next pour.
Can You Use Release Spray on Hard Plastic or Rigid Candle Molds?
Use release spray on hard plastic or rigid candle molds only if the product label allows it and a spot test shows no surface or residue problem.
Plastic is not one single candle mold surface. Coatings, finishes, and rigid mold materials vary, so a spray that works on metal does not automatically work on plastic.
Before spraying a hard plastic or rigid candle mold, check the label, test a hidden area, apply a thin layer, and look for surface change, odor, residue transfer, or finish damage. If the material is uncertain, use manufacturer compatibility guidance before the spray touches the mold. If the mold type itself is the problem, move the decision back to Candle Molds & Shapes instead of treating the spray as universal.
How to Apply Candle Mold Release Spray Without Residue
Apply a light mist to a clean, compatible candle mold, then wipe or buff until no wet film or pooling remains.
Thin means the mold surface is barely coated, not wet. Spray means mist-and-wipe, not soak-and-pour, and exact product label instructions override any general candle-making habit.
Follow these steps before pouring wax into a sprayed mold.
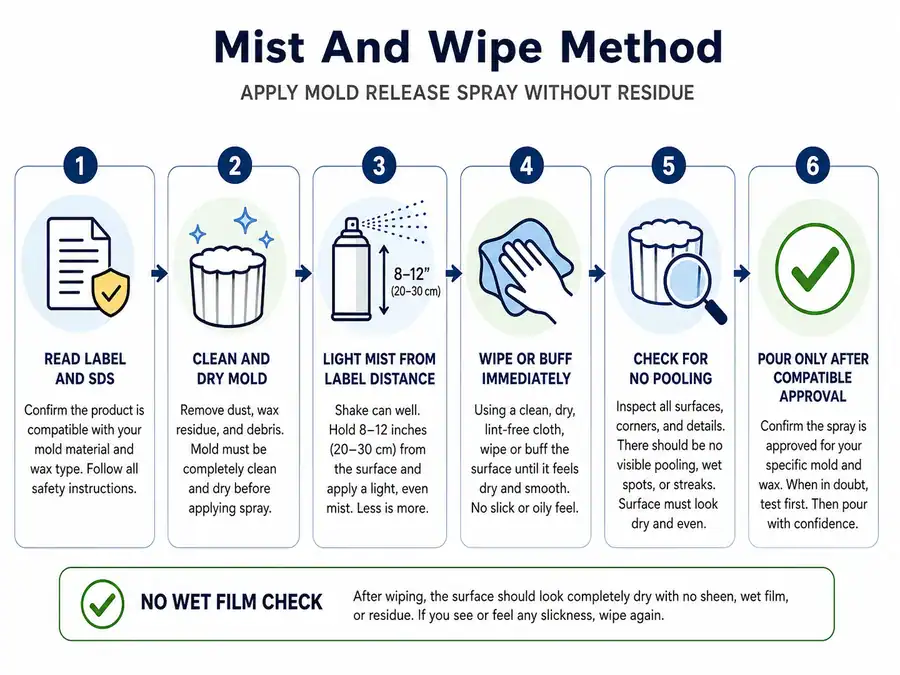
- Read the Product label instructions and confirm the spray can be used on the mold material.
- Check supplier SDS handling notes before spraying, especially for ventilation, storage, and cleanup limits.
- Clean and dry the candle mold so old wax, dust, and previous spray film do not transfer to the next candle.
- Shake or prepare the spray exactly as directed by Supplier SDS and label guidance.
- Mist lightly from the label-recommended distance rather than spraying close enough to create wet patches.
- Wipe or buff the mold surface until the coating looks even and no liquid collects in corners, seams, or details.
- Check for no pooling, wet film, heavy odor, or visible residue before pouring wax.
- Pour only when the mold is prepared and Manufacturer guidance allows that spray-and-mold combination.
A properly applied layer should not look greasy. If the mold still sticks after correct thin application, How to Fix Common Mold Release Issues is the better next step because the cause may be cooling time, wax shrinkage, mold shape, or mold damage rather than lack of spray.
Use the smallest working amount. Do not spray directly and pour immediately unless the label says that timing is allowed, because trapped liquid or uneven film can transfer to the candle surface.
What Happens If You Use Too Much Mold Release Spray?
Too much mold release spray can leave greasy residue, dull the candle surface, attract dust, create mold buildup, or hide a non-spray release problem.
Residue means leftover spray film on the mold or finished candle surface. It can be visible, feel greasy, affect the candle finish, or build up across repeated pours; it is not the same as wax bloom, frosting, cooling defects, or formula issues.
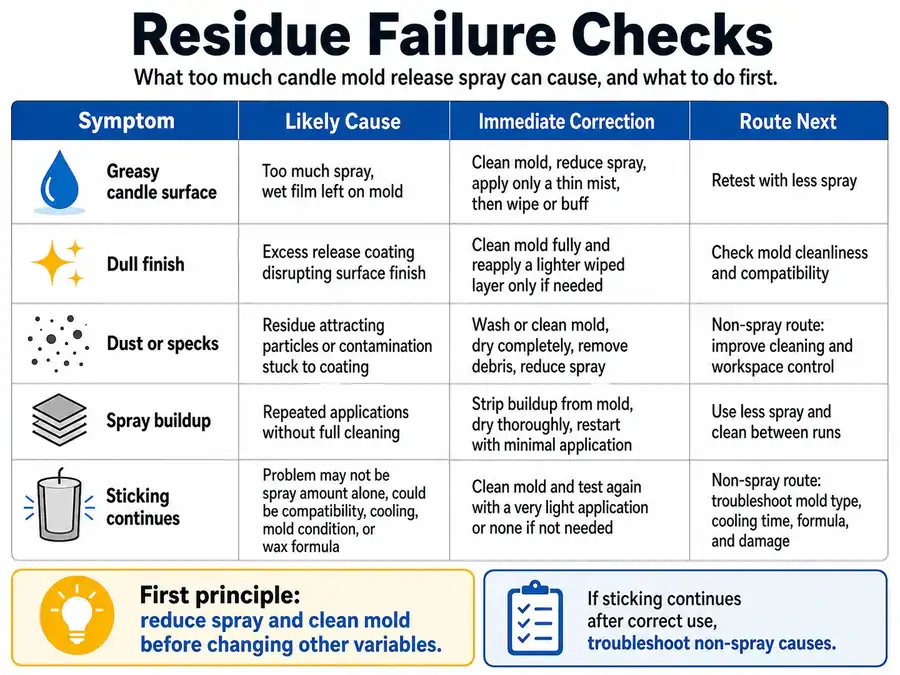
| Symptom | Likely cause | Immediate correction | Bridge if non-spray |
| Greasy candle surface | Too much spray or insufficient wiping | Clean the mold and reduce spray | Stay in residue correction first |
| Dull finish | Spray film transferred to wax | Wipe thinner and test the product | Use How to Fix Common Mold Release Issues if dullness is not spray-related |
| Dust or specks | Film attracted dust before the pour | Clean the mold before the next pour | Check mold care if the problem repeats |
| Spray buildup in the mold | Repeated spraying without enough cleaning | Remove film and stop heavy application | Check Product label instructions for cleanup limits |
| Sticking continues | A non-spray cause likely dominates | Do not add more spray by default | Route wax behavior to Best Candle Additives for Hardness, Opacity, and Mold Release only when formula behavior is the issue |
This failure log separates spray film from broader candle surface defects. If a cloudy patch is frosting, bloom, or cooling damage, more release spray will not correct the cause and may add a second problem.
The symptoms above are limited to outcomes caused by overapplication, insufficient wiping, buildup, or wrong-cause troubleshooting. Cleanup and compatibility decisions should follow product label instructions, Supplier SDS, and Manufacturer cleaning guidance before changing the amount or using a different spray.
Use less spray when residue appears. Stop spraying when the finish worsens, clean the mold, and test a thinner layer only after the mold surface is dry and compatible. If the candle still sticks after a thin wiped layer, the release problem is probably outside spray volume.
How Should You Clean a Mold After Using Release Spray?
Cleaning after release spray use means removing spray film or buildup so the next pour does not inherit residue or finish defects.
Clean the mold when you see visible film, feel a sticky surface, notice odor, see buildup between pours, or have used spray across repeated pours. Cleaning here means release-spray film removal, not full mold restoration.
Use this cleanup checklist after sprayed pours that leave film or buildup.
- Follow Mold manufacturer guidance before using any cleaner on the mold surface.
- Wipe excess film first so cleaner does not spread residue around the mold.
- Use the mildest compatible cleaner allowed by the mold and spray directions.
- Dry the mold fully before the next pour.
- Stop spraying heavily if buildup returns after cleaning.
- Use How to Fix Common Mold Release Issues if cleaning does not improve release.
A clean mold should not feel slick, tacky, or oily before wax is poured. If residue returns quickly, the spray amount, wiping step, or mold compatibility is the issue to correct before blaming the wax.
Candle Mold Release Spray vs Other Release Methods
Candle mold release spray is one candle-specific demolding aid, but the best method depends on why the wax is sticking.
Other methods means candle demolding options, not resin, soap, baking, or industrial release processes. If the candle is stuck because of timing, wax shrinkage, mold shape, or technique, How to Fix Common Mold Release Issues is the better route than treating spray as the first fix.
| Method | Best for | Avoid when | Residue or damage risk | Bridge if complex |
| Thin spray | Compatible rigid molds with repeat surface grip | Clean silicone already releases | Residue if overused | Application and residue checks |
| Correct cooling | Timing-related sticking | Mold damage or undercuts dominate | Low | How to Fix Common Mold Release Issues |
| Gentle mold flexing | Flexible molds | Rigid, brittle, or coated molds | Cracking if forced | Candle Molds & Shapes |
| Short chilling | Extra shrinkage support where mold-safe | Brittle wax or sensitive molds | Cracking or condensation | Broader release troubleshooting |
| Warm-water loosening | Mold-safe warming around the outside | Mold or finish reacts poorly to warmth | Surface or mold damage if misused | Manufacturer mold guidance |
| Formula or additive change | Wax behavior is the cause | Surface grip is the only issue | Formula drift | Best Candle Additives for Hardness, Opacity, and Mold Release |
Use spray before chilling only when the mold surface is compatible and the sticking pattern looks like surface grip. Use chilling or warming only when the mold material allows that temperature change, because the wrong method can crack wax, create condensation, or stress a mold.
Additives are better than spray only when wax behavior is causing the release problem. If a candle maker changes the formula to fix a mold-surface problem, the candle can move farther from the real cause instead of closer to clean release.
Use Product label instructions, Supplier SDS, and Manufacturer mold guidance when a method depends on product handling, cleanup, heat exposure, or mold material. This comparison is a routing aid: it chooses the least risky release path without turning one stuck candle into a full wax, mold, or additive lesson.
How to Choose a Candle Mold Release Spray
Choose a candle mold release spray by checking compatibility, residue risk, odor transfer, label clarity, cleanup directions, and spot-test suitability.
Best means criteria-based, not strongest, cheapest, or most popular. A suitable spray must match the candle mold material, support thin mist-and-wipe application, and avoid turning release help into greasy film or candle-finish damage.
| Criterion | Look for | Avoid | Why it matters |
| Mold material compatibility | Label or supplier surface guidance | Vague multi-purpose claims | Prevents mold damage and residue |
| Candle or craft suitability | Documentation supporting the intended use | Industrial, resin, baking-only, or unrelated use | Keeps the choice candle-specific |
| Residue profile | Low-residue language or clean spot test | Greasy film, staining, or transfer | Protects the candle finish |
| Odor risk | Low odor or no transfer in a test | Strong odor transfer | Protects candle scent |
| Application control | Light mist possible | Heavy coating required | Prevents overapplication |
| Safety documentation | Label and SDS available | Missing safety information | Grounds safety claims |
| Cleanup instructions | Removal or buildup guidance | No cleanup guidance | Reduces repeat-pour film |
| Spot-test compatibility | Hidden-area testing possible | Immediate surface change | Prevents irreversible mold issues |
This page stops at selection criteria. A separate product-list page should own brand comparisons, prices, availability, and ranked recommendations if the topical map later adds that node.
Use Product label instructions, Supplier SDS, Mold manufacturer guidance, and Supplier product documentation before trusting any broad “mold release” claim. If the label does not mention the mold surface or the supplier cannot support candle-use compatibility, treat that as a warning sign rather than a minor detail.
Do not use cooking spray as a candle mold release substitute. It is not chosen by candle mold compatibility, residue control, odor transfer, label clarity, or wax-finish behavior.
If the uncertainty is the mold material itself, use Candle Molds & Shapes before choosing spray. If the candle keeps sticking after correct thin use, use How to Fix Common Mold Release Issues rather than buying a stronger product by default. Product suggestions can come later, but they should map back to the checklist instead of ranking by price, trend, or availability.
What Safety and Label Checks Matter Before You Spray?
Safety for candle mold release spray means label-compliant, ventilated, compatible use; it does not mean universally non-toxic, food-safe, flame-safe, or odor-free.
Check the label, SDS, ventilation directions, flammability warnings, and mold-surface compatibility before spraying. Safety depends on product chemistry, aerosol format, airflow needs, use restrictions, mold material, and possible candle-surface contact.
| Label or SDS item | Why check it | Safer action | Avoid if |
| Approved surfaces | Confirms compatibility | Use only on listed or supported surfaces | The mold surface is not mentioned |
| Handling precautions | Controls exposure during spraying | Follow the handling directions | Directions cannot be followed |
| Ventilation | Reduces fume exposure | Follow label airflow directions | Ventilation cannot be met |
| Flammability | Prevents unsafe workflow | Keep away from ignition sources | The label conflicts with the workspace |
| Residue or odor warning | Protects finish and scent | Spot test before full use | Odor or residue transfers |
| Cleanup directions | Prevents buildup | Follow cleanup directions | No cleanup guidance is available |
| Storage instructions | Supports safe handling between uses | Store as directed | Storage conditions are unavailable |
Use product label instructions, supplier SDS, and Manufacturer compatibility guidance for product-specific safety. Do not spray near heat or flame unless the documentation allows that workflow, and do not assume a product is safe for candles because it works in a different craft.
If a spray passes the buying and safety checks but still fails in the mold, the next step is failure routing rather than adding more coating.
What If Mold Release Spray Does Not Work?
Failed mold release spray often points to cooling, wax, mold, buildup, or demolding problems rather than a bad spray.
Spray fails when the candle still sticks after correct thin compatible use, the finish worsens after spraying, more spray creates residue without release, or sticking returns after one successful pour. Do not keep adding more spray by default; use How to Fix Common Mold Release Issues when the sticking pattern points beyond surface grip.
| Symptom | Likely cause | What to check next | Where to go next |
| Still stuck after thin spray | Cooling, shrinkage, shape, or mold damage | Cooling time, mold geometry, wax behavior, and mold condition | How to Fix Common Mold Release Issues |
| Greasy but still stuck | Overapplication plus a non-spray cause | Clean the mold, reduce spray, and recheck the sticking pattern | Residue cleanup first, then broader troubleshooting |
| Works once, then sticking returns | Buildup or inconsistent cleaning | Spray film, drying, wiping, and repeat-pour cleaning habits | Cleaning and release-process checks |
| Candle cracks during removal | Demolding force, brittle wax, or poor timing | Release timing, wax behavior, and force used during removal | Best Candle Additives for Hardness, Opacity, and Mold Release only if wax behavior is the cause |
| Wick pulls loose | Pulling technique or anchor weakness | Demolding method and whether the candle is being pulled by the wick | Broader stuck-candle troubleshooting |
| Mold shape keeps grabbing | Undercuts, deep texture, or rigid detail | Shape, flexibility, and whether the mold traps the candle mechanically | Candle Molds & Shapes |
This table does not diagnose every stuck candle problem. It separates spray failure from the most common non-spray causes so the next check does not become “use more coating.”
The rows are limited to failure signs that can appear after correct thin use of candle mold release spray. Product handling, cleanup, and compatibility should still follow Product label instructions and manufacturer guidance, especially when residue, odor, mold-surface change, or repeated sticking appears.
The mold or wax is likely the main problem when sticking continues after a clean mold, compatible product, thin wiped layer, and normal cooling. In that case, stronger spray is not the next best test. The better next step is to separate surface grip from cooling, shrinkage, mold geometry, mold wear, buildup, and removal technique before changing products.