
Air-bubble defects in molded candles are trapped-air pits, detail voids, or bubble-like marks that need a defect-first diagnosis before you change process variables. On this page, that diagnosis includes true trapped surface air, shrinkage cavities that can look like bubble problems, and contamination-seeded pits, but it does not replace full sinkhole, additive, or mold-release guides. On this page, brief degassing means letting stirred wax rest for a short time so small entrained bubbles can rise before you pour, not vacuum-chamber or industrial wax-processing methods. Most true bubble defects improve when the mold is dry and lightly warmed, the wax is stirred gently, the pour stays low and steady, and cooling stays even.
Many makers find that small trapped bubbles ruin otherwise beautiful molded candles. Between room conditions, mold prep, wax temperature, and pouring technique, there are more variables than most hobbyists realize. The fastest way to improve results is to diagnose the bubble pattern first, then correct the most likely cause on the next pour. This guide stays focused on molded candles, including simple pillars and more intricate silicone shapes.
Use this quick chart to match the bubble defect to the fix
Match the defect you can see to the most likely cause, then change that variable first. This keeps your next test batch readable instead of turning one bubble problem into five new ones.
| What you see | Most likely cause | What to change first |
|---|---|---|
| Tiny pinholes or surface craters | Cold or damp mold, trapped surface air, or fast surface cooling | Dry and lightly warm the mold, pour lower and slower, and cool away from drafts |
| A deep void near the wick or center | Normal shrinkage in a deeper mold | Let the cavity form, then top off with a second pour |
| Bubbles in fine detail or undercuts | Air trapped in the mold geometry | Tilt the mold, pour along the high wall, and add tiny vents only if simpler fixes fail |
| Specks, streaks, and clustered pits | Dirty wax, undissolved additives, or debris in the melt | Filter the wax, dissolve color and fragrance fully, and keep tools clean |
| Bubble bands on one side | Uneven cooling or airflow across the mold | Cool on a level surface away from vents, fans, and cold walls |
Treat tiny pinholes, surface craters, and detail voids as trapped-air problems first. Treat a deeper center cavity as shrinkage that needs a refill, and treat specks or clustered pits as contamination or additive-dissolution problems.
Start with the defect that repeats most often, not the most advanced fix. Many molded-candle bubble problems disappear once the mold is dry, the pour stream is calmer, and the cooling setup is more even.
Most molded-candle bubbles come from mold prep, wax temperature, stirring, pour height, or uneven cooling
Most molded-candle bubbles come from a short list of causes: a cold or dirty mold, wax that is too cool or too disturbed, a high or choppy pour, or uneven cooling after the fill. Those causes matter more than specialty gear, and they are the right place to start for nearly every batch.
Check the candle molds before you change the wax. A mold that is damp, dusty, or poorly matched to the shape you are casting will keep trapping air no matter how carefully you pour. If the problem starts with mold choice or material, review how to choose the right candle mold and silicone vs metal candle molds before you keep chasing temperatures.
Then work in order. Prep the mold, verify your supplier’s wax guidance, stir gently, pour low, and cool the candle on a level surface. For temperature, use your supplier’s molded-candle pour range as the starting point: wax that thickens early can trap air in detail, while wax that is overly hot for the mold depth can leave a larger refill cavity as it shrinks. In practical candle making, brief degassing usually means letting the wax rest after stirring so the smallest entrained bubbles can rise before you pour.
Plan your workspace to control humidity, drafts, and dust for bubble-free molded candles
For smooth, bubble-free molded candles, keep the room stable, the mold dry, and the cooling area calm so the wax can set evenly without surface pits or hazing.
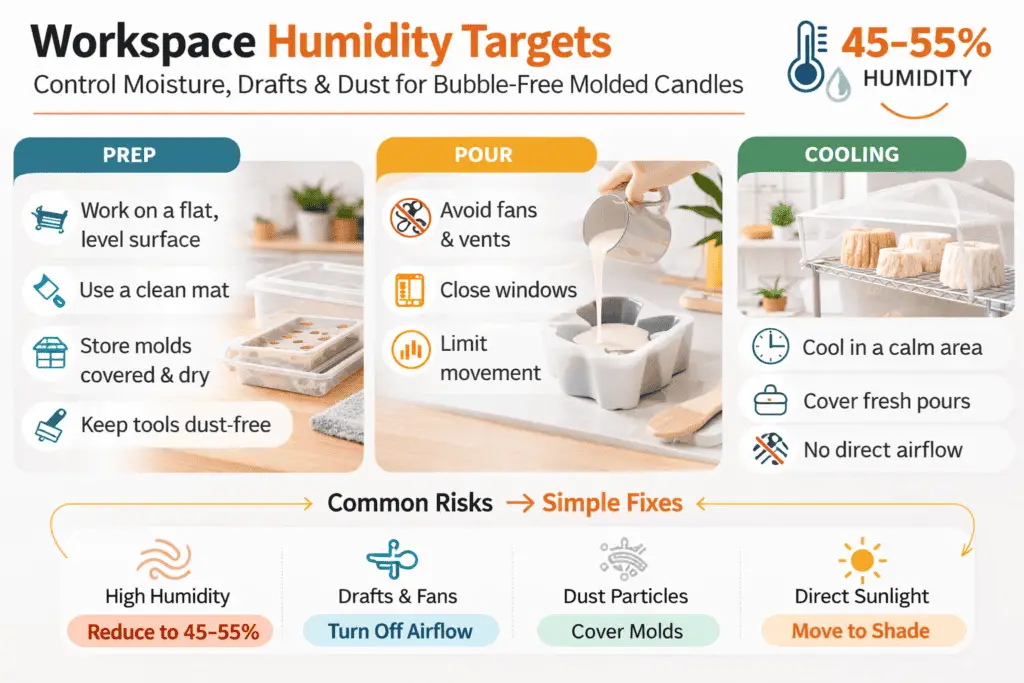
Before you tweak wax formulas, pause to review mold basics in the context of room conditions. High humidity makes condensation more likely on cool mold walls, which can trap moisture at the wax–air boundary and show up as tiny craters, cloudy bands, or weak spots. If the room feels damp, the mold feels cool to the touch, or one face keeps showing pinholes, dry the cavity completely and lightly warm the mold before the next pour. Very low humidity can make static and dust issues worse, so the goal is not “as dry as possible” but a stable room where wax cools predictably. A simple thermometer and hygrometer give you real numbers instead of guesswork.
Start by measuring, not guessing. Note your typical room temperature and humidity at the start and end of a pour session, plus whether you are working in a basement, spare room, or garage. If the room regularly feels damp or swings sharply between cool and warm, move molds away from cold exterior walls and focus on drying the cavity completely before you pour. That is often more useful than chasing one exact humidity target.
Next, eliminate turbulent air. Overhead fans, open windows, and vents blowing directly at your cooling rack create cold spots and moving dust that land on still-soft wax. Position molds away from doors, vents, and walkways, and use a simple barrier or sheltered shelf to break up airflow without trapping heat. For more help with mold handling, the setup advice in how to use silicone candle molds properly works especially well for detailed silicone cavities that mark easily.
Finally, treat dust as a bubble trigger, not just a cosmetic nuisance. Wipe nearby surfaces before each session, store clean molds in covered bins, and tent freshly poured candles with a clean box or other light cover so particles cannot settle onto the forming skin. A stable, clean, quiet room will do more for molded finishes than most advanced tools.
How to dissolve dye, fragrance, and additives cleanly so they do not seed bubbles
Dissolve dye, fragrance, and additives fully at the right stage so they blend smoothly instead of leaving cold fragments or streaky pockets that trap bubbles.
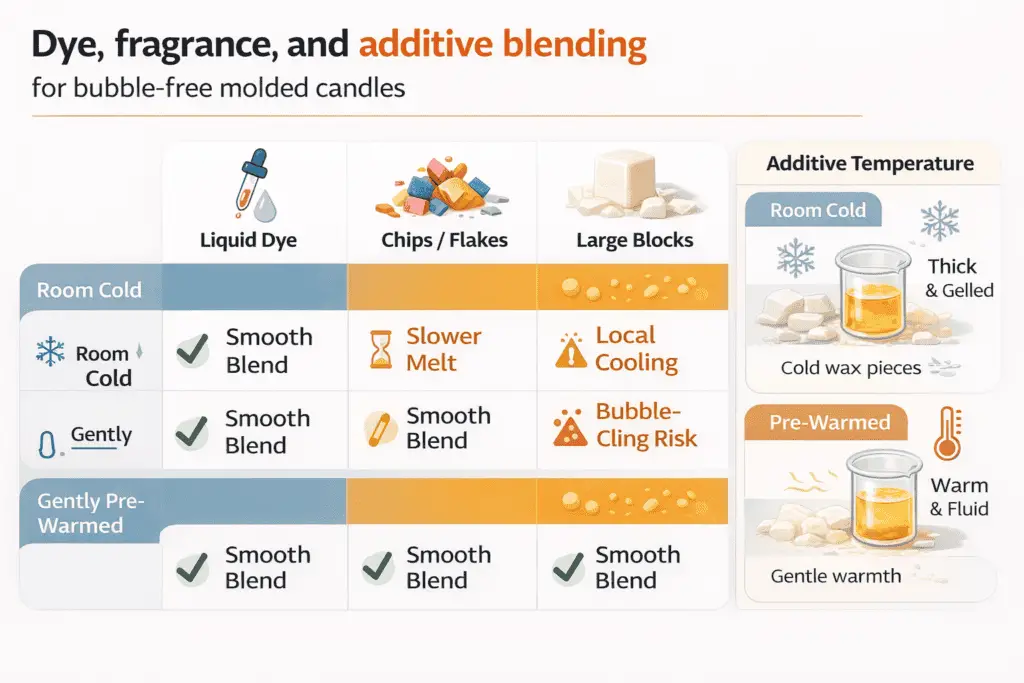
On this page, additives matter only when they enter the wax cold, stay partly undissolved, or carry debris that seeds pits. If specks or streaks keep repeating after you calm the pour, use liquid dyes for dye-format guidance and fragrance oils for fragrance timing instead of expanding that work here.
How to stir and incorporate without entraining air (speed, direction, duration)
To stir without entraining air, use a slow folding motion with a broad spatula, avoid forming a vortex, and stir only long enough to dissolve dyes and fragrance before you let the wax rest briefly.
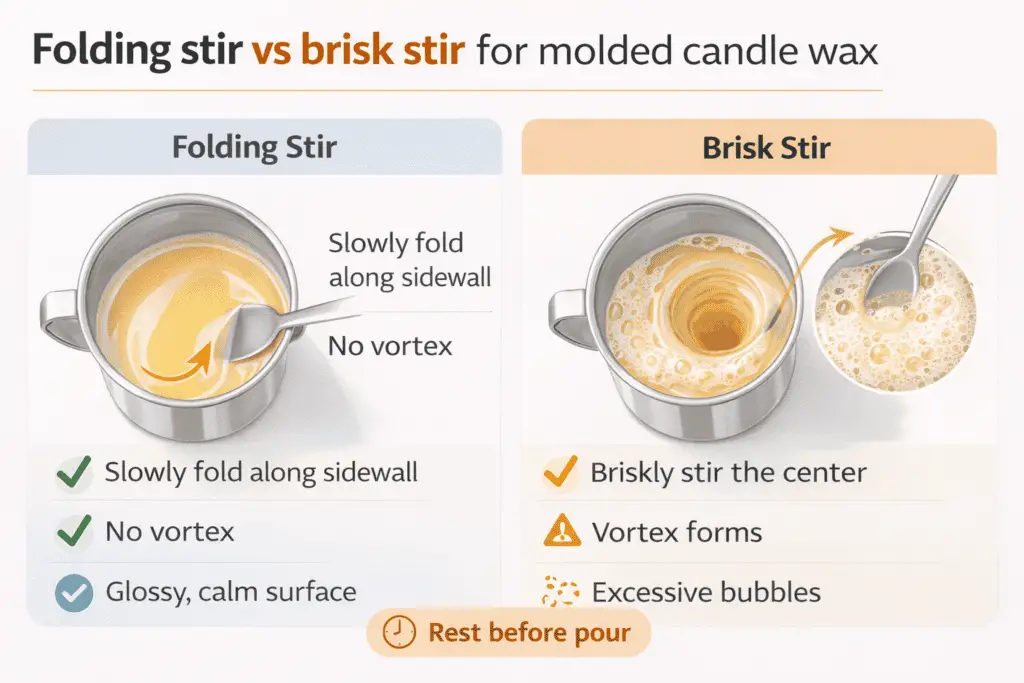
Before you worry about exact seconds on the timer, it helps to see mold fundamentals so your stirring matches the size and shape of the candle you are pouring. Tall, narrow pillars give bubbles a long way to travel back up, which means you need to minimize how many you create in the pot. Instead of whisking straight up and down, place your spatula or paddle near the side and fold the wax from bottom to top, turning the pot a little as you go.
Use speed and time as gentle controls, not brute force. Stir only until the color and fragrance look uniform with no obvious streaks. If you speed up and jab straight through the center, you will pull a funnel of air down into the melt and whip in foam. The surface should look glossy and mostly bubble-free, not frothy.
When you stop stirring, do not rush to the mold. Give the pot a short rest so the smallest bubbles can rise and pop before you move it. If you still see a thin layer of foam, gently skim it off the top edge or tap the container on a protected surface to encourage rise without splashing. Persistent fizz is usually a sign to slow down, not a reason to stir longer.
How to pour low and steadily so the stream stays laminar
A low, steady pour traps less air than a high, splashy pour because the wax enters the mold in one smooth stream instead of breaking into droplets.
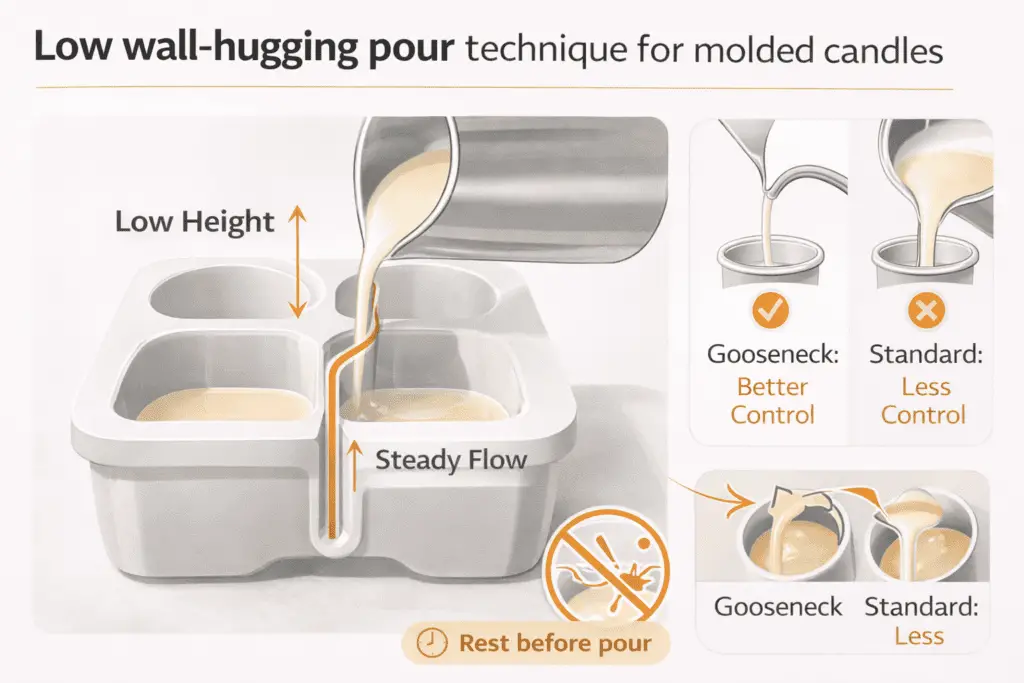
Before you buy another tool, step back and see mold fundamentals in terms of how wax enters the cavity. A laminar stream is a smooth, rope-like flow that slips down the sidewall without splashing. A turbulent stream is choppy and full of little eddies that fold air into the column. The spout shape decides how easy it is to stay in that smoother zone, especially at the start of the pour when most “burps” happen.
A gooseneck pitcher can make that easier because the outlet helps keep the stream narrow and predictable, but the main fix is not the tool itself. With any pitcher, keep the spout close to the mold, start smoothly, and let the stream hug the wall instead of splashing into the center.
If you hear the stream hissing or see it breaking into droplets, reset instead of pushing through. Bring the spout lower, slow down, and restart the flow smoothly. A light tap on the mold base or a tiny side-to-side shimmy can help release a few trapped bubbles, but repeated shaking usually creates fresh turbulence.
For tall, slender molds or very detailed shapes, a thinner stream is easier to manage, but the bigger win comes from stream control rather than from the pitcher itself.
How to tilt and rotate complex molds during fill to purge trapped air
To purge trapped air in complex molds, tilt the mold so high points vent upward, pour along those ridges, then slowly rotate and level once bubbles have escaped.
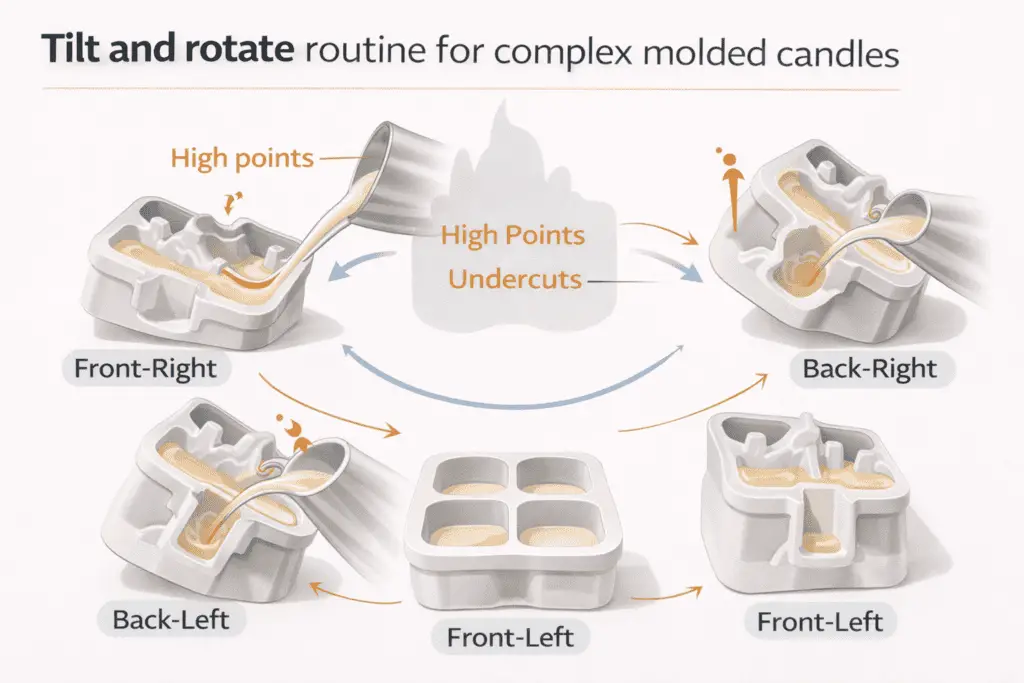
For highly detailed or undercut molds, start by mapping the geometry before you pour. Look at the empty mold from the side and top, noting every peak, hollow, and overhang where air could get stranded. It helps to learn mold basics so you can see each apex as a mini chimney that either gives air a way out or traps it completely.
Set up a stable tilt using wedges or a folded towel under one side of the mold, raising the “exit” apex slightly higher than the rest. Place the mold on a non-slip mat so the base cannot skate when you start rotating. Begin with a low, wall-hugging stream that runs directly toward the highest ridge, letting wax climb that sidewall and push air ahead of it instead of trapping pockets behind details. As the level rises, pause occasionally and watch for little burps of air surfacing near tucked corners.
Once the lowest undercuts are covered, gently roll the mold a few degrees at a time rather than swinging it. Think of a slow, four-stop routine: front-right, front-left, back-left, back-right, with a short pause at each point while the stream keeps hugging the current high wall.
As you approach the final fill height, gradually return the mold to level while reducing the flow to a thin thread. After the pour, tap the mold base lightly or give it a tiny side-to-side shimmy, then leave it alone so new turbulence does not create fresh bubbles. If voids still cluster near the same high points after tilt, rotation, and a calmer pour, treat that as a sign that you may need tiny last-resort vents at those apexes rather than a harder pour.
Steps to double-pour pillars to eliminate sinkholes and hidden voids
To eliminate sinkholes and hidden voids in deeper molded candles, pour the first fill, let the candle shrink and form a cavity, then refill that cavity with a controlled second pour.
Use a first pour to let the core shrink and show the refill cavity, then top it off once the outer shell is firm and the center is visibly recessed. This keeps the second pour tied to the shrinkage pattern instead of forcing a hot refill too early.
If the void is deep or keeps returning, move to how to make pillar candles or your sinkhole workflow instead of turning this page into a full pillar guide.
Insulation vs water-bath cooling: which controls surface finish and bubble release better
If cooling method is still the variable, gentle insulation is usually the simpler first adjustment for most molded pillars because it slows the set without the sharper shell that a casual water bath can create.
| Cooling method | Best use | Main advantage | Main risk |
|---|---|---|---|
| Gentle insulation | Most home and small-studio pillar pours | Slows cooling more evenly and gives bubbles more time to rise | Too much wrapping can slow the set more than you want in an already warm room |
| Water-bath cooling | Only when you can control the bath temperature closely | Can moderate cooling in some setups | A bath that is too cool can set the outer shell too fast and trap defects |
If you are still seeing one-sided bubble bands or chill lines, fix drafts and level support before you reach for more aggressive cooling methods.
Steps to filter and clarify wax so particles don’t seed bubbles
To keep particles from seeding bubbles, filter melted wax when you can see debris, streaky residue, old dye fragments, or repeated speck-related pits in the finished candle.
Use this step when your defect looks more like the chart’s specks, streaks, or clustered pits than like isolated trapped-air voids. Any solid contaminant in wax—old wick fragments, dye crumbs, dust, or bits of cooled wax—can give bubbles somewhere to cling, even when the mold and pour technique are otherwise fine.
Use filtering only when the defect pattern clearly points to residue or undissolved material. If specks or streaks continue after cleaner wax and calmer pouring, return to liquid dyes and fragrance oils for the deeper additive-specific fixes.
How to fix surface bubbles, sinkholes, and vent marks after the pour
After-pour fixes can clean up minor bubble defects, but they work best when the root cause is already under control. Use them as finish corrections, not as a substitute for better mold prep, stirring, pouring, or cooling.
Thermal reflow works by briefly warming the outer film so micro-bubbles and tiny sink marks relax and level. A thermal reflow pass is a short, controlled application of heat that softens only the surface skin. Keep the heat source moving, stay back from the wax, and stop once the defect relaxes. The goal is a gentle sheen shift, not dripping edges or softened detail.
To turn that into a simple routine:
- Wait until the candle has fully set on top and reached a safe handling temperature.
- Use a low heat setting and hold the nozzle or heat source well back from the surface.
- Sweep across the top and any visible defects in smooth, continuous passes rather than hovering in one spot.
- Pause between passes so heat can dissipate and the wax can settle.
- Stop as soon as the surface levels instead of chasing a mirror finish.
For a center cavity or top depression, go back to the second-pour method instead of trying to solve a deeper void with surface heat. For tiny vent scars, use the mildest possible touch-up and then adjust future vent size or placement so the mark forms in a less visible area. One careful repair pass is usually better than repeated reheating.
Use the mold guide that matches the bubble problem you found
When bubble defects point to a bigger mold issue, move to the page that matches that issue instead of stretching this page beyond its job. That keeps the troubleshooting path clean and points you to the guide that matches the real problem.
Use Candle Molds & Shapes for the parent hub, How to Choose the Right Candle Mold when the cavity or material is the wrong fit, Silicone vs Metal Candle Molds: Which Is Better? when the mold material changes the defect pattern, and How to Fix Common Mold Release Issues when sticking or drag marks are creating secondary surface damage that looks like bubble trouble.