
A candle container is the vessel that holds the wax and wick for a container candle. Common container families on this page include heat-rated glass jars, metal tins, glazed ceramic, sealed concrete, wood vessels with liners, and small holders such as tealight cups or votive holders.
This page classifies those container families and their broad tradeoffs. For the main guide, see candle making. For final selection, reused-jar screening, crack or overheat diagnosis, and detailed setup steps, use the linked deeper pages instead of treating this overview as the full workflow.
The container decides how your candle behaves: how hot the walls get, how fast the wax cools, and how the flame sits. A jar that looks perfect can still crack, sweat, or trap soot if the material, shape, and wick do not match. Most makers can narrow the choice quickly by comparing heat tolerance, diameter, breakage risk, and how the candle will actually be used. This guide explains the main container families, the tradeoffs that matter most, and where a deeper container page becomes the better next step.
| Container type | Best for | Main watch-out | Beginner fit | Travel / breakage |
| Glass (straight-sided tumbler) | The “classic” look, easy visual QC, and shelf-ready candles | Can crack from thermal shock, chips, or poor wick matching | Very good | Breakable; better for home use than travel |
| Metal tin (screw-lid or slip-lid) | A durable, travel-friendly candle | Metal conducts heat fast, so oversized wicks can make the sidewalls run hot | Very good | Lowest breakage risk; strongest travel option |
| Glazed ceramic | A premium, sculptural feel | Needs glaze, porosity, and crack checks before use | Moderate | Heavier and less travel-friendly |
| Sealed concrete | A modern, heavy vessel | Must be fully cured and sealed to avoid oil sweat and trapped odor | Moderate to low | Heavy and durable, but not the easiest format to move |
| Wood/bamboo with metal liner | A natural outer look | The liner does the heat work, so fit and movement matter more than the shell | Moderate | Outer shell can shift with humidity; liner fit matters in transit |
| Tealight cups / votive holders / enamel specialty vessels | Small event formats and niche decorative uses | Fit, airflow, and surface condition matter more than appearance | Moderate | Portable, but setup details control safety |
Repurposed or damaged containers need extra caution because original food or décor use does not prove candle heat tolerance, and chips, cracks, or failed coatings are enough reason to reject a vessel. If you want to reuse pantry jars or secondhand glass, read Using Recycled Jars for Candles: What You Need to Know before you pour.
How to Choose the Right Candle Container
The right candle container matches the wax, wick, inner diameter, and real use case before style becomes the tie-breaker.
On this page, the right container means a broad fit by material, inner diameter, and real use case rather than a final tested setup. Start with the material, the inner diameter, and whether the candle will live on a shelf, travel in a bag, or sit in event holders. For a deeper step-by-step decision path, see How to Choose the Best Candle Container, and for the most common head-to-head material decision, compare Glass vs Tin Containers for Candles: Pros and Cons.
Glass Candle Jars: Types, Heat Behavior, and Best Uses
Glass candle jars are best when they’re purpose-made, thick-walled, crack-free, and paired with a wick that keeps the melt pool stable without overheating the sidewalls.
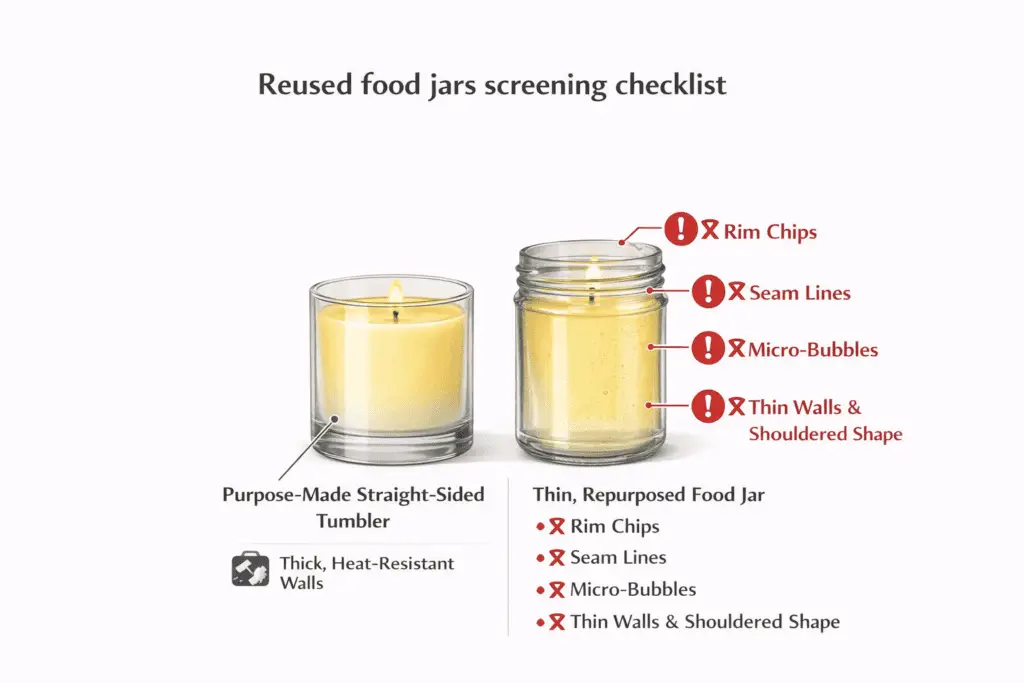
Glass is the “default” look for many home candles because it shows the wax color and looks clean on a shelf, but it also reveals problems fast: wet spots, soot tracks, and uneven melt pools. Thick walls and simple shapes usually tolerate temperature gradients better than thin, embossed, or sharply angled jars. Straight-sided tumblers are the easiest starting point because the diameter stays consistent from top to bottom.
A quick reality check helps: take a phone photo of two empty jars side by side—one thick, straight-sided tumbler and one thin repurposed food jar—then look for micro-bubbles, seams, and tiny chips along the rim that can turn into crack paths once heat cycles start. Straight-sided tumblers are easier to wick because the diameter stays consistent; “status” or shouldered jars can trap heat at the neck and show soot sooner if the wick runs hot. Heat-rated glass can reduce thermal shock risk, but it is not a free pass—shape, thickness, and wick choice still do most of the work.
Glass and tin behave differently under the same flame. Glass heats more slowly and usually feels calmer in steady home use, while tin sheds and transfers heat faster and can feel hot all over sooner when the wick is oversized. For deeper troubleshooting on hot sidewalls, cracks, and sudden failures, see Preventing Overheated or Shattered Candle Containers and How to Fix or Avoid Cracked Candle Containers.
Setup steps still matter for glass, but this page only needs the broad point: purpose-made, straight-sided jars test more predictably than thin or irregular jars, and deeper prep or troubleshooting belongs on the linked setup and failure pages rather than inside this overview.
Candle Tins: Aluminum vs Steel, Coatings, and Safe Sizing
Candle tins (aluminum or steel) are safest and most pleasant to use when the interior coating is intact, the diameter matches the wick’s heat output, and the lid style fits how you’ll store or travel with the candle.
To choose a candle container for portability, tins win on durability and weight, but they demand tighter wick control because metal conducts heat quickly. Aluminum tins tend to feel responsive because they warm up fast, while steel tins can feel steadier but may be more prone to rust if coatings are damaged or moisture gets trapped. Coatings and lacquers matter because they reduce corrosion and staining, and they are often the first part of the container to show that a setup is running too hot.
Quick test method so your notes mean something: use the same room, wick trim, burn length, and timing each time you compare tins. An IR thermometer can help, but even a consistent written log of sidewall heat, soot, lid residue, and seam changes will teach you more than random one-off checks. Treat every result as specific to that wax, wick, fragrance, and tin size rather than as a universal rating.
When you want the big-picture takeaway, use glass-vs-tin logic to guide expectations: tins often travel better and tolerate knocks, while glass tends to look cleaner and cool more slowly between burns. For aftercare and reuse, plan to clean containers after use by softening leftovers, wiping residue fully, and drying seams and lid edges so moisture doesn’t sit where rust starts.
Safe sizing and lid tips prevent the most common tin headaches.
- Don’t oversize the wick “to get more throw” in shallow tins; it’s a fast path to hot sidewalls and smoky rims.
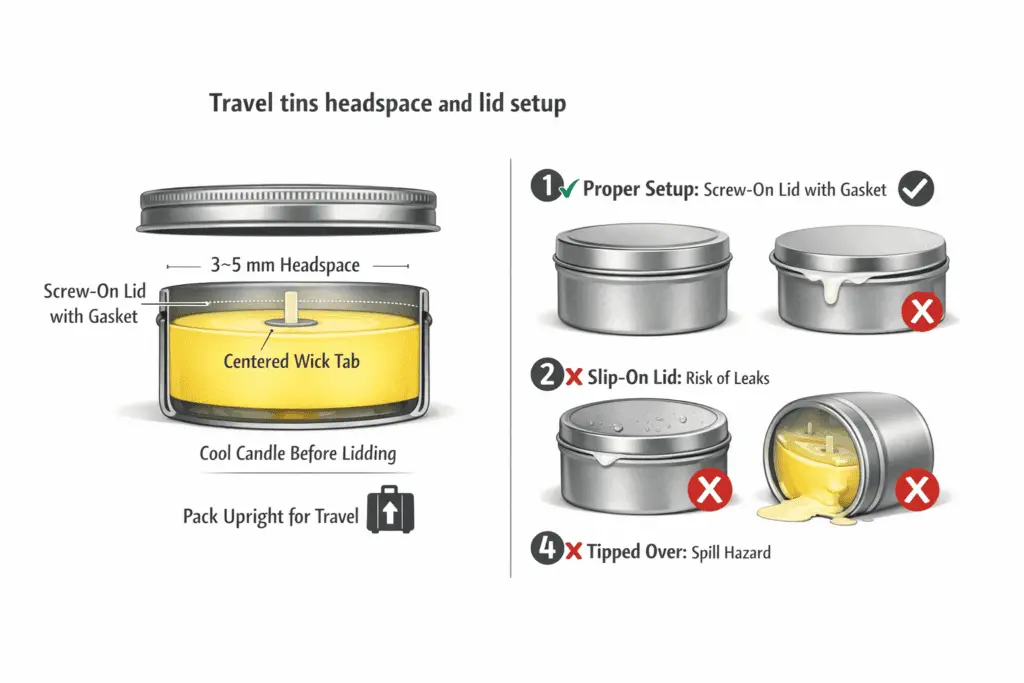
- Leave enough headspace so the lid doesn’t smear wax after cure—especially with softer blends in humid weather.
- Screw-lids usually resist bumps and leaks better than slip-lids, but they can also trap condensation if you cap too soon.
- If the tin discolors near seams or the coating looks dull, treat it as a warning sign to downshift wick heat and re-check the setup.
Ceramic Candle Containers: Glazes, Porosity, and Safety Tests
Ceramic candle containers are safest when they’re vitrified stoneware with an intact interior glaze, no hairline cracks, and enough wall thickness to handle repeated heat cycles without stressing the clay body.
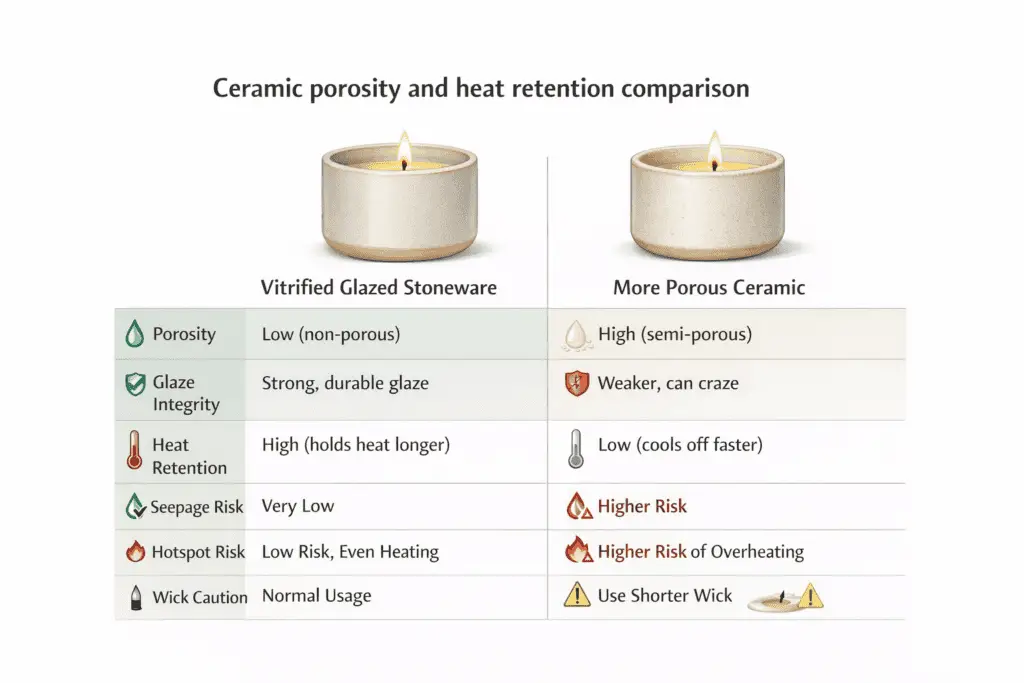
If you’re trying to choose a candle container in ceramic, prioritize purpose-made vessels over casual mugs, because micro-cracks and craze-prone glazes can turn heat soak into seepage, soot at the rim, or sudden cracking. Ceramic holds heat longer than thin glass, which can stabilize a melt pool, but it can also build hotspots if the wick runs too large or the vessel has hidden flaws. Ceramic is usually a better fit for a premium look than for the simplest beginner setup.
Keep ceramic screening conservative: inspect for cracks, glaze damage, or seepage before testing, then move detailed heat checks and discard decisions into a dedicated safety routine instead of treating this overview as the full protocol.
Ceramic typically stores more heat than many glass jars and can feel more forgiving once warmed up, but that same thermal mass makes inspections and conservative wicking more important. If you see warning signs, step down wick heat output, shorten early burn sessions during testing, and retire any vessel that shows new cracks or glaze flaking. When damage appears, move to a safer container instead of treating the mark as cosmetic.
If a ceramic vessel shows crazing, outside oil shadowing, new cracks, glaze flaking, or repeated rim soot, treat that as a sign to reduce heat or retire the vessel rather than diagnosing every failure path on this page.
Concrete Candle Containers: Safe Sealants, Cure Times, and Setup
Concrete candle containers work best when they’re fully cured, sealed with a candle-safe sealer, and cleared by a simple odor check before wax ever touches the vessel.
To pick your container type in concrete confidently, assume raw concrete will absorb oils and can trap odors—sealing is what prevents sweat rings, staining, and lingering smells. Concrete’s pores act like tiny capillaries; a proper multi-coat seal fills those pores so wax and fragrance oils stay where they belong, and the surface wipes clean after use. Concrete is a style-first choice that rewards patience more than speed.
Concrete needs dust-free prep, thin even sealing coats, full cure, and a clean odor check before pouring. Keep the detailed seal-and-cure steps separate from this overview so the section stays focused on where concrete fits as a container family.
Concrete often heat-soaks like a dense ceramic: it can feel steady once warmed, but it can also hold onto heat longer than you expect, especially in wide vessels. That is why it helps to choose a conservative wick size, keep wicks centered, and watch for hotspots or dark rings on early tests. Sealed concrete generally outperforms unsealed concrete for cleanliness and consistent scent behavior.
Wood & Bamboo Candle Jars: Liners, Warping, and Safe Setup
Wood and bamboo candle jars are safe only when they use a snug metal liner, a centered wick, and a fit that stays stable through normal humidity changes.
Use wood or bamboo as an outer shell, and treat the liner as the true heat-holding container: it should sit flat, tight, and wrinkle-free all the way around before you ever pour wax. Select the outer look only after the liner diameter matches a wick that can reach a full melt pool without making the liner rim run hot. This format is decorative first and technical second.
On this page, the liner is the candle container in functional terms, while the wood or bamboo shell affects fit, handling, and appearance.
Because bamboo and wood move with humidity, a liner that fits perfectly on delivery can loosen later in a damp room or pinch in a very dry one. The most reliable routine is to let the empty vessel sit uncovered in the same room you pour in for a day or two, then test-fit the liner again and mark a tiny alignment point so you can spot rotation or lift. Before pouring, press the wick tab onto the liner base and check it from above: if the liner base is slightly domed, the tab needs to match that curve so the wick does not lean as the wax sets.
When a lined wood or bamboo vessel fails, the problem is usually liner fit, liner movement, or a heat pattern that distorts one spot. Keep deeper liner troubleshooting separate; on this page, the main point is that lined wood or bamboo works only when the liner stays flat, centered, and stable.
If you like keeping tests tidy, build a one-page material comparison reference for your own notes: same diameter, same wax, same fragrance load, then compare lined wood or bamboo against glass or tins without changing anything else.
Specialty and Event Candle Containers: Enamel, Tealight Cups, and Votive Holders
Specialty and event candle containers are useful only when fit, clearance, and surface condition are checked as closely as the material itself.
These formats belong on the main container-types page because many makers use them for favors, small events, or decorative sets, but they are still secondary to glass, tins, ceramic, and concrete. Enamel vessels need a fully intact interior. Tealight cups and votive holders depend more on spacing, holder fit, and airflow than on appearance.
Enamel candle containers are only suitable when the enamel is fully intact inside; any chip, exposed metal, or seam defect near the burn zone should disqualify the vessel. Think of enamel as a hard glass-like coating over metal: it looks clean and reflective, but once it’s chipped, the exposed metal can rust, stain wax, and concentrate heat at the damaged edge.
A quick no-go defect log keeps enamel from becoming a style-first mistake.
- Chip on the interior floor or lower sidewall → reject the vessel.
- Exposed metal at a rim edge or seam → reject the vessel.
- Hairline crack through enamel near the seam → reject the vessel.
- Rough, pitted enamel inside → treat it as a high-risk surface and test very conservatively if you keep it.
Tealight cups are simplest when the cup has obvious clearance, stable placement, and enough airflow around the flame path. Aluminum is usually the easiest default for events because it resists heat better than thin plastic and handles bumps well, while glass sleeves work best when the cup is not wedged into a tight tube. Plastic cups belong in the “only if clearly heat-rated and well tested” category, not the default category.
Method for this kind of small-format testing: keep spacing, room conditions, and surface type the same across at least a few burns so you are comparing the holder setup rather than random changes in the room. Stop the test if a sleeve or holder becomes uncomfortably hot, if a plastic cup softens, or if wobble increases flame risk.
Votive holders burn best when the insert or wax body fits the holder without stress, the wick stays centered, and the walls do not trap too much soot near the rim. Inserts usually make cleanup easier because the wax cools as a removable unit, while free-pour votives can cling to the glass and leave more residue—especially in textured or thick-walled holders.
When the event is over, clean glass after use by softening wax gently, releasing inserts without prying against the rim, and drying the holders fully so haze and streaks do not set in.
Container Details That Change the Best Choice: Finish, Shape, Diameter, and Lids
Once you pick the material, finish, shape, diameter, and lid style decide how easy the container is to wick, store, reuse, and keep looking clean.
These details should not replace the material decision, but they do affect how forgiving the final setup feels in everyday use. A clear jar can show flaws sooner than a frosted one, a wide mouth may need more wick coverage than a straight-sided jar of similar volume, and a lid changes storage behavior even when the burn itself stays the same. Treat these as decision refinements, not separate container families.
Finish: Frosted vs Clear Glass
Frosted glass hides wet spots and softens brightness, while clear glass shows adhesion flaws more clearly but usually looks brighter at the same flame size.
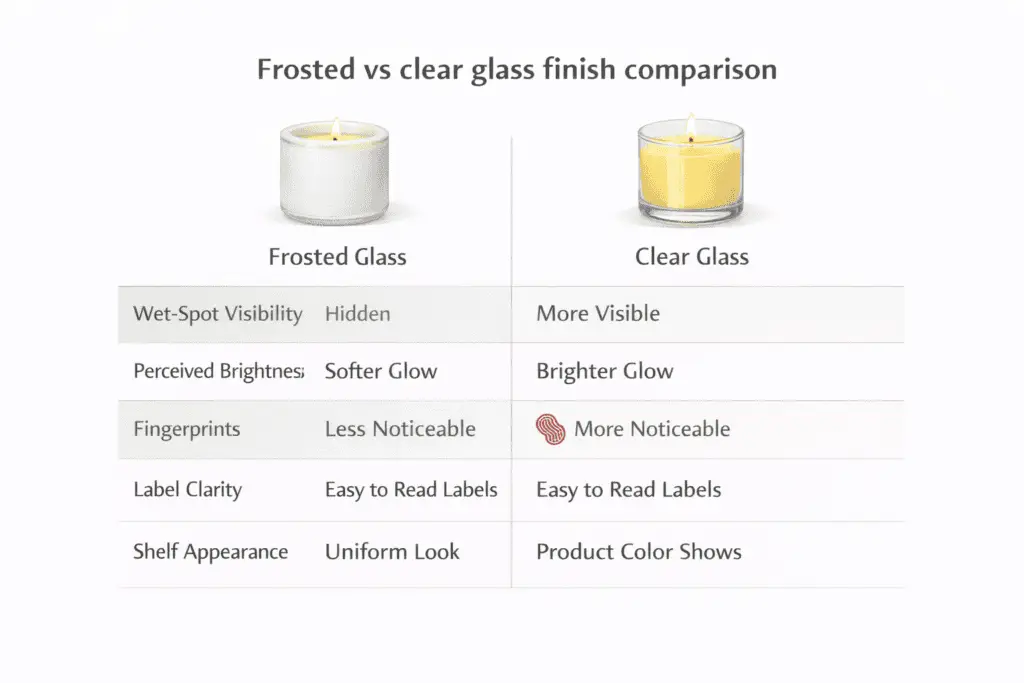
If you want a fast decision, compare finishes by use case: choose frosted when you want a forgiving look on shelves, and choose clear when you want maximum sparkle, easy inspection, and crisp label visibility. Frosting mostly changes what you see—light scatter, fingerprints, smudges—not the basic burn behavior when the wick is sized correctly. Clear jars make quality-control problems easier to spot, while frosted jars often look calmer in retail handling or humid seasons.
A simple cleaning workflow reduces most finish-specific annoyances: let the container cool fully, wash with warm water and a mild degreaser, rinse well, and dry with a microfiber cloth so the finish does not pick up haze. When labels leave ghosting, remove the adhesive first, then wash again so the remover does not leave an oily film.
Shape and Diameter: Wide-Mouth vs Straight-Sided Jars
Wide-mouth jars usually need more wick coverage than straight-sided jars of similar volume, because the flame has to cover a broader surface area without overheating the walls.
Think in geometry: wide mouths spread heat sideways and ask for an even melt across a big circle, while tall straight-sided jars channel heat upward and often look steadier with one properly sized wick. When a single wick is pushed too large in a wide jar, it often trades “fast melt” for soot, unstable flames, and hotter sidewalls. Straight-sided jars are easier to center and repeat across a product line.
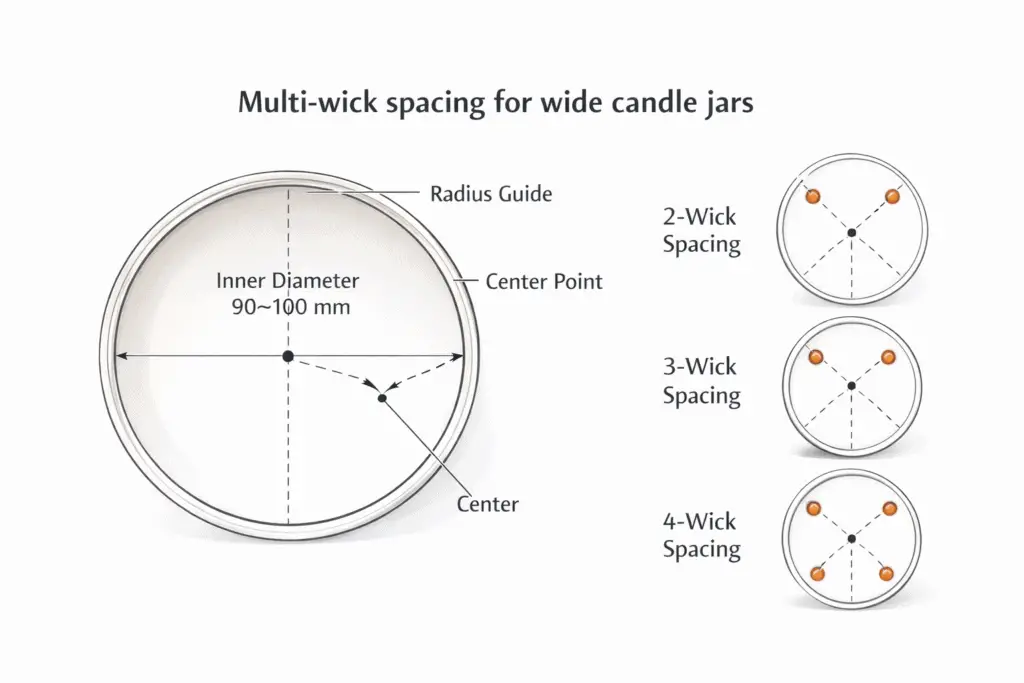
Center multi-wick layouts as evenly as possible and keep the spacing consistent from the middle to the inner wall so one side of the jar does not run hotter than the other. The goal is even surface coverage, not the largest possible flame.
Use the chart for your wick family to pick the starting size, then adjust only one variable at a time during testing. A wide jar around 100 mm across often behaves better with two smaller wicks than one oversized wick, because the melt pool evens out without forcing the flame to run too hot at the center. If the walls heat up more with each burn, move back toward a cooler setup instead of chasing a faster melt.
Lids, Storage, and Travel
Candles with lids stay cleaner in storage and travel better, but lids can trap moisture and pick up soot if you close them while the candle is still warm.
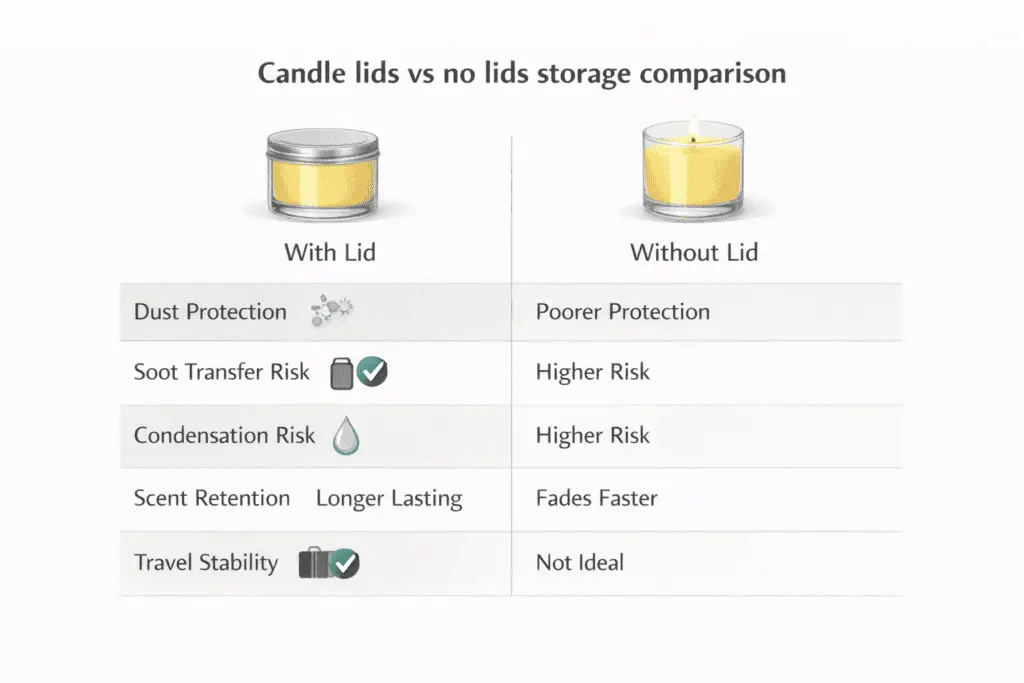
Lids help most when you are protecting the wax surface from dust, pet hair, and fingerprints, or when you are packing candles for shipping or gifting. Lidless storage keeps the top looking fresh right after a burn, but it also leaves the wax exposed and can let the surface pick up debris or lose scent faster in a drafty space. For tins, screw-lids usually beat slip-lids when bumps and movement are part of the plan.
Quick air-out-before-lidding steps prevent the most common lid problems.
- Let the candle cool completely after burning, because warm wax still releases vapors that can condense on cooler lids.
- Wipe any visible soot off the rim before closing, especially on wide-mouth jars.
- If you must pack soon, close the lid loosely at first, then tighten once everything is fully cool and dry.
For travel tins, spill resistance depends on a firm wick tab, enough headspace, and a lid that does not rub the wax surface in transit. Pack tins upright and snug so they cannot hammer the lid loose inside the box, and add a top protector when the lid sits close to the wax. After a trip, wipe the rim and lid underside fully and dry seams before storage.
These quick answers stay at overview level and point you to deeper pages when a question turns into a full choosing or safety decision.
FAQ: Common Questions About Candle Containers
What is the best candle container for beginners?
Straight-sided glass jars and standard candle tins are usually the best starting point for beginners. Both formats are easy to source, easy to compare across tests, and simple to pair with wick charts when the diameter is consistent.
What is the safest candle container material?
No single material is safest in every setup. Purpose-made glass, intact coated tins, sound glazed ceramic, and fully cured sealed concrete can all work well when the vessel is undamaged and the wick matches the diameter and heat behavior.
What are the most popular candle containers?
Straight-sided glass jars remain the most common home-candle format, followed by tins and glazed ceramic vessels. Those formats stay popular because they balance appearance, availability, and predictable testing better than most specialty containers.
Are recycled jars safe for making candles?
Some recycled jars can work, but repurposed glass is a higher-risk choice because original food or décor use does not prove candle heat tolerance. Read Using Recycled Jars for Candles: What You Need to Know before you rely on pantry jars or thrifted glass.
Which candle containers travel best?
Metal tins usually travel best because they resist knocks, weigh less than glass, and store well with lids. They still need conservative wick sizing, enough headspace, and a fully cooled wax surface before the lid goes on.