

Most finished candles should burn for 1 to 4 hours per session, but the label limit and warning signs always override melt-pool or scent goals.
A candle burn session means one continuous period from lighting a finished candle until putting it out. A finished candle means a consumer-ready candle that is already safe to light, not a newly made candle that still needs curing or testing.
In this article, safe means one-session fire-use safety for a finished consumer candle. It does not mean ingredient safety, air-quality safety, wax toxicity, fragrance safety, or candle-making compliance.
This article answers how long one candle session should last. It does not cover total candle lifespan, candle curing time, or maker-side burn testing.
The goal is simple: burn long enough to form an even top melt pool, but stop before heat, flame, soot, smoke, or label limits become the main issue. <!– META-DESCRIPTION: Learn how long to burn a candle each time, including first-burn timing, melt-pool cues, safe session limits, short-burn risks, scent performance, and when to relight. –>
How Long Should You Burn a Candle Each Time?
Most finished candles should burn long enough to form an even melt pool, then stop before the label limit or warning signs.
A good candle burn session usually falls between 1 and 4 hours. The exact time depends on the candle’s width, wax surface, container, wick behavior, and manufacturer instructions.
The safest rule is label-first: follow the candle’s stated maximum burn time, then stop sooner if heat, flame, soot, smoke, or wick problems appear. The National Candle Association treats 4 hours as a general upper session cap when no stricter label applies, not as permission to ignore warning signs.
| Burn-session situation | Practical timing cue | Stop condition |
|---|---|---|
| Normal jar-candle session | Usually 1–4 hours | Label cap, hot jar, large flame, soot, or smoke |
| First burn | Until the top wax reaches the edge or near the edge | Do not exceed the safe session limit |
| Later burn | Long enough to refresh an even melt pool | Stop before heat or flame problems appear |
| Very short session | 30–60 minutes may be too short for many jars | Repeated short burns can leave side wax |
| Maximum safe session | Often no more than 4 hours unless the label says otherwise | Put it out sooner if warning signs appear |
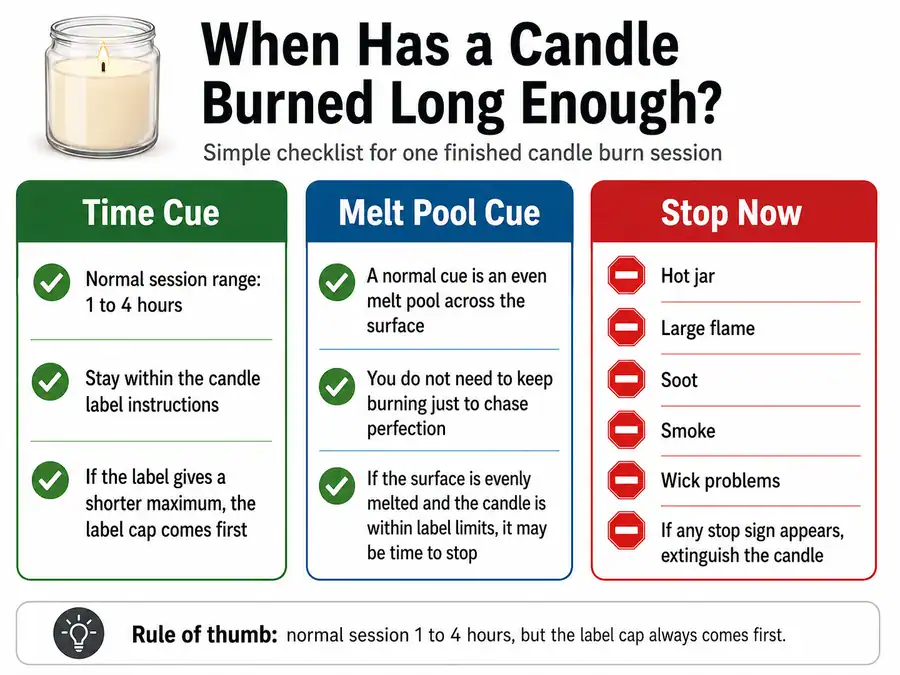
Correct session length creates three outcomes: an even melt pool, safer use, and better candle performance. If those outcomes conflict, safety wins.
A full melt pool is useful, but it is not a reason to keep burning a hot container, a smoking candle, or a candle that has reached its label limit.
How these ranges were set: This table combines common candle-care label guidance, melt-pool behavior, and visible stop signs. It covers per-session burn duration only, not total candle lifespan, curing time, or product burn testing.
How Long Should the First Candle Burn Last?
The first candle burn should last until the top wax reaches the edge or near the edge, without passing the safe session limit.
The first burn means the first consumer-use burn after the candle is ready to light. It does not mean curing time for a newly made candle, and it does not mean a maker’s test burn.
For a container candle, the first burn matters because it helps set the early melt boundary. If the first session ends too soon, later burns may keep melting inside that smaller circle and leave wax on the sides.
| Candle width | First-burn planning cue | What you want to see | Safety override |
|---|---|---|---|
| Small jar or tin | Often closer to 1–2 hours | Wax spreads close to the edge | Stop at label limit or warning signs |
| Medium jar | Often closer to 2–3 hours | Even liquid wax across most of the top | Stop if the jar gets too hot |
| Large jar | Often closer to 3–4 hours | Edge-to-edge or near-edge melt pool | Do not push past the safe cap |
| Very wide container | May need more time than a narrow jar | Broad, even melt without flame stress | Do not extend the session indefinitely |
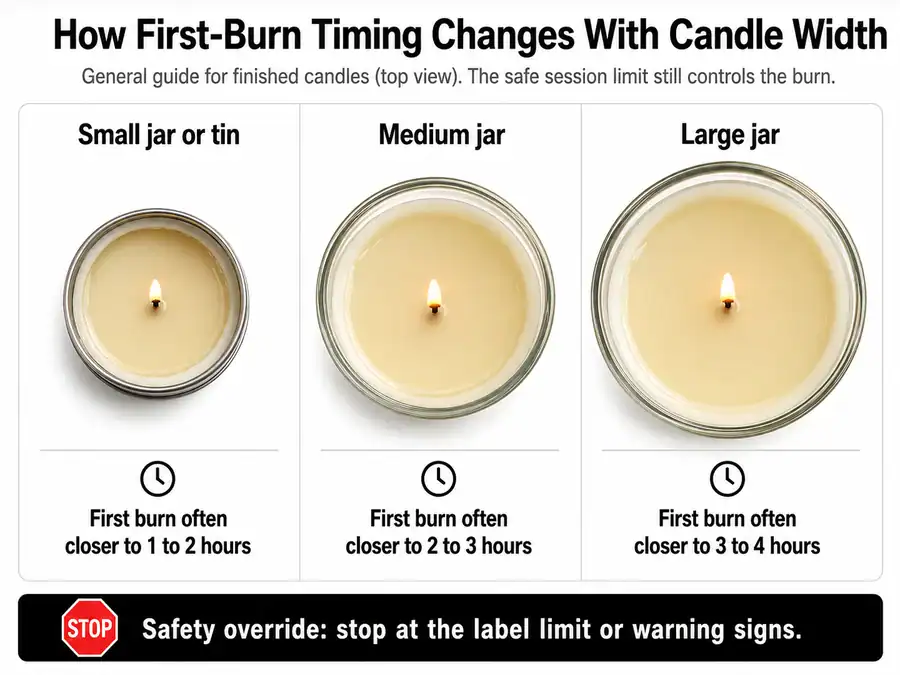
A common planning cue is about 1 hour of burn time per inch of candle diameter on the first burn. Use that as a planning rule, not as permission to ignore the label.
If the melt pool has not reached the edge by the safe limit, do not keep burning just to force it. Put the candle out, let it cool, and treat repeated edge-melt failure as a separate candle-performance issue.
How these benchmarks were set: The ranges are practical planning cues based on candle diameter and melt-pool behavior. Label limits and visible safety signs override the table.
What Should the Melt Pool Look Like Before You Put the Candle Out?
The melt pool should reach or nearly reach the container edge while the candle stays within safe burn-time limits.
A melt pool is the liquid wax area on the top of the candle during a burn session. A full melt pool means the top wax surface reaches or nearly reaches the container edge. It does not mean the entire candle should melt.
| Melt-pool sign | What it means | What to do |
|---|---|---|
| Liquid wax reaches the container edge | The session likely ran long enough | Put it out if the session goal is met |
| A thin unmelted rim remains | The candle may need slightly longer next time | Continue only if still within the safe limit |
| A thick wax wall remains | The session was probably too short for that candle | Avoid repeating short burns |
| Jar is very hot, flame is large, or soot appears | Safety risk is now the main issue | Put the candle out |
| Wax pool looks very deep or unstable | The candle may be over-burning | End the session and let it cool |
Use the melt pool as a timing cue, not a safety override. A candle that reaches the edge after 2 hours does not need to keep burning until 4 hours.
A candle that fails to reach the edge within the safe limit may have a wick, wax, or container mismatch, but that belongs outside normal session-duration guidance.
Why Candle Size Changes the First-Burn Timing
Candle size changes burn time because a wider top wax surface takes longer to melt evenly toward the edge.
Diameter means the width across the top wax surface or container opening. A “large candle” here means a wider melt surface, not stronger scent, better quality, or longer total candle life.
| Candle top diameter | First-burn planning cue | What to watch |
|---|---|---|
| About 2 inches | About 2 hours | Wax should spread close to the edge |
| About 3 inches | About 3 hours | Melt pool should widen evenly |
| About 4 inches | About 4 hours | Stop at label cap or warning signs |
| Wider than 4 inches | Do not extend by default | Safety cap overrides edge-melt goals |
The 1-hour-per-inch cue works best as a planning guide for the first burn. It does not replace the manufacturer’s maximum burn time.
If a wide candle cannot form an edge-to-edge melt pool before the safe cap, stop the session anyway. The safer choice is to end the burn and reassess the candle after cooling.
How Long Is Too Long to Burn a Candle?
A candle has burned too long when it passes the label limit or shows heat, flame, soot, smoke, or wick problems.
The maximum safe burn limit is the longest one-session burn time allowed by the candle label. When the label gives a shorter limit, that shorter limit controls the session.
This timing range assumes supervised use on a stable, heat-safe surface away from drafts, vents, curtains, papers, and other flammable materials.
| Safety order | What it means | Action |
|---|---|---|
| 1. Label cap | The maker gives a maximum session time | Put the candle out at that limit |
| 2. Visible warning signs | Heat, soot, smoke, large flame, or wick mushrooming appears | Put it out even if time remains |
| 3. General upper limit | No stricter label is available | Do not treat longer burning as better |
| 4. Cool-down period | Wax and container need time to settle | Relight only after the candle cools |
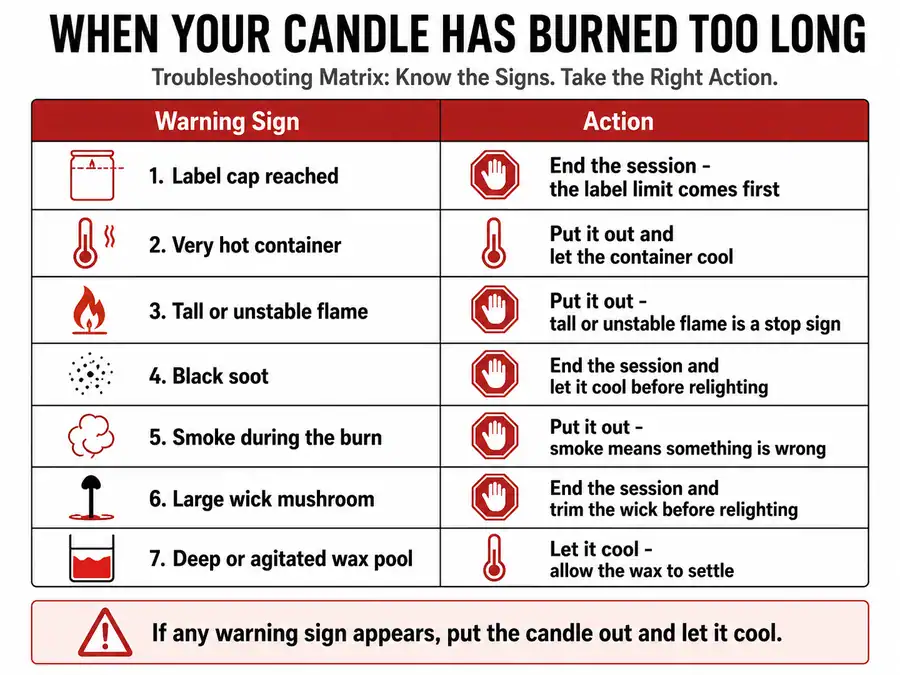
Long burns can create wick carbon buildup, taller flames, extra soot, and excess container heat. These are signs that the session has moved past useful candle performance.
Do not keep a candle burning only for stronger scent or a wider melt pool. Once the candle reaches its safety boundary, the session should end.
Signs You Have Burned a Candle Too Long
Signs of over-burning include a hot container, large flame, soot, smoke, wick mushrooming, and an unstable wax pool.
Over-burning means the candle has moved beyond useful session time into heat, wick, flame, or soot problems. At that point, the right action is to put it out and let it cool.
| Sign | Likely issue | What to do |
|---|---|---|
| Container feels very hot | Heat has become the main risk | Put the candle out |
| Flame is tall or unstable | Wick or airflow may be affecting the burn | End the session |
| Black soot appears | Combustion quality has dropped | Put it out |
| Smoke appears during the burn | Flame or wick behavior is poor | End the session |
| Wick has a large carbon “mushroom” | Wick buildup is affecting the flame | Cool before any later reset |
| Wax pool looks very deep or agitated | Heat is building too much | Stop the burn session |
Do not move a candle while the wax is liquid. Let the wax and container cool before touching, trimming, moving, or relighting the candle.
Over-burning is a stop signal, not a reason to troubleshoot every wick issue inside the same session.
Why Short Burns Cause Wax Memory and Tunneling
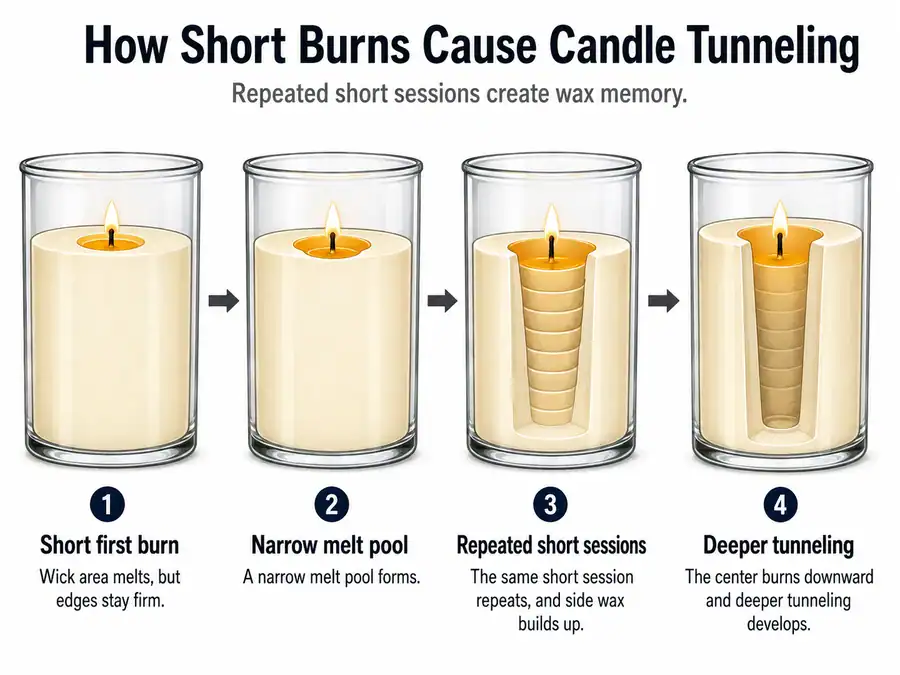
Short burns cause tunneling when wax melts only around the wick and leaves a firm outer ring.
Wax memory is the candle’s tendency to keep melting within the boundary created by earlier burn sessions. Tunneling is the narrow downward burn path that leaves unused wax around the sides.
The first burn carries the highest risk because it sets the early melt pattern. If the first session ends before the top wax reaches near the edge, later sessions may follow that smaller melt path.
| Short-burn pattern | What happens to the wax | Likely result |
|---|---|---|
| Wick area melts but edges stay firm | Melt pool stays too narrow | Early memory ring |
| Same short session repeats | Flame follows the smaller melt path | Deeper tunneling |
| Side wax keeps building | Heat cannot reach the outer wax evenly | Wasted wax and weaker performance |
| User burns longer later | Candle may still follow the old boundary | Uneven recovery |
Preventing tunneling means giving the candle enough time to form a broad melt pool before the pattern becomes established. It does not mean repairing a candle that already has a deep tunnel.
Once tunneling is severe, the issue becomes a correction problem rather than a normal burn-duration question.
What Happens If You Burn a Candle for Only 30 Minutes?
A 30-minute candle burn is often too short for many jar candles because the melt pool may not reach the edge.
One short burn does not always ruin a candle. The risk depends on candle size, wax surface, wick behavior, and whether the same short session keeps happening.
| 30-minute situation | Risk level | What to do next |
|---|---|---|
| Small candle, wax reaches near the edge | Low | Put it out if the session goal is met |
| Medium or large jar, edges stay solid | Medium to high | Plan a longer safe session next time |
| First burn ends at 30 minutes | High for many containers | Avoid repeating the pattern |
| Flame, soot, or heat signs appear before 30 minutes | Safety issue | Put it out immediately |
In user reports, the common worry is that a candle is “ruined” after one short burn. Usually, the bigger problem is a repeated habit: blowing it out before the melt pool widens every time.
For first burns, use the melt pool as the cue rather than the clock alone. If 30 minutes does not melt the top wax close to the edge, the session likely ended too early for that candle size.
How Long Should Later Candle Burns Last?
Later candle burns should last long enough to refresh an even melt pool, then stop at the label limit or warning signs.
A repeat burn is any candle session after the first use. Later burns do not need to reset the candle from scratch, but they still need enough time for the top wax to open evenly.
| Later-burn cue | Meaning | Best action |
|---|---|---|
| Melt pool reaches near the edge | Session has likely run long enough | Put it out when ready |
| Edges stay firm every time | Sessions may be too short | Use a longer safe session next time |
| Flame grows tall or unstable | Burn has shifted into risk | Put it out |
| Container becomes very hot | Heat is the main concern | End the session |
| Wax is liquid and candle needs moving | Movement is unsafe | Wait until wax cools |
The main difference is that the first burn sets the early melt boundary, while later burns maintain it. Repeat sessions should protect the established melt pattern without pushing the candle past its safe session limit.
Do not move the candle while the wax is liquid, and do not relight it while the jar still feels hot.
Does Burning Longer Make a Candle Smell Stronger?
Burning longer can help scent spread after the melt pool forms, but fragrance does not keep increasing without limit.
Scent throw is how well a candle’s fragrance moves through a room while it burns. A short burn may smell weak because only a small wax area has warmed and melted.
Once the wax surface has opened and the room has reached its scent level, extra burning may add more heat than fragrance. In user discussions, this often appears as: “Why can I smell it at first, then it seems to stop getting stronger?” The usual answer is that scent performance can plateau during a normal session.
| Burn time pattern | Scent result | Better decision |
|---|---|---|
| Too short | Weak scent because little wax melts | Burn longer next time, within the safe limit |
| Long enough for an even melt pool | Best useful scent window | Keep or end the session based on need |
| Past the useful scent window | Room may stop smelling stronger | Put it out before heat signs appear |
| Past the label limit | Safety risk outweighs scent goal | End the session |
Do not use scent strength as a reason to exceed the candle’s burn limit. A candle that still smells weak after a normal melt pool may have a room-size, wax, wick, or fragrance issue, but that is separate from safe session length.
Burn-Time Differences by Jar Candles, Pillars, Tealights, Tapers, and Votives
Different candle types need different session lengths because their shape, container, wax surface, and burn pattern are different.
Here, candle type means a finished consumer candle format. This article focuses mainly on finished container candles and scented candles, but a quick type comparison helps prevent one timing rule from being applied too broadly.
| Candle type | Session-duration cue | Why it differs |
|---|---|---|
| Jar candle | Often needs enough time for a broad top melt pool | Container width affects melt-pool timing |
| Pillar candle | Needs controlled sessions that avoid side-wall collapse | Shape and outer wall matter |
| Tealight | Suits shorter planned sessions | Small wax volume and short use case |
| Taper | Usually burns by height, not a container melt pool | Edge-to-edge melt pool is not the main cue |
| Votive | Often needs a holder and shorter controlled sessions | Small format changes heat behavior |
| Large multi-wick candle | May melt faster than a single-wick candle of similar width | More flames change heat distribution |
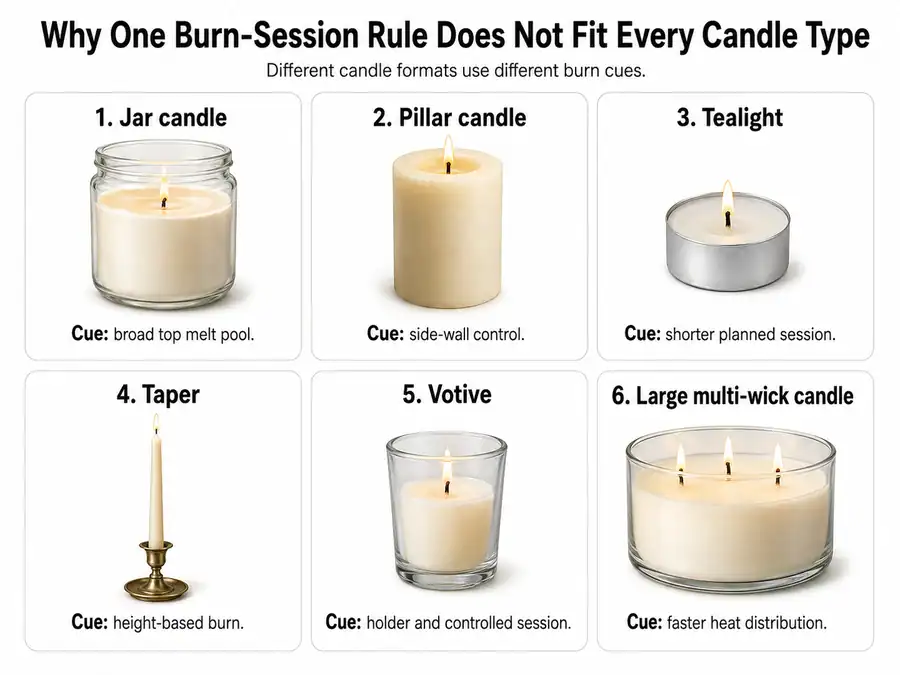
Do not use jar-candle melt-pool advice as a universal rule for every candle shape. A taper, tealight, or votive has a different structure and should be judged by its own safe-use behavior.
Full candle-type selection is a separate topic; for this article, candle type matters only because it changes session timing.
When Should You Put Out and Relight a Candle?
Put out a candle when it reaches the label limit, forms the needed melt pool, or shows warning signs.
A relighting interval is the cool-down period between one finished burn session and the next. Relighting starts a new session; it is not a way to extend one continuous burn indefinitely.
Let the candle cool completely before relighting. When no stricter label instruction is available, use at least 2 hours as the cool-down fallback before starting a new session.
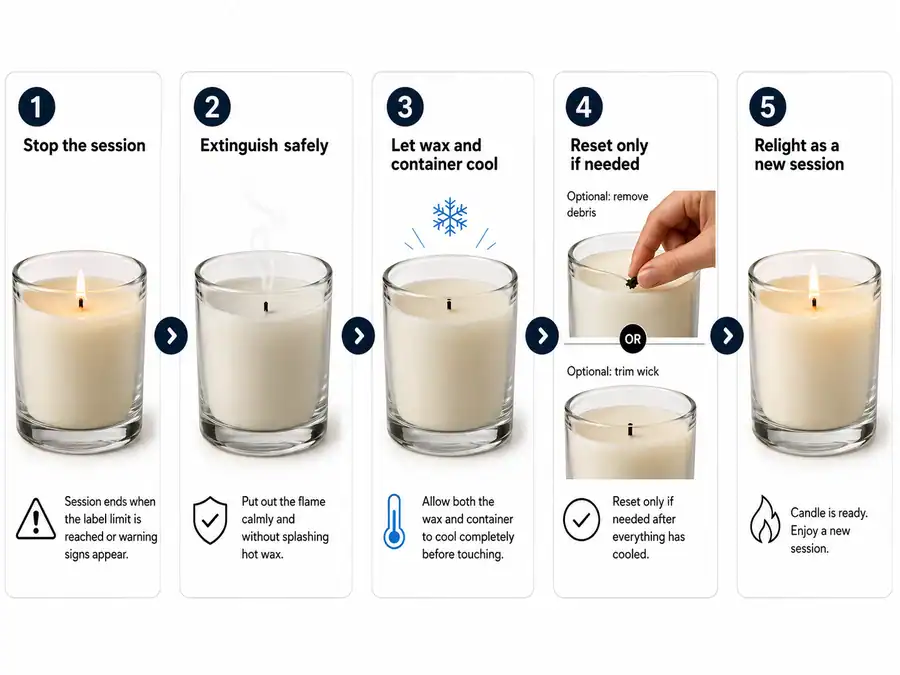
Use this stop-cool-reset-relight sequence:
- Stop the session when the melt pool is even, the label limit is reached, scent has leveled off, or warning signs appear.
- Extinguish the flame safely without splashing hot wax.
- Let the wax and container cool before touching, moving, trimming, or relighting.
- Reset only if needed by removing loose debris or trimming an overly long wick after the candle is cool.
- Relight as a new session only when the candle is stable and ready to burn again.
| Put the candle out when… | Why it matters |
|---|---|
| The melt pool reaches or nearly reaches the edge | The session has likely met its performance goal |
| The label’s burn-time limit is reached | The maker’s limit controls the session |
| The container feels too hot | Heat has become the main risk |
| The flame grows large or unstable | Wick behavior is no longer controlled |
| Soot or smoke appears during the burn | Combustion quality has dropped |
| The room already smells as strong as needed | Extra burn time may add risk without much scent gain |
Keep wick care brief inside this decision. If wick length, soot, or mushrooming keeps returning, that is a separate wick-care issue rather than a reason to keep the same session going.
The safest relight is a cooled, stable candle starting a fresh session.
Session Duration Is Not the Same as Total Candle Lifespan
Session duration means how long one candle burn should last before you put it out. Total candle lifespan means how many hours the candle can burn before the wax is used up.
Those are different questions. A candle might last many total hours across its life, but each individual session still needs its own safe limit. Do not use total burn time to decide how long to leave a candle burning in one sitting.
Curing Time Is Not the Same as First-Burn Duration
Curing time is the rest period before a newly made scented candle is ready to burn. First-burn duration is the length of the first consumer-use session after the candle is already ready to light.
This article covers finished candles during normal use. It does not set wax-specific curing ranges, fragrance-load rules, or candle-making test periods.