
A wick size chart is a starter matrix that matches a candle container’s inside diameter and wax family to wick series and sizes for burn testing.
Choose a starting wick by pairing your jar’s inside diameter with your wax type, then confirm it with a short burn test before you scale up.
On this page, the “right” wick means the wick that passes repeatable burn tests in your exact jar, wax, fragrance load, dye level, and room conditions. It does not mean an ASTM certification, legal compliance finding, universal safest wick, or product-kit recommendation.
A wick that is too small tunnels and wastes wax, while a wick that is too large can soot and overheat the jar. The most reliable starting point is the jar’s inner diameter and your wax family, not the label size or the outer rim. A simple chart plus a consistent test routine turns that starting guess into a repeatable setup. The payoff is a cleaner burn, steadier scent throw, and fewer failed test candles.
How to Measure Your Candle Jar Diameter Correctly
Measure your jar’s inner diameter across the center at the wax surface, not the outer lip or the widest point of the rim.
Use centimeters and inches on your first note (for example, 7.2 cm / 2.83 in) so your chart row and test log stay consistent. For the broader wick-sizing sequence, a wick sizing guide helps you keep diameter, wax, and testing in the right order.
A quick way to avoid “mystery” tunneling or soot is to treat diameter as a measurement problem, not a guess. ASTM F2417 and the National Candle Association both push makers toward controlled, repeatable testing conditions, and that starts with a repeatable diameter number.
Here is the simple rule: the measurement you want is inner wall to inner wall, straight across the center, where the melted wax will sit.
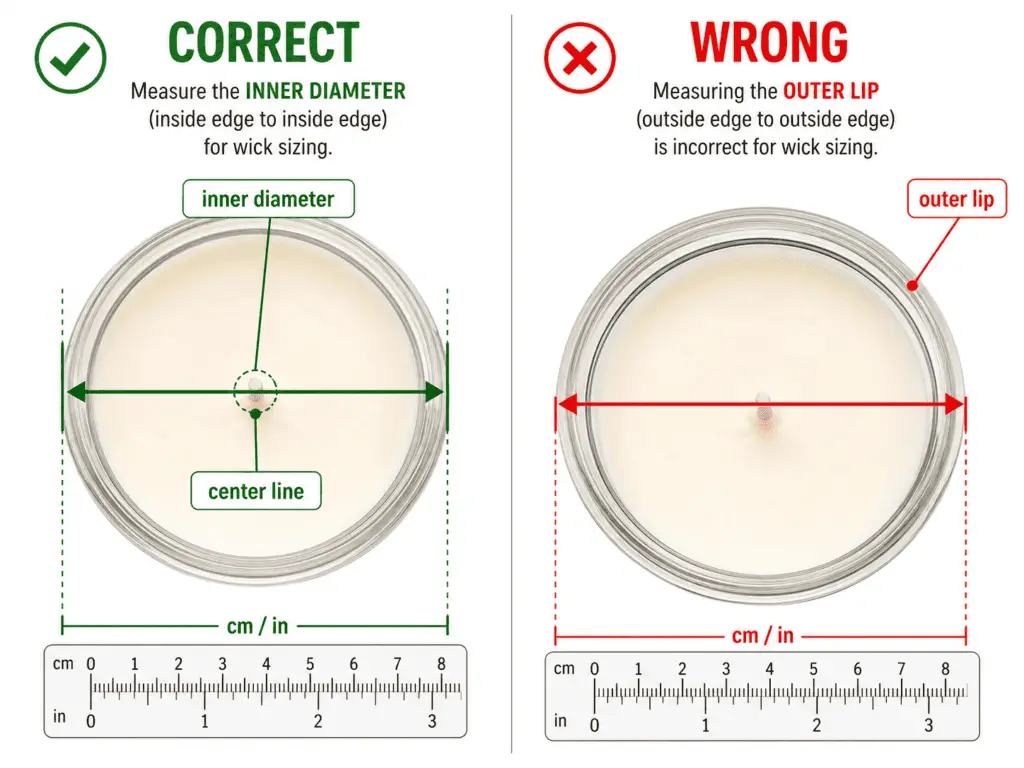
Quick top-down check (correct vs wrong).
This comparison shows what the diameter number should represent when you choose a wick.
- Correct: Measure inside edge to inside edge across the center line.
- Wrong: Measure outside lip to outside lip, or use the product listing’s “overall width.”
Worked example (cm + inches).
A jar measures 7.2 cm (2.83 in) inside the rim. Round it to the nearest 0.5 cm (or nearest 0.25 in): 7.0 cm (2.75 in). That is the number you will plug into a wick size chart by jar diameter and wax type after you identify your candle wax type.
How to measure different container shapes.
This list shows how to get a usable “inner diameter” even when the opening is not a perfect circle.
- Straight-sided round jars: Place the ruler or calipers inside the rim and measure edge-to-edge through the center.
- Tapered or curved jars: Measure the inner width at the intended wax surface (the widest usable melt-pool level), not at the very top lip.
- Square or rectangular jars: Measure the inner width and inner length, then use the average as an “effective diameter” starting point for charts (and confirm with a burn test).
- Irregular openings: Measure the widest usable span of the wax surface and record it as your effective diameter, then plan to test more than one wick size.
Step-by-step measurement routine.
These steps keep your measurements consistent across jars and re-tests.
- Place the jar on a flat surface and look straight down into the opening.
- Measure the inner opening across the true center line (inside wall to inside wall).
- Repeat the measurement once more at a slightly different angle and keep the larger of the two if the jar is not perfectly round.
- Round to the nearest 0.5 cm (0.25 in) and write it down exactly the same way every time (example: “7.0 cm / 2.75 in”).
Wick Size Chart & Calculator by Jar Diameter and Wax Type
Use your jar’s inner diameter and wax family to choose 1–3 wick sizes to test as a starting point.
A good chart or tool gives you a wick series and size code in the format you can actually buy, then you verify it with burn testing.
Start with the wick size calculator, when you want a fast, single answer from your inputs. Use the wick size chart, when you want to scan nearby sizes and understand patterns across diameters. Treat every output as starting wick recommendations until a burn test confirms melt pool, flame behavior, and container comfort under real conditions.
Source boundary: this chart is a conservative starter matrix compiled from common supplier-style wick guidance. Always compare the final candidate against the wick supplier’s own chart for the exact series, wax, and vessel before scaling production.
Wick size chart (starter matrix you can actually use)
A wick size chart by jar diameter and wax type matches your inner jar width and wax family to a starting wick series and size to test.
Use the row that matches your inner diameter, pick the wax column that best matches your wax family, then test the “middle” option plus one size down and one size up in the same series.
| Inner jar diameter (in / cm) | Soy / soy-blend (starting test set) | Paraffin / paraffin-blend (starting test set) | Coconut blends (starting test set) |
| 2.0–2.25 in / 5.1–5.7 cm | ECO 4–6 or CD 4–6 | LX 12–14 or CD 4–6 | LX 12–14 or ECO 4–6 |
| 2.25–2.5 in / 5.7–6.4 cm | ECO 6–8 or CD 6–8 | LX 14–16 or CD 6–8 | LX 14–16 or ECO 6–8 |
| 2.5–2.75 in / 6.4–7.0 cm | ECO 8–10 or CD 8–10 | LX 16–18 or CD 8–10 | LX 16–18 or ECO 8–10 |
| 2.75–3.0 in / 7.0–7.6 cm | ECO 10–12 or CD 10–12 | LX 18–20 or CD 10–12 | LX 18–20 or ECO 10–12 |
| 3.0–3.25 in / 7.6–8.3 cm | ECO 12–14 or CD 12–14 | LX 20–22 or CD 12–14 | LX 20–22 or ECO 12–14 |
| 3.25–3.5 in / 8.3–8.9 cm | ECO 14–16 or CD 14–16 | LX 22–24 or CD 14–16 | LX 22–24 or ECO 14–16 |
| 3.5–3.75 in / 8.9–9.5 cm | Consider 2 wicks before oversizing 1 wick | Consider 2 wicks before oversizing 1 wick | Consider 2 wicks before oversizing 1 wick |
| 3.75–4.0 in / 9.5–10.2 cm | 2 wicks are often easier to tune than 1 very large wick | 2 wicks are often easier to tune than 1 very large wick | 2 wicks are often easier to tune than 1 very large wick |
What Wick Numbers Mean in a Wick Size Chart
Wick numbers compare sizes inside the same wick series, not across all wick families. For example, a larger ECO number is larger than a smaller ECO number, but an ECO number should not be treated as equal to an LX or CD number with the same value.
Methods note (why this chart looks like this).
These bands are compiled as a conservative “starter matrix” from common supplier wick guides (including the way major suppliers describe ECO/CD/LX behavior and the fact that wick numbers scale within a series), and they’re meant to produce a test set, not a final production spec. Use Step-by-Step Burn Test to Validate Your Wick Size as the deciding step, because fragrance load, dye depth, container shape, and room conditions can push you up or down.
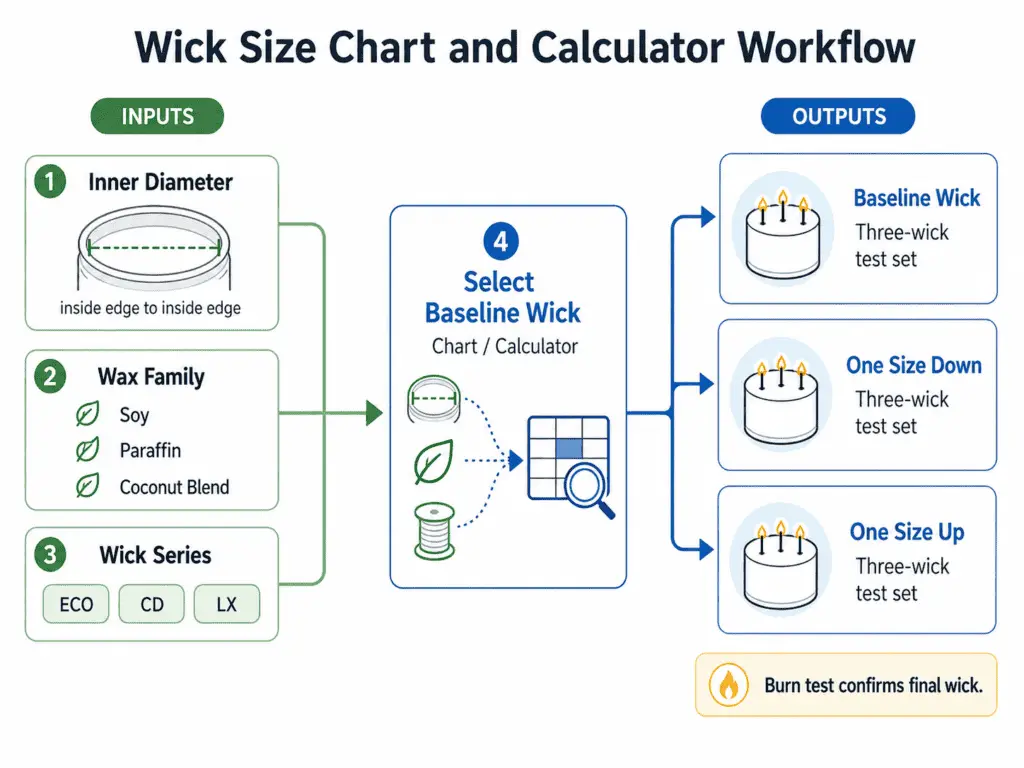
“Calculator” workflow (a fast way to pick the exact three wicks to test)
The calculator workflow converts inner diameter, wax family, and one wick series into a three-wick test set: baseline, one size down, and one size up.
- Measure inner diameter (and round it consistently).
- Choose your wax family (soy/soy-blend, paraffin/paraffin-blend, coconut blend).
- Pick one wick series you can consistently source (ECO, CD, or LX are common starting points).
- From the chart row, select a three-wick test set: one “middle” size, plus one size down and one size up in the same series.
- Burn test the three candidates under the same conditions, then keep the best performer and re-test if you change formula variables.
How to interpret the output codes.
Most recommendations appear as a series plus a size, such as “CD 10” or “ECO 8.” The series matters because different wick families tend to behave differently in different waxes, so changing series is not the same as changing size by one step.
Calculator vs chart (when each wins).
This comparison helps you pick the faster method for the situation you are in.
- Calculator: You enter diameter and wax family, and you get a short list of candidate wicks immediately.
- Chart: You find your diameter band and wax row, and you can see “one size up” and “one size down” at a glance.
How to Choose Single vs Multi-Wick for Your Jar
Choose single or multi-wick by jar width: narrow jars use one wick, while wide jars above set thresholds usually burn best with two or more wicks. A practical starting point is to plan one wick for small containers up to about 7.5 cm (3 in) inside diameter, then consider 2–3 wicks as jars move into wider sizes where one flame struggles to fill the melt pool evenly. Use wick sizing guide rules as planning tools, then verify the final setup with real burn tests because total heat output rises fast in multi-wick jars.
The quick bands below are starting guidelines for container candles, not strict rules.
| Inner jar diameter | Typical wick count to test first |
| 5–7.5 cm (2–3 in) | 1 wick |
| 7.5–10 cm (3–4 in) | 2 wicks (often worth testing) |
| 10–12.5 cm (4–5 in) | 2–3 wicks |
| 12.5–15 cm (5–6 in) | 3–4 wicks |
| Wide bowls / dough bowls | 3–5 wicks (layout-dependent) |
A multi-wick plan works best when you treat each flame as “responsible” for a share of the surface area, not the full container. The clean planning move is to compute effective diameter per wick as: inner diameter ÷ number of wicks, then pick each wick as if it were burning a smaller jar.
Here is what that looks like in practice:
- A 10 cm (4 in) jar with 2 wicks → 10 ÷ 2 = 5 cm (2 in) per wick as your starting lookup.
- A 15 cm (6 in) bowl with 3 wicks → 15 ÷ 3 = 5 cm (2 in) per wick, then you tune spacing and safety during testing.
Methods note: The bands above reflect common supplier multi-wick rules-of-thumb, plus conservative safety framing from sources like the National Candle Association and ASTM F2417; treat them as planning ranges until your burn test confirms melt pool and container temperatures.
If you want to translate those per-wick diameters into specific series and sizes, run each effective diameter through Wick Size Chart & Calculator by Jar Diameter and Wax Type and test one size up and one size down for your wax and fragrance load. Multi-wick candles can look premium and throw stronger scent, but the same “more heat” advantage is why Step-by-Step Burn Test to Validate Your Wick Size matters even more for wide jars.
When wick count is settled, container material and shape become the next variable that can push you up or down a size.
Why Container Material and Shape Change Your Wick Size
Container material and shape affect how hot your candle burns, so they can change the wick size you end up using. Start with the chart result for diameter and wax, then treat the container as a heat-management system: thin metal can shed and concentrate heat differently than thick glass, and a shallow bowl spreads heat across a larger surface than a tall, narrow jar. A simple way to stay consistent is to begin with Wick Size Chart & Calculator by Jar Diameter and Wax Type, then adjust only one step at a time after burn-test evidence shows the jar runs unusually hot or cool.
The comparison grid below gives a practical “bias direction” for first-round testing, not a promise of outcomes.
| Container variable | Tends to do this | Typical first adjustment direction |
| Thin metal tin | Heats quickly; can run “lively” | Consider wicking down if signs of overheating appear |
| Thick glass jar | Buffers heat more steadily | Often no change; tune by burn-test results |
| Heavy ceramic vessel | Can hold heat and keep a hotter core | Consider wicking down if wall temps climb fast |
| Straight-sided jar | Predictable melt pool geometry | Often no change from chart baseline |
| Tapered jar (narrower base) | Can trap heat near the bottom late-burn | Watch late-burn behavior; adjust cautiously |
| Wide, shallow bowl | Spreads melt pool; often needs multi-wick | Consider more wicks before “bigger single wick” |
Two containers with the same inside diameter can behave differently because shape changes airflow and how the melt pool “feeds” the flame. A tall, narrow vessel can encourage deeper melt pools and a hotter core, while a wide bowl asks for more even surface coverage to avoid cold spots at the edges. That is why it is safer to change one variable at a time: keep wax and fragrance constant, keep your wick series constant, and let the burn test tell you whether the container is the reason the chart result needs a tweak.
How Room Conditions Can Mislead Your Wick Tests
Room drafts, vents, fans, and temperature swings can make the same wick look too hot, too weak, or uneven, so check room conditions before changing wick size.
If one test candle suddenly soots, tunnels, or runs hotter than your last round, check the room before you change wick sizes.
Use this quick checklist to keep your comparisons clean:
- Test away from vents and windows, and avoid strong fans.
- Try to keep room temperature “similar enough” between burns (big swings add noise).
- If one burn looks like an outlier, repeat the same wick once under stable conditions before you jump sizes.
Once the container’s heat behavior is understood, fragrance load and additives are the next drivers that can shift wick needs in either direction.
How Fragrance Load, Dye and Additives Change Your Wick Size
Heavier fragrance, darker dye, and some additives can make a candle burn cooler or dirtier, so you often test one wick size up from your chart baseline.
Start by writing your FO (fragrance oil) as a percent (%) of wax weight; when you push scent or color harder—like 8% FO in soy in a 3-inch (7.6 cm) jar—plan to test the next wick size up and confirm with burn testing.
Fragrance load is the percentage of fragrance oil relative to wax weight in your formula. Dark dye load is the amount of pigment that turns a tint into an opaque or very deep color. Additives include UV inhibitors, hardeners, or vybar that change how wax melts and feeds the flame.
These inputs change how hard the wick has to work. Higher FO can make the melt pool feel “heavier” and can increase soot risk when the flame cannot burn the extra fuel cleanly. Dark dye and some additives can clog the wick and slow melt pool growth. The result can look like weak hot throw, tunneling, mushrooming, or soot—depending on which direction the burn shifts.
The table below shows simple starting rules you can test against your baseline wick.
| FO % and formulation level | Color depth | Additives present | Starting adjustment from baseline wick |
| Unscented or lightly scented | No color or very light tint | No | Keep baseline; consider one size down only if the jar runs very hot in tests |
| Within your supplier’s recommended FO level | Light tint | No | Keep baseline; watch soot and melt pool speed |
| Near your supplier’s maximum FO level | Light tint | No | Test one wick size up; compare soot vs melt pool coverage |
| Within your supplier’s recommended FO level | Dark/opaque color | Yes or no | Test one wick size up; watch for mushrooming and dirty burn |
| Near your supplier’s maximum FO level | Dark/opaque color | Yes | Test one wick size up first, then decide up/down from burn-test evidence |
Here is a concrete way to apply it: you pour soy at 8% FO with a dark dye in a 3-inch (7.6 cm) straight-sided jar. You start with the chart’s baseline wick, and you add the next size up as your primary test candidate. You then compare both candles side by side under the same burn test schedule, so you can see whether the larger wick fixes tunneling without creating soot.
Method note: These rules use two inputs you can verify: your supplier’s max fragrance guidance (often listed in product notes or in an SDS (Safety Data Sheet) or TDS) and what your own burn test logs show for soot, flame behavior, and melt pool coverage. Change one variable at a time, and move only one wick size per iteration. A single “wick jump” gives you a clean comparison, while big jumps hide the real cause.
If you want more detail on why fragrance limits and additives behave differently across waxes, use Fragrance Oils & Formulation Basics to ground your plan before you pour. When you adjust from baseline, record the exact FO %, dye depth, and additives under Our “House Rules” for Adjusting Wick Size from the Chart so you can repeat the result. If your symptoms still look like a narrow melt pool and leftover wax walls, How to Diagnose and Fix Tunneling (Underwicked Candles) will help you choose the next correction.
Step-by-Step Burn Test to Validate Your Wick Size
A proper burn test uses repeatable burns and recorded measurements to prove a wick performs within practical safety guardrails in your exact jar, wax, and formula: no repeated soot, aggressive flame, runaway heat, or uncomfortable container temperature under controlled test conditions.
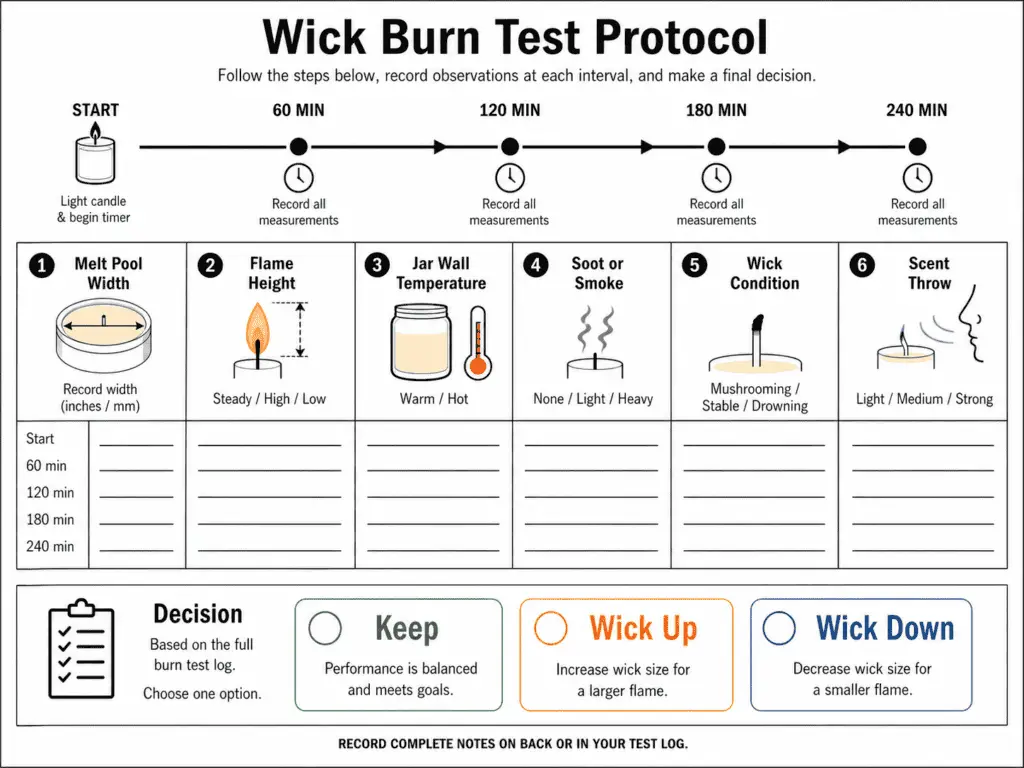
Run burns in consistent blocks, and record observations every 60 minutes (1 hour), including melt pool width, flame height, and jar wall temperature in °C (°F) when you can measure it.
A burn test is structured “lab work” for candle making. You control the room, you trim the wick the same way each time, and you measure the same things on the same schedule. That is how you confirm whether the wick you chose is truly right, not just “seems okay today.”
Before you start, set up a repeatable test environment and measurement plan.
- ASTM F2417 is a standard reference used to frame candle burn testing and safety evaluation.
- NCA (National Candle Association) publishes safety guidance for candle use, including burn behavior and risk awareness.
The checklist below shows what a solid burn test measures and how to capture it.
| What you measure | How you measure it | What you write down |
| Melt pool width | Visual check with a ruler | Approximate width and whether it reaches the sides |
| Flame height | Visual check against a simple reference | Steady vs flickering, and whether it looks unusually tall |
| Jar wall temperature | Touch check or infrared thermometer | Warm vs too hot to touch, and the reading if measured |
| Soot or smoke | Visual check on jar and nearby surface | Any black residue, smoke, or strong carbon smell |
| Wick condition | Visual check of the wick tip | Small curl vs large mushrooming and carbon buildup |
| Scent throw | Smell check at a consistent distance | Weak, moderate, or strong hot throw for that burn |
Follow this numbered procedure to keep tests comparable.
- Pour at least two test candles for the same jar and wax, and keep everything identical except the wick size or series you are testing.
- Let the candle cure as you normally do, and write the cure time in days on the label or log.
- Trim the wick to the same height before lighting, and place the candle on a stable, heat-safe surface away from drafts.
- Light the candle and start a timer, then check and record results every 60 minutes (1 hour) for the first few burns.
- Stop each burn at the same planned session length, and keep that session length consistent across all test candles.
- Decide what to do next using evidence: you keep the wick when you see stable flame, clean burn, and full melt pool progression; you wick up or wick down when the log shows repeated under- or over-performance.
Use your log like a decision tool, not a diary. A “keep” wick shows steady melt pool growth without dirty smoke or unsafe heat. An underwicked result shows a narrow melt pool and leftover walls even with reasonable burn sessions. An overwicked result shows soot, aggressive flame behavior, and fast heat build-up.
For a wider safety reference, Candle Testing & QA helps you treat testing as a repeatable system instead of a one-off experiment.
Compliance boundary: this burn test routine is a practical maker validation process. It does not replace ASTM testing, legal labeling requirements, or supplier-specific safety documentation. In this section, “safe” means no repeated soot, aggressive flame, runaway heat, or uncomfortable container temperature under controlled test conditions.
Safety Guidelines and Temperature Limits for Wick Sizing
Use basic, conservative safety rules as your pass/fail guardrails, and stop a test when the candle behaves aggressively.
Even when a candle “looks fine,” testing should assume that prolonged burns, drafts, and late-burn conditions can increase heat and soot.
Use this simple safety envelope as a practical decision aid (not a legal or regulatory checklist):
- Keep burn sessions conservative; many safety guides use 4 hours as an upper limit for a single continuous burn.
- If the container becomes uncomfortably hot to handle, if the flame becomes unusually tall or erratic, or if soot appears repeatedly, stop the burn and treat the candle as overwicked until proven otherwise.
- Never “push through” a bad burn hoping it will self-correct—wick behavior rarely improves late in the burn when the candle is deeper and hotter.
Our Wick Testing Log Template (Free Copy & How to Use It)
A good log makes wick testing faster because it turns each burn into comparable data instead of memory.
The goal is consistency: write the same fields every time so you can compare one wick change against a stable baseline.
Here’s a simple template layout you can copy into a notebook or spreadsheet:
| Jar ID | Inner diameter (in/cm) | Wax family | FO % | Dye level | Wick series/size | Burn # | Burn duration | Melt pool notes | Flame notes | Soot/smoke | Jar heat notes |
| JAR-01 | 2.75 in / 7.0 cm | Soy blend | 8% | Dark | CD 12 | 1 | 2 hours | Expanding, not fully to edge yet | Steady | None | Warm, comfortable |
To keep your results trustworthy:
- Only change one variable per test round (wick size or wick series, not both).
- Note room conditions briefly (draft/no draft, general room feel), because environment can skew results.
- Record a clear “keep / wick up / wick down” decision after each round so you don’t re-test the same mistakes.
How to Diagnose and Fix Tunneling (Underwicked Candles)
To fix a tunneling candle, confirm you burned long enough, then move up one or two wick sizes or series from your chart recommendation and retest.
Use this section only as a wick-size direction check: confirm burn time, recheck inner diameter, wax family, and wick series, then test one size up in the same series if tunneling repeats. If a larger test wick creates repeated soot, smoke, aggressive flame behavior, or fast jar heat build-up, treat the candle as overwicked and step back down one size in the same series before changing any other variable. For full repair options and non-wick causes, use Candle Troubleshooting: Tunneling, Soot & More.
Wooden Wick Sizing vs Cotton Wick Sizing
Wooden wicks use the same starting inputs—vessel size, wax family, fragrance load, and burn-test results—but they are not sized like cotton wick series. Use this chart only to understand the heat band, then use a Wooden Wicks Guide or supplier-specific wooden wick chart for width, ply, booster, and brand-specific sizing.
Wick Sizing for Palm, Gel and Other Specialty Waxes
For palm, gel, and unusual blends, use the closest wax-family column only as a conservative starting point, then follow supplier-specific wick guidance and smaller test jumps. These waxes should route to Specialty Candle Waxes because their melt behavior, fuel behavior, and safety checks vary more than standard soy/paraffin container waxes.
Our “House Rules” for Adjusting Wick Size from the Chart
Adjust from the chart by changing only one variable at a time and moving one wick size per test until your burn logs show a stable, safe candle.
Use Wick Size Chart & Calculator by Jar Diameter and Wax Type to pick a baseline, then prove the final choice with Step-by-Step Burn Test to Validate Your Wick Size so the result is repeatable, not luck.
Think of the chart as your starting lane, not your finish line. Your real “winner” is the wick that produces consistent melt pool behavior without soot, overheating, or erratic flames across multiple burns. If you ever feel stuck, zoom back out to your wick sizing guide fundamentals: diameter, wax family, formulation load, and controlled testing.
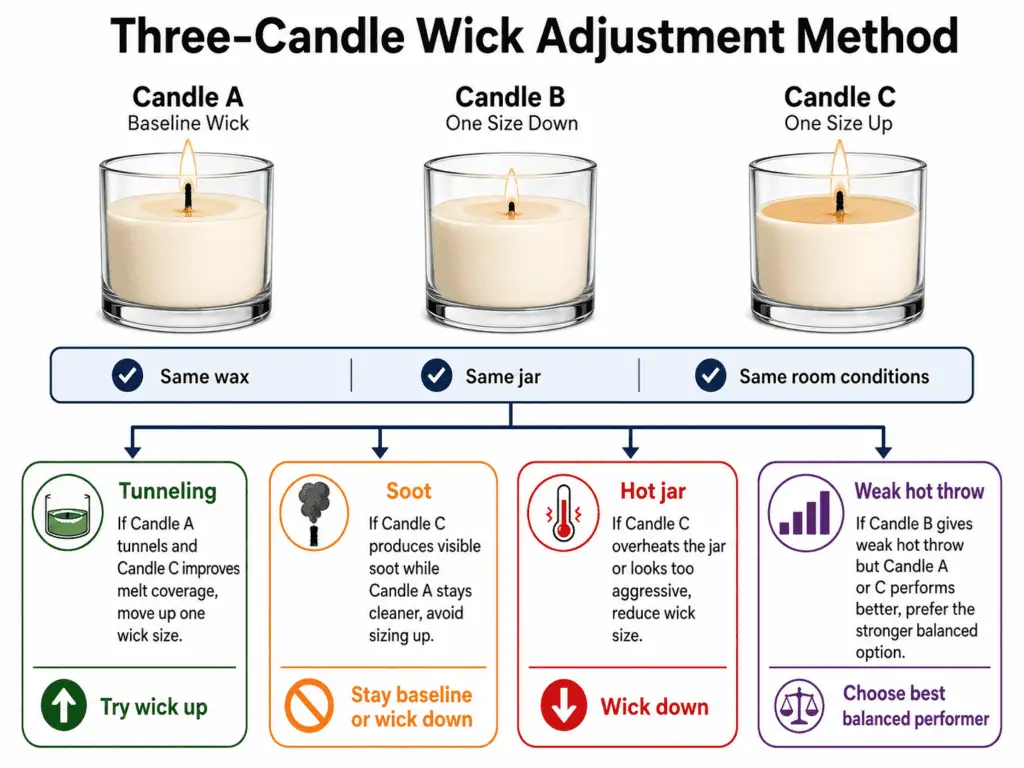
The three-candle adjustment method
The three-candle adjustment method compares the chart baseline against one size down and one size up under the same burn-test conditions.
- Candle A: baseline wick from the chart/tool
- Candle B: one size down (same series)
- Candle C: one size up (same series)
Burn them on the same schedule, in the same room conditions, with the same wick trim routine. This turns “maybe” into an obvious comparison.
If/then rules you can apply immediately
Use symptoms to choose direction, then confirm with the same test cadence.
- If the candle tunnels or leaves thick side walls after reasonable sessions → wick up one size and retest.
- If the flame is too tall, sooty, smoky, or the jar gets uncomfortably hot → wick down one size and retest.
- If the melt pool reaches the sides but hot throw is weak → don’t automatically wick up; check cure time, fragrance quality/load, and airflow first.
- If the candle is close-but-not-clean (minor soot or minor hang-up) → change only one step: either one size change or a wick series change, not both.
- If you change FO%, dye depth, additives, jar shape, or wax supplier → treat it as a new test cycle, because “same diameter” does not guarantee “same burn.”
What not to do (because it wrecks your data)
These mistakes make wick-test results unreliable because they change the data before the wick has been isolated.
- Don’t jump multiple wick sizes at once unless you’re correcting an extreme failure.
- Don’t compare two tests with different burn schedules or different trims and assume the wick caused the difference.
- Don’t interpret one perfect burn as “done”; a wick can look great early and fail late.
The “final answer” definition
A wick is “right” when your logs show stable performance across multiple burns and your candle stays within your safety expectations over time. When you reach that point, lock it in: keep the same series, record the exact code, and reuse the same test routine whenever you scale or reformulate.
How to Choose Wick Sample Kits and Test Packs (Based on Your Jar & Wax)
Choose a wick sample kit only when it contains your baseline wick plus one size down and one size up in the same series.
A wick sample kit is useful as an inventory shortcut, not as a substitute for the chart or burn test. For product comparisons, use a separate wick sample kit guide so this page stays focused on wick-size selection and validation.