Diagnose the Damage by Timing and Location
Molded candle damage is easiest to diagnose when you record when the crack, break, or warp appeared and where it started. Timing separates cooling stress, release-force damage, and after-release weakness. Location shows the stress path or weak point that failed during unmolding.| When the damage appears | What you may see | Likely cause cluster | First fix to try |
|---|---|---|---|
| Before release | A crack is visible while the candle is still in the mold. | Uneven cooling, shrinkage stress, brittle wax, or internal tension. | Let the next batch cool more steadily and review wax firmness before changing release technique. |
| During release | A snap, split, rim crack, or broken detail appears as you pull or flex the mold. | Mold grip, release force, thin geometry, seam friction, or stuck wax. | Stop pulling harder; change the release direction, mold prep, or wax balance. |
| Immediately after release | The candle leans, flattens, bends, or loses the intended shape. | Early unmolding, soft wax, poor support, or uneven cooling. | Wait for better structural readiness and support the candle as it comes out. |
| Unknown timing | Damage is found after cleanup or later handling. | The main cause is harder to prove. | Log the next batch by timing, location, mold type, wax, pour temperature, and release resistance. |
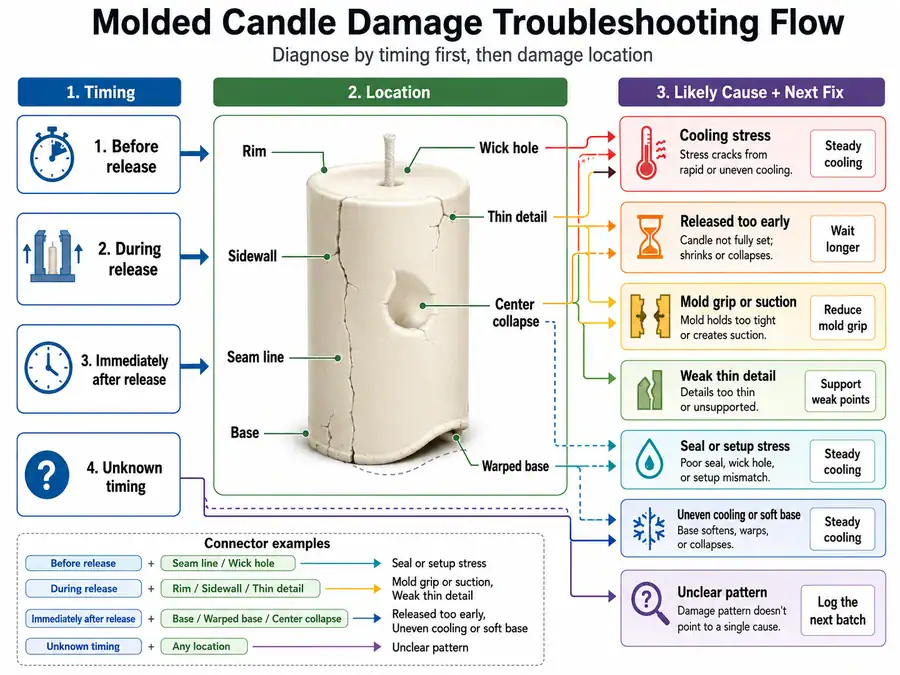
| Damage location | Likely cause | Confirmation clue | Next prevention step |
|---|---|---|---|
| Rim or top edge | Mold grip, rigid release, cooling tension, or brittle wax. | The edge chips or cracks before the body moves. | Loosen the edge gently before full release and check wax brittleness. |
| Sidewall | Shrinkage stress, mold friction, or cooling shock. | A vertical or curved crack follows the mold wall. | Stabilize cooling and improve mold-surface prep. |
| Base | Pulling force, uneven support, wick-hole weakness, or brittle wax. | The split starts where pressure is applied or where the base is thinnest. | Support the base and avoid forcing the candle out from one point. |
| Seam line | Friction, snagging, uneven mold closure, or wax locked into the seam. | The crack follows the seam rather than a random path. | Clean the seam area and check for residue or roughness before pouring. |
| Wick hole | The wax structure is interrupted around the opening. | The crack begins at the wick opening or runs outward from it. | Treat it as a structural weak point, not a full wick-sizing issue. |
| Thin detail, tip, or narrow neck | Fragile geometry, early release, brittle wax, or wrong release direction. | Only the small feature breaks while the main candle releases. | Support the detail and release in the direction that reduces bending. |
| Center collapse or middle break | Hidden void, soft wax, or unsupported internal gap. | The outside looked acceptable, but the body gives way under pressure. | Check pour technique and log whether the break exposed a hollow area. |
| Warped base or leaning body | Soft wax, uneven cooling, or poor support after release. | The candle comes out whole but cannot hold the intended shape. | Wait longer before release and support the candle on a level surface. |
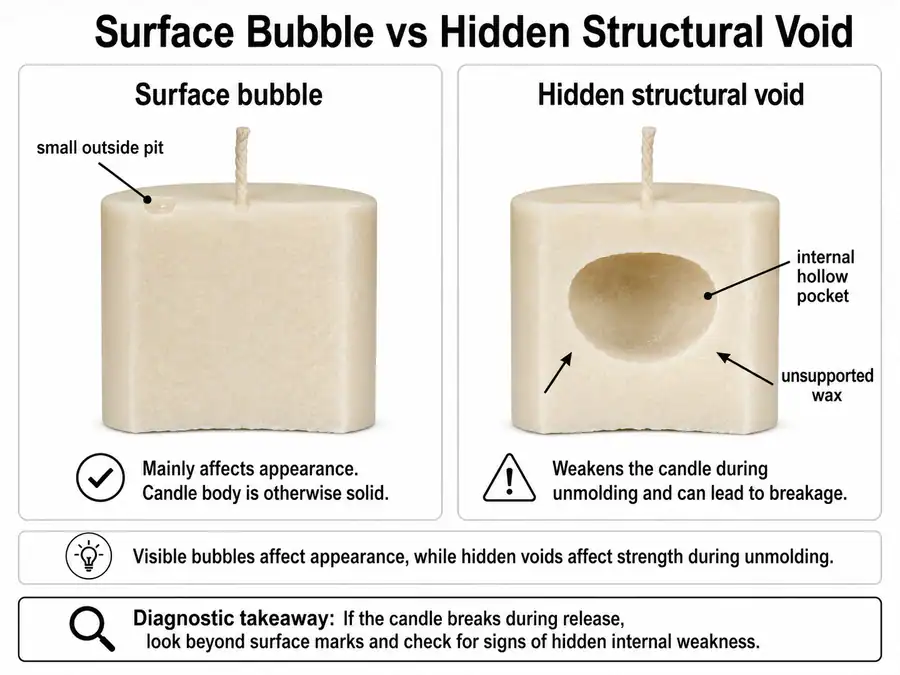
Check for Hidden Voids and Unsupported Wax Areas
Hidden voids belong in this diagnosis only when they leave the molded candle unsupported enough to break during release. A void is a hidden structural gap inside the wax body. It is not every surface bubble, pinhole, or cosmetic mark.| Surface bubble | Hidden structural void |
|---|---|
| Mostly affects appearance. | Affects strength during release. |
| Usually visible on the outside. | May stay hidden until the candle breaks. |
| Often appears as a small pit or mark. | May expose a hollow pocket after a snap or collapse. |
| Belongs in air-bubble troubleshooting when structure is sound. | Belongs here when the candle breaks, caves in, or fractures during unmolding. |
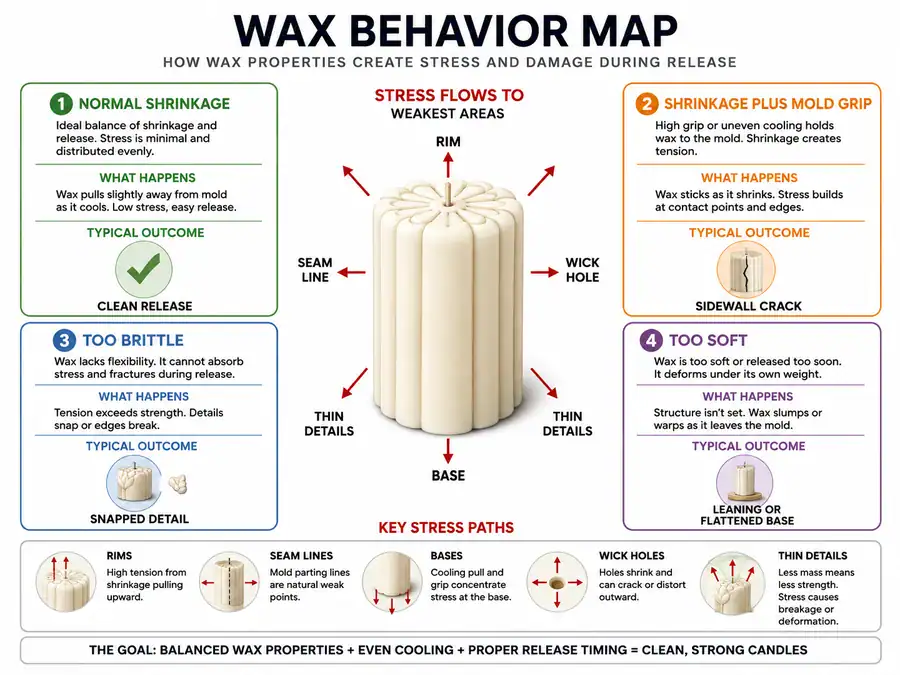
Control Wax Shrinkage, Brittleness, and Softness
Molded candles can crack, snap, or warp when wax shrinkage, brittleness, or softness creates more stress than the candle can handle during release. Wax shrinkage is the contraction that happens while melted wax cools and sets inside a mold. Shrinkage itself is normal, but it becomes damaging when the candle grips the mold, contracts unevenly, or releases only after pressure builds at one weak point.| Wax behavior | What happens during unmolding | Common symptom | Likely direction for the next test |
|---|---|---|---|
| Normal shrinkage | The wax contracts enough to release cleanly or with light loosening. | The candle comes out whole and keeps its shape. | Keep the same wax, cooling setup, and release timing. |
| Shrinkage plus mold grip | The wax contracts but still clings to the wall or seam. | Sidewall crack, rim chip, or split during pulling. | Improve mold prep and loosen the candle before applying release force. |
| Uneven shrinkage | One part of the candle contracts faster or harder than another. | Curved sidewall crack, base stress, or one-sided distortion. | Stabilize cooling and avoid sudden temperature changes. |
| Too brittle | Wax is firm but snap-prone. | Clean crack, broken rim, snapped detail, or base split. | Check wax type, additive load, cooling shock, and release force. |
| Too soft | Wax cannot support its own shape yet. | Warped body, leaning candle, flattened base, or stretched detail. | Wait longer, support the mold, or review wax firmness. |
| Sticky-soft | Wax resists release without a clean snap. | Dragged surface, torn sidewall, or stuck detail. | Check fragrance load, release aid, mold cleanliness, and unmold timing. |
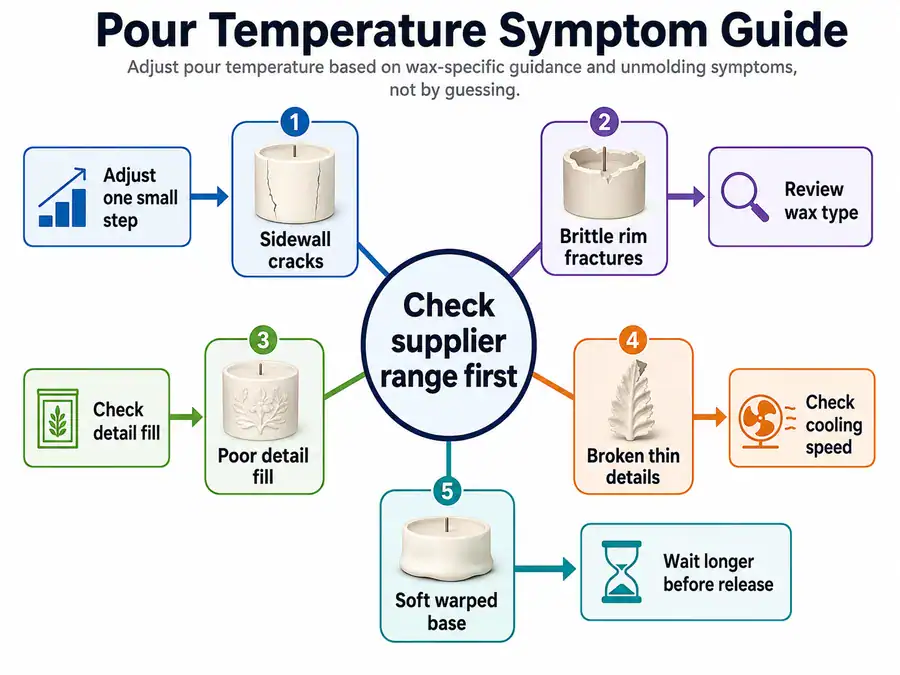
Adjust Pour Temperature Without Guessing
Pour temperature can cause molded candle cracks, breaks, or warping when it sits outside the workable range for that wax, blend, mold, and additive load. “Too hot” and “too cool” are not universal numbers. They must be judged against the wax manufacturer’s guidance, the mold shape, the formula, and the defect you see during unmolding. Pour temperature affects how wax fills the mold, holds detail, contracts, and handles release pressure. A pour that is too hot for the setup may worsen shrinkage stress or soft warping. A pour that is too cool may drag, set unevenly, miss fine detail, or create weak joints that break under pressure.| Symptom after unmolding | Possible temperature issue | Confirmation clue | Next adjustment |
|---|---|---|---|
| Sidewall cracks | Pour may be creating uneven contraction for this mold and wax. | Crack follows the mold wall or appears as release pressure starts. | Compare with the wax supplier’s range, then adjust in one small step. |
| Brittle rim or edge fractures | Wax may be setting too hard or unevenly for the release force. | Edge chips before the body moves. | Check wax type, additive load, cooling speed, and pour temperature together. |
| Poor detail fill | Pour may be too cool for thin or detailed mold areas. | Tips, rims, or narrow parts look incomplete or weak. | Use wax-specific guidance before changing the pour. |
| Broken thin details | Detail may be underfilled, brittle, or stressed by release direction. | The main body releases but a small part snaps. | Check temperature, detail fill, and release direction as one diagnosis. |
| Soft body or warped base | Pour and cooling may be leaving the candle too soft at release. | Candle comes out whole but bends, leans, or flattens. | Wait longer before release and review wax firmness before raising temperature. |
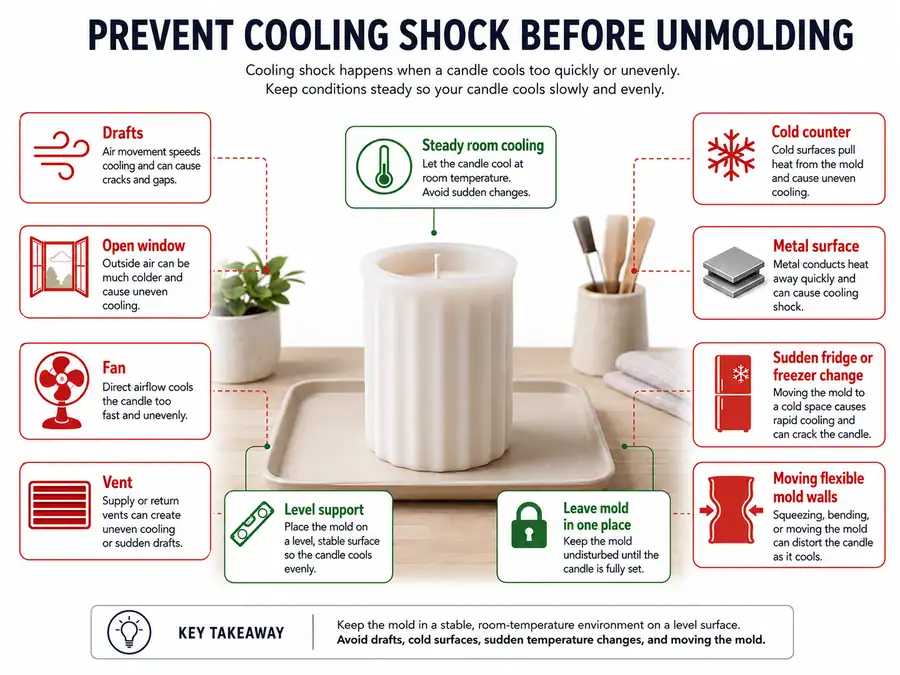
Prevent Cooling Shock Before Unmolding
Cooling shock can crack or warp a molded candle before unmolding because the wax body contracts unevenly while it sets. Cooling shock means rapid or uneven temperature change during the setting and unmolding window. Here, warp means shape distortion around cooling or release, not burn-time melting or long-term storage bending. Workspace conditions are cooling modifiers. They matter when one part of the molded candle cools, grips, contracts, or carries weight differently from another part.| Stable-cooling check | Why it matters | What to do next |
|---|---|---|
| Keep the mold away from drafts. | Drafts cool one side faster than another. | Move the mold away from fans, open windows, and vents. |
| Avoid cold counters or metal surfaces. | A cold base can pull heat from one area too fast. | Place the mold on a stable, level, room-temperature tray or board. |
| Do not rush release after the outside looks firm. | The outside can set before the center supports itself. | Judge readiness by structure, not only surface firmness. |
| Keep large or thick molds supported. | Uneven support can let soft wax lean or flatten. | Use a level tray or flat base under the mold. |
| Avoid sudden fridge or freezer changes as a first fix. | Sudden cooling may increase stress in brittle wax. | Try stable room cooling before cold-release shortcuts. |
| Leave the mold in one place while the wax sets. | Moving a soft candle can shift weight before the wax body is stable. | Move the tray, not the flexible mold walls, if the setup must be moved. |
Confirm the Candle Is Ready to Unmold
A molded candle is ready to unmold when the wax body, base, core, and details can hold shape without bending, tearing, or sticking. Ready means structurally ready for release. It does not mean cured for scent performance, ready for burn testing, or ready for long-term use.| Readiness check | What to look for | Failure risk if ignored |
|---|---|---|
| Mold feels cool and stable. | The mold is no longer warm in one area and cold in another. | Uneven contraction or soft-core damage. |
| Base feels firm. | The base does not dent, sag, or bend under gentle support. | Warped base, leaning body, or base split. |
| Surface is not tacky. | The candle does not smear, drag, or feel sticky at exposed areas. | Torn surface, stuck release, or soft deformation. |
| Details hold shape. | Tips, rims, narrow necks, and raised parts do not flex easily. | Snapped details or stretched shapes. |
| Candle loosens before force is applied. | The edge or body starts to release with light, even help. | Crack from pulling against mold grip. |
| No new crack appears before movement. | The candle looks structurally sound before release starts. | Cooling crack mistaken for release damage. |
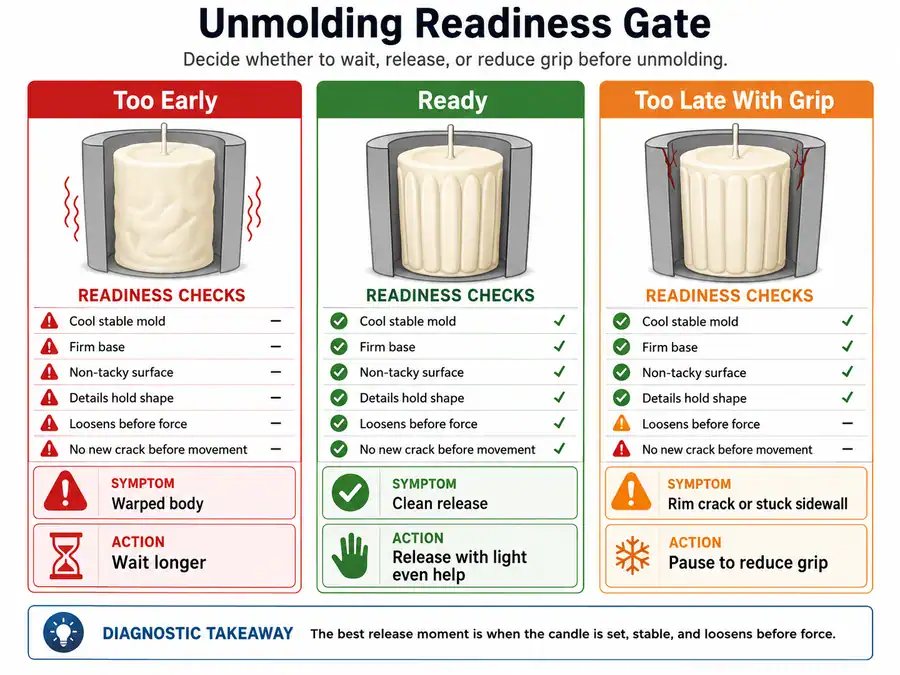
| Timing condition | What is happening | Typical symptom | Safer response |
|---|---|---|---|
| Too early | Wax body is not strong enough yet. | Warped body, bent base, torn detail, or soft collapse. | Wait for better structural firmness. |
| Ready | Wax body supports itself and release resistance is low. | Candle releases with light, even help. | Keep the same timing and log it. |
| Too late with grip | Candle is firm, but mold friction has increased. | Stuck sidewall, rim crack, base split, or broken detail. | Pause and reduce grip before using force. |
| Too late in a complex shape | Thin details or undercuts lock into the mold. | One small part snaps while the body releases. | Support the weak area and change release direction. |
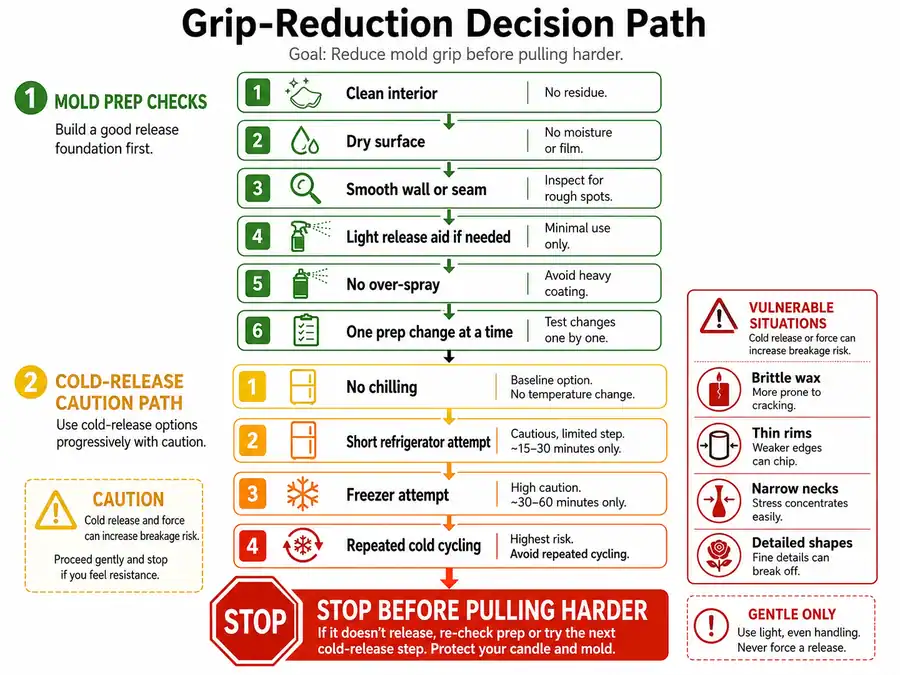
Reduce Mold Grip Before Applying Force
Molded candles break during release when mold grip forces the candle to move before the wax has separated from the mold surface. Mold grip is friction, suction, or resistance between the set candle and the mold interior. The fix is to reduce resistance before release force travels through a rim, seam, wick hole, thin detail, or base edge.| Mold-grip check | Why it matters | What to do before pouring or pulling |
|---|---|---|
| Clean interior | Old wax, dust, dye, or residue can create drag. | Remove debris before the next pour. |
| Dry surface | Moisture can interfere with smooth contact. | Let the mold dry fully before adding wax. |
| Smooth wall or seam | Scratches, dents, or rough seams can snag wax. | Inspect the interior before reuse. |
| Light release aid, if needed | A small release aid may reduce sticking in problem molds. | Apply lightly and test before using it on detailed candles. |
| No over-spray | Too much release product can mark the candle surface or blur detail. | Use the least product that solves sticking. |
| One prep change at a time | Mixed changes hide the cause. | Change only prep, then compare the next release. |
| Cold-release method | Possible benefit | Main risk | Safer first step |
|---|---|---|---|
| No chilling | Keeps cooling steadier. | A stuck candle may still resist release. | Loosen edges, check mold prep, and release with even support. |
| Short refrigerator attempt | May reduce mold grip in some setups. | Uneven contraction can split brittle or stressed wax. | Use only after stable cooling and only when the candle is structurally firm. |
| Freezer attempt | May create contraction quickly. | Thermal stress can crack brittle wax or thin details. | Avoid as a routine fix; check wax guidance and failure history first. |
| Repeated cold cycling | May seem helpful for stubborn molds. | Repeated swings can hide the real cause. | Fix mold prep, wax balance, cooling, or release direction instead. |
Release the Candle Without Snapping Details
Many molded candles break because release force is concentrated in the wrong direction or through the weakest part of the shape. Release force is the pressure applied to free the candle from the mold. It can come from pulling, twisting, peeling, squeezing, tapping, or flexing.| Release step | Best for | What to do | Stop if you see |
|---|---|---|---|
| Check timing first | Every mold type. | Confirm the candle is structurally firm before release. | Soft base, tacky surface, or flexible details. |
| Loosen the edge | Metal, rigid plastic, and some silicone molds. | Ease the rim or wall before moving the whole candle. | Rim chip, sidewall crack, or sudden resistance. |
| Support the base | Tall, heavy, or uneven candles. | Hold the candle where weight is highest as it comes out. | Base bending, leaning, or cracking. |
| Flex the mold, not the candle | Silicone molds. | Move the mold wall away from the wax instead of bending the candle body. | Detail stretching, neck bending, or sidewall tearing. |
| Avoid twisting thin shapes | Detailed or narrow-neck molds. | Release in small sections and support fragile areas. | Snapped tip, broken rim, or cracked narrow neck. |
| Reduce force when resistance rises | Stuck or detailed candles. | Pause and reassess grip, seam friction, or mold prep. | A crack sound, white stress mark, or sudden split. |
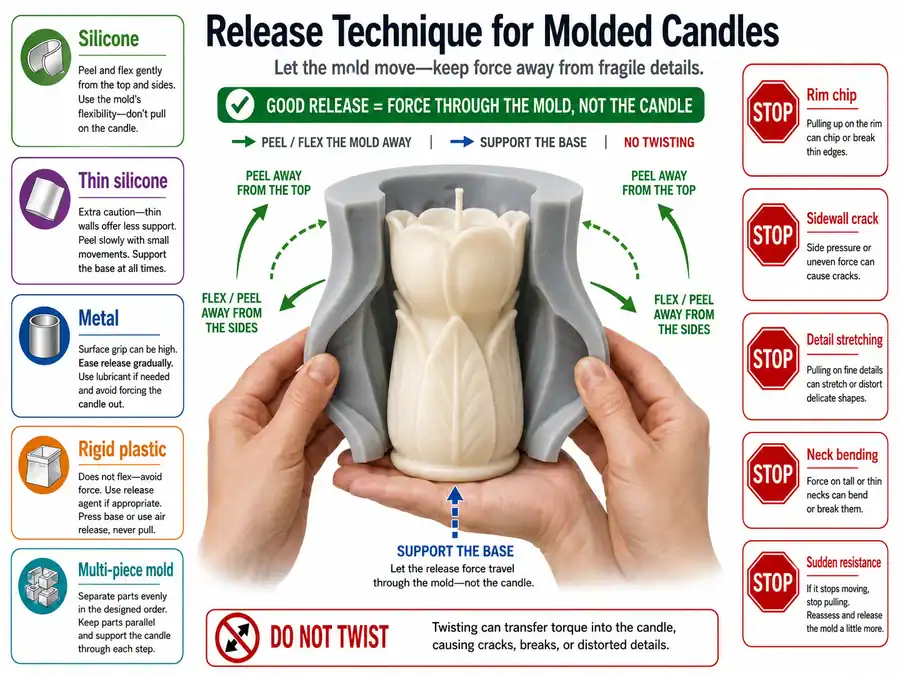
| Mold material | Release behavior | Main break risk | Safer release approach |
|---|---|---|---|
| Silicone | Flexible walls can peel away from the wax. | Soft candles can bend, stretch, or warp if unsupported. | Peel the mold away from the candle while supporting the candle body. |
| Thin silicone | Easy to flex, but easy to distort. | Tall or detailed candles can cure crooked or lean during removal. | Place the mold on a stable tray and avoid lifting it by the sides while wax is soft. |
| Metal | Holds shape well but offers little flex. | Candle may grip the wall and crack if pulled hard. | Loosen the edge gradually and avoid twisting the candle body. |
| Rigid plastic | Stable shape with limited movement. | Sidewalls, seams, or bases can crack when resistance rises suddenly. | Reduce friction before release and push evenly where the mold allows it. |
| Multi-piece mold | Seams control the release path. | Crack may follow a seam or base line. | Separate the mold evenly and support the candle before the final piece comes away. |
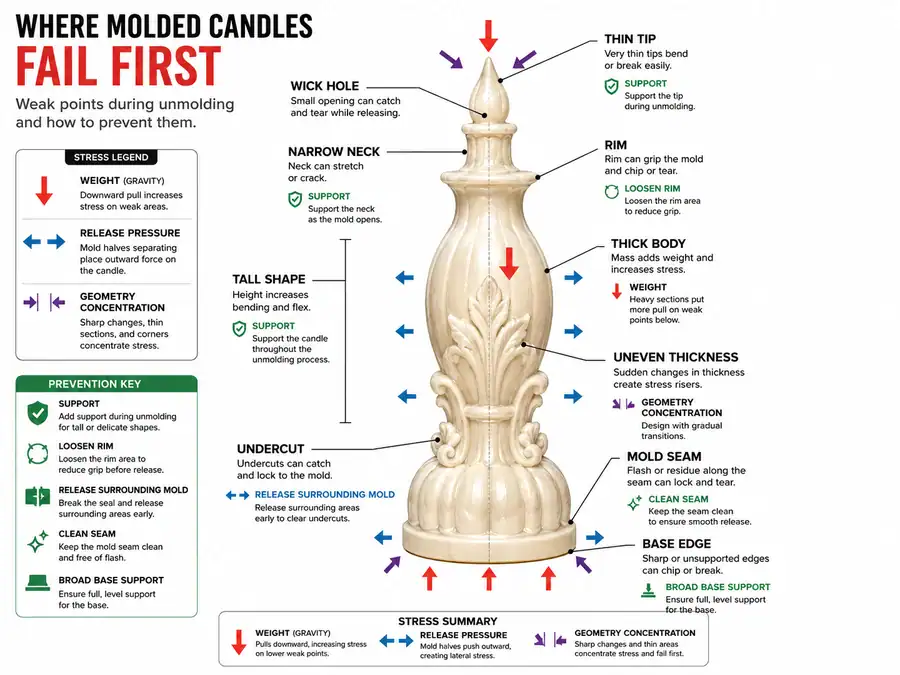
Protect Weak Points in Complex Molded Shapes
Large, uneven, thin, or interrupted molded shapes fail first where weight, release pressure, or geometry concentrates stress. Large or uneven means the candle has more thermal mass, uneven thickness, height, weight, or shape imbalance that affects cooling and release. Thin or complex means fragile molded geometry that concentrates stress during release.| Shape or weak point | Why it fails first | Prevention step |
|---|---|---|
| Thick body | The outside may firm before the center supports itself. | Wait for the full wax body to feel stable before release. |
| Tall shape | Weight can bend the base or lean the body. | Support the candle as it leaves the mold. |
| Uneven thickness | Thin and thick areas cool at different speeds. | Let the mold cool steadily and avoid sudden temperature changes. |
| Thin tip | Small wax area cannot carry much bending force. | Release the surrounding mold before moving the tip. |
| Rim | Edge catches the mold wall or chips under pressure. | Loosen the rim before pushing or pulling the body. |
| Narrow neck | Stress collects where the candle changes thickness. | Support both sides of the narrow section during release. |
| Undercut | Wax locks behind a mold shape. | Peel or open the mold path before pulling the candle. |
| Wick hole | Wax structure is interrupted around the opening. | Support the base and reduce pulling force near the wick path. |
| Mold seam | Wax snags where the mold closes or has residue. | Clean the seam and release the mold evenly. |
| Base edge | Weight, brittle wax, or one-point pressure overloads the edge. | Use broad base support instead of pushing from one spot. |
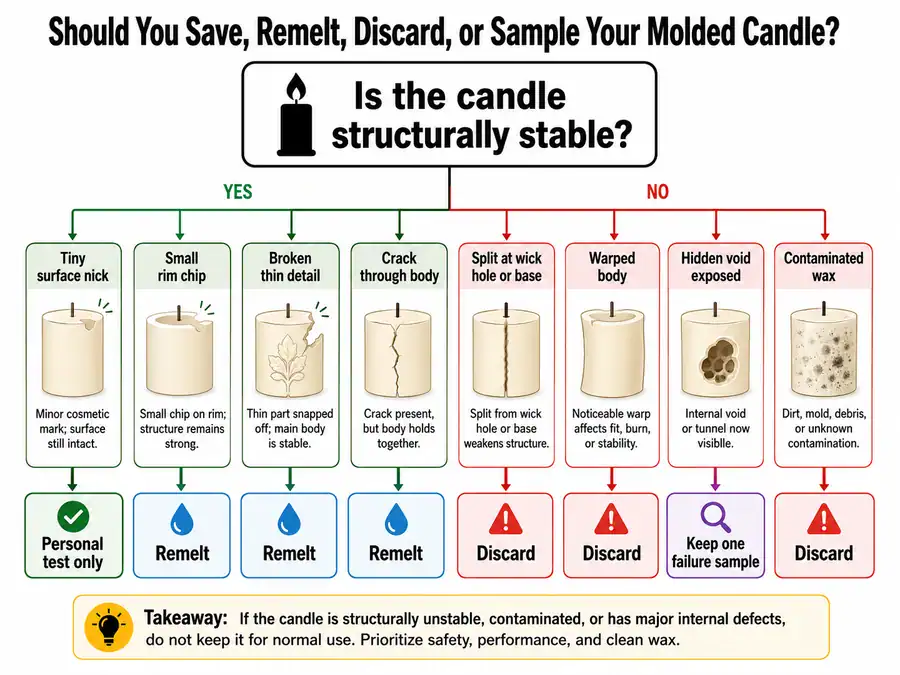
Decide Whether to Save, Remelt, or Retest
A damaged molded candle can be saved only when the defect is cosmetic, structurally stable, and safe for personal test use. Safe on this page means the candle can be handled without a weak base, unstable body, exposed void, or crack that may affect burning or movement. It does not mean certified, sale-ready, gift-ready, or fire-tested.| Damage type | Can it be saved? | Safer decision |
|---|---|---|
| Tiny surface nick | Often, if the candle is structurally sound. | Keep as a personal-use or sample candle. |
| Small rim chip | Sometimes, if the body is stable and the wick path is unaffected. | Keep only as a test piece if structure is not compromised. |
| Broken thin detail | Sometimes, for display or testing only. | Do not sell as a finished candle if the shape is compromised. |
| Crack through the body | Usually no. | Remelt or keep as a process-failure sample. |
| Split at wick hole or base | No for normal finished use. | Remelt or retest the formula and release method. |
| Warped body or leaning base | No for finished use. | Remelt if the wax is clean and compatible. |
| Hidden void exposed by a break | No. | Treat it as a pour or structure failure and retest. |
| Contaminated wax | No. | Discard rather than remelt. |
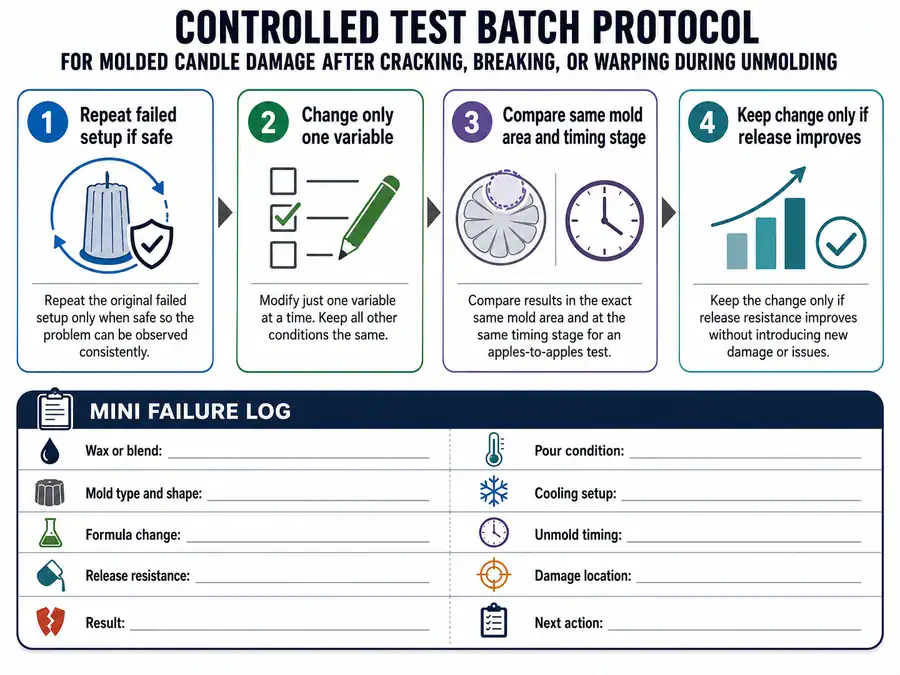
Run One Controlled Test Batch
A small test batch prevents repeat cracking by changing one likely cause and comparing the next release against the failed candle. A test batch is a controlled pour made to check one variable before scaling the same mold, wax, fragrance, dye, additive, cooling setup, or release method. It is not a new design experiment where every part of the process changes at once.| Test-batch field | What to record | Why it matters |
|---|---|---|
| Wax or blend | Exact wax used. | Separates wax behavior from mold or handling problems. |
| Mold type and shape | Silicone, metal, rigid, detailed, tall, thin, or uneven. | Shows whether material or geometry concentrates stress. |
| Formula change | Fragrance, dye, stearin, vybar, hardener, or no change. | Prevents blaming the wrong ingredient. |
| Pour condition | Supplier-guided temperature range or process note. | Links fill, shrinkage, and setting behavior to the defect. |
| Cooling setup | Drafts, surface, support, room stability, chilling. | Identifies cooling shock or support failure. |
| Unmold timing | Before release, during release, immediately after release. | Separates cooling cracks from release-force breaks. |
| Release resistance | Low, medium, or high. | Shows whether force was part of the failure. |
| Damage location | Rim, sidewall, base, seam, wick hole, detail, or center. | Finds the weak point. |
| Result | Whole, cracked, broken, warped, stuck, or improved. | Confirms whether the change helped. |
| Next action | Keep, adjust, retest, remelt, or route to another guide. | Prevents random troubleshooting. |
- Repeat the failed setup once if you need a control and the materials are safe.
- Change only one variable, such as cooling location, release timing, mold prep, or formula.
- Compare the same mold area, timing stage, and release resistance.
- Keep the change only if the candle releases cleaner without creating a new defect.