
A room-by-room scent-throw test is a controlled hot-throw comparison that keeps the candle fixed while the room changes.
Test candle scent throw in different rooms by keeping room conditions fixed, matching the candle to room volume, and scoring scent at set distances and times.
This page shows candle makers how to compare small, medium, and large spaces with one repeatable setup, one distance ladder, and one logging method.
Use it to standardize one candle across several rooms before you change wick, vessel, or fragrance load, then move to deeper wick, load, or weak-throw pages only after the room data is clear.
Fast setup protocol for room-by-room scent-throw tests
A room-by-room scent-throw test works best when you follow one fixed setup sequence from measurement to scoring. This gives you one clean baseline before you compare rooms or change wick, jar, or fragrance load.
For the parent scenting branch, start from your candle fragrance and scenting guide.
Use one candle at a time and keep the same wax, vessel, wick, and fragrance load through the full room series. In a room-comparison test, the room is the variable and the candle setup stays fixed until the data is clear.
- Measure the room and write down its volume.
- Close windows, switch off fans, and note the HVAC setting.
- Place the candle on a stable surface in the central third of the room.
- Mark fixed distance points such as 1 m, 2 m, and 3 m.
- Trim the wick, light the candle, and start a timer.
- Check scent perception, flame behavior, and melt-pool progress at fixed times.
- Log the result before you change anything else.
Record the same fields on every test: room name, room volume, temperature, humidity if known, door state, HVAC setting, candle ID, wick, vessel, fragrance load, checkpoint times, distance markers, scent score at each marker, melt-pool progress, and flame notes.
Use one pass/fail rule: if the candle reaches your target distance markers in the expected time without sooting, overheating, or struggling to form a proper melt pool, keep the setup for that room band. If not, rerun the same room test once more before you change the candle.
Benchmark note: On this page, your target distance markers and expected time mean the fixed markers and checkpoint windows you chose for this room-test series, not universal performance standards or certification thresholds.
If the candle performs poorly, change one variable at a time on the next test: room, wick, vessel, or fragrance load.
If the same candle misses the same markers twice in the same controlled room band, keep the room data and move next to the deeper troubleshooting, wick, or fragrance-load pages instead of expanding diagnosis here.
Methods note: The room bands, timing checkpoints, temperature target, and distance ladder on this page are working ranges for repeatable home-maker testing, not legal or industry certification standards. Use them to keep one test series consistent from batch to batch. For hard safety limits, follow your container guidance, supplier documentation, the National Candle Association for safe burning practice, and IFRA or supplier paperwork for fragrance-use limits. For the parent scenting branch, pair this process with your candle fragrance and scenting guide.
These room bands, distance markers, and checkpoint times are house ranges for repeatable comparison, not certification thresholds.
Calculate Room Volume (m³) to Set Realistic Scent-Throw Targets
To size your test candle to any room, multiply length × width × height to get cubic meters, then group rooms into small, medium, or large bands.

Most makers think in “small bedroom” or “big living room”, but scent throw depends on how much air your candle has to perfume, not just floor area. Treat volume as part of your detailed scent throw testing protocol for room size, airflow, and wax so every burn you log happens in a known size of box. Once you know the room’s cubic meters, you can stop blaming a fragrance that vanishes in a huge lounge but feels overpowering in a snug office. Room volume becomes the bridge between wick choice, vessel size, and realistic expectations for scent coverage.
Here’s a simple way to calculate it in minutes: measure the room’s length and width along the floor, then its height from floor to ceiling, all in meters. Multiply L × W × H to get cubic meters (m³); for example, 4.0 m × 3.0 m × 2.4 m ≈ 28.8 m³. If you only have feet, measure in feet first and then divide the result by about 35 to convert cubic feet to cubic meters. Write the three measurements and the final volume in your test log so you can reuse them for every future candle.
| Room band | Approx. volume | Typical use case | Starting expectation for one medium jar |
|---|---|---|---|
| Small | 10–20 m³ | bathroom, tiny office, box room | should register quickly at near and mid markers |
| Medium | 21–35 m³ | standard bedroom, home office | should fill the room if wick and vessel are matched well |
| Large | 36–60 m³ | living room, large bedroom | may need a stronger wick, larger vessel, or longer warm-up |
| XL | 60+ m³ | open-plan space, high ceilings | treat as a special case and test larger formats or multiple candles |
Next, turn raw numbers into quick “room bands” so they’re easy to use on pouring day. Many makers find something like 10–20 m³ (small), 21–35 m³ (medium), and 36–60 m³ (large) is a practical starting point. Bathrooms, tiny offices, and box rooms usually land in the small band, typical bedrooms in medium, and open-plan living spaces in large. If a room is way beyond 60 m³, treat it as “XL” and consider multiple candles later.
Once your rooms are banded, you can map room bands to starting wicks instead of guessing in the moment. For example, you might decide that a single medium jar with a mid-range wick is only ever tested in small and medium rooms, never in the large band. As you collect more data, you’ll see patterns: some fragrances stay detectable at farther markers even when you test them in bigger volumes, while others feel perfect only in tighter spaces. Over time, this becomes a reference chart you can use for new collections.
Finally, room volume only helps if other variables stay stable, so your next job is to establish a no-draft baseline in each test space. That means deciding how doors, windows, vents, and HVAC will be set whenever you’re evaluating scent throw. Once volume and airflow are controlled, any differences you smell between burns are much more likely to be caused by the wax, wick, or fragrance—not the room itself.
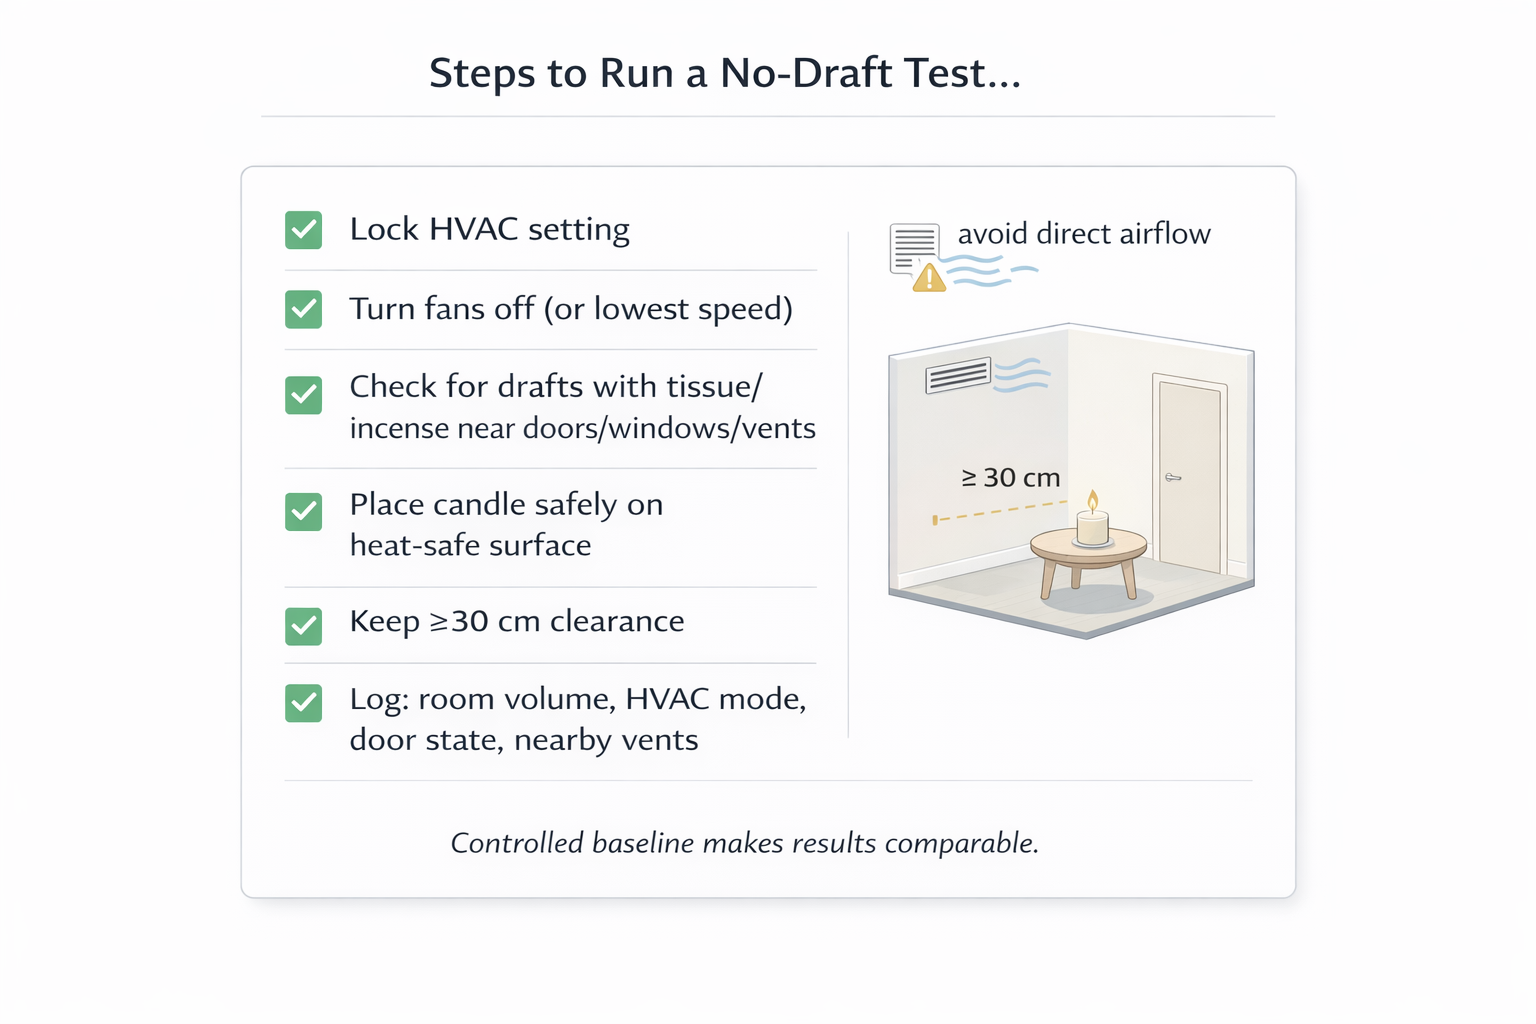
Steps to Run a No-Draft Test (HVAC, Windows, and Fans Controlled)
A no-draft test means closing openings, stabilizing HVAC, and placing the candle away from vents so air around the flame stays as still and repeatable as possible.
The goal isn’t to mimic how a customer lives every day, but to create a clean baseline you can compare across batches, fragrances, and wicks. That baseline fits inside a repeatable test method where you always know how the room was set up when you wrote a high, medium, or low scent score in your notes. Drafts stretch the flame, cool the melt pool, and blow scent away from your nose, which makes it nearly impossible to judge real performance. The National Candle Association advises keeping candles away from drafts and vents. Removing those drafts first lets you see whether the candle itself can ever match heat output to room size.
Use this quick no-draft checklist when you run your repeatable scent-throw testing protocol:
Reset the room. Clear the surfaces near where the candle will sit and turn off plug-in diffusers, wax warmers, and fans. Fifteen to thirty minutes before the test, you can briefly crack a window or door to flush lingering odors, then close everything to establish a neutral odor baseline.
Lock in your HVAC setting. Decide whether the test will run with heating, cooling, or system “off” and keep that choice the same for the whole burn. If the fan has multiple speeds, use the lowest that keeps the room comfortable, or switch it off entirely in smaller rooms to prevent airflow across the flame.
Hunt for hidden drafts. Stand where the candle will sit and slowly walk a tissue, match stick, or incense stick around door gaps, window frames, and vents. If you see movement, adjust: close doors firmly, shift the candle farther from a vent, or redirect louvers so air doesn’t blow directly toward the jar.
Place the candle safely. Put the candle on a stable, heat-safe surface about table height, not on the floor or inside a bookshelf alcove. Leave at least 30 cm around it in all directions so air can move gently but not rush past the wick, and keep it well away from curtains, plants, or stacks of paper.
Log the conditions. In your test sheet, record the room name and volume, HVAC mode, whether doors are fully closed or slightly open, and any nearby vents. These notes will help later when deciding if you should match heat output to room size with a larger jar, a different wick series, or more than one candle.
Once you’ve repeated this setup a few times, you’ll be able to tell at a glance whether the room is “ready” for a proper test. Your notes will start to feel more trustworthy, because every new fragrance is facing the same no-draft conditions. That controlled baseline makes it much easier to interpret what happens later in colder rooms, humid weather, or more complex open-plan layouts.
Control the Room and Keep Candle Variables Fixed
When you compare scent throw across rooms, the room is the experiment and the candle is the control. That means you should hold the candle setup steady and change only the room conditions you are testing.
Use one baseline room standard for every comparison:
- keep the room close to your normal test temperature
- avoid steamy or recently humid spaces
- log whether the door is open or closed
- note HVAC mode, vents, and obvious drafts
- use the same candle, wick, vessel, wax, fragrance load, and scent for the full room series
Do not change fragrance load during a room-comparison test. Do not switch from one jar family to another halfway through the series. Do not change wick size until the room data is clear. If a candle misses the same markers in one room and meets them in another, record that result first, then move to a separate wick, vessel, or formulation test.
A simple rule helps here: change the room first, then change the candle later. That keeps your notes useful and makes it much easier to tell whether lower scent scores come from airflow, temperature, humidity, room volume, or the candle itself.
Wick Size vs Room Size: How to Choose for Reliable Throw Tests
For reliable throw tests, match wick heat output to room volume by grouping rooms into bands, then using test data and a simple wick size chart by jar diameter and wax type to decide when to size up or down.
Use this section only to decide whether the current setup matches the room band or needs a deeper wick review elsewhere. If the melt pool stays shallow and scent fades before your furthest marker, the setup is underpowered for that room; if the flame is tall, unstable, or sooty, the wick is too aggressive even if the near-marker score looks high. Keep the room-test result here, then move to your wick size chart by jar diameter and wax type for the next size change only after the same candle fails its markers in the same room band.
Steps to Place and Space the Candle (Height, Distance Ladder, Wall Clearance)
For consistent scent-throw tests, place the candle at about nose height in the central third of the room, away from walls and corners, then mark fixed test distances and log what you smell over time.
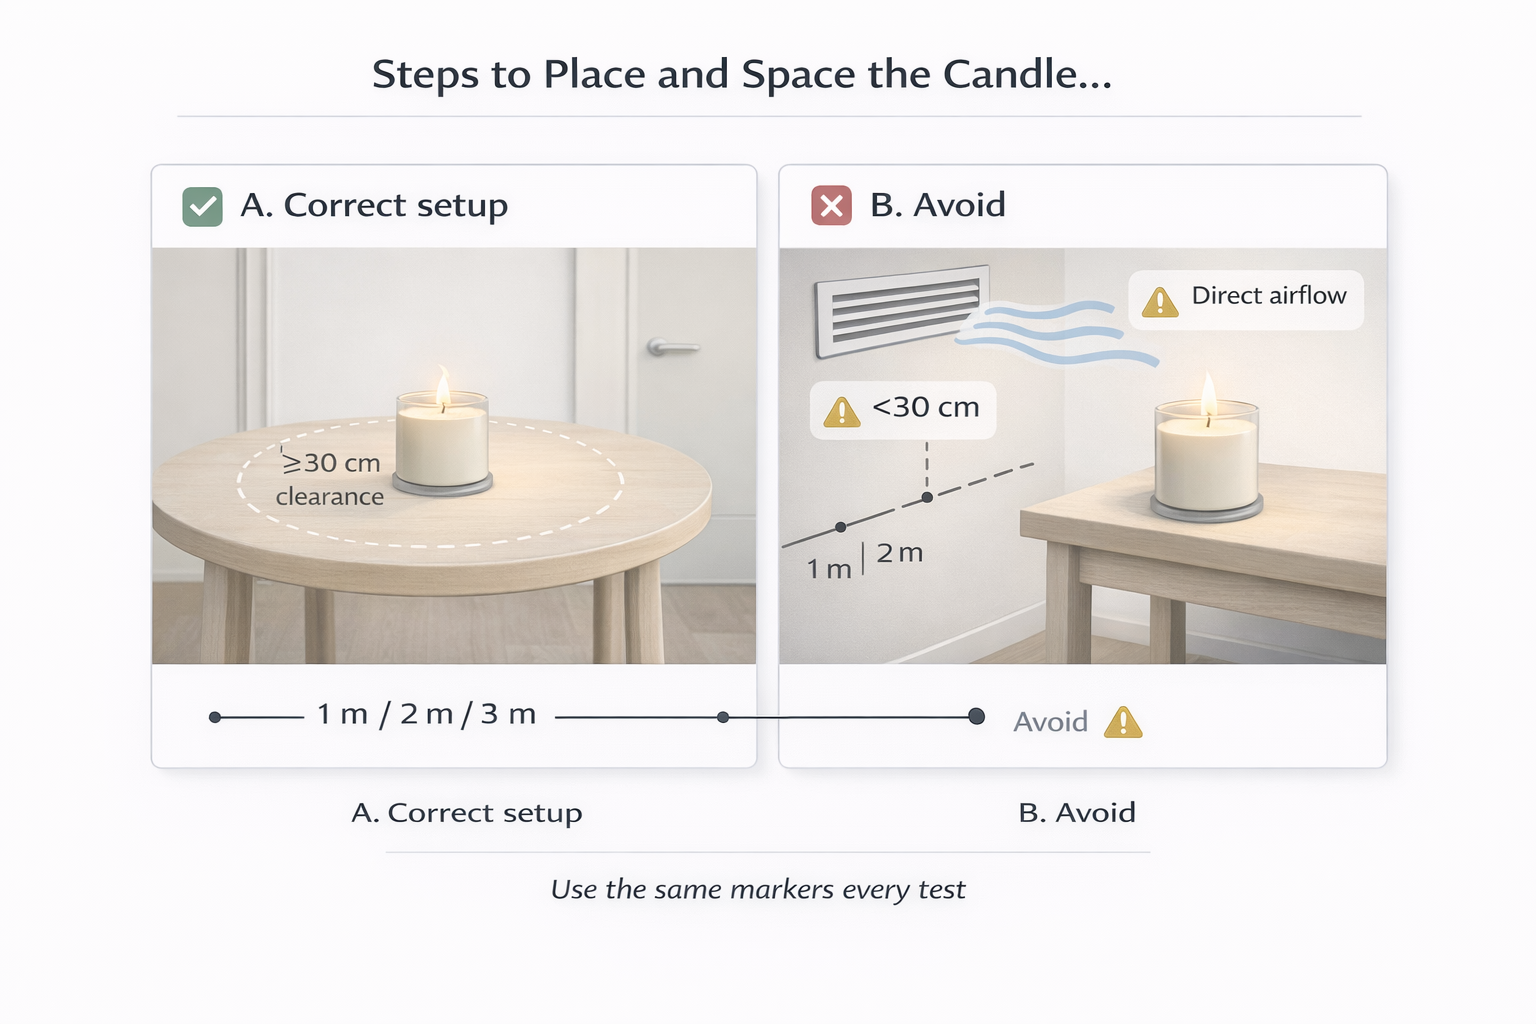
Placement is part of the same test method you use for room volume and wick choice. A candle on the floor or hidden in a corner creates “dead zones” where scent pools instead of flowing through the paths people actually walk. Start by choosing a stable, heat-safe surface roughly coffee-table to chest height in the main circulation zone of the room—not right by the door, and not jammed into a shelf cubby. For this test setup, start with about 45–60 cm of clearance from any wall, curtain, or big piece of furniture so airflow stays gentle without being blocked.
Next, create a simple distance ladder you can reuse in every room. Pick three points in a straight or gently curved path away from the candle—typically 1 m, 2 m, and 3 m. Mark them subtly (tape on the floor, a note in your sketch, or objects you won’t move) and always stand on those same spots when judging throw. During each test, use a timer or stopwatch so you can log 1/2/3 m perception times instead of vague score labels. That data becomes priceless when you’re comparing different jars, wicks, or fragrances weeks later.
Before you even light the candle, quickly scan for anything that might bend or block scent plumes: open windows, vents blowing straight at the flame, or tall furniture that creates a wall in front of the jar. Adjust the setup or move to a slightly more open surface if needed. Then clear the slate for your nose: open the door for a few minutes if the room smells stale, close it again, and mentally reset to a neutral odor baseline first so you’re not judging through cooking smells or last night’s diffuser. With height, clearances, and distances standardized, you can spot real differences in candle performance instead of chasing inconsistencies in where you happened to set the jar down.
Door Open or Closed for Scent-Throw Tests? Use This Rule of Thumb
Test with the door closed first for 30 minutes, then repeat with it open for another 30 minutes, always logging the door state in your notes. Use the closed-door run in a right-size room as your baseline, and treat the open-door or open-plan run as a realism retest.
On this page, a right-size room means a room band the current candle format is meant to test, not a buying recommendation. Use the closed-door run as your control because it limits scent loss and makes the room easier to repeat; use the open-door run only as a realism retest after the closed baseline is logged.
Prepare the room and neutralize odors before both runs by clearing cooking, pet, or spray smells and letting the space settle for at least 10–15 minutes.
Run the closed-door baseline: shut the door fully, light the candle, and start timing from ignition until you first notice scent at each distance marker.
After the baseline, extinguish the candle, let the room air out if needed, then repeat the test with the door open in the way you usually keep it (wide open or slightly ajar).
Use your log sheet to log baseline and retest times consistently, noting door state, perception times, and any comments about how quickly scent escapes into the hallway or adjacent rooms.
As a practical rule, if a candle cannot comfortably fill a closed test room within your usual time window, adjust wick, vessel, or room band before you spend time measuring how it behaves with the door standing open into the rest of the house.
Plan Your Burn Cycles: First-3-Hour vs Repeat Burns (Include Cure Time)
After proper cure days, run a 3-hour first burn, let the candle cool completely, then schedule repeat tests with checkpoints at 30, 60, and 90 minutes.
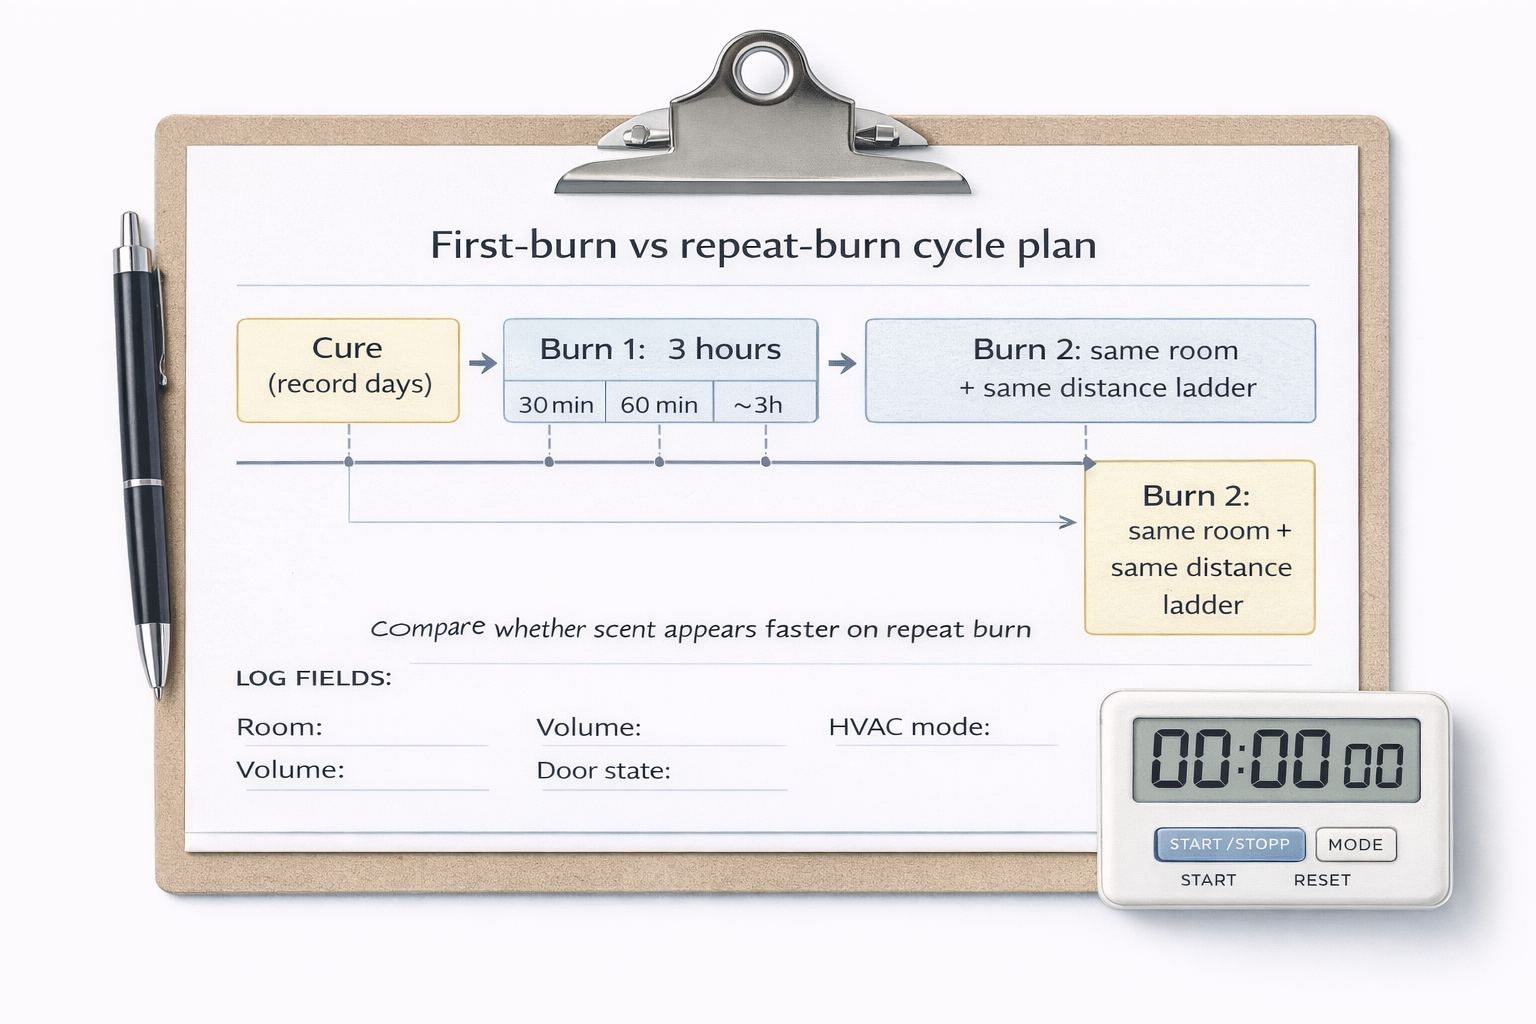
Think of burn cycles as part of one repeatable test method rather than random evening burns. The first full 3-hour burn after the planned cure time for scented candles helps the wax and fragrance matrix settle into its working pattern, so later burns better reflect how customers will actually experience the candle.
Methods in plain language: choose a realistic cure window based on the number of days your wax and fragrance supplier suggests, then always test the same jar type after that many days. Use a timer to capture 30, 60, and 90 minute checkpoints, noting when scent first reaches each distance marker and how intensity changes over time. These timings are working ranges for home testing, not official lab standards, but they keep your comparisons fair.
Use this basic cycle when you want repeatable data instead of one-off impressions.
Cure the candle for the planned number of days in a cool, dark place, and record the pour and first-test dates in your log.
Run the first 3-hour burn in your chosen test room, checking scent perception at 30, 60, and 90 minutes and once again near the 3-hour mark.
Let the candle cool fully, trim the wick if needed, and schedule a second burn on another day in the same room with the same distance ladder.
On the repeat burn, note whether scent appears faster at each checkpoint and whether the melt pool reaches the same depth and diameter as on the first burn.
Use repeat burns to compare room performance, not to solve every formulation issue on this page. If the same candle keeps missing its fixed markers after consistent cure time and the same room setup, route next to your deeper cure, wick, or troubleshooting pages before you change multiple variables at once.
What to Log Before Lighting and During the Burn
Log cold throw once before lighting, then switch to hot-throw logging for the rest of the room test. The point is not to write a full fragrance review; it is to compare the same candle under repeatable room conditions.
Use a candle burn test log template or one fixed sheet so every room test captures the same fields.
Record these fields on every pass:
- candle ID, batch, wax, vessel, wick, and fragrance load
- room name, room volume, door state, HVAC setting, and any obvious drafts
- checkpoint times and distance markers
- cold-throw note before lighting
- hot-throw strength and first detection time at each marker
- melt-pool progress, flame height, soot, and any heat or stability notes
Before lighting, note the cold-throw strength at close range and whether the scent is easy to detect at about arm’s length. Then light the candle and record hot-throw checkpoints at your normal times and distance markers. At each checkpoint, write down whether the scent is detectable, how noticeable it is at that marker, and whether the flame and melt pool look normal for that point in the burn.
Keep the notes practical. Record first detection time, strongest point in the burn, furthest reliable distance, and any warning signs such as weak melt-pool spread, an unstable flame, soot, or a room condition that may have suppressed the result.
Calculate Scent Throw: Distance Ladder + Time-to-Perceive Scale (Simple Scoring)
To calculate scent throw consistently, combine a simple distance ladder scent-throw test with a 1–5 time-to-perceive scoring scale so every test becomes a repeatable score instead of a vague impression.
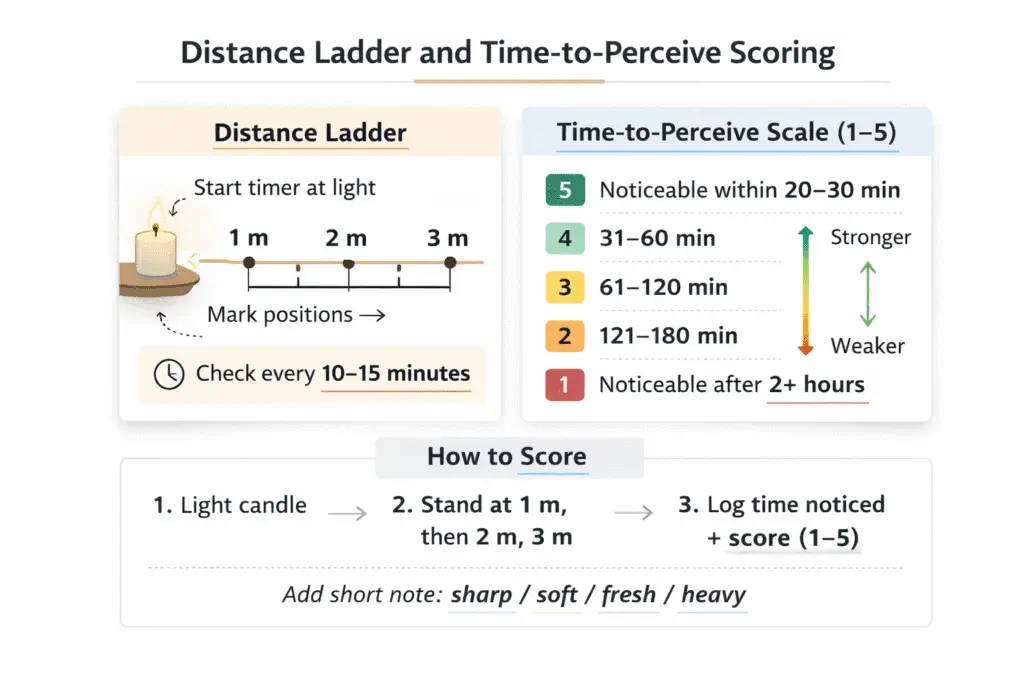
Start by fixing your distances. Choose three or four points moving away from the candle—many makers like 1 m, 2 m, and 3 m in typical rooms, and maybe 4–5 m for larger spaces. Mark those spots in a sketch or with subtle tape on the floor. Each time you test, stand on exactly those marks and note how long it takes before you can clearly detect the scent. Over time, your notebook turns into a simple candle performance scorecard rather than a stack of “registered early” or “registered late” comments.
How to avoid nose fatigue during scent-throw tests
Leave the room after each checkpoint, close the door, and re-enter at the same intervals before you score the scent. This helps reset your nose so you do not under-score a candle that has become background scent. Keep the re-entry timing the same on every run.
Here’s a quick scoring method you can adapt:
Start a timer when you light the candle.
At each distance, walk to your marker every 10–15 minutes until you clearly notice the fragrance.
For each distance, give a time-to-perceive score from 1–5 (1 = only noticeable after 2+ hours, 2 = noticeable by 90–120 minutes, 3 = noticeable by 60–90 minutes, 4 = noticeable by 30–60 minutes, 5 = noticeable within 20–30 minutes).
Add short comments about character (sharp, soft, fresh, heavy) so the numbers have context.
When you review results, look for patterns instead of obsessing over single numbers. A candle that scores 4 or 5 at 1–2 m but only 2 at 3 m might be perfect for bedrooms and offices but underpowered for open-plan rooms. One that hits 4–5 across all distances could be a good candidate for a high-scoring throw line—but double-check wick behavior and jar temperature so performance doesn’t come at the cost of safety or comfort.
As your dataset grows, you can compare new tests back to your best performers. If a fresh fragrance sits one point lower across all distances than your benchmark, you’ll have a concrete reason to tweak wick size, vessel type, or room band rather than guessing. This kind of simple, repeatable scoring turns scent throw from a fuzzy feeling into a practical design tool you can refine with every collection.
How to Interpret Your Scent-Throw Score
Interpret your scent-throw score by matching the result pattern to the next action: rerun the same room test if room conditions were unstable, keep the setup if it meets its fixed markers, or move to wick, vessel, or weak-throw pages only after repeated controlled failure. On this page, strong and weak describe results inside the same distance-and-time scoring protocol, not overall product quality.
| What you observed | Most likely issue | Change next |
|---|---|---|
| Strong at 1 m, weak at 3 m | room is too large for the current heat output | test a larger vessel or the next wick size up in the same room band |
| Weak at every marker | underpowered setup or poor room conditions | repeat in a no-draft room before changing the candle |
| Good throw, but flame is tall or sooty | wick is too aggressive | wick down and rerun the same room test |
| Good in a small room, poor in a large room | candle-to-room mismatch | keep the formula and change the room target or product format |
| Weak only in cold or damp rooms | environmental suppression | rerun at baseline temperature and log humidity |
| Better on repeat burn than first burn | first-burn warm-up effect | keep the burn-cycle notes and compare later burns before reformulating |
If the same problem repeats in the same room band after two controlled tests, move to the page on how to fix weak scent throw in your candles and change only one candle variable on the next run.