

To make tealight candles, use heat-rated cups, correctly sized tabbed wicks, suitable wax, careful melting, steady pouring, and burn testing before gifting or selling.
Tealight candles are small cup candles made from wax, a centered wick, and a cup that holds the melt pool while the candle burns. This guide covers homemade tealights in candle-rated tealight cups, not votive candles, wax melts, floating candles, LED tealights, or decorative holders used as containers. Safe here means the cup, wick, wax, holder, and burn test work together without smoking, overheating, warping, or drowning the flame. Start with the cup and wick choice before changing fragrance, dye, additives, or batch size. Keep the process test-driven because small tealights react quickly to cup material, wick size, wax type, and pouring habits.
How to make tealight candles step by step
Make tealight candles by preparing the cups, securing tabbed wicks, weighing wax, melting with controlled heat, pouring carefully, cooling the cups, trimming the wicks, and burn-testing the finished tealights.
- Choose candle-rated tealight cups and inspect them for dents, cracks, warping, or coating damage.
- Stick one tabbed wick in the center of each clean, dry cup.
- Weigh the wax for the number of tealights you plan to pour.
- Melt the wax with controlled indirect heat and monitor it with a thermometer.
- Add fragrance or dye only when that variable is part of the test batch.
- Pour slowly into level cups without flooding or moving the wick.
- Let the tealights cool and cure according to the wax supplier’s guidance.
- Trim the wicks, label the test batch, and burn-test at least one tealight in the real holder.
For a beginner, test in this order: cup, wick, unscented wax, fragrance or dye, then batch size. This order keeps the first failure easier to diagnose because each change has a clear source.
Tealight supplies checklist (what you need + safe setup)
To make safe tealights, start with heat-safe cups, tabbed wicks, candle wax, a scale, a thermometer, and a stable indirect melting setup.
A tealight kit is smaller than a full candle setup, but it still needs the parts that control heat, flame position, and spill risk. Tealights should use tabbed wicks because the metal sustainer keeps the wick anchored in a shallow cup. A candle is not finished when the wax hardens; it is only ready to use after a burn test shows that the cup, wick, wax, and holder behave safely.
| Required for a first batch | Why it matters |
|---|---|
| Heat-safe tealight cups | The cup holds the melt pool and must stay stable during burning. |
| Pre-tabbed tealight wicks | The tab anchors the wick and reduces floating or leaning. |
| Container-appropriate candle wax | Tealights behave like small container candles, not free-standing pillars. |
| Digital scale | Weight-based batches are repeatable and easier to troubleshoot. |
| Candle thermometer | Wax and fragrance should follow supplier ranges, not guesswork. |
| Pouring pot or heat-safe jug | Controlled pouring reduces spills and overfilled cups. |
| Indirect melting setup | Wax should melt with steady, controlled heat instead of direct flame contact. |
| Heat-safe work surface | Small spills spread fast and can damage plastic, varnish, or fabric. |
| Wick stickers or heat-suitable adhesive | The wick tab must stay centered through pouring and cooling. |
| Burn-test area | Tealights must be tested in the real cup and holder before use. |
Nice-to-have tools can make the process cleaner, but they should not replace the safety basics. A wick-centering tool, spare cups, silicone mat, wick trimmer, heat-resistant gloves, and a simple batch log help you repeat the same setup without relying on memory. For beginners, the safest upgrade is not a scent, dye, or additive; it is a clearer way to record what you used and what happened during the test burn.
Use these pre-flight checks before melting wax:
- Place the cups on a level, heat-safe surface.
- Keep paper towels, packaging, hair, sleeves, and loose decorations away from the melt area.
- Keep children and pets out of the workspace.
- Set out a tray, scraper, and spare cloth for wax spills.
- Check that every wick tab is stuck down before you pour.
- Keep the batch unscented if you want the cleanest first wick test.
- Follow your wax or fragrance supplier’s handling ranges if you add fragrance later.
- Test the finished tealight before gifting, storing, or making a larger batch.
The basic workflow is simple: set out cups, stick and center the tabbed wicks, weigh the wax, melt with controlled indirect heat, pour carefully, let the tealights cool, trim the wicks, then burn-test one sample. If wax spills, let it cool before scraping unless the spill creates an active hazard; do not wipe hot wax across a wider surface. If a wick floats, leans, or pulls loose during pouring, stop using that cup as a test sample and rebuild it with a fresh tab or better adhesive.
A safe first batch is a learning batch, not a perfect production run. Write down the cup type, wax, wick, any fragrance or dye, pour notes, and burn-test result. The next setup choice is the cup, because cup size and material affect how to choose a wick size, Melt wax safely, and the Burn testing checklist.
Tealight cups: sizes, materials, and how to choose
Choose heat-rated tealight cups by material and size, then test the wax and wick in that exact cup and holder.
A tealight cup is the small container that holds the wax pool while the candle burns. The best cup is not just the one that fits your recipe; it is the one that stays rigid, fits the holder, holds the wick tab securely, and does not change shape during testing. Standard, maxi, clear, and refillable cups can all change wick behavior, so treat the cup as part of the candle design.
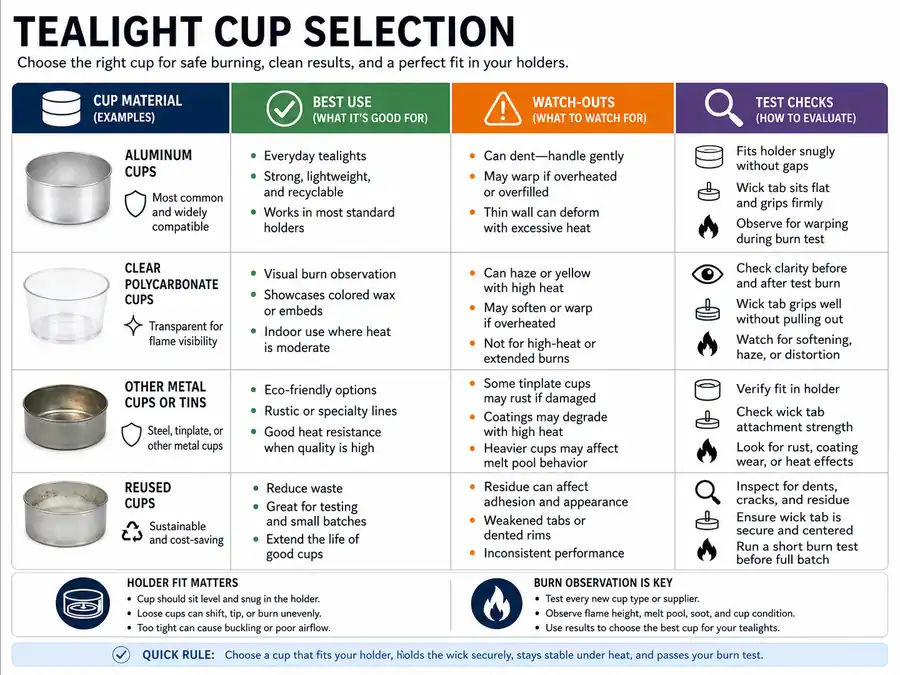
| Cup option | Best use | Watch-outs | What to test |
|---|---|---|---|
| Aluminum tealight cups | Beginner batches and general use | Thin cups can dent, and dents can shift the wick off-center. | Holder fit, centered burn, soot, and cup stability. |
| Clear polycarbonate cups | Decorative tealights where the visible wax matters | Clear cups can haze, soften, or warp if the setup runs too hot. | Cup shape before, during, and after the burn. |
| Other metal cups or tins | Refillable or specialty tealights | Unknown coatings, odd dimensions, or poor holder fit can cause problems. | Material suitability, leakage, wick tab grip, and heat behavior. |
| Reused cups | Practice batches only when undamaged | Old wax, warped edges, loose tabs, or hidden residue can affect burning. | Cleanliness, flat base, tab adhesion, and flame stability. |
Aluminum cups stay rigid under heat; clear polycarbonate cups can soften or warp, so they require stricter burn testing and stopping if deformation appears. Use clear cups only when the seller states they are made for candle use, and still test them in the holder you plan to use. Do not treat “clear” as a safety feature; it is a design feature that adds another thing to watch.
Use this cup benchmark before scaling a batch:
| Checkpoint | Record this | Action if it fails |
|---|---|---|
| Material | Aluminum, clear polycarbonate, or other cup material | Switch to a candle-rated cup with clearer specs. |
| Size class | Standard, maxi, extra-tall, or other | Match the wick test to that exact cup size. |
| Holder fit | Open holder, enclosed holder, or no holder | Retest in the holder that will be used. |
| Wick tab grip | Stays flat, lifts, or slides | Change adhesive or cup base before pouring more. |
| Burn observation | Stable cup, haze, warping, soot, or excess heat | Stop the test and adjust cup, wick, or wax. |
Standard tealight cups are the normal starting point for beginner batches. Maxi or long-burn tealight cups hold more wax and expose the holder to heat for longer, so they need their own wick test instead of a copied standard-cup recipe. Do not overfill a standard cup to imitate a maxi tealight; choose the right cup size and leave room for a controlled melt pool.
Cup prep is quick but important. Check each cup for dents, cracks, warped rims, or coating damage. Set the cup in its real holder before pouring if holder fit is uncertain. Press the wick tab onto a clean, dry, flat base. Keep the wick centered while the wax cools, because an off-center flame heats one side of the cup more than the other.
For most beginners in this workflow, aluminum is the safest default because it is common, rigid, and easy to inspect during a burn test. Clear cups are better treated as a specialty choice that needs extra observation. Refillable systems can work, but only when the cup, refill, wick, and holder are made to fit together. Cup choice comes before wax choice because wick sizing depends on cup size, and the same candle can pass the Burn testing checklist in one holder but need Fix burn problems in another.
Wax for tealights: pick the right wax (and what changes)
Pick one container-suitable wax for your tealight goal, then validate it through wick and burn testing.
Right wax here means a container-suitable wax that passes the tealight burn test in your chosen cup and wick setup, not the wax with the strongest scent or lowest cost.
Tealight wax has less room for error than jar wax because the cup is shallow, the flame sits close to the rim, and small changes can affect soot, drowning, or scent. The key is how wax changes wick needs, not whether one wax is always “best.”
| Goal | Good starting wax category | Testing note |
|---|---|---|
| Easiest first batch | Container soy blend or ready-made tealight/container blend | Watch for frosting, soft tops, and wick drowning before adding scent. |
| Stronger scent focus | Supplier-rated container blend | Test unscented first, then test fragrance as a separate change. |
| Cleaner visual finish | Paraffin or paraffin-blend container wax | Check soot, rim marks, and melt-pool behavior in the real cup. |
| Natural-wax preference | Soy or beeswax blend | Expect more variation in finish, cure, and wick response. |
| Repeatable small batches | One wax used with one cup and one wick series | Keep the setup fixed before changing color, fragrance, or additives. |
Use a one-variable test plan when comparing waxes:
| Test field | Keep or change? | Record this |
|---|---|---|
| Cup type and size | Keep the same | Material, size class, holder fit |
| Wick series and size | Keep the same for the first wax comparison | Flame behavior, soot, mushrooming, drowning |
| Wax type | Change one wax at a time | Finish, shrinkage, melt pool, scent result |
| Fragrance and dye | Leave out for the first test | Add later only after the base burn passes |
| Pour routine | Keep the same | Pour timing, cooling place, visible defects |
Soy blends are usually friendly for beginners because they are easy to source and common in small container candles. Paraffin and paraffin blends may give a cleaner-looking surface and stronger scent release in some recipes, but that depends on the exact product and test setup. Beeswax can work, but it may need more wick adjustment because it behaves differently from softer container blends.
A jar wax can fail in tealights because a tealight has short walls, a small wax mass, and a cup that reacts quickly to flame heat. A wax that burns well in a jar may drown the wick in a tealight, leave wax around the edge, or run hotter than expected in a thin cup. That is why the wax test should lead into Wick sizing & test instead of stopping at a wax comparison.
Cure matters most when fragrance is added. A tealight may look finished after cooling, but scent throw can still change after the wax settles. Do not fix weak scent by adding more fragrance before the base wax and wick pass a clean burn test. Too much fragrance can make wick behavior worse, so treat the Fragrance module as a later variable, not the first adjustment.
Additives are optional, test-driven tools. A hardener, opacity additive, or wax modifier may help a specific finish or handling problem, but it can also hide the real cause of soot, tunneling, or drowning. Skip additives in your first wax test unless your wax supplier specifically calls for them in that wax system.
Use this decision rule: if you want the easiest first batch, start with one container-suitable wax and test it unscented; if you see soot or drowning, change the wick or wax before changing fragrance.
Wick types & sizing for tealights (how to choose + test)
Choose a wick family that fits your wax and cup, then burn-test one size change at a time.
A tealight wick controls how fast wax becomes fuel, so wick size is not just a diameter match. A full wick testing guide starts with wax, cup material, cup size, fragrance status, and the tabbed wick itself. A “right” wick is the one that burns steadily in your exact tealight cup without drowning, smoking, leaning badly, or overheating the setup.
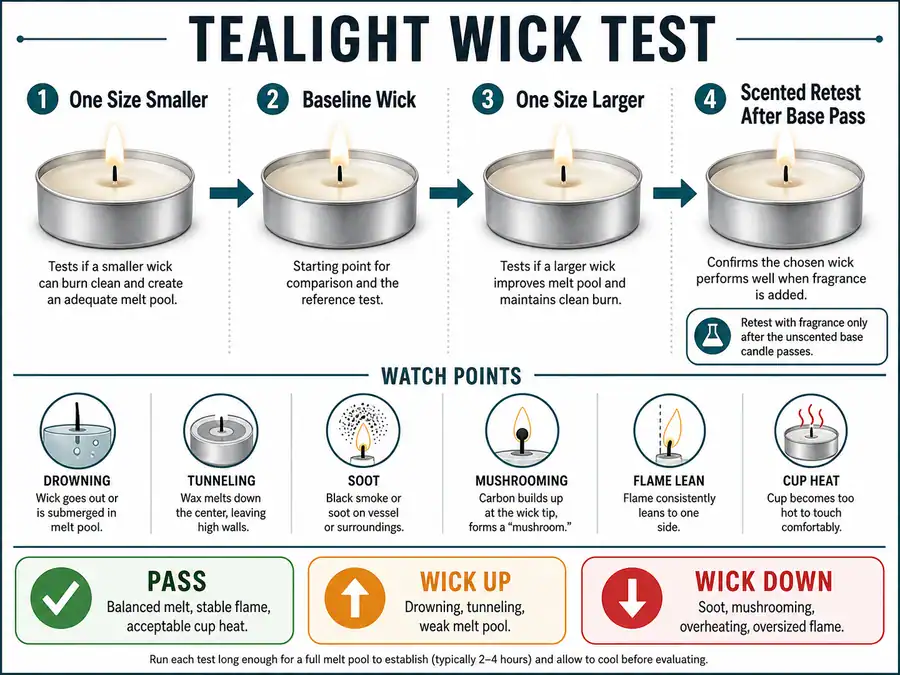
| Test cup | Wax | Wick series/size | Fragrance or dye | What to watch | Decision |
|---|---|---|---|---|---|
| Cup A | Same wax | Baseline wick | No | Flame steadiness, soot, melt pool, tab position | Pass, wick up, or wick down |
| Cup B | Same wax | One size smaller | No | Drowning, tunneling, self-extinguishing | Pass or wick up |
| Cup C | Same wax | One size larger | No | Soot, mushrooming, hot cup, fast melt | Pass or wick down |
| Cup D | Same wax | Best unscented result | Yes, only after base pass | Smoke, clogging, weak flame, scent result | Retest or reduce variables |
A wick series is a family of wicks made with a similar structure. Pre-tabbed wick means the wick already has a metal sustainer attached at the base. Wick size does not only mean width; it reflects how much fuel the wick can draw, how it stands, and how it behaves in wax. ECO, CD, HTP, LX, and other series can differ in stiffness, curl, mushrooming, and how they behave with different waxes.
Use this wick-up or wick-down ladder:
| Symptom | Likely direction | Safer next test |
|---|---|---|
| Wick drowns or goes out | Too little fuel pull or clogged wick | Try one size up, or retest without fragrance or dye. |
| Candle tunnels and leaves wax at the edge | Wick may be too small | Try one size up in the same cup and wax. |
| Soot marks the cup rim | Wick may be too large or wax/fragrance mix is too heavy | Try one size down before changing scent. |
| Large mushroom forms repeatedly | Wick may be too hot for the setup | Try one size down or a different wick series. |
| Flame leans hard to one side | Wick placement or cup airflow may be wrong | Rebuild with a centered tab before changing wick size. |
| Same wick works in one wax but not another | Wax has changed fuel flow | Retest from the baseline instead of copying the old result. |
Method: Fill the wick log with real observations from labeled tealights made with the same cup, same wax, and only one wick change at a time. Mark a test as failed if the wick self-extinguishes, smokes, leaves heavy soot, deforms the cup, or shows unsafe flame behavior. Use the same holder planned for real use, because holder shape can change heat and airflow.
Pre-tabbed wicks are faster and cleaner for beginners because the metal tab is already attached. DIY tabbed wicks give more control when you use odd cup sizes or need a wick length not sold pre-tabbed. Performance still depends on the finished wick, tab, cup, wax, and test result; DIY tabbing does not fix a poorly chosen wick size.
Maker threads often repeat the same pattern: one person asks for a universal tealight wick size, then others answer with wax, cup, scent, and holder questions. That pattern is useful because it shows the missing variables. A wick chart can give a starting point, but the tealight still needs the Burn testing checklist before the batch is trusted.
Do not fix every wick problem by moving bigger. If the tealight smokes, mushrooms heavily, or marks the cup, test smaller or change series. If it drowns, tunnels, or goes out, test larger only after checking the wick is centered and the fragrance or dye is not clogging the burn. Keep Fix burn problems for the symptom ladder after the wick baseline is tested.
The next step is securing the chosen tabbed wick in the cup so the test result reflects the wick, not a floating or off-center tab.
Wick assembly: tabbing, sticking, centering in cups
Use a tabbed wick, secure the tab reliably, center it consistently, and verify the setup before pouring.
Tealights need tabbed wicks because the metal tab holds the wick at the bottom of a shallow cup. Good assembly makes the burn stable and makes wick tests comparable. The goal is not to find one perfect adhesive; it is to assemble and secure wicks the same way every time.
| Step | What to do | Pass check |
|---|---|---|
| Prep the cup | Use a clean, dry, undamaged cup. | The base is flat and free from old wax or dust. |
| Choose the wick | Use a pre-tabbed tealight wick or tab raw braid with a proper sustainer. | The wick is straight and firmly crimped into the tab. |
| Add adhesive | Use a wick sticker, glue dot, or heat-suitable adhesive method. | The tab sticks flat without sliding. |
| Seat the tab | Press the tab into the center of the cup base. | The tab does not lift when gently tugged. |
| Center the wick | Use the cup rim as a visual guide or a simple centering aid. | The wick stands upright near the middle. |
| Verify before pouring | Check every cup before wax is melted. | No wick is tilted, loose, or touching the cup wall. |
| Failure | Likely cause | Next fix |
|---|---|---|
| Tab lifts | Cup base was dusty, oily, or too textured. | Clean the cup and use a fresh adhesive point. |
| Wick floats after pouring | Tab was not pressed down firmly enough. | Rebuild the cup instead of forcing the wick back later. |
| Wick sits off-center | Placement was eyeballed too quickly. | Use a repeatable centering cue before every pour. |
| Wick leans while cooling | Wick was too long, unsupported, or bumped. | Hold it upright with a simple centering aid. |
| Adhesive softens | Wax or cup surface was too hot for the adhesive. | Change adhesive method and test again. |
| Wick tab slides | Cup base is curved or slick. | Use a different cup or a stronger tab-seating method. |
A wick tab is the metal base that anchors the wick inside the cup. A sustainer is the same type of metal support used to hold a wick in place. If you start with raw wick braid, cut it longer than the cup depth, thread it through a tealight sustainer, crimp it firmly, and tug-test it before adding wax.
Wick stickers are fast and clean for beginner batches. Hot glue can work only when used carefully and kept stable under heat, but it can create messy blobs that tilt the tab. Melt-wax tack is less reliable for first batches because it can release when fresh hot wax is poured. The better choice is the one that keeps the tab flat through pouring, cooling, and the full test burn.
Centering matters more in tealights than in larger containers because a small lean puts the flame closer to one side of the cup. That can create uneven heat, tunneling, soot, or a cup that gets hotter on one side. If the wick moves after pouring, let the tealight cool and inspect it. Scrap and redo that cup if the tab lifted, the wick is close to the wall, or the test result would no longer reflect the real wick size.
Keep how to assemble and secure wicks separate from recipe changes. If the wick is not anchored and centered, the next burn result may look like a wax or wick problem when it is really an assembly problem. Once the setup is repeatable, move into Wick sizing & testing, then use Pour/cool/cure notes and the Burn testing checklist to confirm the candle behaves safely.
Melt wax safely: temperature control + safe workflow
Melt wax with controlled indirect heat, a thermometer, and a stable workflow from melt to pour.
The safest beginner method is a double-boiler-style setup or another controlled wax-melting setup recommended for candle making. Do not heat candle wax directly over an open flame, and do not leave melting wax unattended. The purpose of temperature control is to avoid scorching, smoking, spills, water contamination, and inconsistent tealight tests.
| Do | Don’t |
|---|---|
| Use controlled indirect heat. | Do not put wax directly over an open flame. |
| Keep a thermometer in your setup. | Do not guess by appearance alone. |
| Follow your wax supplier’s melt, add, and pour ranges. | Do not invent one temperature for every wax. |
| Keep the work area level and uncluttered. | Do not melt wax near paper, fabric, or loose packaging. |
| Keep water out of melted wax. | Do not splash boiler water into the pouring pot. |
| Stay with the wax while it heats. | Do not leave the room during melting. |
| Keep children and pets away. | Do not rely on quick reactions around hot wax. |
| Shut down the heat before cleanup. | Do not wipe hot wax across a larger surface. |
Use this safe melt workflow:
- Set the cups and wicks before heating wax.
- Place the pouring pot in a stable indirect-heat setup.
- Melt the wax slowly and monitor it with a thermometer.
- Stir gently so heat spreads evenly.
- Add fragrance or dye only at the stage your supplier recommends.
- Remove heat before the wax smokes or smells scorched.
- Pour only when your cups, wicks, surface, and spill plan are ready.
- Turn off the heat and let tools cool before cleanup.
Double boiler setups are useful for small tealight batches because they heat wax more gently than direct heat. Wax melters can be practical for larger batches when they are designed for candle wax and used according to the manufacturer’s instructions. Microwave melting is harder to control for beginners because hot spots, overheated containers, and uneven melting are easier to miss.
If wax starts smoking, smells burnt, or looks discolored from heat, stop heating it. Move the pot away from the heat source if you can do that safely, keep the area clear, and do not pour that wax into a test batch meant to judge wick performance. Scorched wax can change color, scent, and burn behavior, so it can ruin the comparison between tealight samples.
Fragrance in tealights should be measured by weight, not splashed in by drops. Fragrance load means the amount of fragrance compared with the wax weight, while fragrance content means the fragrance share of the total finished mixture. Use the later How much wax and fragrance do tealights need? section for grams, and avoid changing fragrance while you are still trying to solve base wick behavior. Fragrance can thin, thicken, clog, or otherwise change how the wick draws fuel, so it must be tested as its own variable.
Dye should be treated the same way. Use candle-safe dye, avoid particulate colorants that can interfere with the wick, and test one colored tealight beside one uncolored control. If the colored tealight smokes, weakens, or drowns while the control burns better, the dye choice or amount may be part of the problem.
A safe melt setup protects the maker and keeps the tealight test meaningful. The phrase why melt variables affect wick testing matters because wax temperature, fragrance timing, dye choice, and overheating can all change the burn result. After the melt workflow is repeatable, move to Pour/cool/cure and then confirm the finished batch with Burn testing.
Pour, cool, and cure tealights (consistent results)
Pour tealights into prepped, centered cups on a level surface, cool them undisturbed, and cure per wax guidance before judging performance.
A tealight that looks finished is not automatically ready for a fair burn test. The pour, cooling environment, and cure period affect the top finish, scent behavior, wick position, and how reliably you can compare one batch with another. The goal is how to keep tests consistent, not to chase one universal pour temperature or cure time.
- Check that every cup is level, clean, and already wicked.
- Pour slowly down the side or near the center without flooding the wick.
- Leave the cups in one stable place while the wax sets.
- Keep drafts, fans, cold windows, and direct sun away from the cooling batch.
- Inspect the tops after the wax firms.
- Store the tealights as your wax supplier recommends before testing.
Record this for every batch:
| Batch field | What to write down |
|---|---|
| Wax | Brand or blend name, plus any supplier notes followed. |
| Wick | Series, size, tab type, and whether it was pre-tabbed or DIY tabbed. |
| Cup | Material, size class, and holder used for testing. |
| Additives | None, hardener, opacity additive, or other wax modifier. |
| Fragrance/dye | Yes or no, plus weighed amount if used. |
| Pour conditions | Same room, draft-free area, visible issues, and handling notes. |
| Cure start date | Date poured and when you plan to test. |
| First inspection notes | Smooth top, crater, frosting, wet spots, bubbles, or wick movement. |
Fast cooling can make tops look rougher, especially when the room is cold or drafty. Slow cooling can give a smoother finish in many setups, but trapping too much heat can affect small cups differently. Covered curing can protect scent and dust control, but cover only after the wax has set enough that the surface will not be marked. Uncovered curing gives better airflow, but it can leave tealights exposed to dust, pet hair, and workspace debris.
If a top looks uneven, treat it as a process clue before treating it as a safety failure. A shallow dip, light frosting, or small surface mark may be cosmetic, while a shifted wick, cracked cup, loose tab, or signs of overheating need a rebuilt sample. Do not overheat finished tealights just to make the surface look perfect; too much correction can create a new test variable.
Wick movement during cooling usually means the tab was loose, the wick was unsupported, or the cup was bumped after pouring. Use Wick assembly notes to fix that before changing the wax or wick size. If a wick leans after the wax sets, mark that sample as unreliable for comparison because the flame will not heat the cup evenly.
Store curing tealights in a cool, dry place away from direct sunlight and strong odors. Keep batches labeled so scented, unscented, dyed, and undyed tealights do not get mixed. Use your batch notes during Burn testing to interpret results and keep Fix cosmetic issues separate from true flame, soot, or cup-safety failures.
Burn testing + tealight safety checklist (pass/fail)
A tealight passes only when it burns stably in its real cup and holder without unsafe flame behavior, heavy soot, or cup failure.
Burn testing is the safety gate that confirms whether the wax, cup, wick, fragrance, dye, and holder work together. For tealights, the test must use the same cup and holder planned for real use because small containers concentrate heat quickly. Use burn testing to confirm wick size, not just to admire the finished candle.
A tealight is ready only after the same cup, wick, wax, fragrance status, and holder pass a burn test without unsafe flame behavior, cup deformation, leaking, or repeated soot.
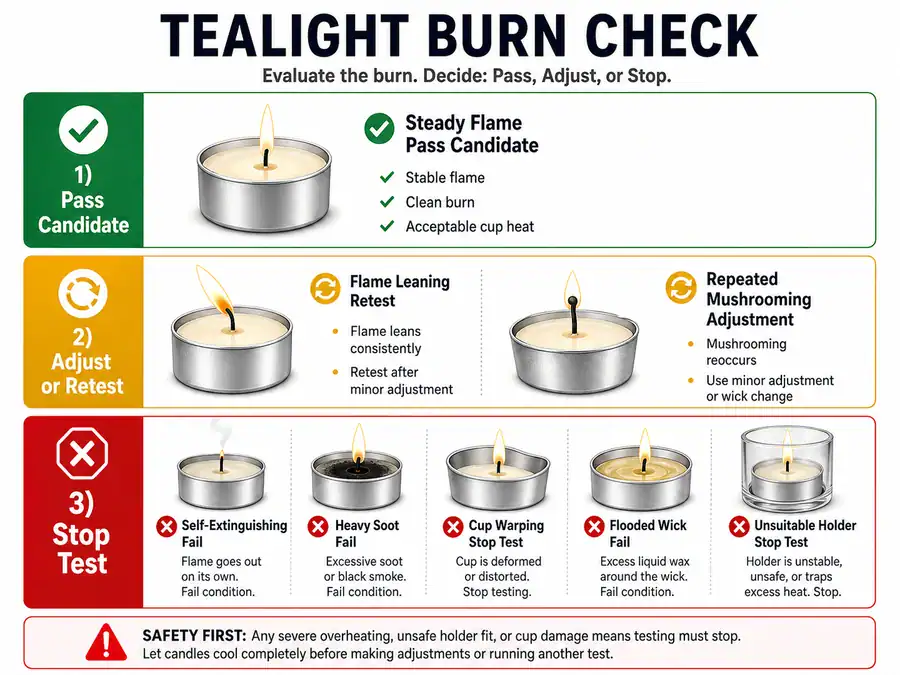
| Test result | Pass or fail? | What it means |
|---|---|---|
| Steady flame with no heavy soot | Pass candidate | Continue observing through the planned test. |
| Wick self-extinguishes | Fail | The wick may be too small, clogged, off-center, or drowned. |
| Heavy soot or repeated smoking | Fail | The wick may be too large, the fragrance/dye may be too heavy, or airflow may be poor. |
| Cup warps, cracks, leaks, hazes badly, or deforms | Stop test | The cup, heat exposure, or holder setup is unsafe for that design. |
| Flame leans hard toward one side | Fail or retest | Check wick centering, drafts, holder shape, and cup level. |
| Wick mushrooms heavily again and again | Adjust | Test a smaller wick or different wick series before scaling. |
| Melt pool floods the wick | Fail | Try a different wick, wax, fragrance level, or cup setup one variable at a time. |
| Holder becomes unsuitable for handling or placement | Stop test | Retest in a safer holder or change the tealight design. |
Method: Test labeled samples on a heat-safe, level surface with draft control and enough space between candles to compare them fairly. Check each tealight at regular intervals, write down flame behavior, soot, wick condition, cup condition, melt pool, and stop reasons. Do not treat one lucky candle as proof; repeat the best setup before making a larger batch.
Stop the test immediately if the flame becomes erratic, the cup deforms, wax leaks, the wick shifts dangerously, smoke continues after trimming or adjustment, or anything nearby becomes unsafe. Let the candle cool before handling unless leaving it in place creates a greater hazard. A stopped test is useful data, not a failed project.
| Comparison | Trust this result more | Why |
|---|---|---|
| Holder test vs free-standing test | Holder test | The real holder changes heat and airflow. |
| Short check vs full burn observation | Both, for different reasons | Early checks catch obvious hazards; longer observation catches late drowning or overheating. |
| One sample vs several samples | Several labeled samples | Repeated results are more reliable than one clean burn. |
| Unscented test vs scented test | Unscented first, then scented | Fragrance can change wick behavior, so it should be tested after the base setup. |
If the tealight soots, try a smaller wick or lower-impact formula change before blaming the cup. If the wick drowns, first check wick centering, tab security, fragrance, dye, and wax choice before moving larger. If the cup overheats or deforms, change the cup or holder immediately rather than trying to force the wick to compensate.
A good burn log makes troubleshooting easier because it connects each symptom to a specific batch field. Use Fix burn problems only after the test notes show what changed. If cup material or holder fit appears involved, return to Cups/material choice before repeating the same wick test.
How much wax and fragrance do tealights need?
Tealight batch math starts with the measured fill weight of one cup, then uses that number to calculate wax, fragrance, overage, and yield.
Use your measured grams-per-cup instead of a generic “standard tealight” weight. Cup size, fill line, wax type, fragrance, dye, and additives can all change the finished weight. The safest batch math uses grams because a digital scale is easier to repeat than an eyeballed pour line.
| Input | What to enter | Example label |
|---|---|---|
| Number of tealights | The cup count you plan to pour | 12, 24, 50, or 100 cups |
| Grams per cup | Your measured wax fill weight for one cup | “Measured cup fill” |
| Fragrance percentage | Only the percentage allowed by your wax and fragrance guidance | “Supplier-specific” |
| Planned overage | Extra wax for pot residue, spills, and top-offs | “Small buffer” |
Formula box:
| Output | Formula |
|---|---|
| Base wax weight | Number of tealights × measured grams per cup |
| Overage weight | Base wax weight × chosen overage rate |
| Total batch weight before fragrance | Base wax weight + overage weight |
| Fragrance grams | Total batch weight × sourced fragrance percentage |
| Wax grams after fragrance math | Total batch target − fragrance grams |
| Estimated yield | Total usable wax ÷ measured grams per cup |
Fragrance load means the fragrance amount compared with the wax weight or batch basis used by the supplier. Do not copy a percentage from another wax, another fragrance, or another maker’s scented tealight without checking the product guidance. If the fragrance guidance is missing, make an unscented test batch first and keep the scented version separate until you can test it safely.
Dye and additives belong in the same caution zone as fragrance. They can change how the wick draws fuel, so a batch that calculates neatly can still fail the burn test. The calculator tells you how much to weigh; it does not prove that the tealight burns safely.
Use batch scaling next when you want a reusable yield plan for different counts, and use a dedicated calculator page when you need broader candle math beyond tealights.
Fix common tealight burn problems before scaling
First-pass tealight troubleshooting starts with the visible symptom, one controlled change, and a repeat burn test in the same cup and holder.
Most tealight fixes are tested changes, not guesses. Start with the symptom, keep the same cup, holder, wax, and test space, then change only the next likely variable. Stop the test when flame behavior, smoke, leaking, cup deformation, or heat exposure becomes unsafe.
| Symptom | Likely cause | Next test change | Stop note |
|---|---|---|---|
| Tunneling with wax left around the edge | Wick may be too small, clogged, off-center, or affected by a cool draft | Recenter the wick if needed, then test one wick size up in the same cup | Stop if the flame becomes unstable or the cup overheats. |
| Wick drowns or goes out | Wick may not pull enough fuel, or fragrance/dye may be clogging it | Test unscented or undyed control, then test one wick size up | Stop if the wick repeatedly disappears under the melt pool. |
| Heavy mushrooming | Wick may be too large, fuel-heavy, or poorly matched to the wax | Trim before testing, then test one wick size down or a different series | Stop if smoke or carbon buildup keeps returning. |
| Soot or smoke | Wick may be too large, fragrance may be too heavy, or airflow may be poor | Remove drafts, test a smaller wick, and compare scented vs unscented samples | Stop if smoke continues after controlled changes. |
| Flickering or leaning flame | Draft, holder shape, tilted cup, or off-center wick | Test on a level surface, rebuild the centered wick, then retest | Stop if the flame repeatedly heats one side of the cup. |
| Cup haze, warping, leaking, or cracking | Cup or holder may not suit the heat pattern | Change cup material or holder before changing the recipe | Stop immediately and do not scale that design. |
Method: Use the same cup type, holder, wax, wick series, room setup, and note fields for each troubleshooting test. Change only one variable per run so the result points to a real cause. Record the symptom, the change made, and whether the problem improved, worsened, or stayed the same.
Keep full symptom ladders, repeated wick changes, and multi-candle diagnosis in the dedicated Fix burn problems guide. This page should identify the first safe adjustment before you scale the tealight batch.
Batch scaling: wax per tealight + yield planning
Scale tealights only after a small batch passes the burn test, then multiply your measured grams-per-cup by the number of cups and planned overage.
Method: Measure once, reuse the number.
| Step | What to do | What to record |
|---|---|---|
| Tare | Put one empty cup on the scale and zero it. | Cup type and size class |
| Fill | Add wax to your chosen fill line. | Your measured grams per cup |
| Repeat | Check another cup from the same pack. | Any meaningful difference |
| Save | Write the value on your batch sheet. | Cup, wax, wick, and date |
| Scale | Multiply by the number of tealights. | Batch count and planned overage |
Use the How much wax and fragrance do tealights need? section when you need the final wax grams, fragrance grams, and estimated yield. This planning step is the cup-measurement method behind the math, not a second calculator. The key value is your measured grams per cup, because standard cups, maxi cups, different waxes, and different fill lines can all change the amount you need.
Standard tealights and maxi tealights should have separate yield records, even when the wax and wick series are the same. If fragrance, dye, cup size, holder, or wick changes, repeat the burn test before treating the larger batch as gift-ready.
A dry run helps before a big batch. Set out the cups, labels, tray, wick tools, and pouring route before wax is melted. Count the cups twice, keep spare cups nearby, and decide where overage will go if you have extra wax. Batch planning ends at the scale; safe production still depends on cooling notes, storage choices, and a fresh burn test after any formula change.
Packaging & storage + basic safety warning label
Store finished tealights cool, dry, dark, and covered, then add plain safety warnings before gifting or storing.
| Do | Don’t |
|---|---|
| Store tealights in a cool, dry, dark place. | Do not leave them in sun, hot cars, or near heaters. |
| Keep them covered to reduce dust and scent fade. | Do not store scented batches open beside strong odors. |
| Label batches with pour date, wax, wick, and scent. | Do not mix test batches with gift-ready batches. |
| Inspect cups before packing. | Do not gift cracked, warped, dusty, or loose-wick tealights. |
| Keep packaging clean and snug without crushing cups. | Do not use packaging that bends the wick or dents the cup. |
| Keep warning text visible for gifts. | Do not treat a basic warning as full selling compliance. |
A simple storage routine protects the tealight’s shape, scent, wick, and cup. Heat can soften wax or deform some cups, light can affect color and scent, and dust can make a candle look dirty before it is used. For scented tealights, sealed or covered storage usually makes more sense than open tray storage, but the candles should be fully cooled before packing.
Basic warning label example for gifts:
| Label line | Plain wording |
|---|---|
| Surface | Burn only on a heat-safe surface in a suitable holder. |
| Supervision | Never leave a burning candle unattended. |
| Distance | Keep away from children, pets, drafts, and flammable items. |
| Wick | Trim wick before lighting if needed. |
| Stop use | Stop use if the cup cracks, leaks, smokes heavily, or deforms. |
| Use | Burn only one tealight per holder unless the holder is made for more. |
This label is basic use guidance, not a legal clearance for selling. Selling can require market-specific chemical, safety, language, batch, and supplier-document checks. Keep that boundary clear so gifting, storage, and selling do not get treated as the same task.
Use this pre-gift check before packing:
- The wick is centered and secure.
- The cup is not cracked, warped, leaking, or dented near the wick.
- The top is clean enough for gifting.
- The scent has not bled into nearby packaging.
- The tealight passed the same holder-based burn check used for the batch.
- The package includes plain safe-use wording.
Refillable and reusable tealight systems need a separate fit check. Measure holder fit, check airflow, inspect the reusable cup, and burn-test the refill in the actual holder. A refill that fits loosely, sits too deep, or burns in a tight decorative holder can behave differently from a disposable tealight.
Use burn testing notes before gifting any new cup, scent, wick, or refill setup. If the candles will be sold, shipped, or offered across markets, move from basic storage and warnings to Compliance & labeling before listing them anywhere.
Compliance & labeling: selling vs gifting boundary
Tealight compliance means market-specific verification for selling, while gifting still needs safe-use warnings, batch notes, and a passed burn test.
This section is a boundary check, not legal advice. A basic warning label can help a gift recipient use a tealight more safely, but it does not prove that a sold candle meets chemical, packaging, language, marketplace, or consumer-product duties.
Method: Keep a compliance document set before selling.
| Document or record | Why to keep it |
|---|---|
| Wax supplier documents | Shows product identity, handling notes, and supplier guidance. |
| Fragrance SDS | Helps identify classification, hazards, and handling information for the fragrance. |
| IFRA certificate from supplier, where applicable | Helps check fragrance use guidance for the intended product type. |
| Formula log | Records wax, fragrance, dye, additive, wick, cup, and batch changes. |
| Label versions | Shows what warning, ingredient, or hazard text was used for each batch. |
| Review date | Records when supplier documents and official guidance were last checked. |
| Burn-test log | Supports safety notes and helps you document your pass/fail tests. |
Stop and consult a qualified compliance professional when you sell in more than one market, use complex fragrance blends, change suppliers, re-label products made by someone else, or cannot interpret supplier documents.
| Situation | Practical boundary |
|---|---|
| Gifting to friends or family | Use safe-use warnings, batch notes, and a passed burn test. Do not treat this as selling compliance. |
| Selling locally | Check the rules for your country, state, region, marketplace, and product category before listing. |
| Selling in the EU | Verify chemical classification, packaging, and label duties for the finished scented candle or mixture. |
| Selling in the US | Verify candle safety, hazardous-substance labeling, wick restrictions, and consumer product duties. |
| Selling through a marketplace | Check both legal requirements and marketplace-specific label or document rules. |
General candle safety pictograms and chemical hazard labeling are not the same thing. A fire-safety warning tells people how to burn the candle more safely; a chemical hazard label, when required, communicates classification-based hazards for the product or mixture. Keep those two buckets separate so a basic safe-use label does not accidentally replace a required compliance label.
For a small maker, the cleanest workflow is simple: collect supplier documents, record the formula, verify the finished product requirements for the target market, design the label, keep the label version with the batch, and re-check when suppliers or rules change. Re-check the label, packaging, and records before the next sale.
PATCH SUMMARY:
Applied internal: 9
Skipped internal: 1
Applied external: 6
Skipped external: 0