A scented candle is wax, a wick, and a measured scent ingredient added during the melted-wax process.
For most beginners, candle-safe fragrance oil is the more predictable choice because it is made and labeled for candle use. Essential oil can work in some candles, but plant origin does not automatically mean better scent throw, safer burning, or candle suitability.
To make a scented candle, prepare the container and wick, melt the wax, weigh the scent against the wax weight, add the scent at the right melted stage, stir it through the wax, pour the candle, let it cure, and test the scent after curing.
The best beginner result comes from treating “scented” as a measured candle-making step, not as a naturalness claim or a room-strength guarantee. Fragrance choice, scent amount, add timing, mixing, and cure time all affect whether the finished candle smells pleasant, burns safely, and performs consistently.
Scent ingredient choice: fragrance oil vs essential oil
Fragrance oil is usually the more predictable beginner choice for scented candles when it is labeled for candle use.
On this page, “better” means easier to measure, easier to verify for candle use, and more likely to give repeatable cold and hot throw.
Essential oil can fit a natural-origin preference, but plant-derived oil does not automatically mean stronger scent, safer candle use, or better wax performance. In candle making, the useful question is not “Which oil sounds more natural?” It is “Which scent ingredient is suitable for wax, heat, wick behavior, and the scent result I want?”
| Decision point | Candle-safe fragrance oil | Essential oil |
|---|---|---|
| Beginner predictability | Usually easier to use when made for candles | More variable by oil type and supplier guidance |
| Scent throw | Usually stronger and more consistent | Often lighter or less predictable |
| Natural-origin preference | May be synthetic, natural, or blended depending on supplier | Plant-derived, but that does not prove candle suitability |
| Candle-use documentation | Often includes candle-use notes, usage range, and handling details | Must be checked carefully for candle use |
| Cost per usable candle | Often more practical for repeat batches | Can become costly at candle-use amounts |
| Best beginner use | First scented candles, gifts, repeatable scent results | Small natural-preference tests with limited expectations |
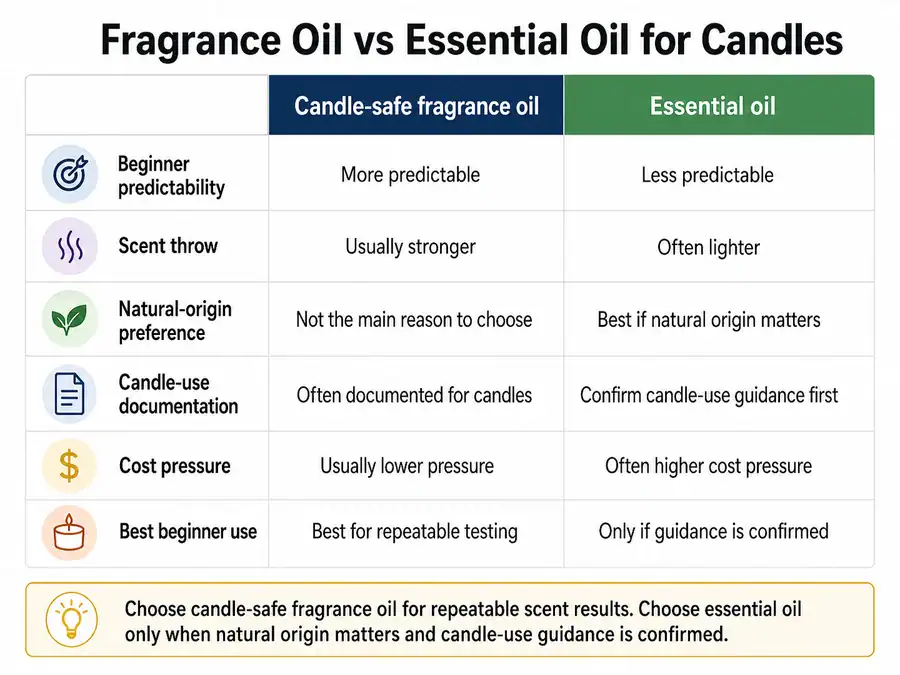
Method note: This is a modeled beginner-use comparison, not a lab test. It compares common candle-making decision factors: candle-use labeling, expected scent throw, beginner error risk, cost pressure, and how much extra checking the maker must do.
Choose fragrance oil when your goal is a scented candle that smells clear after curing and burning. Choose essential oil only when natural origin matters more than scent strength and you can confirm the oil fits candle use.
A useful rule is simple: do not use diffuser oil, perfume oil, or soap-only fragrance just because it smells good in the bottle. Candle wax and flame conditions are different from room fragrance or skin products.
Basic scented candle process
Make a scented candle by preparing the container and wick, melting wax, weighing scent by wax weight, adding scent at the proper wax stage, mixing, pouring, curing, and testing.
Scented candles add three extra decisions to the base candle-making process: which scent ingredient to use, how much to add, and when to judge the finished scent.
Use a heat-safe container, a suitable candle wick, and supplier instructions before treating the scent step as the only performance variable.
- Prepare the container and wick. Center the wick before melting wax so the pour stage is not rushed.
- Melt the wax. Follow the wax maker’s heating and handling directions.
- Weigh the wax. Scent amount should be based on wax weight, not drops.
- Weigh the scent ingredient. Check whether the oil is intended for candle use.
- Add scent during the wax-appropriate melted stage. Do not rely on one universal temperature for every wax and oil.
- Stir the scent through the wax. Stirring helps distribute scent, but it cannot fix an unsuitable oil.
- Pour into the prepared container. Keep the wick centered as the wax sets.
- Let the candle cure. The candle may smell different before and after cure.
- Test cold throw and hot throw. Cold throw is the scent before burning. Hot throw is the scent while burning.
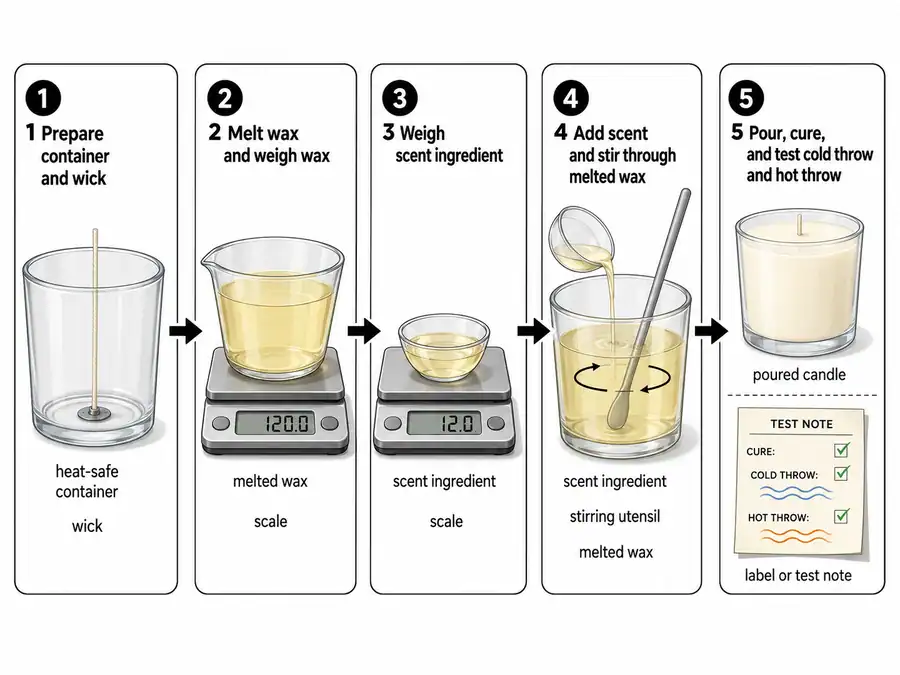
A functional photo sequence, if added, should show the scent-specific steps: weighing oil, adding it to melted wax, stirring, pouring, and labeling the test candle. Decorative lifestyle photos should not replace those steps because the reader needs process clarity, not mood imagery.
Fragrance load and measurement basics
Fragrance load is the scent weight compared with wax weight, so scented candles should be measured with a scale instead of drops.
For beginner candle making, treat scent as a weighed ingredient. Drops are too uneven because oil thickness, dropper size, and fragrance strength vary. A candle that smells weak in the jar may be under-scented, but a candle that uses too much oil can sweat, burn poorly, or fail to hold scent in the wax.
Use this basic formula:
Fragrance load (%) = fragrance oil weight ÷ wax weight × 100Example:
30 g fragrance oil ÷ 500 g wax × 100 = 6% fragrance loadThat example shows the math pattern only. It is not a universal target for every wax, oil, or container. The correct amount depends on the wax maker’s guidance, the fragrance supplier’s candle-use notes, and your own small-batch test result.
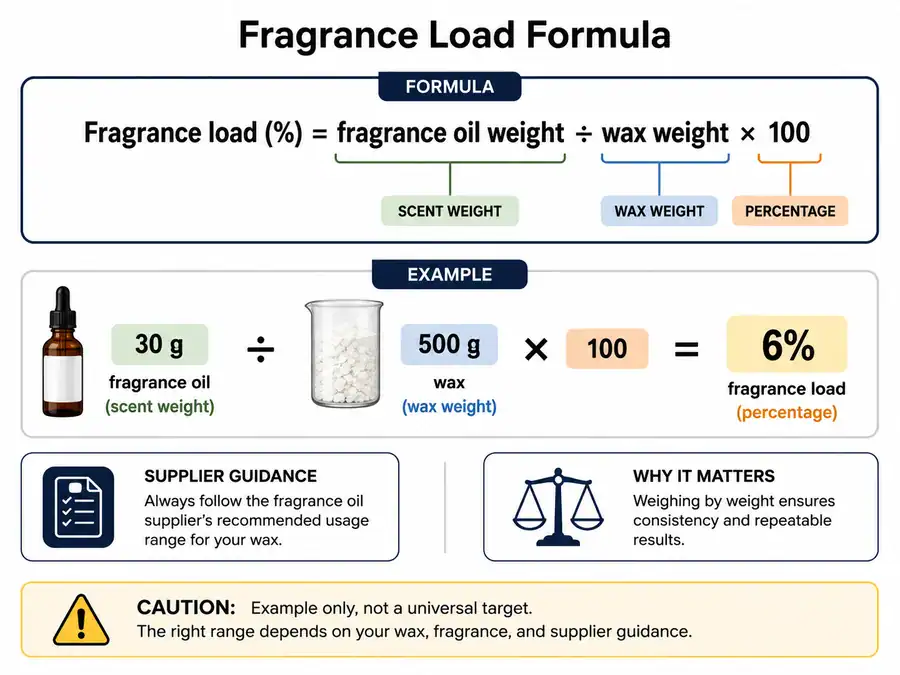
This section explains the ratio; exact batch sizing should be calculated from the wax, container, and supplier guidance before pouring.
| Measurement choice | Better beginner habit | Why it matters |
|---|---|---|
| Wax amount | Weigh wax before scenting | Keeps the scent ratio tied to the actual batch |
| Scent amount | Weigh oil in grams or ounces | Reduces guesswork and repeat-batch drift |
| Supplier guidance | Check candle-use range | Stops you from copying a number that does not fit the oil |
| Test batch | Label wax, oil, load, and date | Makes the next candle easier to adjust |
Do not raise fragrance load just because the bottle smells light. The bottle scent is not the same as cold throw, and cold throw is not the same as hot throw.
When to add scent to wax
Add scent after the wax has fully melted and reached the fragrance-add range recommended by the wax maker or scent supplier.
There is no single add temperature that works for every scented candle. Wax type, scent ingredient, oil design, and supplier instructions all affect when the scent should go into the melted wax. The goal is to add scent when the wax can accept and distribute it without overheating the oil or pouring before it is mixed.
A practical beginner sequence looks like this:
- Melt the wax until no solid wax remains.
- Remove or reduce heat according to the wax instructions.
- Check the wax maker’s and oil supplier’s add guidance.
- Weigh the fragrance or essential oil.
- Add the scent into the melted wax at the recommended stage.
- Stir until the oil is evenly distributed.
- Pour according to the wax and container plan.
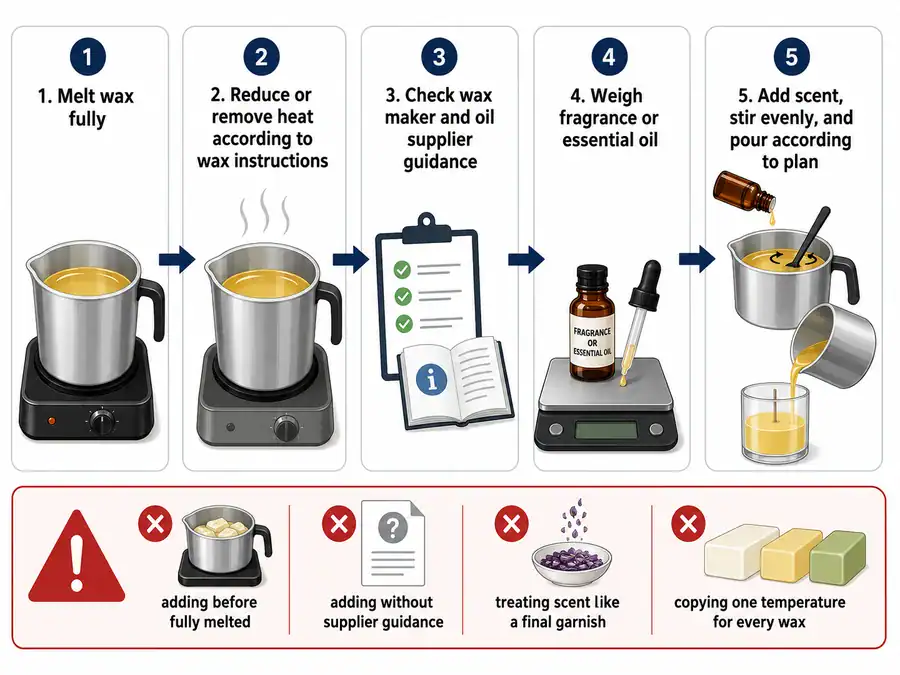
| Timing mistake | What can happen | Better habit |
|---|---|---|
| Adding scent before the wax is fully melted | The scent may not spread evenly | Melt wax fully before scenting |
| Adding scent without supplier guidance | The oil may be added at the wrong stage | Check wax and scent guidance first |
| Treating scent like a final garnish | The oil may not mix through the wax | Add scent before pouring and stir well |
| Copying one temperature for every wax | The step may not fit your wax or oil | Follow the materials you are using |
The common mistake is treating scent like a final garnish. Scent needs time to distribute through the melted wax before pouring. Adding it too late can leave uneven scent pockets, while overheating can reduce scent quality or create a harsher finished candle.
For essential oils, be more cautious because each oil behaves differently under heat. Natural origin does not remove the need for candle-use guidance.
Mixing and binding scent into wax
Stir enough to distribute the measured scent ingredient through melted wax, but do not use stirring to fix unsuitable oil or excessive load.
In scented candle making, mixing means spreading the fragrance or essential oil evenly through melted wax before pouring. It does not prove the oil is candle-safe, and it cannot make a wax hold more scent than the wax and supplier guidance allow.
This section is about prevention before pouring, not full diagnosis after the candle fails.
| Mixing step | What to do | What it prevents |
|---|---|---|
| Weigh the scent first | Measure the scent before adding it to wax | Guesswork and accidental overload |
| Add scent at the right melted stage | Follow wax and oil guidance instead of one universal rule | Poor distribution or heat damage |
| Stir through the full wax pool | Move the utensil through the center and edges | Uneven scent pockets |
| Keep stirring controlled | Mix steadily instead of whipping air into the wax | Bubbles and messy surface texture |
| Watch the wax surface | Look for oily streaks or separation before pouring | Early signs that the oil may not be binding |
| Pour only after the scent looks distributed | Do not rush the pour just because the oil is in the pot | Weak or uneven candle scent |
| What you notice before pouring | Likely meaning | Safer next step |
|---|---|---|
| Oily streaks stay visible | The oil may not be distributing well | Check scent amount, oil suitability, and wax guidance |
| Oil beads on the surface | The wax may not be holding that ingredient or amount | Stop and review the scent load before pouring |
| The mixture smells harsh after heating | The oil may have been overheated or poorly suited | Use supplier guidance before repeating the batch |
| The candle smells uneven after setting | The scent may not have been mixed through the wax | Log the batch and test again with one changed variable |
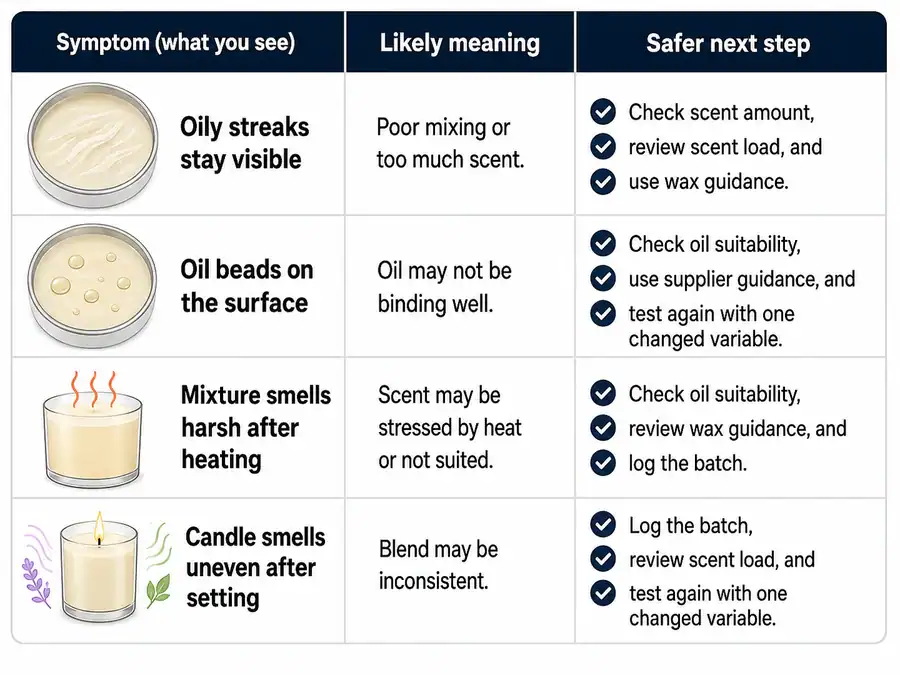
Method note: This checklist is a prevention tool based on common beginner failure patterns. It separates mixing technique from ingredient suitability because longer stirring cannot turn diffuser oil, perfume oil, soap-only fragrance, or overloaded wax into a stable scented candle.
Good mixing supports a suitable oil; it does not rescue the wrong oil.
Cure time and scent throw expectations
Judge final scent after curing, then separate cold throw from hot throw before deciding whether the candle is weak.
Cure time is the resting period after pouring when the candle firms and the scent settles in the wax. Cold throw is the scent before burning. Hot throw is the scent while the candle burns under test conditions.
Compare scent results under the same room size, burn window, and note-taking method so the batch result is not distorted by the test setup.
In this scented-candle article, the main rule is simple: do not judge the finished scent only from the jar smell right after pouring.
| Checkpoint | What to judge | What not to assume |
|---|---|---|
| Right after pouring | Whether the candle set safely and evenly | That the final scent is already fixed |
| After initial rest | Whether the cold scent is developing | That cold throw predicts hot throw |
| After the recommended cure period | Whether the candle is ready for a test burn | That more fragrance oil is always needed |
| During a test burn | Whether hot throw appears under burn conditions | That weak hot throw has one single cause |
| After logging results | Whether the recipe needs one change | That the whole recipe must be rebuilt |
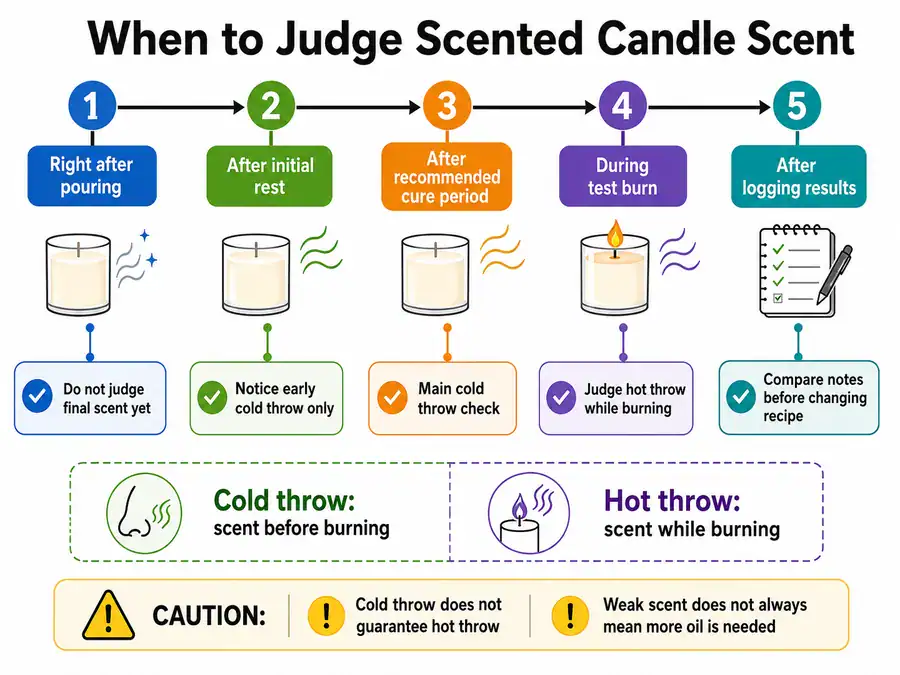
A candle can smell strong in the jar and still feel weak while burning. The reverse can happen too: a candle that smells modest before lighting may perform better after cure and test burn. That is why cold throw and hot throw should be recorded as separate observations.
| Beginner conclusion | Better interpretation | Better next step |
|---|---|---|
| “It smells weak right after pouring.” | It may be too early to judge final scent. | Wait for the wax and scent to cure. |
| “The jar smells good, so it will fill the room.” | Cold throw does not guarantee hot throw. | Test the candle under repeatable burn conditions. |
| “The scent is weak, so I need more oil.” | Load, wick, wax, cure, and oil fit can all affect scent. | Review the recipe before adding more oil. |
| “One test tells me everything.” | One test can miss cure timing or burn-condition effects. | Record results before changing more than one variable. |
Method note: This section uses beginner evaluation stages rather than fixed cure claims. Exact cure windows depend on wax type, fragrance, supplier guidance, container size, and storage conditions, so this article keeps the rule at the decision level.
Essential oil candle limitations
Essential oils can be used only when the oil and use conditions are suitable for candles.
Plant-derived oil does not automatically mean safer burning, stronger scent, or better candle performance. In candle making, “natural” should mean source origin only, not a guarantee that the oil belongs in hot wax or performs well after curing.
Do not use essential-oil candle wording to imply therapeutic, cleaner, or safer burning unless a qualified source and use condition support that claim.
This section only covers the limits that affect a beginner scented-candle batch.
| Limitation | What it means for beginners | Safer decision |
|---|---|---|
| Candle suitability | Not every essential oil is made for candle wax and flame conditions | Check candle-use guidance before making a batch |
| Scent strength | Some essential oils smell lighter in wax than expected | Test a small batch before scaling |
| Heat behavior | Heat can change how an oil smells or performs | Avoid treating diffuser results as candle results |
| Cost pressure | Essential oils can be expensive at candle-use amounts | Compare cost against the finished scent result |
| Claim risk | Plant origin does not prove therapeutic, cleaner, or safer candle use | Avoid aromatherapy and medical claims |
| Documentation | Supplier notes may be thinner than candle fragrance documentation | Use documented candle-safe inputs when repeatability matters |
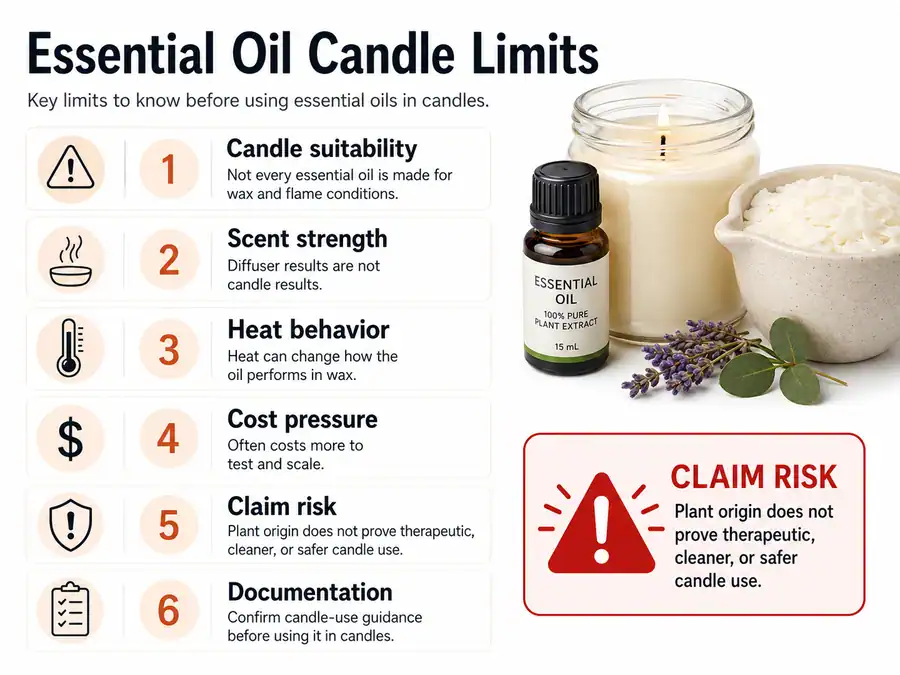
Method note: This limitation matrix is a modeled beginner decision tool, not oil-specific lab testing. It compares essential oils by candle-use fit, heat and scent expectations, cost pressure, and claim risk.
Essential oils make the most sense when natural origin matters and lighter or less predictable scent is acceptable. Candle-safe fragrance oil is usually a better first test when the goal is repeatable scent throw.
Candle-safe fragrance oil selection
Choose fragrance oil intended for candle use and verify supplier guidance before using it in wax.
Here, candle-safe means the supplier documents the oil for candle wax and burn conditions, not merely that the oil smells pleasant.
A candle-safe fragrance oil should be described for candle making, not only for diffusers, perfume, soap, or skin products. The useful buying check is whether the supplier gives candle-use guidance that matches wax, load, and testing needs.
This section stays limited to candle-use verification, not product rankings.
| Check | What to look for | Red flag |
|---|---|---|
| Candle-use label | The oil is sold or documented for candle making | “For diffuser use only” or no candle-use note |
| Usage guidance | Supplier gives a candle-use range or handling notes | No guidance for wax use |
| Wax fit | Notes mention wax type or general candle compatibility | Only soap, perfume, or room-spray guidance |
| Safety documentation | Supplier provides clear handling or compliance notes where relevant | Vague “safe” claims without use conditions |
| Scent expectation | Reviews or notes mention candle performance, not just bottle smell | Praise only for diffuser or perfume use |
| Test plan | You can test one small candle before making more | Buying a large bottle before any burn test |
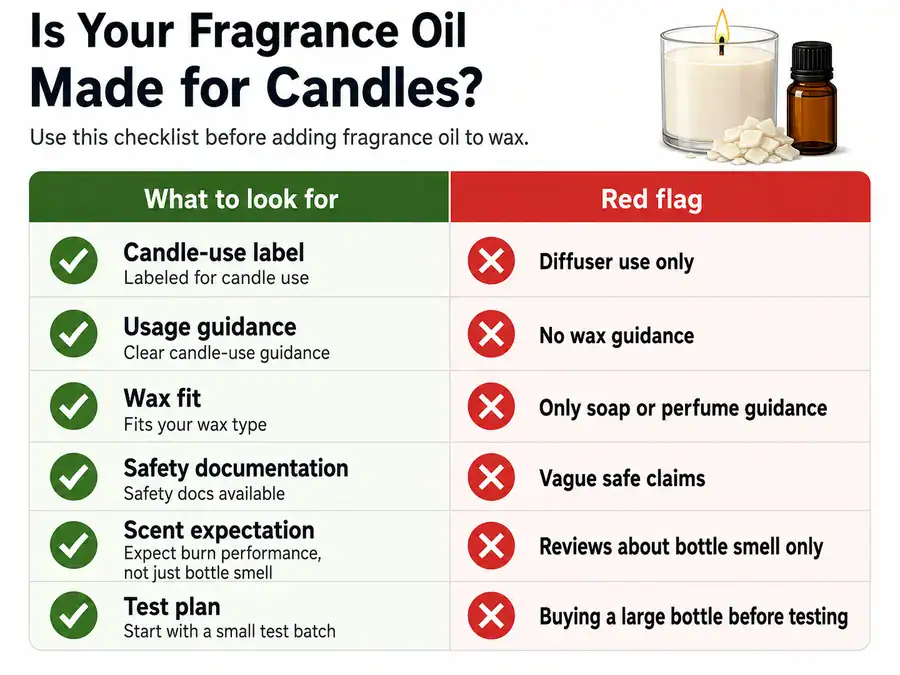
Method note: This checklist is a modeled verification dataset for beginners. It does not rank brands, test specific products, or replace supplier instructions.
Do not buy fragrance oil only because it smells strong in the bottle. Bottle scent is not the same as wax behavior, cold throw, or hot throw.
Once the oil passes a candle-use check, measure it by wax weight.
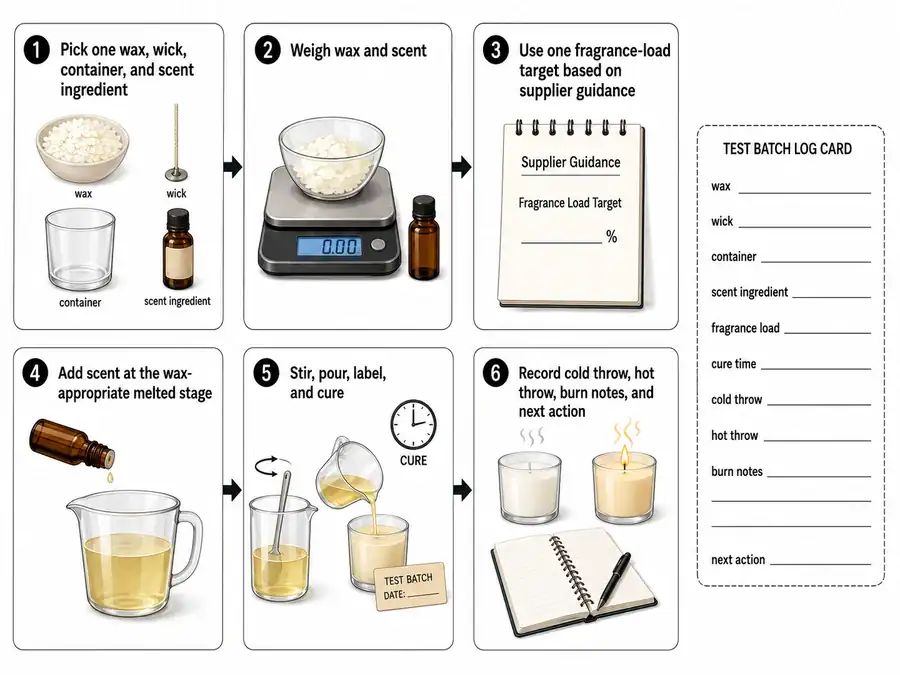
Beginner scent test batch
Test one small scented candle before making a larger batch.
A test batch is one controlled candle used to check scent choice, fragrance load, cure, cold throw, and hot throw before scaling. Change only one variable at a time, or the result will not tell you what actually improved or failed.
This beginner version is enough for a first scented candle.
- Pick one wax, one wick, one container, and one scent ingredient.
- Weigh the wax and scent instead of using drops.
- Use one fragrance-load target based on supplier guidance.
- Add the scent during the wax-appropriate melted stage.
- Stir, pour, and label the candle with the batch details.
- Let the candle cure before judging final scent.
- Record cold throw before burning.
- Record hot throw during a careful test burn.
- Change only one variable in the next test.
If the only question is exact scent math, calculate the scent weight from the wax weight and supplier guidance before repeating the batch. If the candle has already cured and still smells weak, diagnose the full recipe separately instead of turning this test section into a troubleshooting article.
| Field | What to record |
|---|---|
| Test date | Date poured and date tested |
| Wax | Wax type or blend |
| Wick | Wick series and size, if known |
| Container | Jar size, diameter, and material |
| Scent ingredient | Fragrance oil or essential oil name |
| Candle-use check | Supplier candle-use guidance confirmed: yes/no |
| Fragrance load | Percentage or weighed scent amount |
| Add stage | When the scent was added to melted wax |
| Stirring note | Whether the oil looked evenly distributed |
| Cure time | How long the candle rested before testing |
| Cold throw | Weak, moderate, strong, or notes |
| Hot throw | Weak, moderate, strong, or notes |
| Burn notes | Flame, melt pool, soot, or uneven behavior |
| Next action | Keep recipe, lower load, raise load, change oil, change wick, or retest |
Method note: This log is a beginner validation tool, not a commercial quality-control protocol. It is designed to isolate one change at a time so a maker can learn whether the scent ingredient, load, cure, or burn behavior needs adjustment before making more candles.