
Wood-wick candle burn problems are wood-wick performance symptoms, such as tunneling, soot, weak flames, drowning, high flames, unstable crackling, or a wick that keeps going out. This page covers personal-use and test-burn troubleshooting only, so “safe” means lowering fire risk during a monitored burn, not product certification, seller compliance, or a full candle safety standard.
Wood wicks can burn beautifully, then start tunneling, smoking, or dying out halfway through a candle. The good news is that most issues come from a small set of causes you can spot by watching the flame and melt pool. Make one change at a time so you do not trade one problem for another. If anything looks unsafe, stop the burn and troubleshoot only after the wax is fully cool.
How to Fix Common Wood Wick Problems
Most wood-wick issues come from three things: wick height, wick size, and burn conditions, especially airflow. The fastest way to troubleshoot is to match the symptom to a safe first move, then re-check the next burn before you change anything else.
Wood-Wick Symptom Matrix: Cause, First Fix, and Escalation Signal
This matrix keeps the first fix tied to the visible wood-wick symptom, while “safest first move” means the lowest-risk action before another monitored burn.
| Symptom | Likely cause | Safest first move | Escalate if |
|---|---|---|---|
| Tunneling | Under-sized wick, short early burns, drafts, or a heavier blend | Remove drafts, confirm trim, and re-test with a steady burn | Side wax returns after two careful burns |
| Wick keeps going out | Wick too short, drowning, debris, drafts, or wick/blend mismatch | Cool fully, remove loose char, relight in calm air, and stop repeated relights | It fails again after trim, debris removal, and calm-air testing |
| Tiny or weak flame | Under-wicking, heavy wax or fragrance setup, or airflow cooling the melt pool | Re-test with a clean trim in calm air | The flame stays small across controlled burns |
| Drowning wick | Too much liquid wax around the wick or weak fuel draw | Extinguish, cool fully, and remove solid excess wax from around the wick | The wick repeatedly ends up underwater |
| Soot or smoke | Long wick, over-sized wick, drafts, or carbon buildup | Extinguish, cool, remove loose char, trim shorter, and re-test away from drafts | Soot returns with careful trim and calm air |
| High, wild, or flickering flame | Wick too long, over-wicking, drafts, or carbon buildup | Extinguish, cool, trim, and move the candle away from airflow | The flame reaches the rim or label, sparks, or overheats the container |
| Mushrooming or carbon buildup | Excess fuel, long sessions, over-sized wick, or residue-heavy blend | Cool fully, remove the carbon cap, and re-trim to a neat edge | Large buildup returns quickly |
| Spitting, sparks, or unstable crackle | Unstable flame, debris, drafts, or buildup | Extinguish, cool, remove debris, and re-test carefully | Sparks, flare-ups, or unstable flame behavior returns |
Stop first, safety gate. Extinguish right away if you see heavy smoke, repeated sparking, a flame reaching the jar rim or label, or a container that feels excessively hot near the top. When in doubt, follow beginner candle safety rules: stop, cool, assess, then decide.
Wood-Wick Decision Ladder: What to Fix First
Use this wood-wick ladder to decide whether the next move is a safety stop, a trim-and-airflow correction, or a sizing signal.
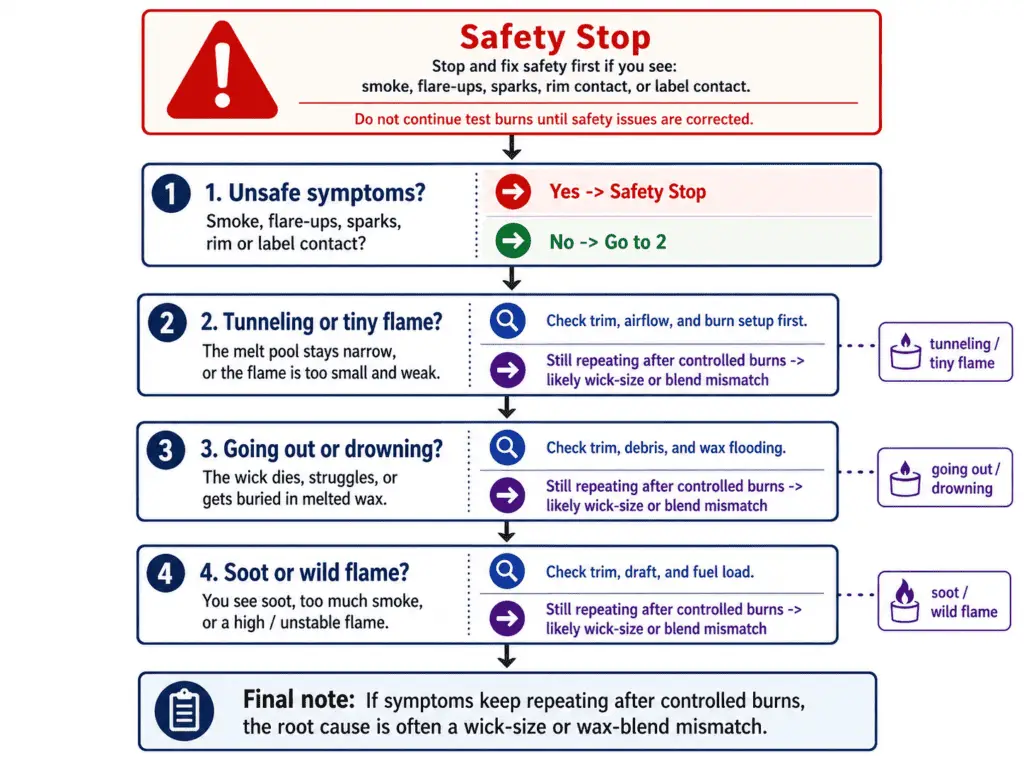
- Smoke, flare-ups, sparks, or a flame near the rim or label: extinguish and do not relight until the candle is cool and stable.
- Tunneling or a tiny flame: confirm trim and drafts first. If it repeats after two careful burns, treat it as a wick-size mismatch.
- Going out or drowning: cool fully, clear loose char, then re-test in calm air. If it repeats, treat it as a wick and blend mismatch.
- Soot streaks or a tall, wild flame: cool fully, trim shorter, remove drafts. If it repeats, test a smaller wick.
If you keep running into the same symptom across different candles, step back and review the sizing logic in the full wood-wick sizing guide before you keep rescuing jars one by one.
Tunneling: wax left on the sides
Tunneling is when the candle burns down the center while leaving a ring of wax stuck to the jar wall, and light cases are usually corrected by improving trim, burn conditions, and airflow before changing wick size.
Wood-wick tunneling usually comes from an under-sized wick for the container width, early burns that were too short to warm the outer wax, drafts that cool the melt pool, or a blend that needs more heat. Some wax and fragrance combinations burn heavier than others.
A quick tunneling severity scale
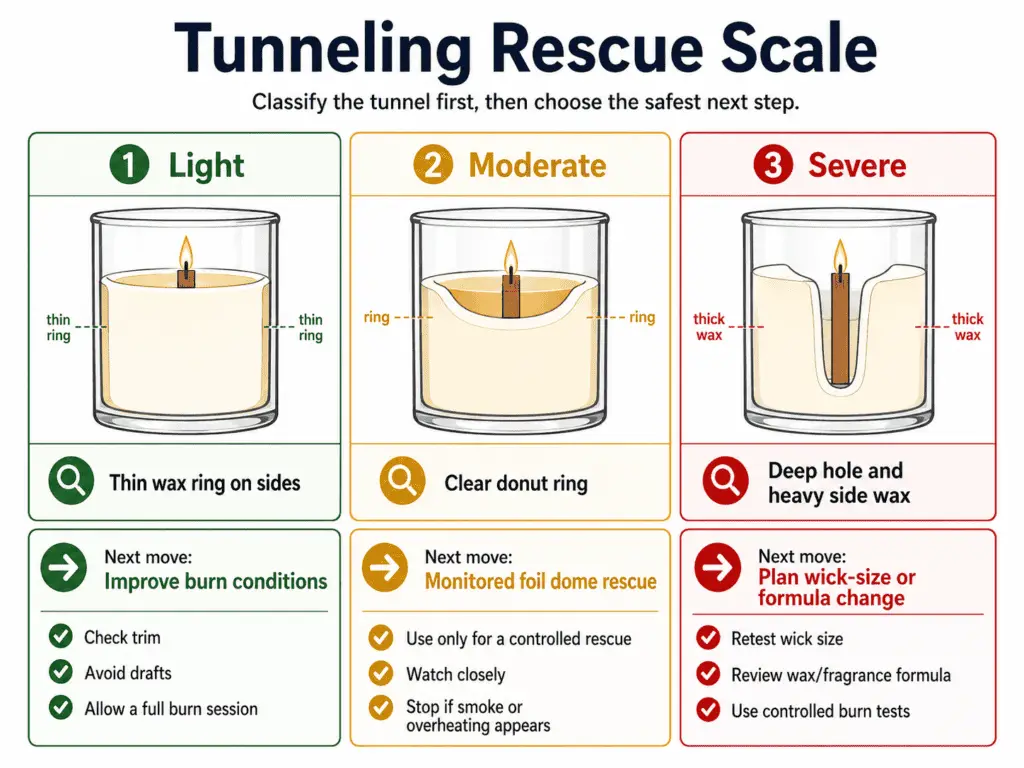
The severity scale separates a burn-condition problem from a repeated sizing signal.
| Severity | What you see | Safest next move |
|---|---|---|
| Light | Thin wax ring. Melt pool almost reaches the wall | Improve burn conditions, remove drafts, confirm trim, and re-test |
| Moderate | Clear donut ring. Center is noticeably deeper | Controlled rescue burn with a foil dome, then re-test |
| Severe | Deep hole, thick side wax, very small or struggling flame | Plan a wick-size or formula change. Retire the candle if the flame is unstable or the jar overheats |
Safe rescue steps for personal-use candles only
Use a rescue burn only for a monitored personal-use candle when the flame is stable and the jar is not overheating.
- Extinguish and let the wax cool and set fully.
- Remove loose char bits from the wax surface.
- Create a loose foil dome that reflects heat inward while leaving a vent opening above the flame.
- Burn on a stable, heat-safe surface away from drafts.
- Watch continuously and stop if smoke increases or the flame flares.
Prevention for next time
Tunneling prevention depends on steady early burns, calm air, and a wick that can heat the jar width.
- Do not rely on repeated rescue burns. If tunneling returns after two careful burns in calm air, treat it as a sizing signal.
- Keep early burns consistent. Do not move the candle once a melt pool forms, and avoid fans or vents nearby.
- If tunneling pairs with a weak flame, check the tiny flame notes below because the two often share the same root cause.
What people try in maker forums
Foil domes can be reasonable when monitored. But over-burning to catch up, carving side wax aggressively, or applying direct heat can overheat glass and make smoke worse.
Wick won’t stay lit or keeps going out
A wood wick that keeps going out usually means the wick is too short, drowning in wax, under-sized for the jar or blend, or fighting drafts.
Use timing as a clue:
- Goes out immediately: ignition, trim, airflow, or debris is most likely.
- Goes out after a short burn: drowning is likely.
- Goes out later: carbon buildup or a wick-size mismatch is more likely.
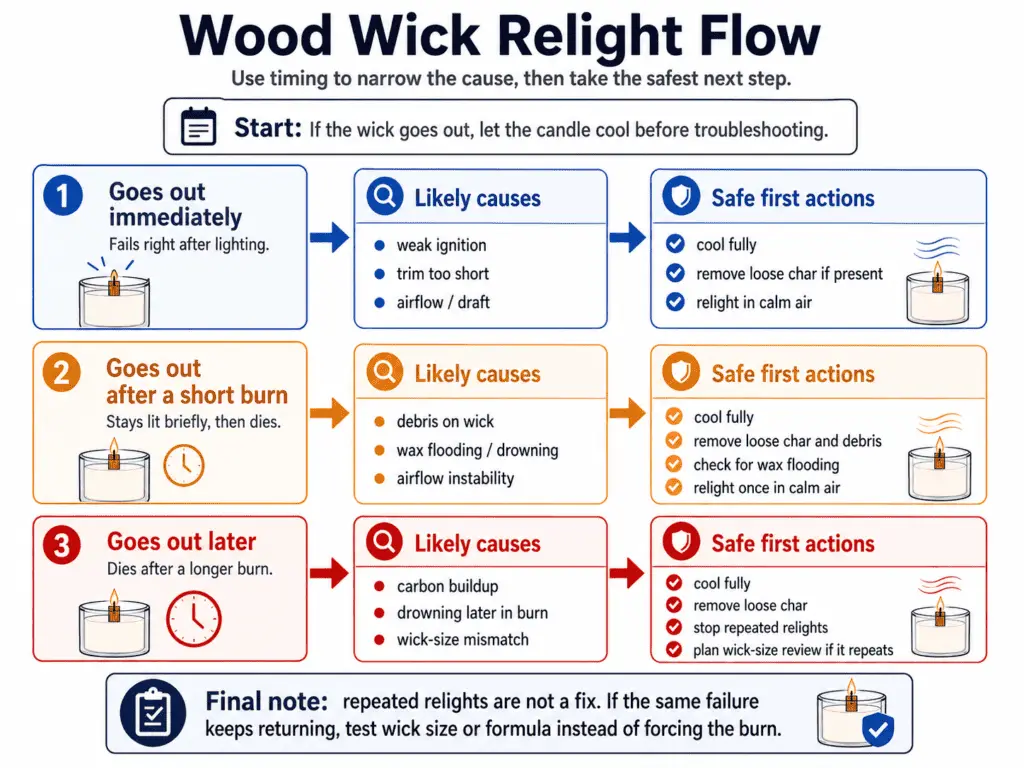
Practical steps to try in order
These steps separate a relighting problem from a repeated wick or blend mismatch.
- Extinguish, cool completely, and remove any loose char pieces on the wax surface.
- Confirm the wick is upright and centered. A leaning wick can starve oxygen.
- Relight in a draft-free spot.
- If it struggles again, stop and diagnose rather than relighting repeatedly.
- If it keeps failing across burns, treat it as a sizing or blend issue and track it in the log tool.
If a wood wick still keeps going out after trim, debris removal, and calm-air testing, use a dedicated wood-wick self-extinguishing guide rather than expanding that full diagnosis here.
Tiny or weak flame that barely melts the wax
A tiny flame that stays tiny usually signals under-wicking, a heavy wax or fragrance setup, or airflow cooling the melt pool faster than it can expand.
If the flame is stable but weak, do not try to force performance with long burns. Re-test with a clean trim in calm air. If the flame remains small, plan a wick-size change instead of repeated relights.
When your wood wick drowns in the melt pool
Fix a drowning wood wick by extinguishing, cooling fully, and removing cooled excess wax only after the wick and melt pool are solid.
A drowning wick looks buried or partially submerged in liquid wax, often with sputtering and repeated self-extinguishing. The safest sequence is:
- Extinguish.
- Cool fully.
- Gently remove cooled excess wax from around the wick, by spooning or lifting solid wax.
- Re-trim loose char.
- Re-test.
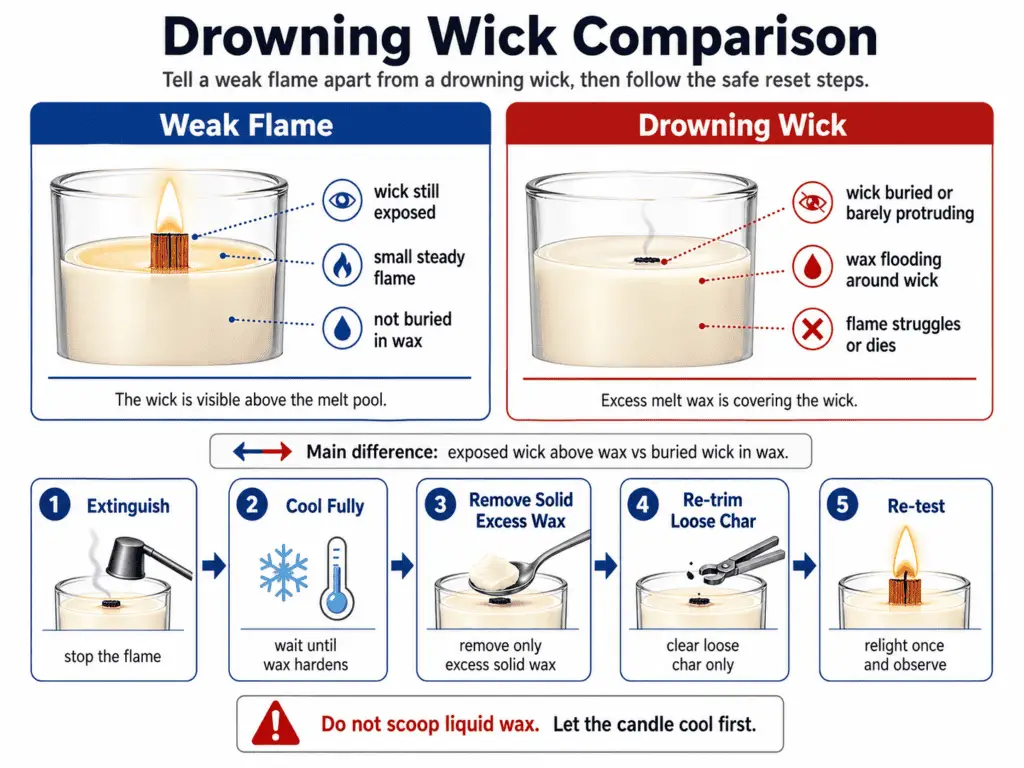
If the wick repeatedly ends up underwater, that is strong evidence the wick size or setup needs to change rather than repeated surgery.
Weak flame vs drowning wick
This comparison shows whether the wick is still exposed but underperforming or actually buried by the melt pool.
| Sign | Weak flame | Drowning wick |
|---|---|---|
| Wick position | Visible above wax | Buried or barely protruding |
| Flame behavior | Small, steady | Sputters, shrinks suddenly, goes out |
| Best next move | Plan a sizing or blend adjustment | Remove solid excess wax after cooling, then re-test. Plan sizing if it repeats |
Excessive soot or smoke from wood wicks
If a wood-wick candle is smoking, extinguish it and troubleshoot only after it cools.
Persistent black smoke, soot streaks, or a dark chimney plume usually comes from a wick that is too long, an over-sized wick for the jar, drafts that make the flame flicker, or carbon buildup.
If it is smoking right now
Current smoke is a stop-first symptom, so the first fix is to extinguish before trimming or relighting.
- Extinguish the candle.
- Let the wax cool completely.
- Remove loose char, then trim to a short, tidy edge.
- Relight in a draft-free spot and watch for a steadier flame.
Quick soot pattern guide
Soot patterns help separate draft problems from trim problems and over-wicking.
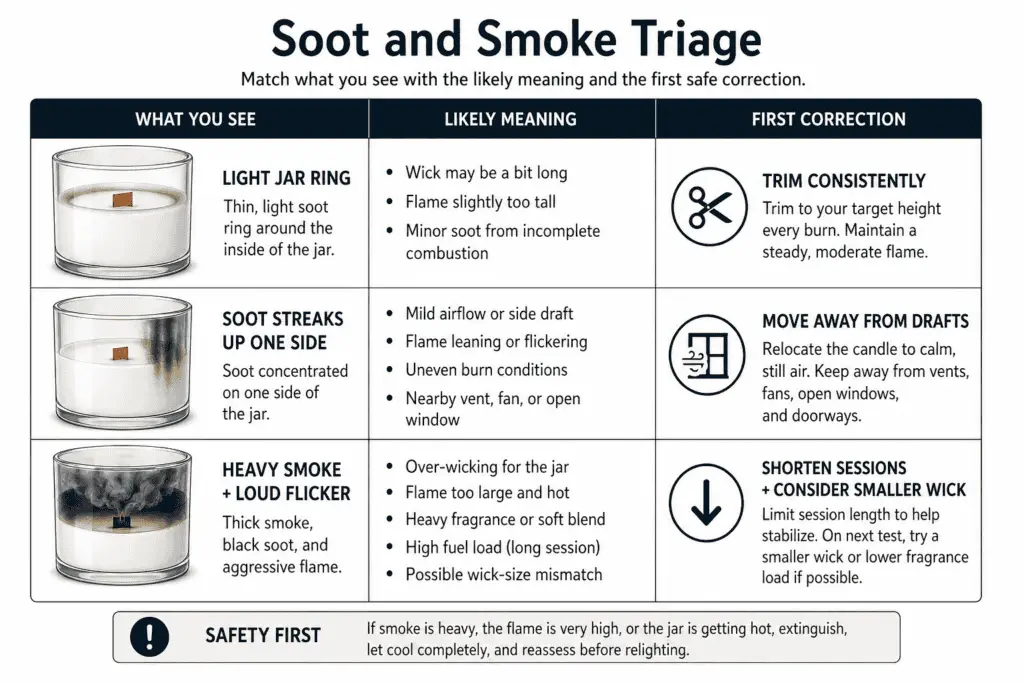
| What you see | What it often means | What to change first |
|---|---|---|
| Light jar ring | Slightly long wick or mild airflow | Trim more consistently. Move away from drafts |
| Soot streaks up one side | Draft or uneven airflow | Change placement. Avoid fans and vents |
| Heavy smoke plus loud flicker | Over-wicking, long wick, or heavy blend | Trim, shorten sessions, and consider a smaller wick next test |
If soot keeps returning even with careful trimming and no drafts, treat it like a sizing or blend signal. Makers should double-check trim habits against a candle wick trimming guide so the candle is not burning on an uneven or overlong wick.
Flame too high, wild, or flickering
Extinguish a wood-wick candle when the flame reaches toward the jar rim or label, sparks repeatedly, or makes the container uncomfortably hot.
Stop burning immediately if the flame reaches toward the rim or label, you see persistent sparks, or the container becomes uncomfortably hot. These are the cases where one more hour can turn a nuisance problem into a safety problem.
Simple safe-band check
The safe-band check classifies flame position by how close it gets to the jar rim or label area.
| Flame position | What it suggests | Next action |
|---|---|---|
| Well below rim or label | Likely normal | Monitor and keep burns consistent |
| Approaching label area | Too much fuel or airflow | Extinguish, cool, re-trim, and re-test placement |
| Reaching rim or licking sides | Unsafe burn | Extinguish and retire the candle as a test |
Common causes and fixes
High or wild flames usually come from too much fuel at the wick, airflow, or carbon buildup.
- Wick too long: cool fully, then trim shorter before relighting.
- Wick too large for the jar or wax: plan a smaller wick test for the next candle.
- Drafts: relocate away from fans, vents, and open windows.
- Carbon buildup: address the buildup and shorten burn sessions.
Mushrooming and carbon buildup on wood wicks
Mushrooming is a carbon cap that forms at the wick tip. Excessive buildup can drive higher flames and more soot.
A small amount of dark char can be normal, but large, crumbly buildup that returns quickly often means the wick is getting too much fuel. This can come from long sessions, a wick that is too large, or a blend that leaves more residue.
Carbon buildup guide
The buildup guide separates normal char from carbon caps that raise soot and flame risk.
| What it looks like | Usually fine? | What to do |
|---|---|---|
| Thin, flat char edge | Often normal | Trim before the next burn |
| Small rounded cap | Can be normal | Trim and shorten burn duration |
| Large, flaky ball | Not ideal | Extinguish, cool, remove cap safely, re-test, and consider wick or blend changes |
Safe steps
Remove carbon buildup only after the candle is out and the wax has cooled.
- Extinguish and let wax cool completely.
- Snap or trim off the carbon cap into a bin. Avoid dropping chunks into the wax.
- Re-trim to a neat, short edge.
- Relight only if the candle burns steadily without smoke or flare-ups.
Crackling: too loud, spitting, or almost silent
A normal wood-wick crackle ranges from quiet to noticeable, but spitting, sparks, or unstable flames mean something needs to change.
Sound varies with wick design, jar width, wax blend, and fragrance load, so the same wick can behave differently in a new container.
This section handles unsafe or performance-related crackle symptoms only; sound preference and crackle tuning belong in a dedicated wood-wick crackle guide.
Crackle troubleshooting guide
The crackle guide separates normal wood-wick sound from spitting, sparks, and unstable flame behavior.
| Complaint | Likely cause | Safer adjustment to try |
|---|---|---|
| Too loud or popping | Drafts, over-wicking, long wick | Move away from airflow, trim more, and shorten burn sessions |
| Spitting or sparks | Unstable flame, buildup, or debris | Extinguish, cool, remove debris, and re-test carefully |
| Almost silent | Wick design or setup burns quietly | Consider a different wick style next test. Do not chase sound over a clean burn |
How to trim wood wicks correctly
Trim wood wicks only when the wax is cool, removing loose char so the wick stands about 2 to 3 mm tall. Many suppliers teach a short, tidy trim for cleaner burning.
Simple trimming routine
The trimming routine keeps the wick short enough to reduce soot while leaving enough exposed wood to relight.
- Wait until the wax is fully solid and cool.
- Remove only loose, brittle char. Snapping often works, and small scissors can help.
- Keep the edge even so it lights across the full width.
- Clear fallen bits off the wax surface before relighting.
Trim length vs symptoms
Trim length changes the balance between fuel, airflow, soot, and self-extinguishing.
| Wick state | Tunneling | Soot/smoke | High flame | Going out |
|---|---|---|---|---|
| Too short | More likely | Less likely | Less likely | More likely |
| Ideal | Less likely | Less likely | Less likely | Less likely |
| Too long | Less likely at first | More likely | More likely | Sometimes, after buildup |
If trimming does not calm a high flame or heavy smoke, stop and treat it as a sizing or blend issue rather than repeatedly relighting.
Choosing the right wick size for your jar and wax
The right wood-wick size on this page means a tested size that produces a stable flame, a widening melt pool, and limited soot under controlled burn conditions.
Use wick size here as an escalation signal, not as a full sizing chart. Repeated tunneling or a weak flame can point to a slightly larger wick. Repeated soot, smoke, or a high flame can point to a slightly smaller wick. For exact starting sizes by jar inner diameter and wick line, use the full wood-wick sizing guide.
When sizing becomes the likely cause
Sizing becomes the likely cause when the same symptom returns after trim, airflow, debris, and burn-session variables are controlled.
- Repeated tunneling or weak flame: test a slightly larger wick size in the next controlled candle test.
- Repeated soot, smoke, or high flame: test a slightly smaller wick size in the next controlled candle test.
- Mixed symptoms across burns: keep jar, wax, fragrance load, room conditions, and burn duration consistent before changing wick size.
How wax and fragrance blends affect wood-wick performance
Higher fragrance loads and heavier blends can make a setup burn cooler or dirtier. If you suspect your blend is part of the problem, keep changes small and re-test with the same jar and burn conditions so the signal is clear.
Room conditions and burn habits
Drafts, inconsistent early burns, and very long sessions can push wood wicks into tunneling, soot, or self-extinguishing.
Quick conditions checklist
The conditions checklist controls the room and burn variables before you blame the wick size.
- Burn away from fans, vents, and open windows.
- Keep the candle level and do not move it mid-burn.
- Avoid repeated very short burns early on.
- Follow the safety guidance on the candle label. Many container-candle labels advise not burning longer than about 4 hours per session.
If you are trying to learn what a wick is doing, consistency matters more than perfect numbers. That is why the checklist and log below are useful for both home users and small-batch makers.
Wood-wick troubleshooting checklist and burn-test log
This tool is a reusable checklist and log that helps you pinpoint the cause by changing one variable at a time. It is a site method for personal testing and education, and it does not replace jar safety labels, manufacturer instructions, or local fire rules.
Start with the sizing baseline in the full wick sizing guide, then use this tool to track what the candle actually does in your jar and room. When a symptom repeats, use clear labels in your notes, such as fix tunneling or reduce soot, so you can see patterns across burns.
How to use this checklist and log
The log works by holding most variables steady while you change only one cause at a time.
- Fill the pre-burn checklist before you light, including trim, placement, and room air.
- During the burn, record what you see at set time marks, for example 30 minutes, 60 minutes, and 120 minutes.
- End the session while the burn is stable, then log the final melt pool, flame, and any soot.
- Let the candle cool to solid before the next session.
- Change one variable for the next test, such as trim height, wick size, placement, or session length. Do not change several things at once.
Pass/fail targets you can apply
Use these as practical decision points, not as hard regulatory standards.
- Flame behavior: steady, not leaning hard or roaring, and staying well below the rim or label.
- Melt pool behavior: widening steadily over the session rather than staying coin-sized. If it never widens after two consistent sessions, suspect under-wicking.
- Smoke/soot: a clean burn should not produce visible smoke after the first moments of lighting. Repeated soot streaks suggest drafts, a too-long wick, or over-wicking.
- Stability: if the wick repeatedly goes out, sputters, or drowns even after careful trimming and calm air, treat it as a setup mismatch.
Pre-burn checklist
The pre-burn checklist confirms the candle, wick, and room are ready before each monitored test.
- Wick trimmed and free of loose char debris
- Wax surface clear of fallen bits
- Candle centered on a stable, heat-safe surface
- No fan, vent, or open-window drafts
- Jar looks intact, with no cracks or damage
- You can monitor the burn. Do not leave it unattended.
Burn-test log
Copy, paste, and reuse this log.
| Date | Jar type/size | Inner diameter | Wax/blend | Fragrance % | Wick line/size | Trim height | Room notes, drafts/temp | Burn duration | Time marks observed | Melt pool, width/depth | Flame, height/steadiness | Smoke/soot | Sound | Symptom label | Next change, one variable |
|---|---|---|---|---|---|---|---|---|---|---|---|---|---|---|---|
| 30 / 60 / 120 | |||||||||||||||
| 30 / 60 / 120 | |||||||||||||||
| 30 / 60 / 120 |
Simple decision rules
Use these rules to choose the next change:
- Narrow melt pool plus recurring side wax: adjust drafts and trim first. If it repeats, test a slightly larger wick size.
- Tall flame plus smoke or soot: improve trim discipline and calm air first. If it repeats, test a slightly smaller wick size.
- Repeated drowning or going out: confirm trim, debris, and airflow. If it repeats, treat it as a wick and blend mismatch.