You start to look for candles online when you see something you have never seen before, namely floating candles. But what are these, and how do they float? Could you make your own? With this guide, you’ll get all the answers you need.
Floating candles float thanks to a process called water displacement when a candle is burning, its weight decreases, allowing it to stay afloat on water
As its name suggests, a floating candle floats when placed in water. Sounds interesting, doesn’t it? Once you reach the last page of this guide, you will know all about floating candles, how to make them, as well as how to use them.
How Do Floating Candles Float?
The primary reason why candles can float is that they have been engineered so that their flame forms around the candle wick, which is filled with wax. The water ensures that the exterior candle walls are kept cool. Consequently, there is a notable decrease in the weight of the candle due to the burning, allowing it to stay afloat.
What Makes Floating Candles Float?
The weight and size of some candles allow them to float on water. They are relatively light and small, which forces water out of the way. This process is known as displacement, which you can test for yourself by placing a floating candle in a glass bowl and cylinder and watching it push some water out.
Can Regular Tealight Candles Float In Water?
If you have ever bought or seen candles categorized as tealights, then you must have noticed that they have a round shape. It is this very shape that allows them to float in water. Moreover, the longer a candle is allowed to burn, the more it will rise within the water.
You may not be aware of this fact, but tealight candles have certain properties that allow them to heat any air present in their surroundings. This leads to expansion, forcing the process of oxygen depletion to halt for a couple of moments. As a result, the water level stays low. Later on, when the oxygen does deplete, the candle burns out, and the water is allowed to rise again.
How Long Do Floating Candles Float?
Floating candles are known to last for as long as an average candle. However, their burn times may fluctuate a little depending on their size. For broader context, see types of candles. For example, a 2-inch floating candle can provide you with light for around 4 to 5 hours. On the other hand, a floating candle with a surface area of 3 inches can last up to 8 to 10 hours.
Can Fake Candles Float In Water?
For a candle to float in water, it has to be specially designed to do so. Fake candles are not created to float in water; therefore, they often sink in.
Do Regular Tealight Candles Float?
Yes, tealight candles can float in water. It all comes down to their shape and design and the container they are placed in. For a tealight candle to float in water, it has to be small, round, and lightweight. Furthermore, the weight and shape of the container should also be similar to that of the candle itself.
How Do You Keep A Floating Candle Lit?
If you want to ensure that your floating candle does not blow out, then place it gently onto the water but keep holding the wick. As a result, your candle will be dry before you light it, making it easy to do so.
What Do You Need To Make Floating Candles?
Get the following materials, and you can make your own floating candles at home!
- Container of your choice
- Paraffin wax
- Candlewick
- Dye chips
- Mould
- Essential oil
How To Make Floating Candles?
Here are all the steps you need to follow to make your own floating candle.
- Assemble your ingredients
You can buy the ingredients from any local store that carries art goodies. The quantity you buy will depend largely on the number of candles and their size. If you are not sure about how much of each ingredient you should buy, refer to your mold tray to give you a better idea.
Below are suggested amounts of every ingredient you can purchase.
- At least half a pound of paraffin wax will suffice.
- A couple of drops of any essential oil of your choice will do. These will help you add fragrance to your candles.
- A molded tray to help you determine the size of your candles. If the molds are the size of small muffins, they will burn for at least an hour. However, mold trays that are bigger in size can last for approximately three hours.
- A handful of candle wicks. If you want to save yourself the hassle of adding them to the paraffin wax yourself, feel free to acquire some pre-tabbed ones.
- Dye chips are especially helpful when making candles at home. They are small, but that does not prevent them from being effective. Therefore, you will need only one for every candle you are making.
- Heat the Wax
Now, bring out a hot or double boilerplate and use it to heat the paraffin wax. However, if you do not have either at home, you can make your own double boiler by placing a smaller pot inside a larger pot and filling the latter with boiled water. The heated water will automatically warm up the contents, rather than the paraffin wax placed inside the smaller pot.
Keep the following tips in mind to ensure a seamless process of heating the wax.
- Make sure that the paraffin wax is not directly heated. It is bound to catch fire if you try to warm it up without a hot or double boilerplate. You do not want that, do you?
- If you do not have a small pot to place inside the double boiler, use an old empty can of coffee to get the work done. Similarly, you can use a large empty coffee can to act as the larger pot and get the work done.
- Add dye chips during the heating process.
Use a single dye chip for one pound of paraffin wax to give it a pleasant and bold color. Make sure to add the dye when you are heating up your candles. This will allow them to accumulate space throughout the candle wax.
Use a wooden spoon to stir in the dye and ensure its consistency. In addition, add some drops of essential oil if you want, but only after turning the heat off.
- Warm up the wax
It would be best if you heated the paraffin wax to at least 65.5 degrees Centigrade to prepare it for pouring. Feel free to determine the temperature with the help of a thermometer. But if you do not have a thermometer, wait for a thin film to form around your pitcher.
- Transfer the wax to the tray
When the heat is turned off, take the pitcher of paraffin wax and pour it into the mold. Below are some tips to help the process along.
- Pour carefully and with a steady hand. If you hurry the process along, you may end up injuring yourself with the hot paraffin wax or create a mess that will be difficult to clean up.
- While muffin trays are quite commonly used to make homemade candles feel free to use whichever kind of mold you want; remember, the slots should be small enough to be the right size for a floating candle.
- Put the wick in place.
Add the candlewicks to the mix once the paraffin wax has cooled down. Pre-tabbed wicks make this entire process easier, as the tab assists in securing it in place. If you do not like its placement, you can also use a bamboo skewer or a toothpick to set the candlewick in place.
- Let the candles stiffen.
After the candlewicks have been set in place, leave them for a while to harden. They may take at least two hours, so you must be patient. Occupy your mind elsewhere so that you do not end up disturbing this part of the process.
- Take the candles out.
Once the two hours have passed, and you are too excited to sit in one place, take the candles out gently with the help of the wicks. Take some paper towels and wipe away any gunk stuck to the candles. After you have done this, your candles are ready to go!
Just remember, if you take the candles out before the two hours are up, you could damage them as they will become more difficult to remove. However, if you have done this, you can fix it by putting your candles in your freezer for a couple of minutes. Take the tray out and try once again.
How To Use Floating Candles?
Floating candles have various uses that can benefit you and bring joy to your loved ones. Continue reading to find out more!
- You can place your floating candle in the pool. This will enable you to make a gorgeous night-time display, and your gatherings will become even more festive. You can choose to do this when you are having a dinner party, and no one is going to use the pool. Just make sure that the water stays calm; otherwise, you could ruin all your candles.
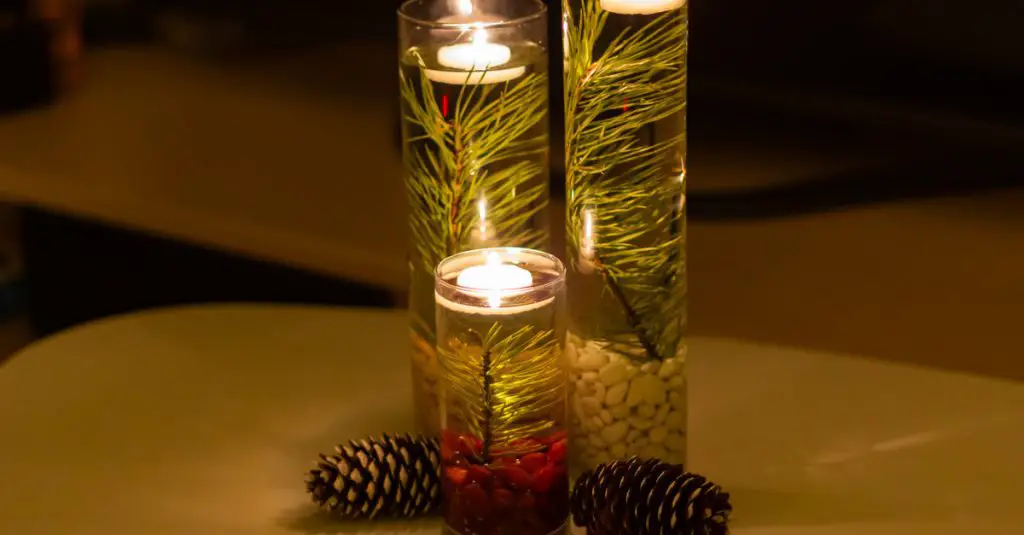
- Another way to use floating candles is to place them in clear cylinders made of glass with some flowers or a ribbon beneath the candle. This will allow you to add some decoration to your display. Try using a beautifully shaped glass container so that you can place them at the center of your table at dinner parties and weddings or in your kitchen.
- You can also place your floating candles in transparent glass bowls to put them in the bathroom or on the window when your guests come to visit. This will complement the beauty of your home.
- Your outdoor events can now be even more lovely with floating candles. All you need are candles in the shape of lotus flowers. Needless to say, such decorations will liven up any party that you host.
By now, you know all about floating candles and what makes them so interesting. Their beauty is going to leave you speechless and make them the center of attention at any event you organize. Enjoy making your own homemade floating candles!