
We all agree that making your own candles can be relaxing and a lot of fun! You can be as creative as you want; the sky is the limit. But if you lack ideas or wish to know what type of ingredients many candle makers use in their crafting, stay tuned because this article might be what you need.
What can you add to homemade candles? Many types of items that are not combustible can be embedded in a candle but should never come in contact with the wick under any circumstance. Any contact may cause the wick to extinguish.
Do you dream of creating your own beautifully scented candles that put store-bought ones to shame? Are you tired of feeling envious of those who effortlessly craft stunning candles for their homes or businesses? If so, we have the perfect solution for you! Candle Making 4 You™ is a comprehensive step-by-step guide that will turn you into a master candle maker – whether you’re a complete beginner or an experienced hobbyist. This system will teach you everything you need to know to create candles that look professional and smell amazing.
To make it clear, this article is not about how to make candles but about what you can add as extras. Making a basic candle is very simple since you only need wax, but to give you a quick guide, you can use a few types of wax.

Paraffin:
When we talk about making candles the traditional way, Paraffin wax comes to mind. In fact, this method was used for hundreds of years and still is today by many. However, the use of Paraffin comes with some concerns. After a study made back in 2009 found that paraffin wax could actually be potentially toxic when burnt.
The fumes released when burning Paraffin were linked to Asthma or, even worse, lung cancer. So, my recommendation would go for an alternative.

Soy:
Soy wax is (compared to the two others) quite new. It was created in the ’90s and is gaining quite some popularity lately. Compared to Paraffin, Soy wax is all-natural (made with soybean) and is not toxic at all. This is probably the best option overall.

Beeswax:
The first candle makers used beeswax; it was even used in ancient Egypt, so it is one of the oldest among the three. It is not the best option for scents, as beeswax does not work well if you ad fragrances to it. Its naturally sweet and subtle scent interferes with other added artificial scents. On top of it, it is one of the most of three.
So now we got that out of the way. Let’s see what type of ingredients you can add to your candle.
1. Fragrances and essential oils
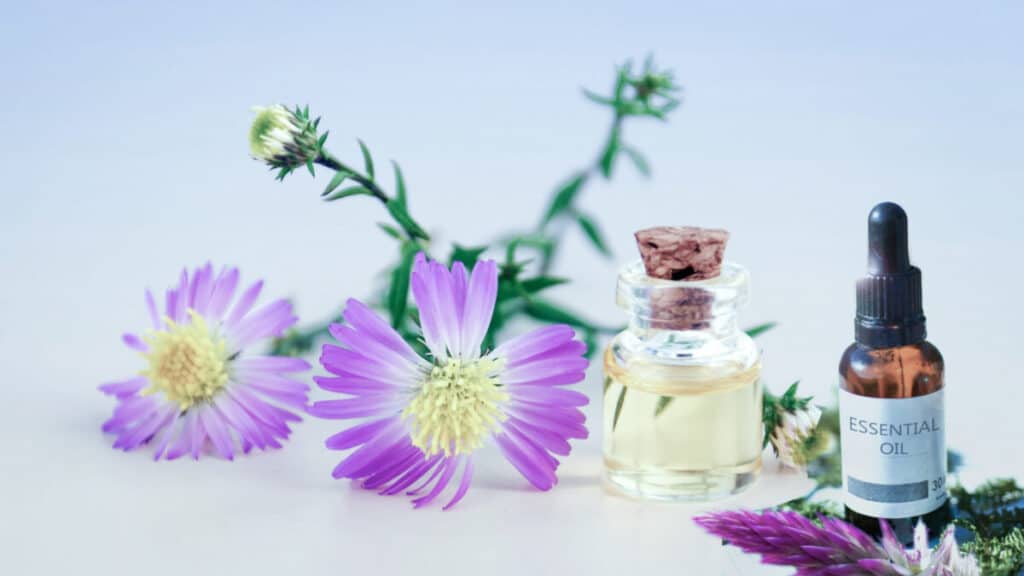
Let’s start first with the most obvious, shall we? Your candle will light up and burn without any fragrance, but it won’t have any aromatic smell. Like anyone, you have your preference for fragrances, but also, like many, you might not know that some are not suited for candle making.
Also, something that is asked a lot is the number of fragrances added to candles. I won’t go into details, but all I can say is when you make candles, you need to get your measurements right. If you wish to know more about it, you can find all the information in this article.
Stay away from synthetic fragrances.
Most people don’t realize that fragrances can be harmful and, in some cases, can cause headaches or even an allergic reaction leading to asthma attacks. Obviously, I am not referring to all types of fragrances here, only the chemical kind.
Chemical fragrances can give off dangerous VOCs (volatile organic compounds), which contribute to the formation of Tropospheric ozone and smog, so these are the types you need to avoid at all costs. The problem is they are cheap and most of the time, when someone starts with a new hobby, trying to cut down costs, in the beginning, is something we all want.
So, if you are planning on going synthetic, buy it in very small quantities, so once you feel confident in making candles without any hiccups, switch over to essential oils instead.
Use essential oils for fragrance instead.

Check out the current price on Amazon.
There are significant benefits to using essential oils besides the fact that it’s 100% natural, which is why most candle makers are now switching to them. Essential oils are highly fragrant and are known for their therapeutic qualities.
Mostly you would place them in a diffuser or in bathwater to have that pleasant aroma in the bathroom. Some would prefer a therapeutic scent, such as lavender, which may provide calming and anti-anxiety effects.
But just like with anything, it also has its drawbacks. If you are new at making candles and did not get your measurements right, you might have a not-so-subtle hot throw. Or if you did not add your fragrance at the right temperature (or did not mix it correctly), you will end up with the opposite, a very weak fragrance. Check out this article for a good example.
There is also the price range. Essential oils can be costly, especially if you want to go 100% natural and use high-end products. Essential oils are pure extracts, so there are no chemicals involved; therefore, it can take a lot of natural resources to produce a little oil.
If a 100% pure essential is too expensive, you can opt for a blend of fragrance oil (synthetic but phthalate-free). This is the closest you can get to natural and less expensive. If you’ve never mixed it yourself, this article might be perfect for you.
2. Adding colors
Colored candles really only took off in the late 1980s. Before that time, candles were not seen as a decorative items but rather as an alternative way to light up the room during a power outage. But honestly, if you think about it, if we could not color our candles, they would have all looked the same, and that would have been boring!
However, the main question here is how to color them and what type of coloring you are allowed to use in candle making. There are different types, so let’s go over them individually.
DYE:

Check out the current price on Amazon
Dye coloring is the most popular and, simultaneously, the most common way to color your candles. It is also the safest and the most suited among all other options. You can find them in different varieties, such as liquid dyes, dye blocks (which need to be cut beforehand and weighted), and chips.
All of them have their advantages, so in the end, it is all about preference. But just to go quickly over them, the liquid kind is easy to use but can be very powerful, so be careful not to overcolor.
Blocks type needs to be cut beforehand and weighted but can be cheaper, and finally, chips type is maybe the easiest to use as they melt fast because they are small and evenly sized. You can easily eyeball when adding them, not overcolor.
Just be careful not never to use Dye that has alcohol in it; it is flammable and is thus dangerous to use. So when choosing, make sure to read the label.
Soy Dye:

Check out the current price on Amazon
Soy Dye flicks are the most natural kind, so if you wish to go for all-natural, I recommend soy dye. They work really well and are perfectly suited for candle coloring. When adding your color, you can, as previously mentioned, eyeball it to see you do not add too much, or you can simply measure each time you make candles until you have the right amount.
A quick tip on knowing if you have added enough is to take a piece of parchment paper, dip it, and leave it aside and let it cool. The cooled wax will show you how it will look when it’s cooled off. You could just drop some off on paper and let it cool; this also works well.
Food coloring:
You might already have food coloring for other purposes in your kitchen, and it’s easy to tell yourself that if it works in food, why not in candles? Well, sorry to be the bearer of bad news, but they are not suited. If you try to add them to your melted wax, you’ll see for yourself that they won’t mix at all and sink to the bottom.
The more you stir, the more they will just split and split and keep on splitting, but they won’t mix! This is because they contain glycerin and propylene glycol, which attract water and thus cannot mix with wax.
Crayons:
They are cheap, and you can buy them almost anywhere. On top of that, most crayons are made out of wax. Logically, you might think, hey! Why not use them to add as coloring? Crayons are primarily made of pigment, and most of these pigments have a very large particle size.
They don’t dissolve quickly and also may not fully incorporate. You’ll likely have chunks left in your jar when you pour your candle. If you check the bottom of the glass jar you poured into, you’ll see that there will be some speck of chunks of crayons in the bottom, so not really a pretty sight.
If you still want to go further and use crayons, you can, but you’ll see that the flame will have a hard time burning and staying burned because of these pigments. In the end, the wax will burn, but the pigments are drawn up the wick, so they won’t. You’ll end up with a tunnel, and eventually, your candle will not be able to burn further and inevitably put itself out. ,
I would only recommend this option if you want to learn how to make candles and color but don’t want to spend a lot of money. But once you get used to the process, switching over to (soy) Dye is highly recommended.
Pigment powder and Mica:

Check out the current price on Amazon
You’ll most likely have Mica at home if you are a soap maker. Mica might work really well for soap coloring, but when it comes to candles, it actually will clog your wick, and thus your candle will have a hard time burning.
One of Mica’s biggest problems is that once cooled down, it will sink to the bottom, and you’ll end up with a much heavier color at the bottom. As previously mentioned, it will also have a hard time burning and will most likely not reach a full melt pool so it can burn evenly. Also, you might notice a lot of mica pockets just sitting on the surface.
Pigment powder has similar problems to Mica but is probably worse as an option. Your candle will have equally a hard time burning, but with this option, your candle will also not have a full melt pool and most likely burn out.
3. Fresh ingredients
Fresh ingredients can be used in candles and are lately becoming very popular. Such as fruits or dried roses petals at the bottom of your candle, is something that I have seen a lot lately. I don’t use them because I am not a big fan of them, but I can see why they’re becoming popular.
However, one must be careful about what type of ingredients to add and what it means to have fresh ingredients in your candle. Under no circumstances should your fresh or dried petals (or any material used for that matter) come in direct contact with your wick.
This is something that those big candlemaking companies do because they spend a lot of time developing a system that ensures the wick never comes in contact with any materials.
There is also the worry of candles going bad because they have organic materials in them. The more organic you go, the more chances you’ll end up with a spoiled candle. To counter that, you can use additives; this is probably the only way to make sure your candle will last much longer and stay fresh; however, additives may affect your candle’s burn time, so use caution.
4. Decorative elements
Let’s start with the most obvious, shall we? Do not ever add combustible items to your candle, especially gel candles. To give you a few examples, dried fruits, resin figures, plastic figures, or cinnamon sticks are NOT safe to put in gel candles.
One should remember some other things before embedding items in the candle.
First, make sure the item you want to integrate is clean. You don’t want any residue in your candle mix, or if it’s transparent, you don’t want your item to look dirty.
Any object you want to add may cause bubbles in your candles, so make sure to warm up your container to avoid this as much as possible.
Always try to make sure nothing touches the wick, which may cause your wick to extinguish.
You want to embed items by placing them at the bottom, and after that, add your wax, and not the other way around. If the item is heavy, you won’t have a problem, but when it’s light, you might need to glue it to the bottom so that it won’t float to the surface.
This guide might be perfect for you if you wish to add glitter to your candle.
Another technique you can use to embed items is pouring your wax and leaving it to cool until you see a 1/2-inch thick film on top. This should only take around 10 minutes. Make a hole in the wax. With a spoon, take out the wax in the center and return it to your melting pot.
Now you can add your embedments, and afterward, you remelt the wax and pour it back in. This way, you may be able to make it look like the item is floating in the candle.
5. Jewelry candles

If you have never heard of Jewelry Candles, it’s, as the name suggests, a candle that has Jewelry in it. It works simply by letting your candle burn until your Jewelry is revealed.
This is something that recently started to become very popular, and I can see why it’s fun and relatively easy to make one yourself. When you make your candle (preferably with a plant or vegetable-based wax), you just need to make sure your Jewelry is wrapped in foil so it won’t get damaged or have the wax all over.
Then depending on how deep the item is, the Jewelry will be revealed accordingly.
Here is a video that gives a good explanation of how to do it.