Candles usually fail to burn because the wick is the wrong size, too short, untrimmed, or flooded by wax after poor first burns, tunneling, or an uneven top.
A candle that keeps going out usually has a burn-balance problem, not a random flaw. Most failures come from the first burn, wick size, wick length, tunneling, or a wick that sits too low in melted wax. Once you match the symptom to the cause, the fix gets easier and you can tell whether the candle needs trimming, leveling, or a full rework. Start with the reasons a candle will not stay lit, then move to the wax-pool problems that drown the flame.
Why Won’t My Homemade Candle Stay Lit?
A homemade candle that will not stay lit usually has a wick problem, a flooded wax pool, or a burn pattern that keeps the flame too weak to feed itself.
The flame needs exposed wick, steady fuel, and enough heat to keep pulling melted wax upward. When one of those fails, the candle lights, shrinks, and goes out.
Start with the wick before you blame the whole candle; that is where candle troubleshooting should begin. If the top is buried, bent, carbon-heavy, or cut too short, the flame loses heat fast and cannot stay stable. A wick that is choked with debris or bent into the wax will often die even when the formula is fine.
The next check is fit and airflow. If the jar is wide, the wick may simply be too small, and a draft from a fan, open window, or vent can push a weak flame out before it stabilizes. Dense wax or a heavy fragrance load can make that weakness show up sooner, but a weak wick or moving air is usually the main cause.
Look at the burn pattern after each failed try. A narrow tunnel, a tiny weak flame, and hard wax stuck to the sides point to an underpowered burn system. A small flame with a hard wax wall usually points to tunneling, while a small flame sitting in deep liquid wax usually points to wick drowning.If the first burn was too short, that pattern can lock in poor candle burn memory before the candle can form a stable melt pool.
Drowning in a Wax Pool
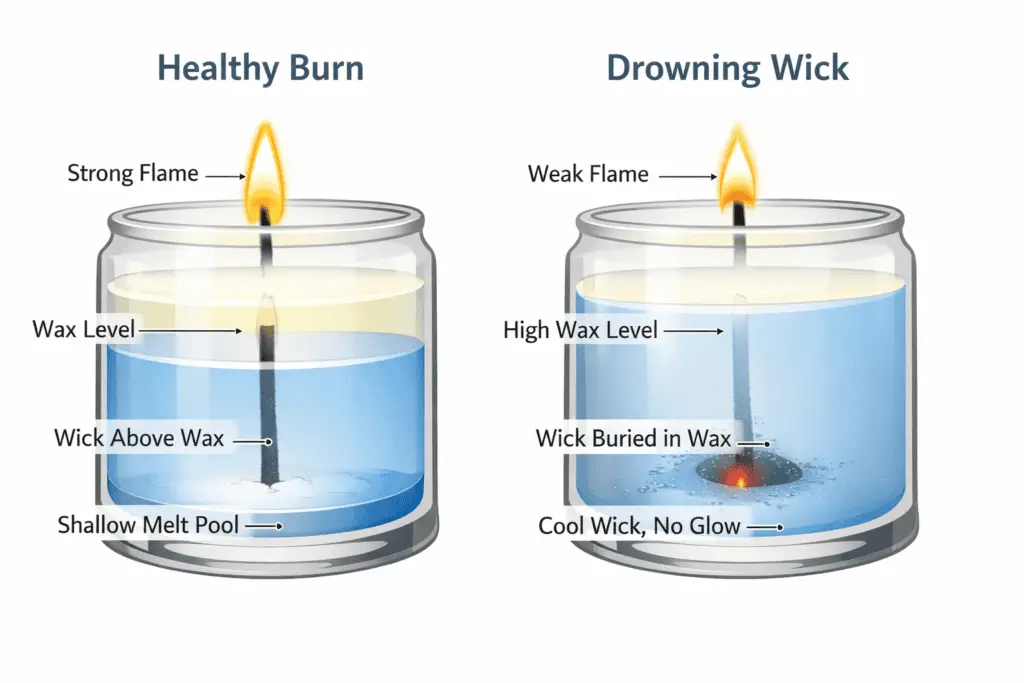
A wick drowns when liquid wax rises high enough to cool the wick tip faster than the flame can heat it.
You will usually see a weak flame, a red glow without much fire, or a wick that sputters and dies after a short burn. The cause is often a wick that is too small, a short first burn, or too much fragrance in the wax that slows clean feeding.
A melt pool is the ring of liquid wax around the wick. That pool should support the flame, not bury it. When the wick sits too low inside that liquid wax, the candle has fuel but not enough heat at the wick tip to keep burning.
Repeated drowning often connects to structure, not just wick length. If the center stays hot while the outer wax stays tall and hard, the candle is likely tunneling. In that case, correct the burn pattern first with a separate uneven-burn fix instead of treating every relight as a new problem.
Use this order when a wick keeps drowning:
- Let the candle cool fully, then clear loose carbon and expose the wick tip.
- Relight only when the surface is level enough for the wick to sit above the wax instead of below it.
- If the wick drowns again on the next full burn, treat it as a wick-size or build problem rather than a one-time mistake.
Wick Too Short, Too Small, or Clogged
A candle will keep failing when the wick cannot pull enough fuel, hold a steady flame, or stay above the melted wax.
That usually shows up as a tiny flame, repeated self-extinguishing, or a wick that glows red before disappearing under the surface. The wick may be too small for the jar, too short after trimming, or packed with carbon that blocks a clean burn path.
This is why a candle that keeps going out is often a wick diagnosis before it is a wax diagnosis. A wick trimmed too low may light once and fail on the next try, while a wick that is too thin for the container may never build enough heat to form a full, stable melt pool.
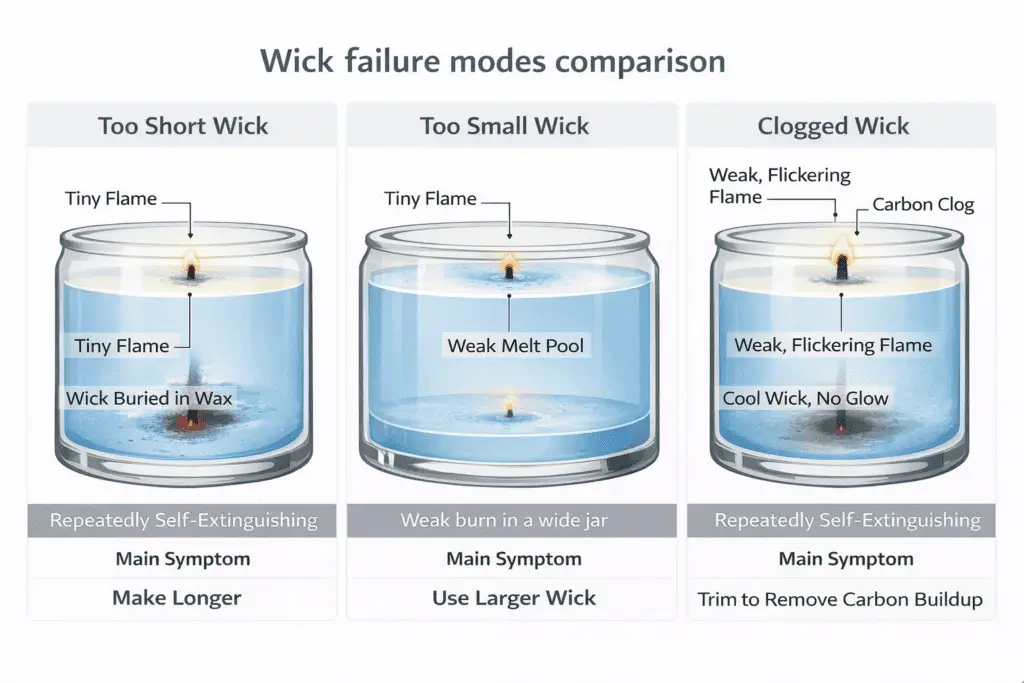
Start by clearing loose debris and using proper wick trimming techniques so the wick stays exposed above the wax line. If the flame still stays small after that, the wick is likely undersized for the container or the candle has a bigger build mismatch. Heavy fragrance can make that weakness show up sooner, but it should not be the first thing you blame.
How to Fix a Candle That Keeps Going Out
The right fix depends on whether the flame is starving, drowning, tunneling, or failing from a wick-and-formula mismatch.
Use this quick troubleshooting checklist first, then go back to the broader candle burning and usage guide if the same problem keeps showing up across multiple candles.
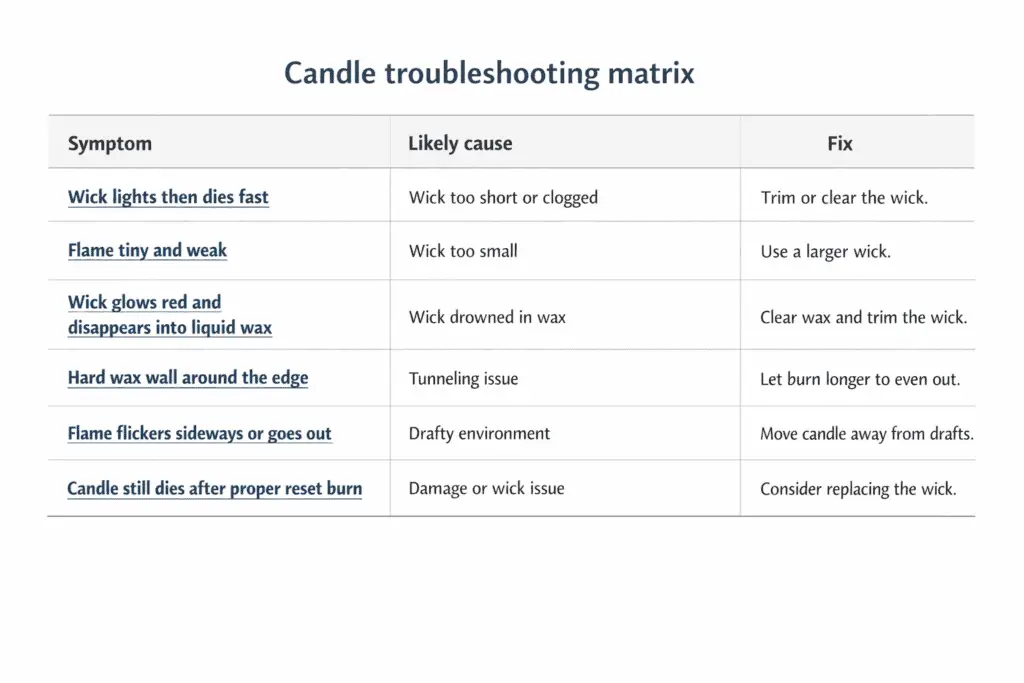
- Symptom: The wick lights, then dies fast. Likely cause: The wick is too short, bent, or buried under wax. Fix: Let the candle cool, expose the wick, and relight only when the top is level enough to keep the wick above the wax line.
- Symptom: The flame is tiny and weak. Likely cause: The wick is too small for the jar or clogged with carbon. Fix: Clear debris, trim only enough to remove buildup, and test again before assuming the whole candle is bad.
- Symptom: The wick glows red, sputters, and disappears into liquid wax. Likely cause: The wick is drowning in the melt pool. Fix: Cool the candle fully, expose the wick, and make sure the next burn starts from a flatter surface.
- Symptom: A hard wax wall stays around the edge while the center burns down. Likely cause: Tunneling from a short first burn or repeated short burns. Fix: Correct the burn pattern before testing the candle again, or the wick may keep failing even after relighting.
- Symptom: The flame flickers sideways or goes out even though the wick looks usable. Likely cause: Drafts from a fan, vent, or open window. Fix: Move the candle to still air and test it again before changing the wick or formula.
- Symptom: The candle still dies after a proper reset burn. Likely cause: A bigger wick-size, wax-blend, or container-width mismatch. Fix: Stop repeating small relights and treat it as a build problem that needs retesting.
If the candle still dies after a proper reset burn, the problem is usually built into the wick choice, wax blend, fragrance load, or container width. At that point, more trimming will not solve it, and testing a different wick setup is the cleaner fix.