
Candles sink in the middle when the outer wax cools and hardens before the center, so shrinking wax leaves a cavity around the wick or under the surface.
Sunken centers usually come from cooling speed, wax shrinkage, and trapped air rather than one single mistake. Once you know whether the problem started with pour temperature, wax type, container shape, or room conditions, the fix gets much easier. The main issue is that wax contracts as it sets, and some waxes pull inward more than others. Start with the causes first, because the right repair depends on why the void formed. For the main guide, see candle making .
What Causes Sinkholes in Candles?
Candle sinkholes form when wax cools unevenly and shrinks around the wick, leaving a hollow center or a hidden void under the surface.
The most common triggers are pouring too hot, cooling too fast, and using wax that contracts strongly as it sets. A deep jar, a large single pour, or trapped air near the wick can make the cavity more obvious once the top hardens.
| Symptom | Likely cause | Best fix |
|---|---|---|
| Shallow dip on top | The center settled after the surface started to harden | Use a brief surface remelt or a light top-off pour |
| Deep hole around the wick | Wax shrinkage left a void under the surface | Reopen the cavity, refill it with warm wax, and cool the candle slowly |
| Sinkhole after a very hot pour | The temperature gap between the edge and center was too large | Lower the next pour temperature and slow the cooldown |
| Repeated sinkholes in cold or drafty conditions | The outer wax hardened before the middle could settle | Stabilize the room, avoid drafts, and keep jars off cold surfaces |
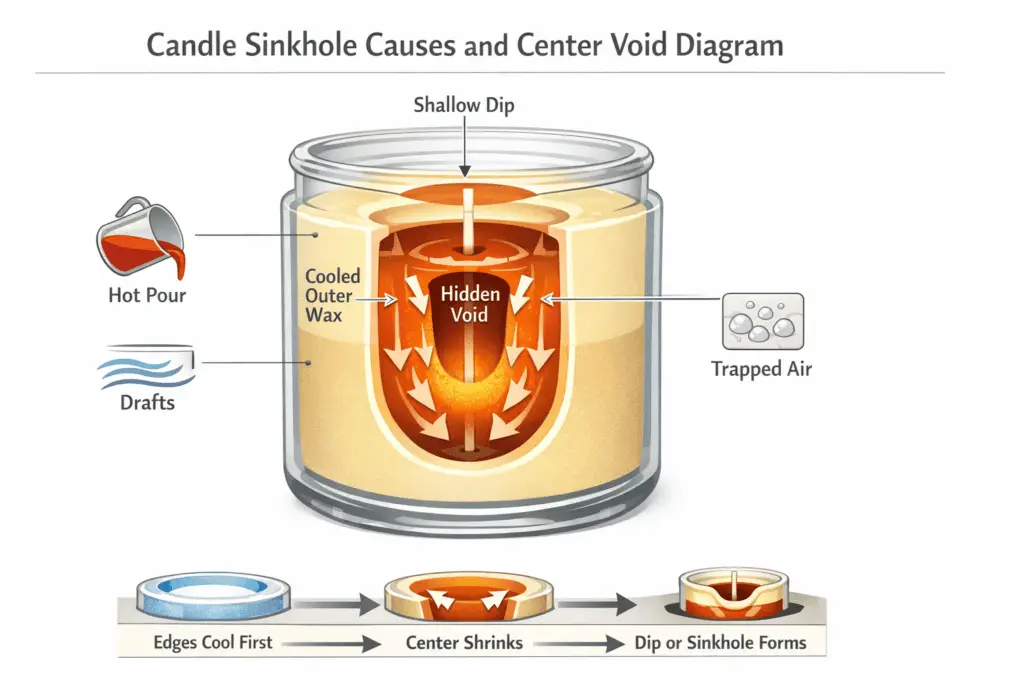
A useful way to start candle troubleshooting is to picture what the wax is doing below the surface instead of judging the candle by the top alone. The outer edge usually touches the cooler container first, so it firms up before the center has finished settling. As the middle stays hotter for longer, it keeps moving and shrinking. When that delayed shrinkage has nowhere to go, the wax pulls down around the wick and creates the dip many makers notice the next day.
Pouring temperature matters because very hot wax increases the temperature gap between the center and the edge. Cooling conditions matter because drafts, cold counters, and big room swings can harden the outside too quickly.
That is why people trying to fix candle sinkholes get better results when they look at the full setup rather than only smoothing the top. The same cause-and-effect pattern shows up when fixing sinkholes and wet spots in candles, because both problems often come from wax pull, uneven cooling, or poor adhesion during the first set.
How Wax Density and Additives Affect Sinkhole Risk
Wax density and additives affect sinkhole risk because harder, higher-shrink blends tend to pull inward more as they cool, while additives can change how strongly that shrinkage appears on the finished surface.
Paraffin-heavy blends often show deeper contraction than softer container blends, especially in larger jars or thicker pours. Additives may improve hardness, opacity, or scent performance, but they do not erase problems caused by poor pouring or cooling conditions.
A simple way to compare candle wax types is to ask how much each wax wants to contract after it leaves the melt pot. Paraffin usually shrinks more visibly, which is why sinkholes and relief holes are common in paraffin candles. Soy container waxes often shrink less, but they can still dip in the center when the pour is too hot or the candle cools unevenly. Coconut blends and softer container blends may hide shrinkage better, yet they are not immune when the wick area stays hot and the outer wall sets first.
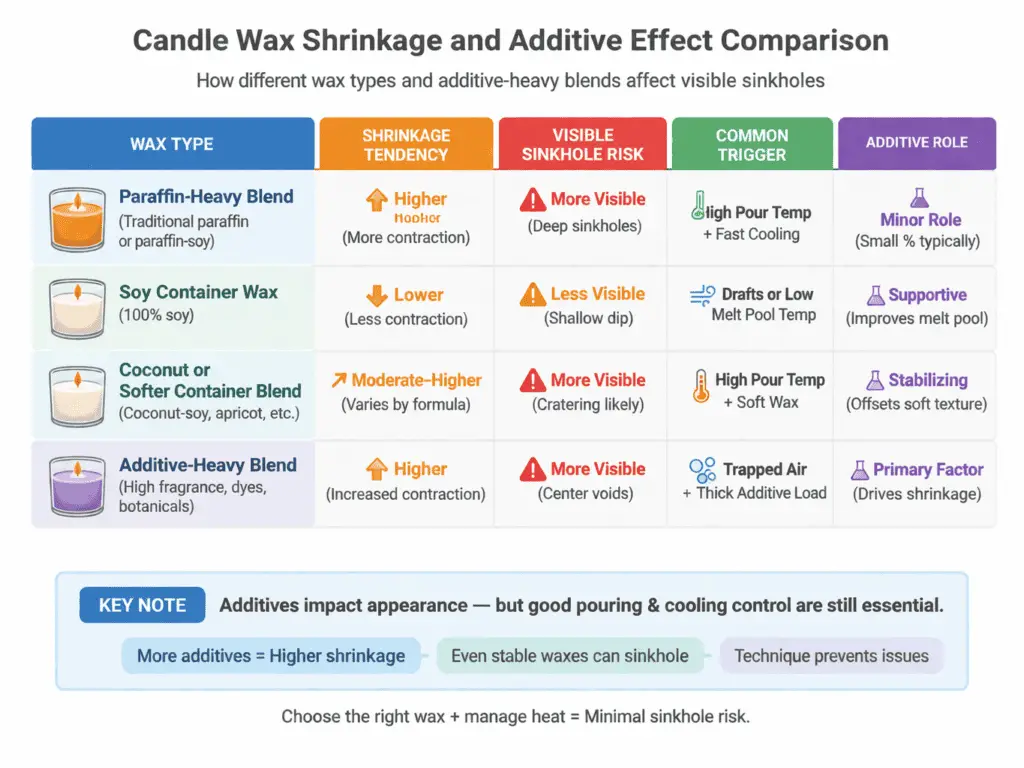
This is also where common candle additives can change the result without becoming the main cause. In most cases, additives only change how clearly the shrinkage shows, while the main driver is still the wax, pour temperature, and cooling setup.
Can Room Conditions Cause Candle Sinkholes?
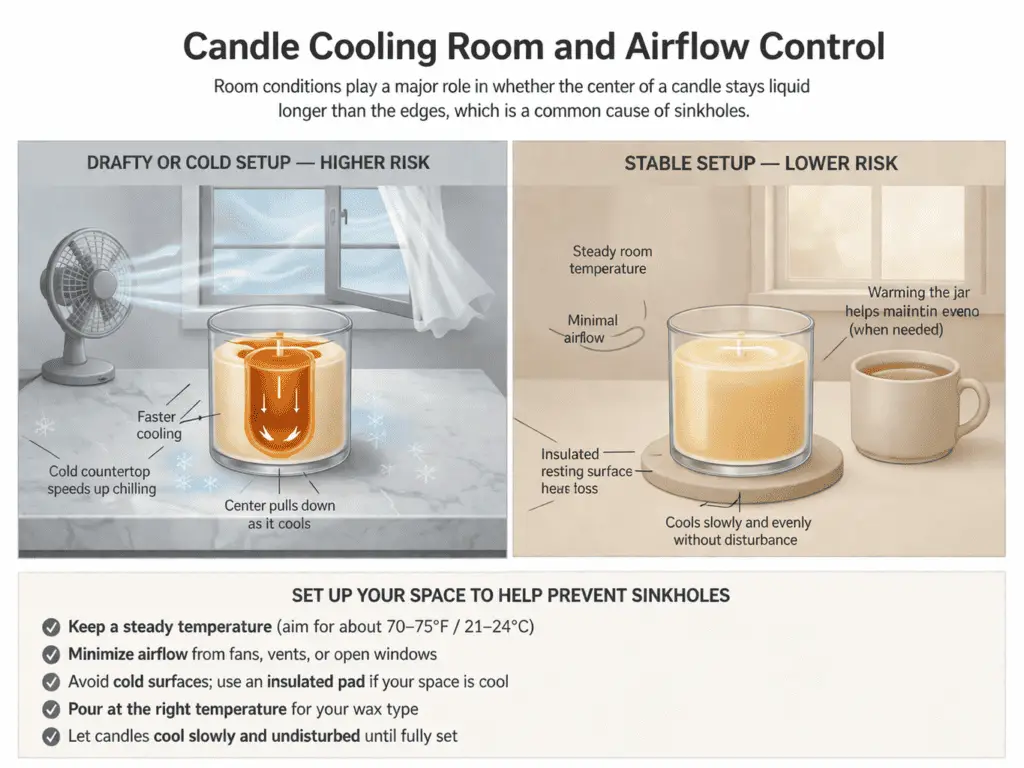
Yes. Room temperature, airflow, and the surface your jar sits on can cause candle sinkholes because they change how fast the outside wax hardens compared with the center.
A candle poured in a cold room or placed near a fan, open window, or stone countertop often sets unevenly. The jar wall cools first, the middle stays hot longer, and the center pulls downward as it finishes shrinking.
- Pour in a room with steady temperature and as little airflow as possible.
- Keep jars off cold stone or metal surfaces while they set.
- Use the wax-specific pour temperature that matches your container and fragrance load.
- Warm very cold jars when needed so the outer wax does not harden too fast.
- Let large candles cool undisturbed before judging the finished top.
One of the easiest ways to reduce that mismatch is to use candle thermometer checks instead of pouring by feel. When you track melt temperature, fragrance-add temperature, and pour temperature, you can see whether the wax is entering the jar hotter than intended. The ideal pour temperature for candle waxes is not one fixed number for every blend, because soy, paraffin, coconut blends, and additive-heavy formulas all release heat differently. Even with the right temperature, strong drafts or a cold workspace can still force the edges to set too fast.
Cooling conditions after the pour matter just as much as the pour itself. Letting candles rest in a stable room with minimal airflow usually gives the center more time to settle without leaving a deep void. Large jars often need even more patience because their inner mass stays warm for longer than the top suggests. That is also why candle cure time should not be confused with initial cooling time. A candle may look set on top within hours while the inner structure is still evening out below the surface.
Do Container Shape and Dye Type Matter?
Yes. Container shape can affect sinkhole risk more than dye type because the jar controls heat loss, while dye usually changes the result only when it is overused or poorly mixed.
Tall, narrow jars often cool differently from wide, shallow vessels because the heat stays concentrated deeper around the wick. Containers with thick walls, sharp shoulders, or a narrow opening can also make center voids harder to spot until the top fully settles.
When makers compare types of candle containers, the most important detail for sinkholes is not style but how the vessel releases heat. A wide jar can cool more evenly across the surface, while a deep jar may hold a hotter core that keeps shrinking after the rim has already firmed up. That is why people who choose candle container options only by appearance sometimes get inconsistent tops even when the wax formula stays the same. Jar diameter, fill depth, and wall thickness often matter more than beginners expect.
The types of candle dye you use usually play a smaller role, but they can still influence how cleanly the wax sets. Dye is usually secondary unless it is overused, poorly dissolved, or mixed unevenly.
Fix Sinkholes After Candle Pouring
You can fix sinkholes after pouring by reopening the cavity, refilling the void with warm wax, and then letting the candle cool slowly in a stable room.
A shallow dip may only need a surface remelt, but a true sinkhole usually needs more wax added back into the center. The goal is not just to smooth the top but to fill the empty space below it.
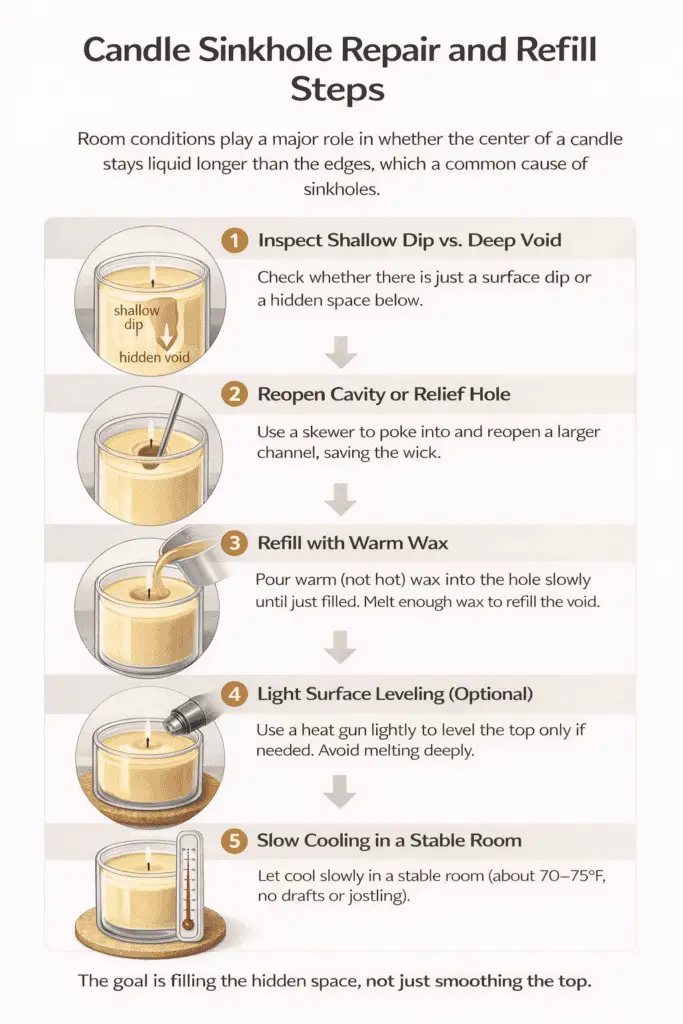
- Check whether the problem is a shallow surface dip or a deeper void around the wick.
- If the center has collapsed sharply, reopen the cavity or poke a small relief hole so trapped air and hidden space are exposed.
- Pour a small amount of warm wax into the center to refill the missing space without overheating the whole candle again.
- Use a heat gun only for a shallow dip or for final leveling after the refill, not as the main fix for a deep hidden cavity.
- Let the candle cool slowly in a stable room, then note what to change on the next batch so the same sinkhole does not return.
Which Wax Types Are Most Prone to Sinkholes?
Paraffin and harder shrink-prone blends are usually the most prone to sinkholes, while softer container blends often hide contraction better but can still dip when the pour and cooling setup are off.
The wax itself does not create every sinkhole, but it strongly affects how visible the defect becomes. A wax with stronger contraction makes center voids easier to create and harder to ignore.
The broader pattern comes down to how different candle wax types shrink and how your container setup handles that movement. Paraffin usually shows sinkholes more clearly, while softer container blends are often more forgiving when temperature and cooling stay controlled.